Title: daiwa saltist ld 20
Post by: alantani on December 29, 2009, 06:20:16 PM
Post by: alantani on December 29, 2009, 06:20:16 PM
daiwa saltist 20 LD rebuild - 12/29/09
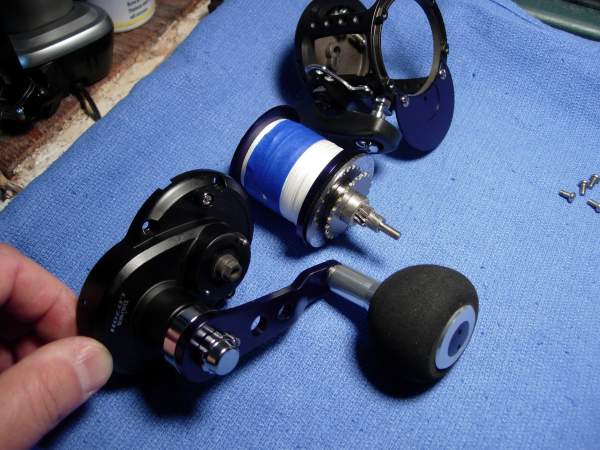
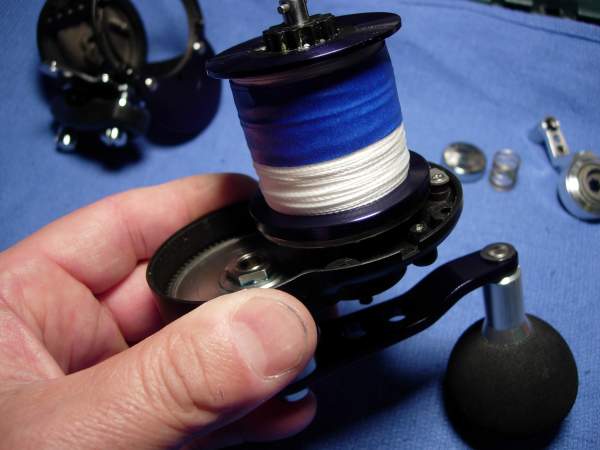
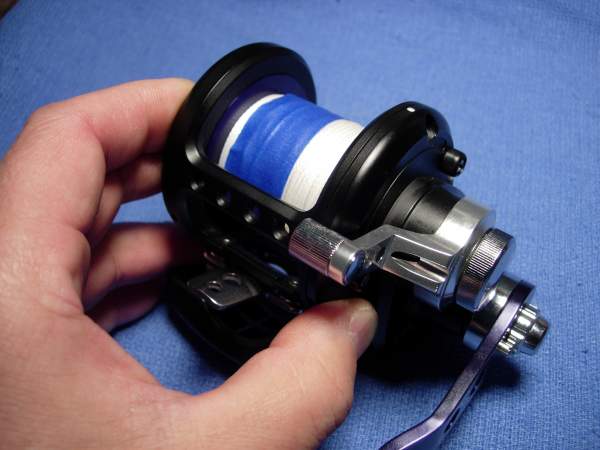
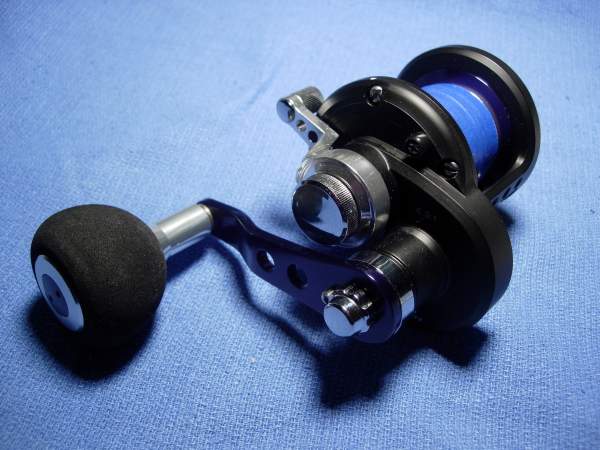
ok, guys. settle down into a nice comfy chair and grab a cup of coffee or a drink. this is gonna be a long one. here's the new daiwa saltist lever drag 20.

you know the drill by now. we are going to grease the drag washer, clean and lube the spool bearings, pack all of the non-spool bearings with grease, spread a little grease around the non-exposed metal surfaces and grease the screws. i checked this reel and got 35 seconds of freespool.


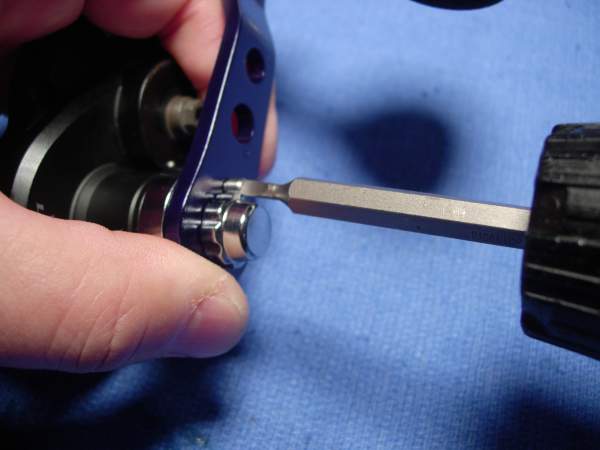
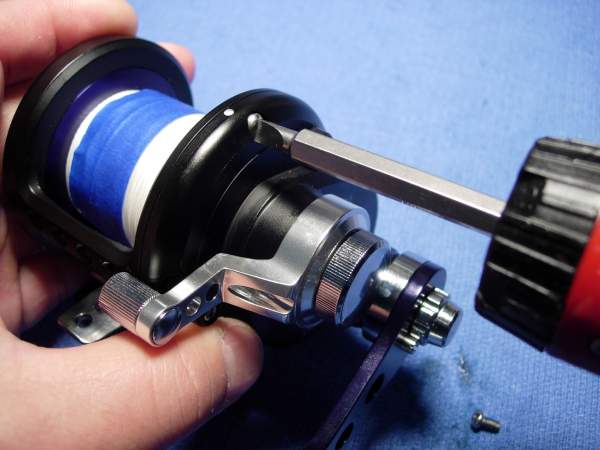
the reel includes a clamp and a spanner wrench for the handle grip. we're not going to mess with the handle grip, so we'll set the spanner wrench aside but we'll need the clamp.

a quick scan of the schematic reveals a pretty standard design and one possible problem. i see a single anti-reverse roller bearing and a single ambassaduer-style dog.

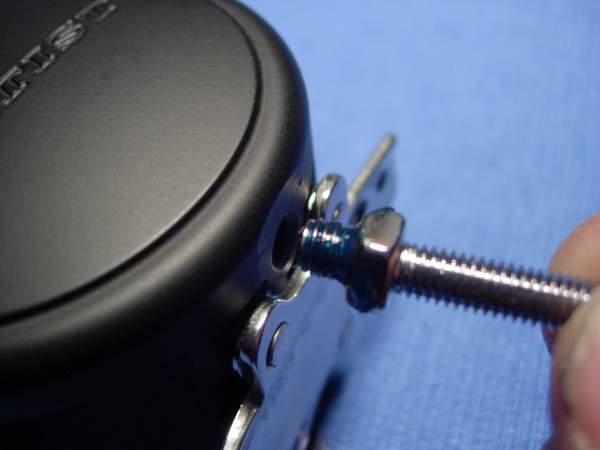
there are four right side plate screws (key #38). they all come out.

well, that was easy enough.

hmmmm. dry as a bone. an old toothbrush with a little grease will fix this.

back out the pair of frame plate screws (key #10), add a bead of grease and zip them back in.

grease the clamp bolts (key #66) and install them.
install the rod clamp (key #67) and the clamp bolts (key #68).
ok, the frame is done. set it aside and let's move on.
now for the right side plate and spool assembly.

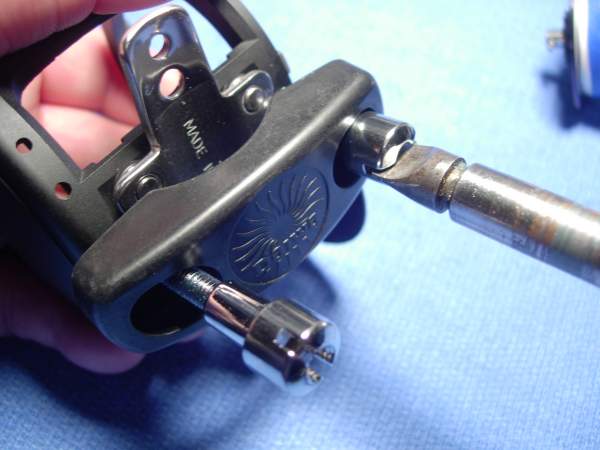
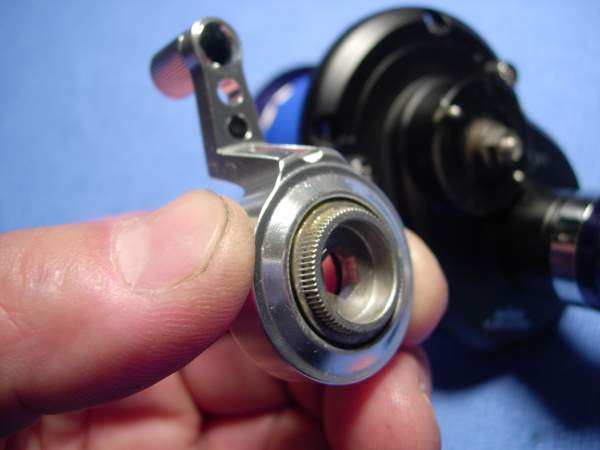
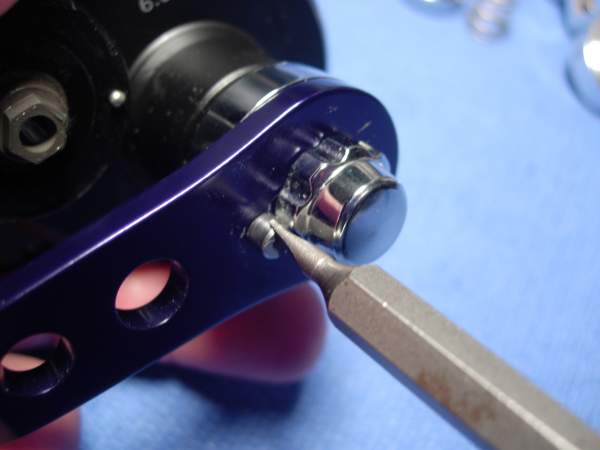
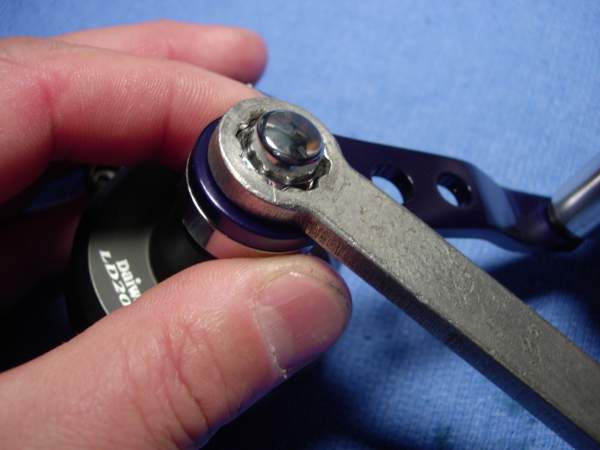
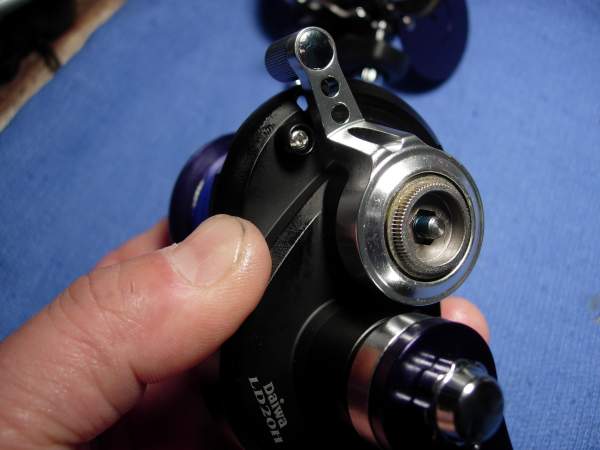
remove the preset drag knob (key #53).
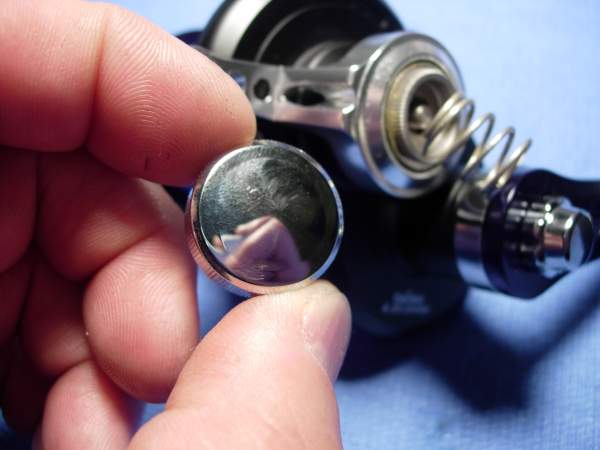
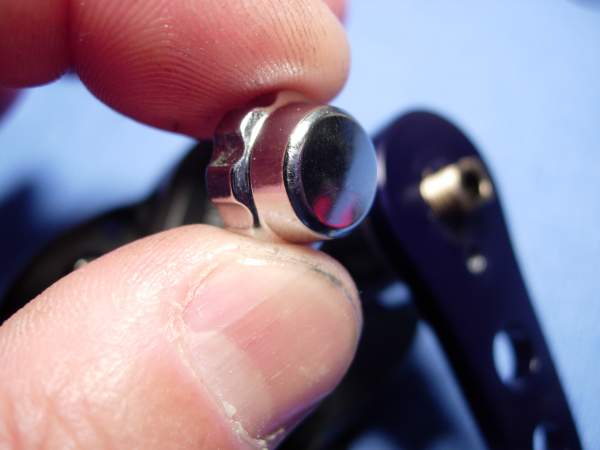
note that the preset click spring (key #52) is still stuck inside the preset drag knob (key #53).

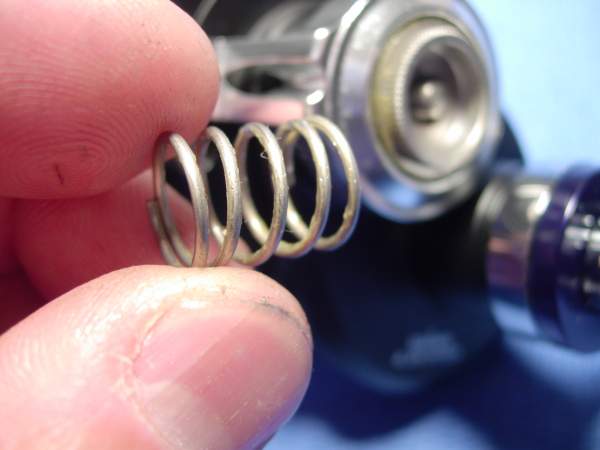
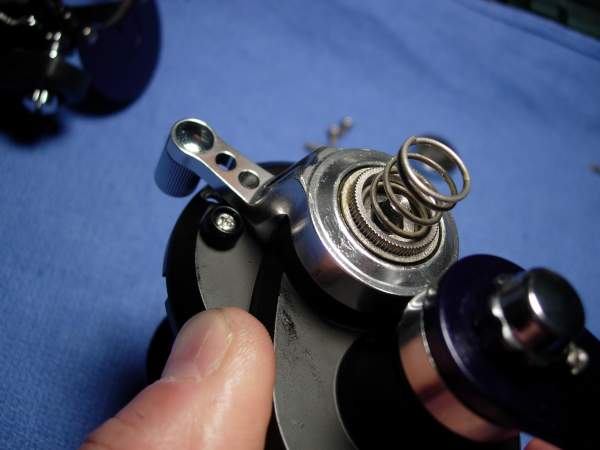
remove the drag knob spring (key #51).
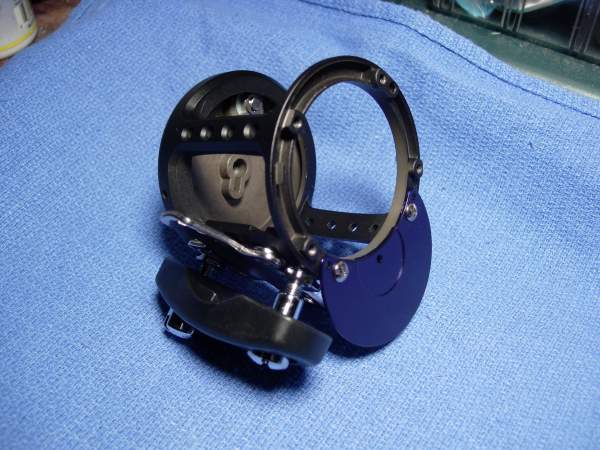
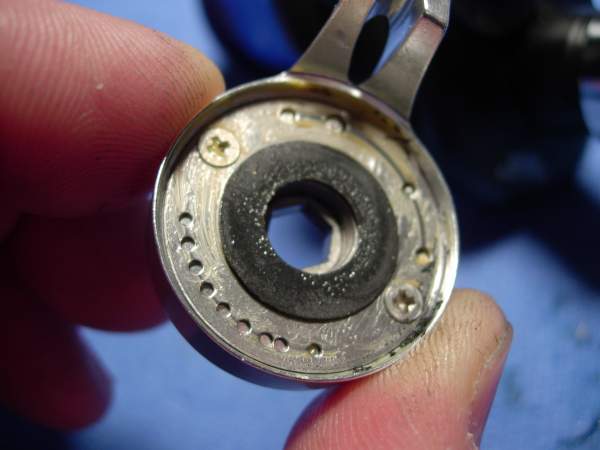
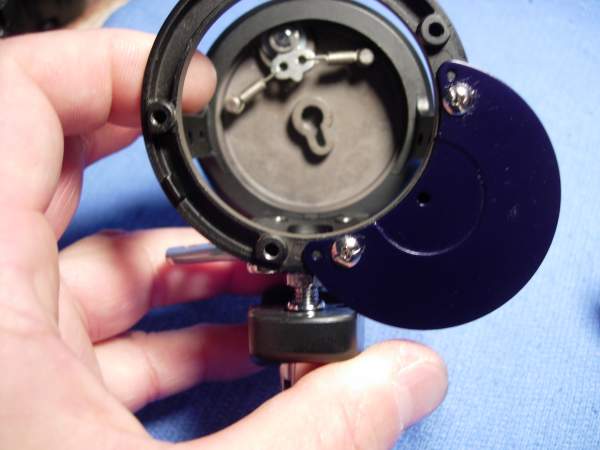
lift off the entire drag lever assembly (key #'s 44 through 50) as a unit.
the washer (key #41) came up with it.
ok, now here's a mistake that i made and i want all of you to avoid. when i pulled out the spool assembly (key #'s 11 through 25), the drag ratchet (key #23) came with it. there was fortunately no damage to the drag pawl (key #28). when you pull the spool out, you have to leave the drag ratchet (key #23) in place. anyway, the spool is out and it needs to be serivced.
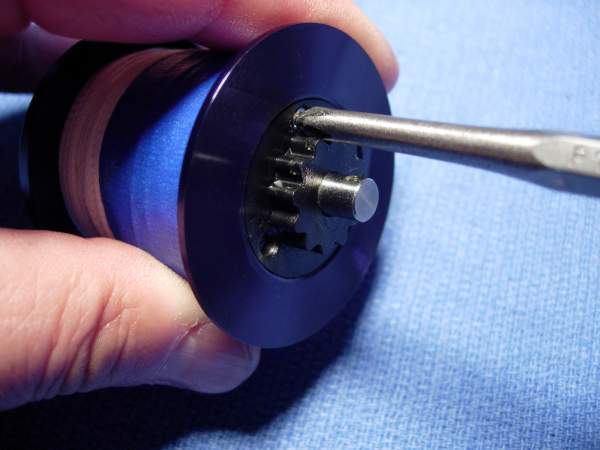
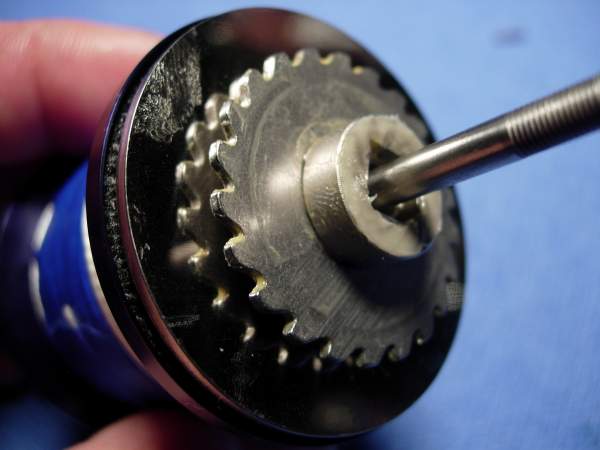
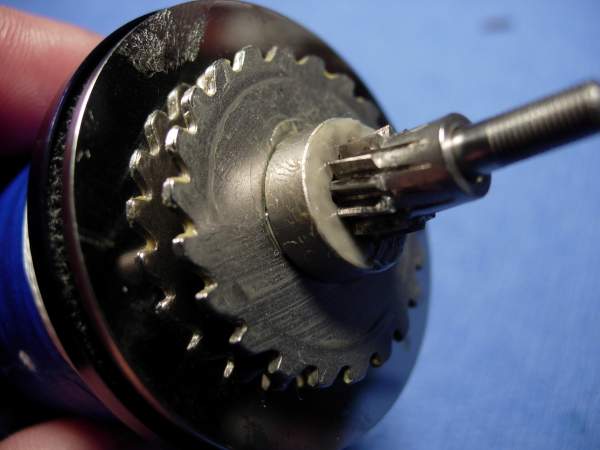
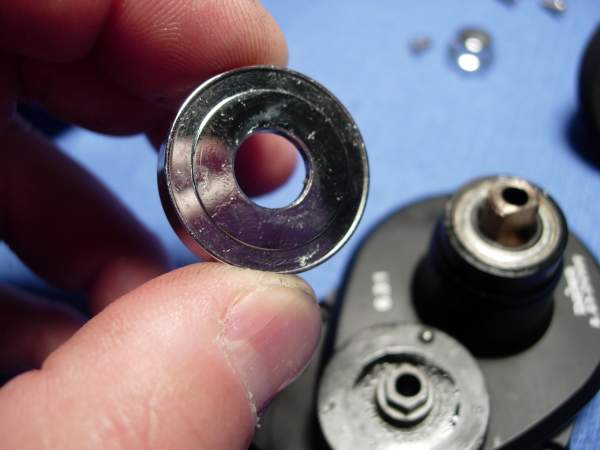
remove the pinion gear (key #25).
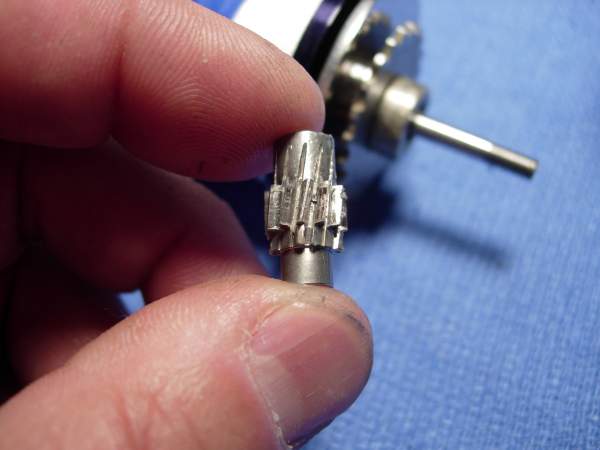
remove the pinion gear collar (key #70). there was supposed to be a washer (key #24) in between, but this reel did not have one.
remove the drag ratchet (key #23).
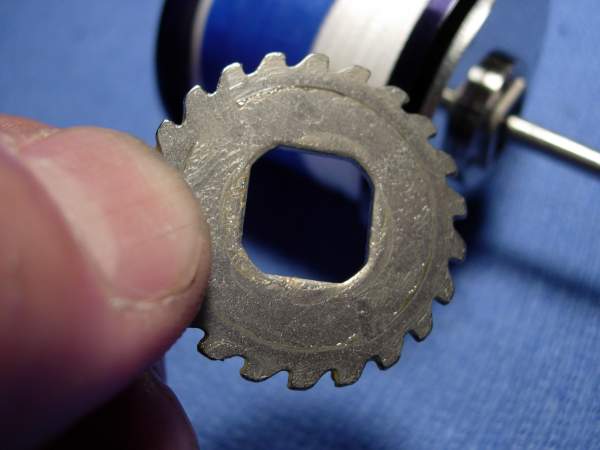
remove the drag plate (key #22).
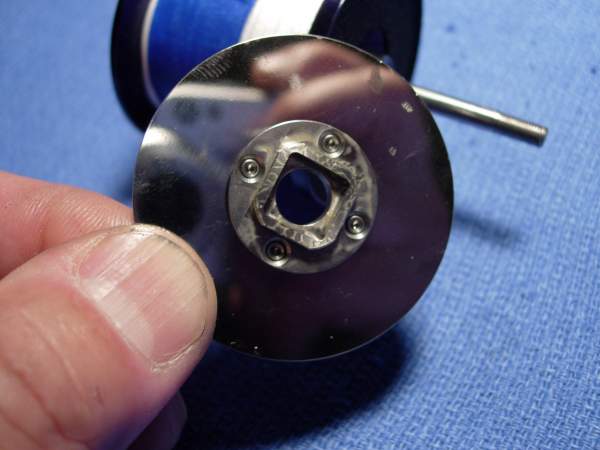
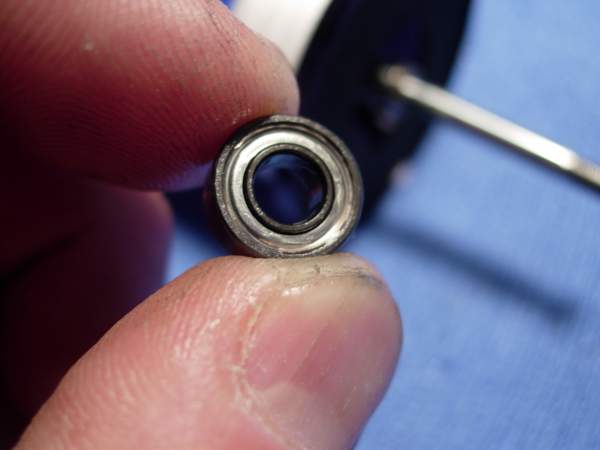
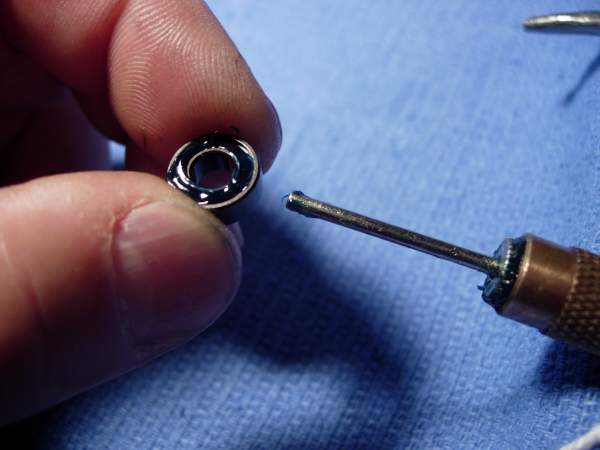
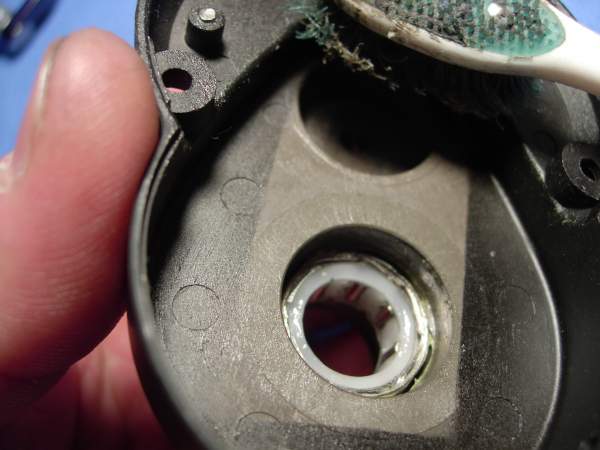
remove the drag plate bearing "C" (key #21). it measures 5x11x4 mm.
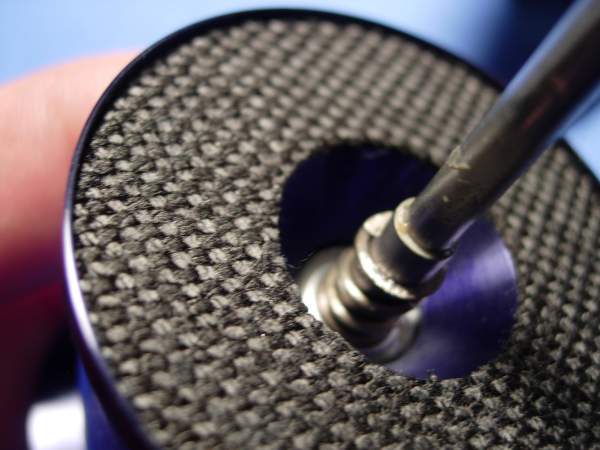
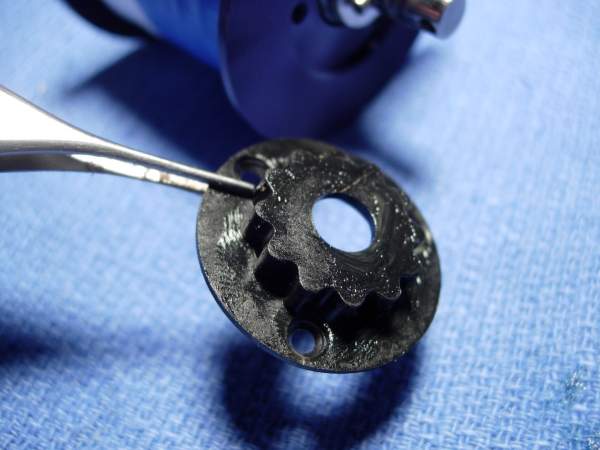
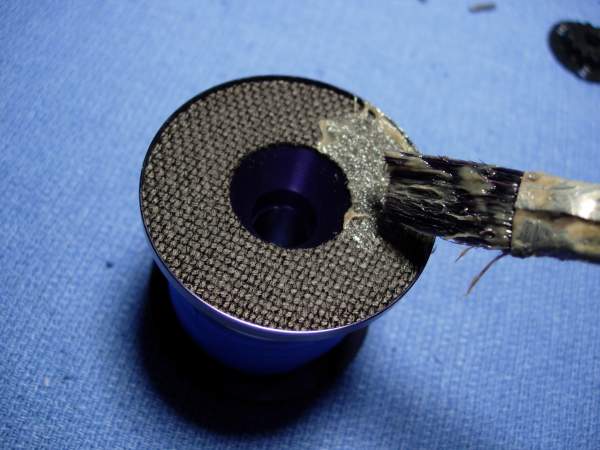
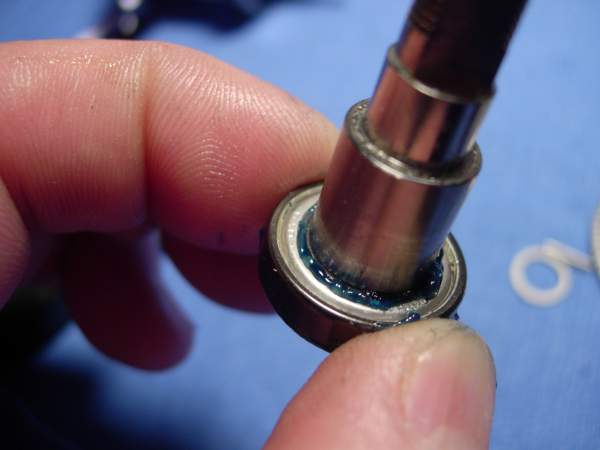
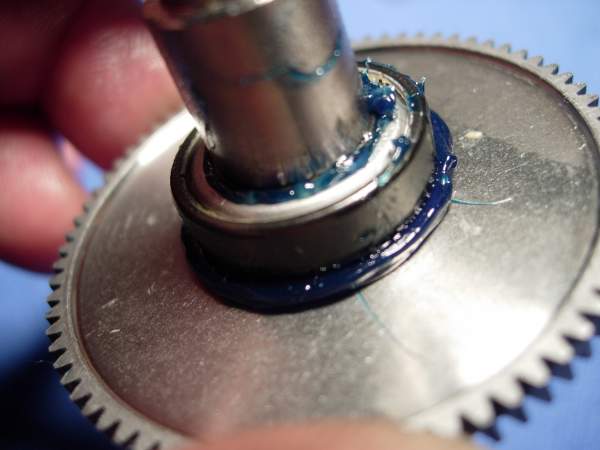
well, this is interesting. here is a dry carbon fiber drag washer that is glued to the spool. this arrangement should sound familiar. it is the same thing that is done in the smaller avets.
remove the return spring (key #20).
just thought i'd check. you're lining everything up, right?
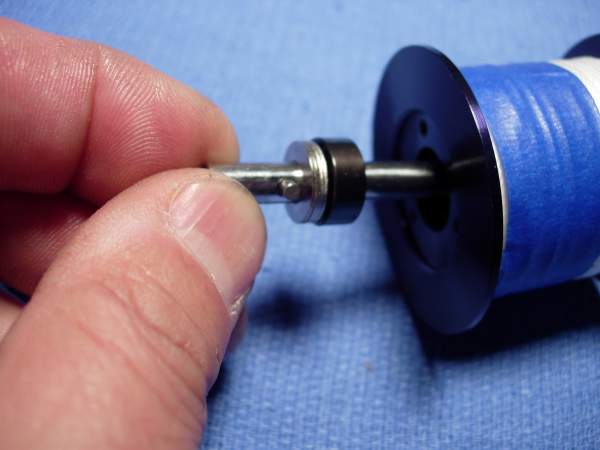
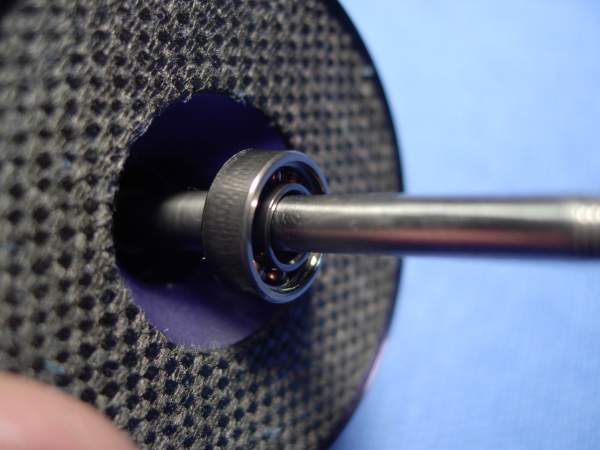
remove the right side spool bearing "B" (key #19). this bearing measures 5x11x4mm.
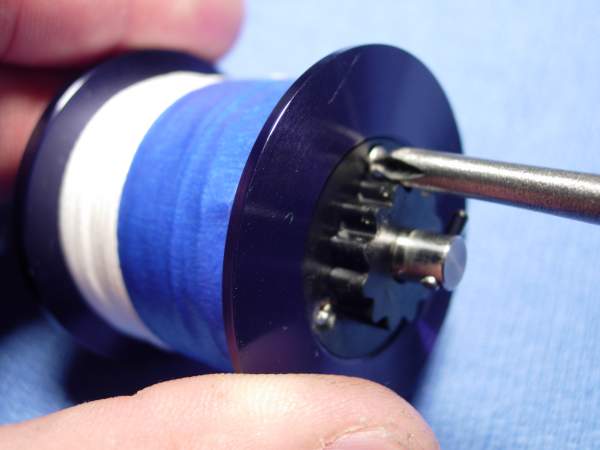
now for the left side of the spool. remove the three screws (key #17) for the drive shaft retainer (key #16).
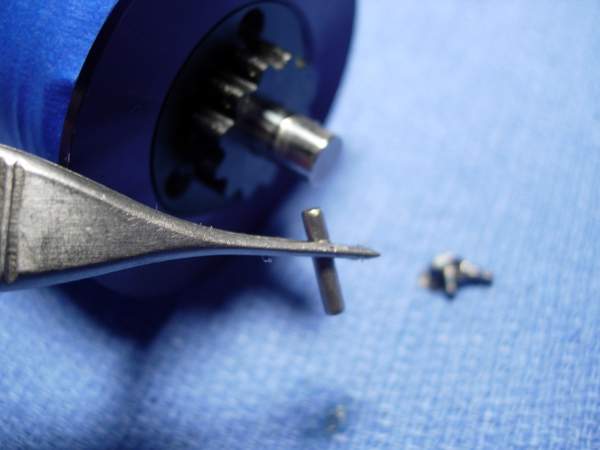
remove the drive shaft pin "A" (key #18).
remove the drive shaft retainer (key #16).
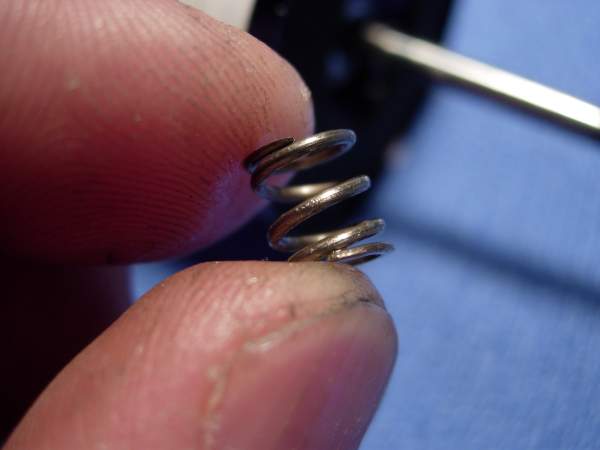
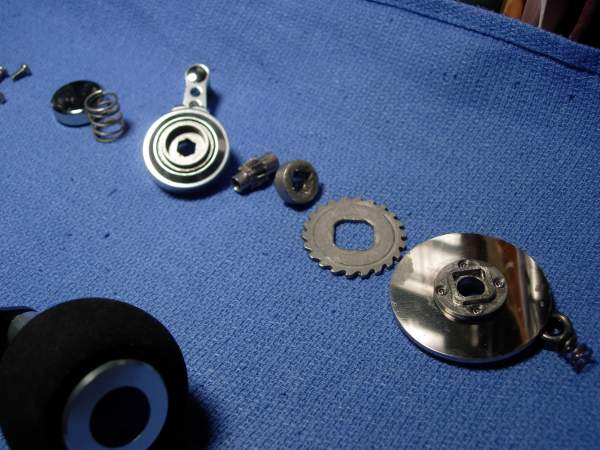
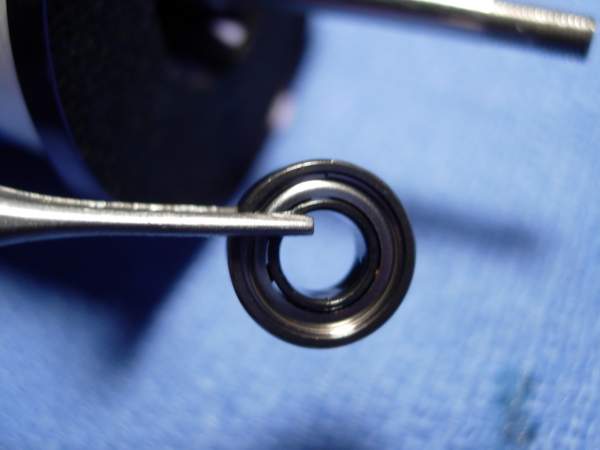
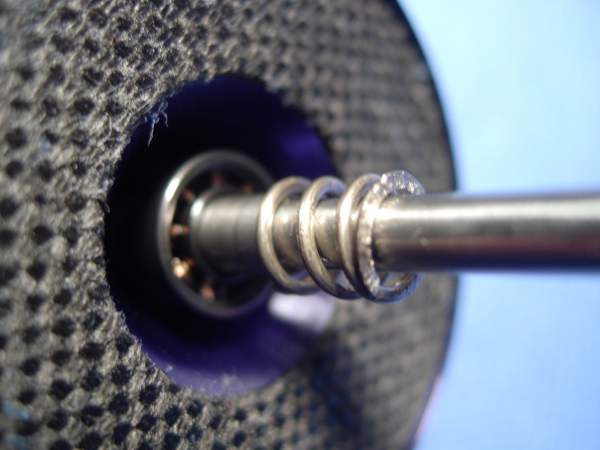
remove the drive shaft "A" (key #15). from left to right, you have the left spool bearing "A" (key #12), a washer "A" (key #13), four drag spring washers (key #14) and a drive shaft pin (no key #). the four drag spring washers are oriented in a "(())" configuration. the bearing measures 6x13x5mm.
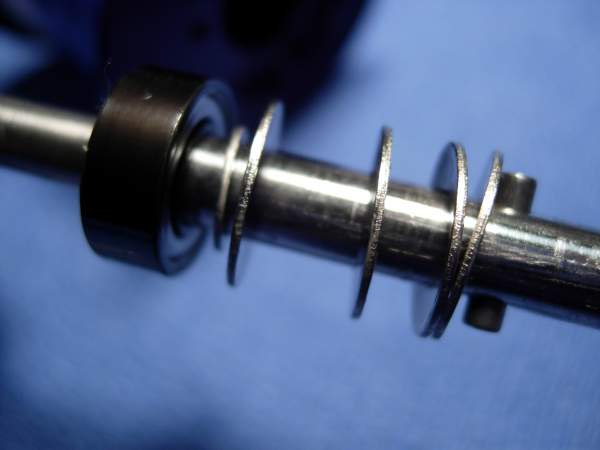
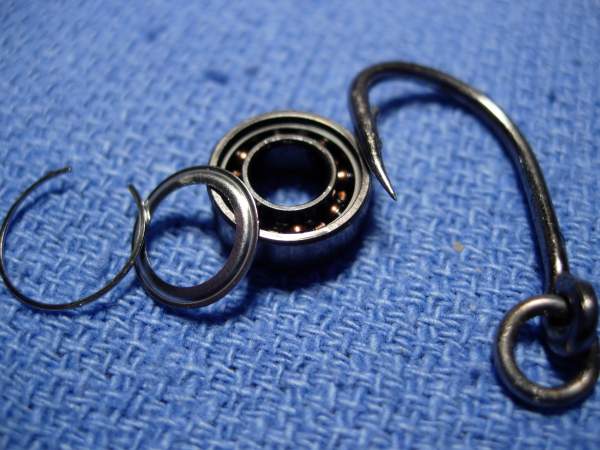
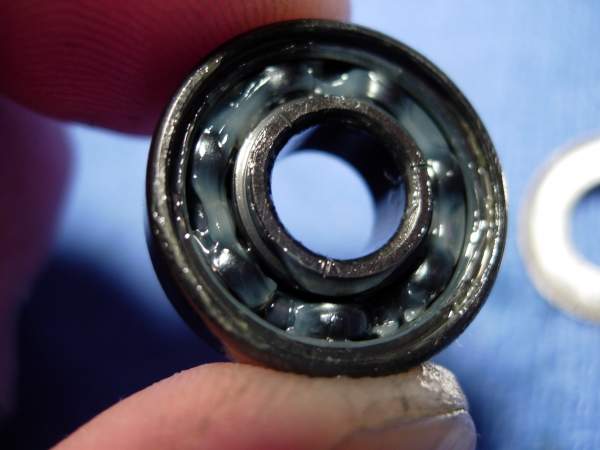
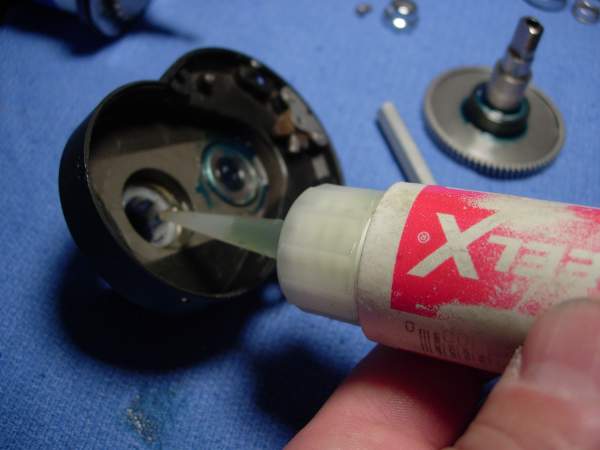
i'm going to pull the left spool bearing "A" (key #12) and pry out the shields, then clean them with carb cleaner and compressed air, and lube them with xtreme reel +. for a complete discussion of bearing service, review http://alantani.com/index.php?topic=13.0
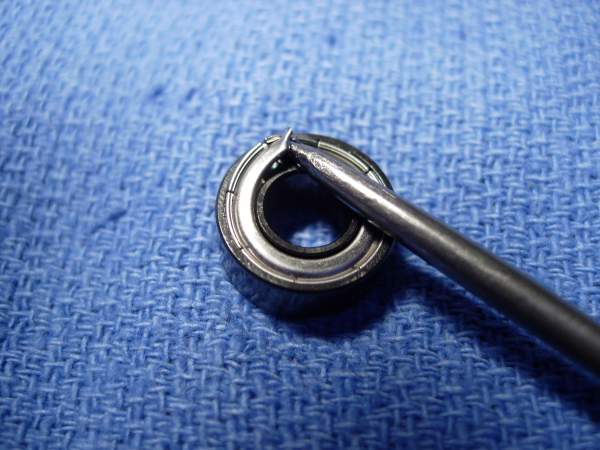
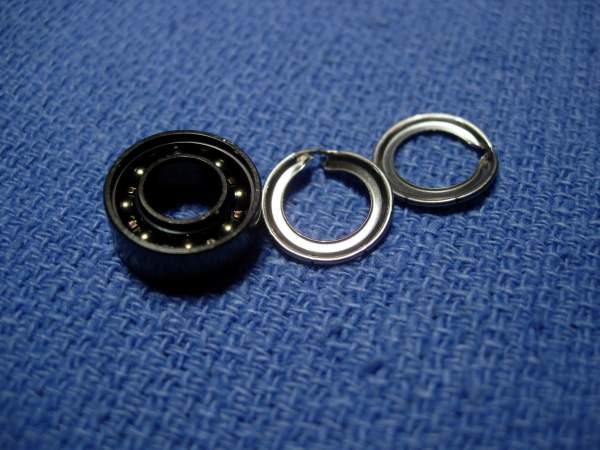
the right spool bearing "B" (key #19) has a retaining ring that holds in the shield. this one will be cleaned and lubed as well.
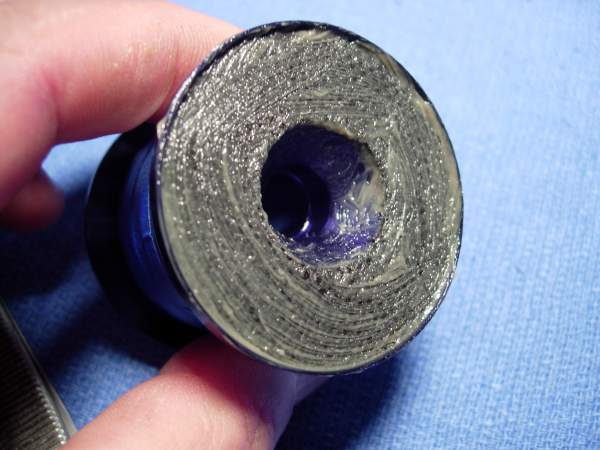
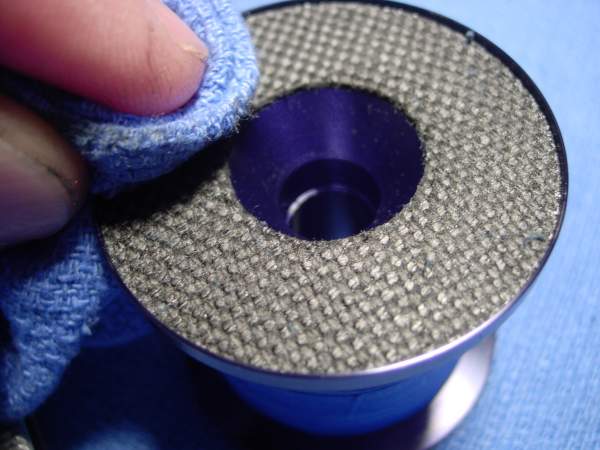
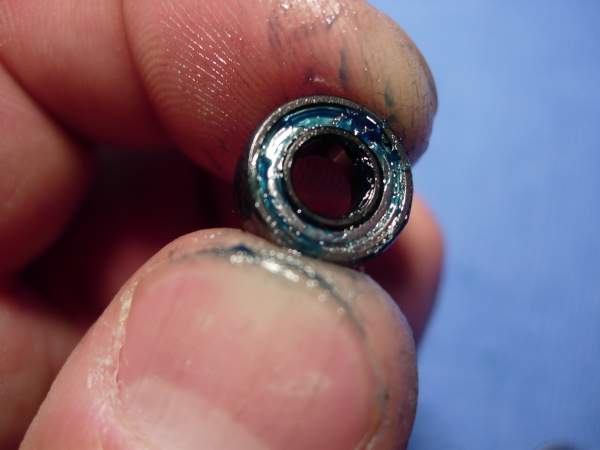
apply a thick coat of cal's drag grease to the carbon fiber drag washer, make sure you get all of the edges, then wipe off the excess.

reassemble the left side of the drive shaft (key #s 12 through 15) and slide it into the left side of the spool.
install the drive shaft retainer (key #16) and screws (key #17).
install the right spool bearing "B" (key #19). note that both spool bearings are now open and lubed.
install the drag plate return spring (key #20).
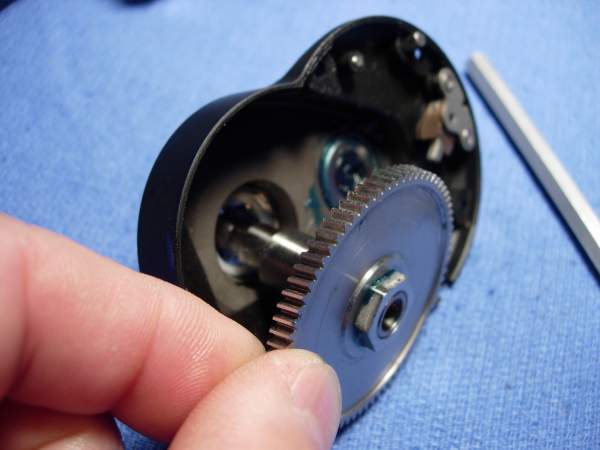
the bare spool now spins for 120 seconds. this xtreme reel + is pretty good stuff.
the drag plate bearing ""C" (key #21) does not affect freespool, so i'm going to remove the shields, pack it with grease and reshield it.
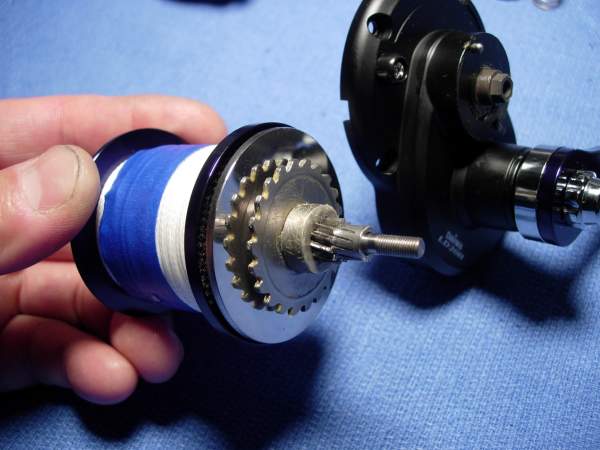
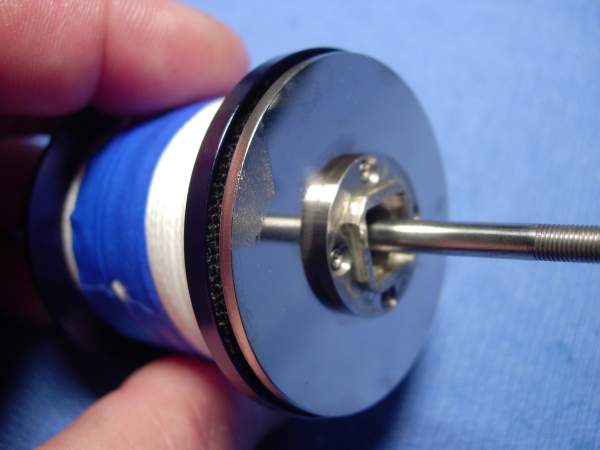
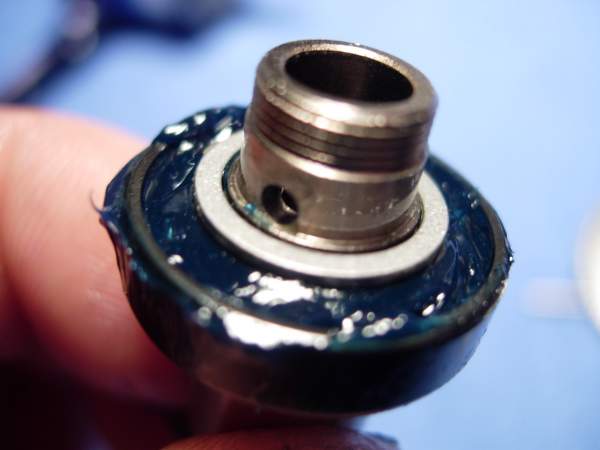
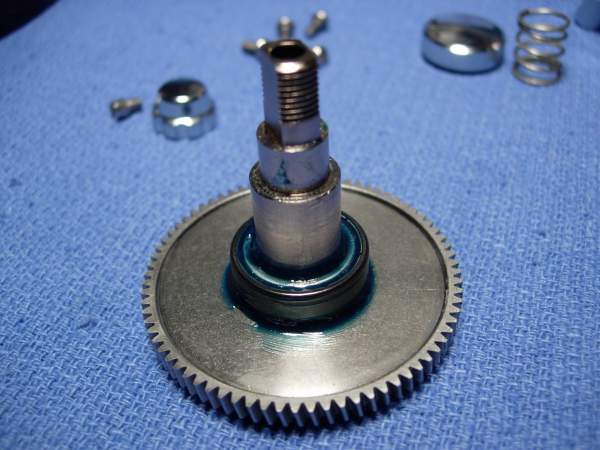
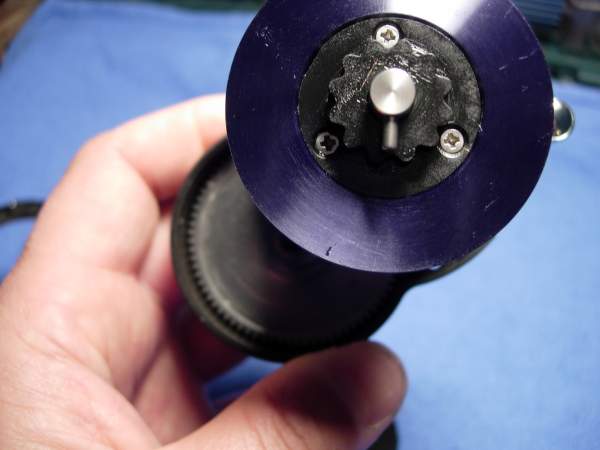
at this point, you are actually done with the spool. we are going to install the pinion gear, ratchet and pressure plate on now just to get them out of the way. we have to install them into the right side plate later. notice also that something is MISSING!!!!!!!!!! this reel does not have a cover for the drag chamber. that's right. it's an open drag system just like an avet.

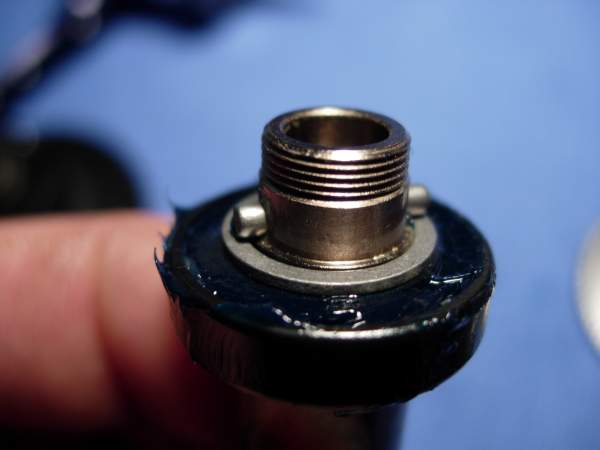
install the drive shaft pin "A" (key #18) and set the spool aside.
now for the right side plate.
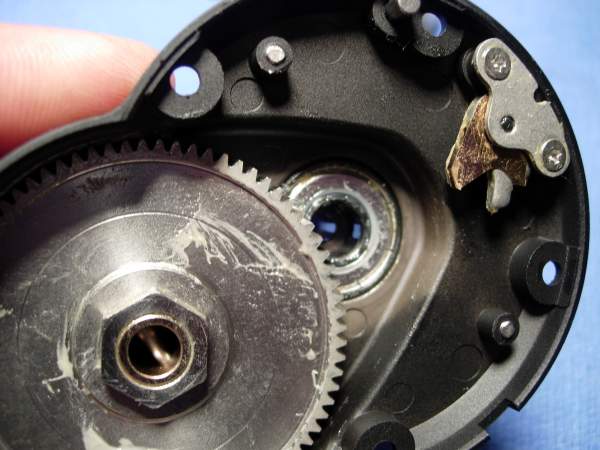
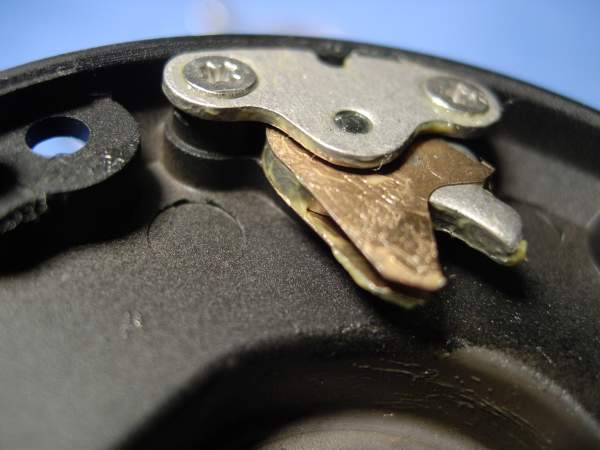
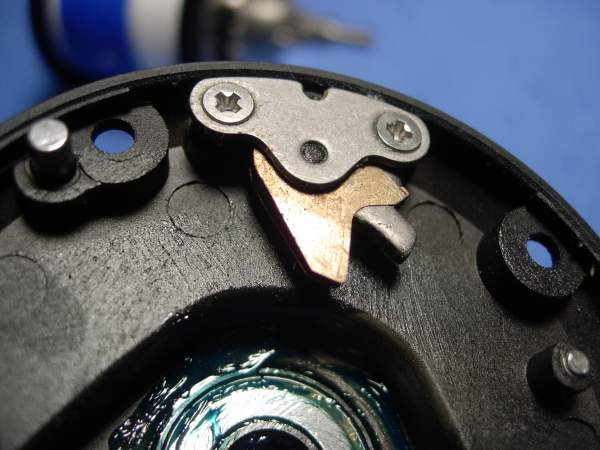
remember that i mentioned a problem? well, here it is, an ambassaduer-style dog.
we have three bearings to service in this side plate. let's start by removing the handle nut screw (key #65).
remove the handle nut (key #64).
remove the handle assembly (key #'s 56 through 63).

remove the handle collar "B" (key #55).
lift the right side plate assembly (key #27) off of the drive gear assembly (key #'s 31 through 36).
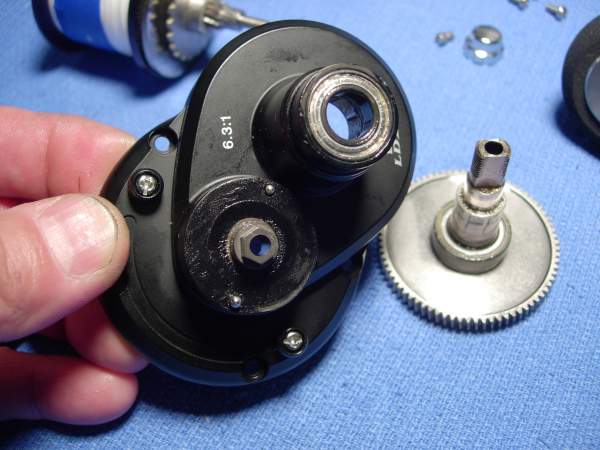
first out is the right main side plate bearing "D" (key #26). it measures 7x19x6mm.
second out is the outer drive shaft bearing "F" (key #54). this bearing measures 9x17x6mm.

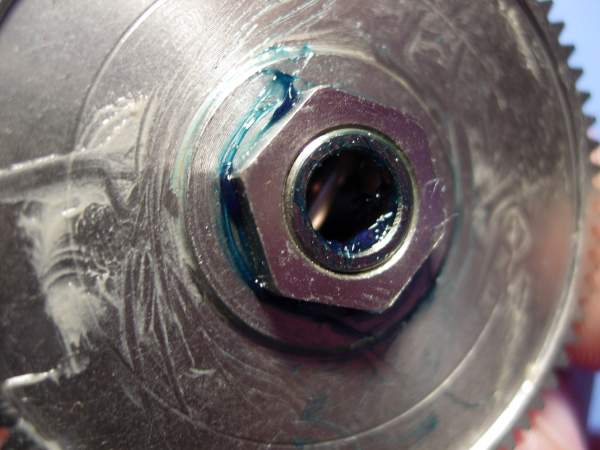
to get to the inner drive shaft bearing "E" (key #32), we have to remove the drive shaft nut (key #36). it's a 12mm nut and, if my memory is correct, it has left handed threads.
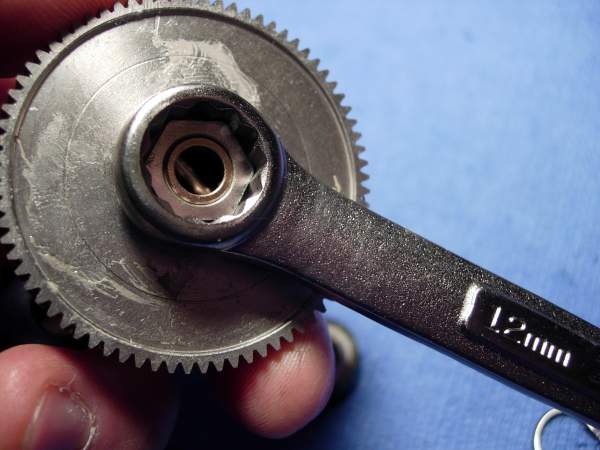
left to right, you see the drive shaft "B" (key #31), the inner drive shaft bearing "E" (key #32), the drive shaft washer "B" (key #33), the drive shaft pin "B" (key #34, the drive gear (key #35), and the drive shaft nut (key #36).

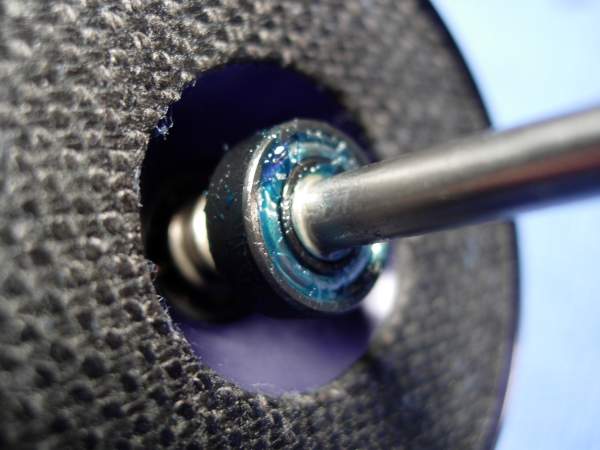
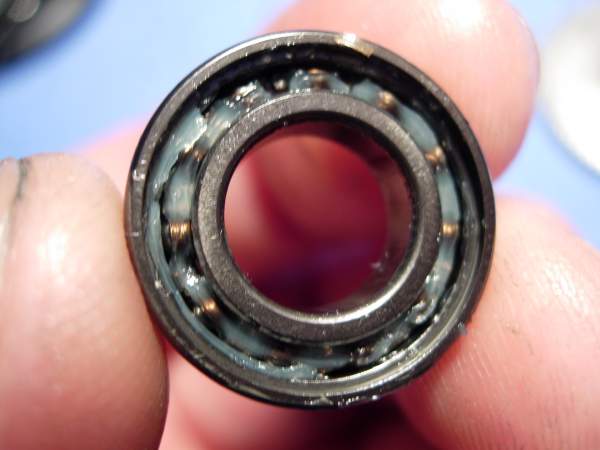
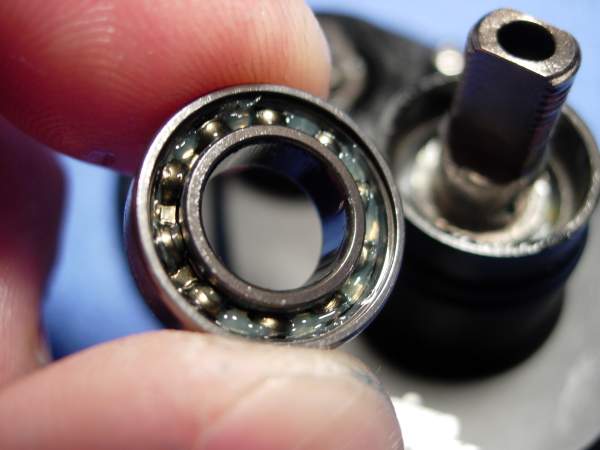
the inner drive shaft bearing "E" (key #32) measures 10x20x5mm and has shields that are pressed in. prying out the shields will damage them, so we are going to pull out only one side. note that the bearing is greased, but the grease does not completely fill the bearing. poorly greased like this, salt water can intrude, the shields will hold the water in and the bearing will corrode.
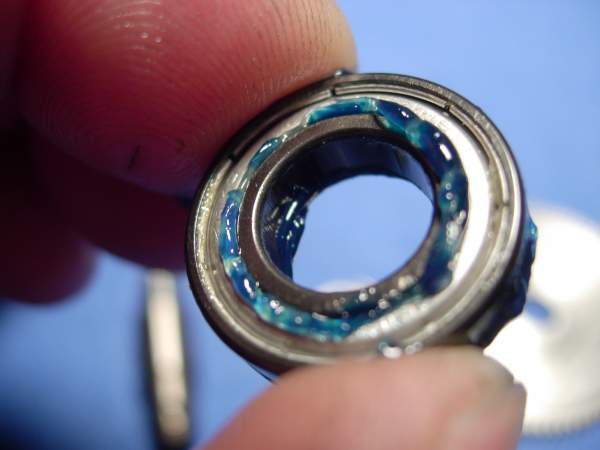
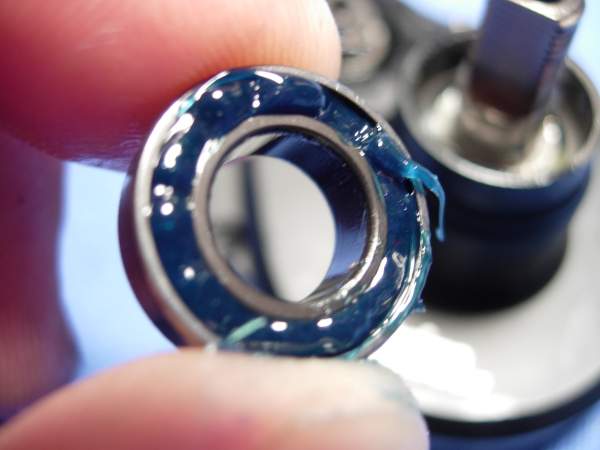
pack this bearing with grease on the one open side and then press the grease through to the other side using the palm of your hand.
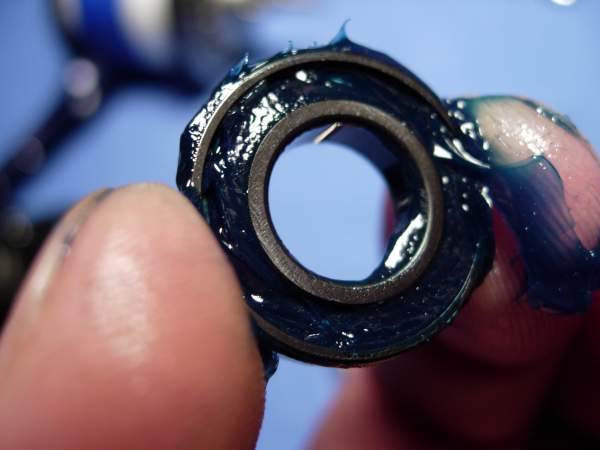
when grease squeezes out the other side, you know that the bearing is adequately packed.
install the inner drive shaft bearing "E" (key #32) onto the drive shaft "B" (key #31).
install the drive shaft washer ""D" (key #33).
install the drive shaft pin "B" (key #34).
install the drive gear (key #35).
install the drive shaft nut (key #36).
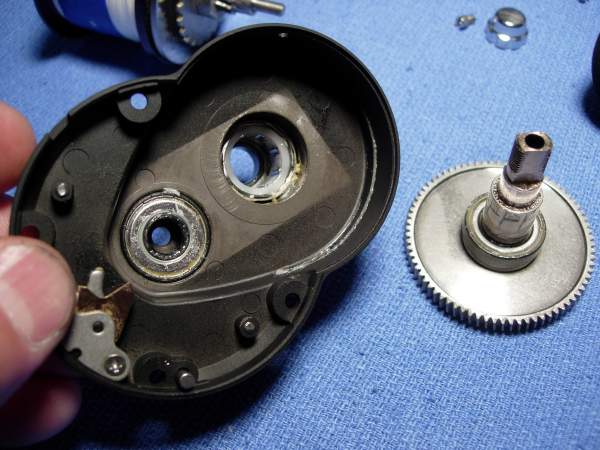
an immediate concern about the right side plate is the fact that it is bone dry.
use an old toothbrush with a little grease on it to put a light coat of grease on the inside.
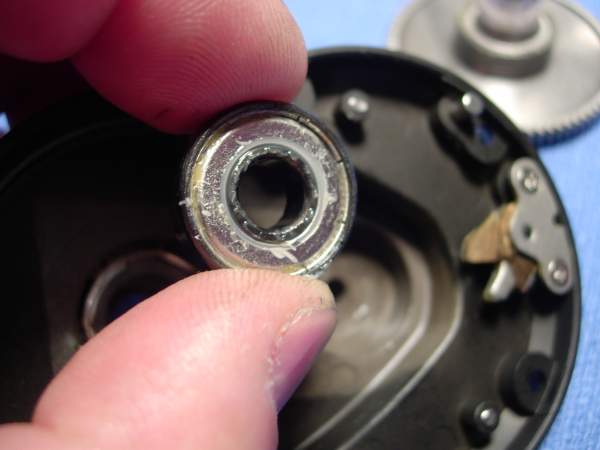
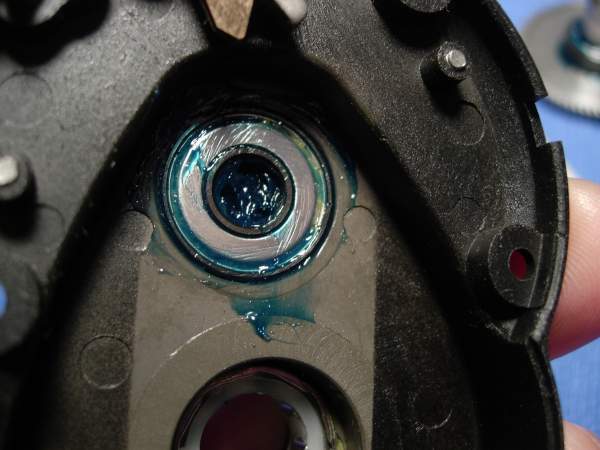
here's the same problem with the right main side plate bearing "D" (key #26).
squeeze a little grease into the bearing cup.
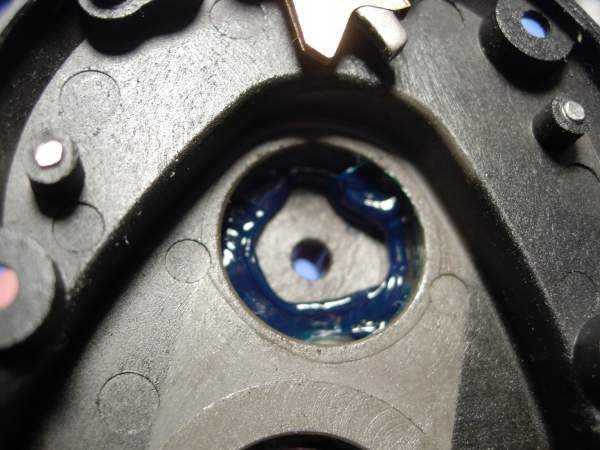
pack this bearing with grease using the same technique described earlier and install it "shield side out."
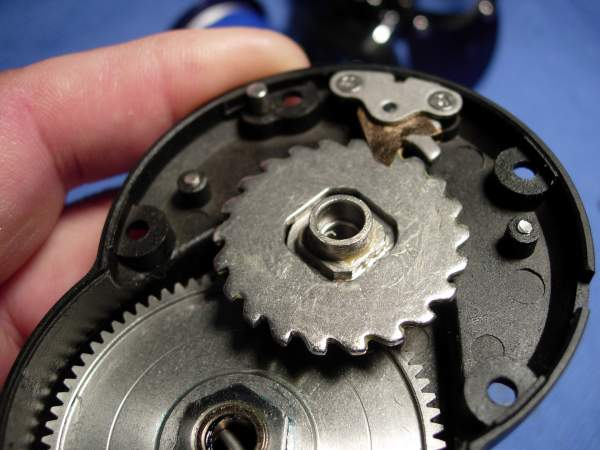
lube the anti-reverse roller bearing (key #37) with corrosion x.
install the drive gear assembly (key #'s 31 through 36).
here is the outer drive shaft bearing "F" (key #54). this bearing will also have to be packed with grease and then installed.

fortunately, the shields of this bearing were held in by a retaining ring that could be replaced.
install the collar "B" (key #55).
install the handle assembly (key #56 through 63).
install the handle nut (key #64) and align it with the hole for the handle nut screw (key #65).
install the handle nut screw (key #65).
finally, the home stretch!
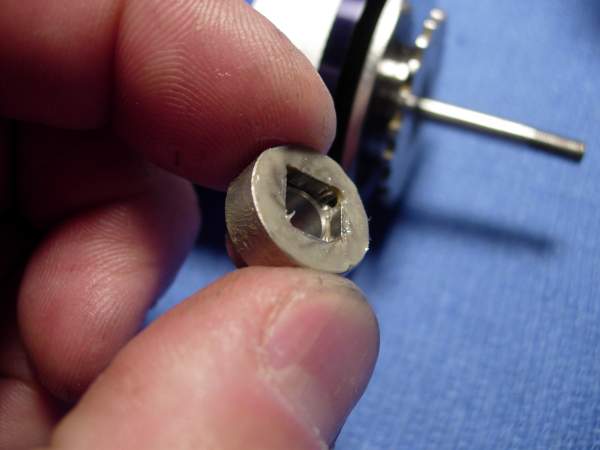
what makes the final assembly of this reel different from most is the ambassaduer-style dog or drag pawl (key #28). the bronze "blades" of the pawl are what "grab" the drag ratchet (key #23). it is a slight backwards rotation of the drag ratchet that moves the pawl down into postion to engage the ratchet. if the blades are bent out, the pawl will not work. the final installation requires that you squeeze the blades together and then slip the ratchet in without bending the blades out again.
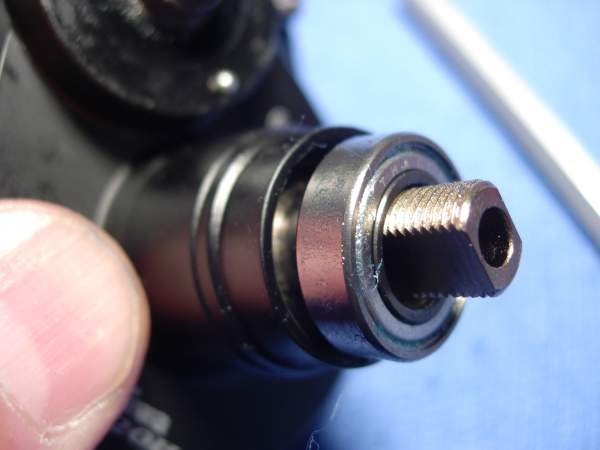
here goes! install the pinion gear (key #25).

install the pinion gear collar "C" (key #70).

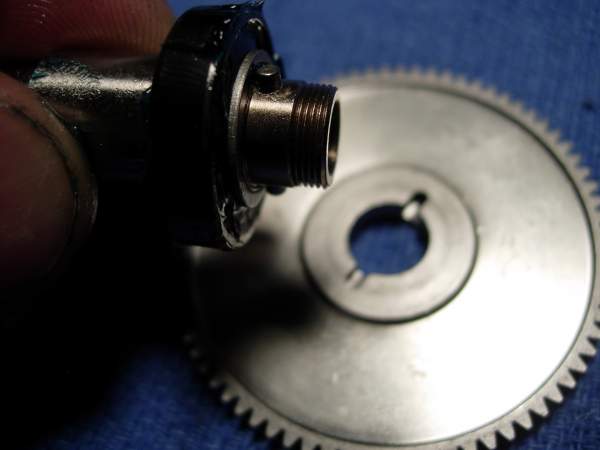
slip the drag ratchet (key #23) in between the blades of the drag pawl (key #28) and center it over the pinion gear collar "C" (key #70).
install the drag plate (key #22) so that it seats properly between the drag ratchet (key #23) and the pinion gear collar "C" (key #70).

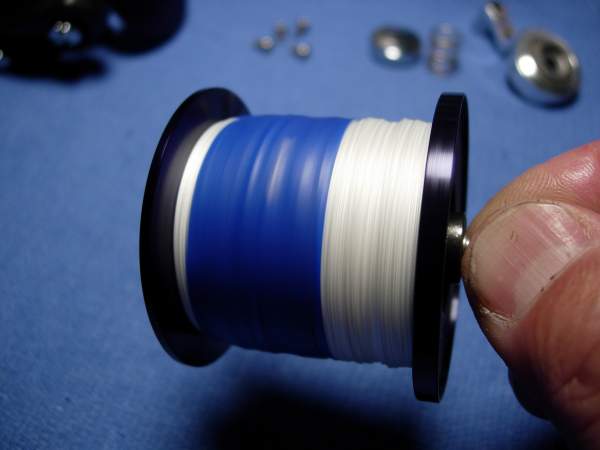
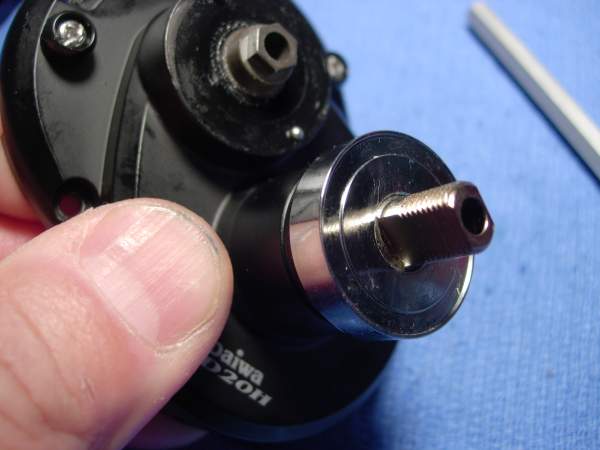
install the spool assembly (key #'s 11 through 21).
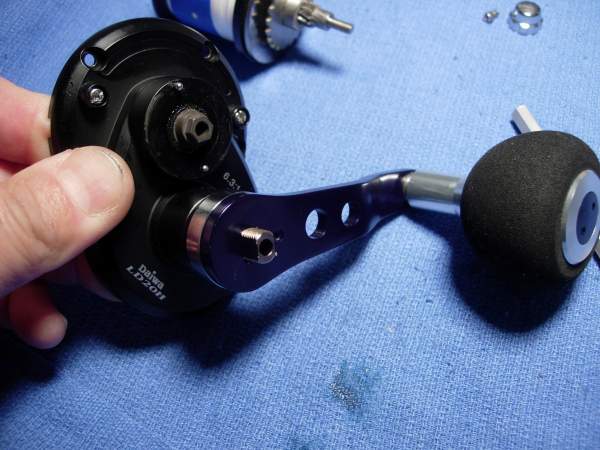
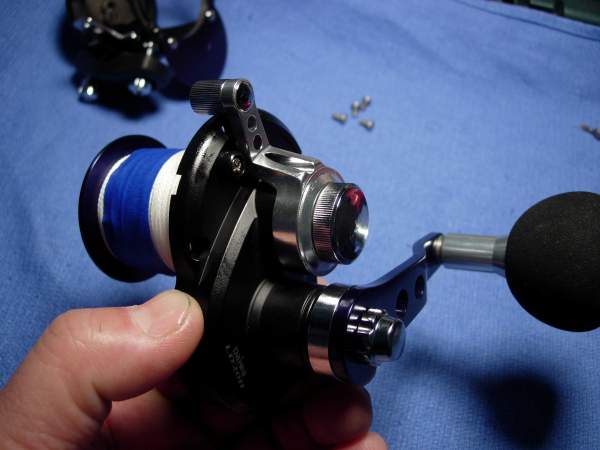
install the washer "B" (key #41) and the drag lever assembly (key #44 through 50) as a unit and in the "free" position as shown.
install the drag knob spring (key #51).
install the preset drag knob (key #53) and preset click spring (key #52) as a unit.
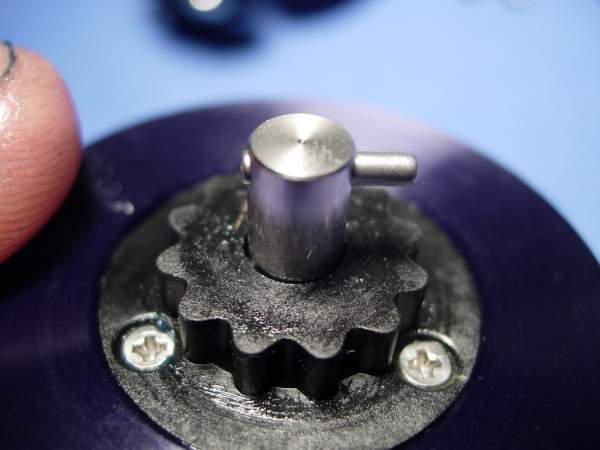
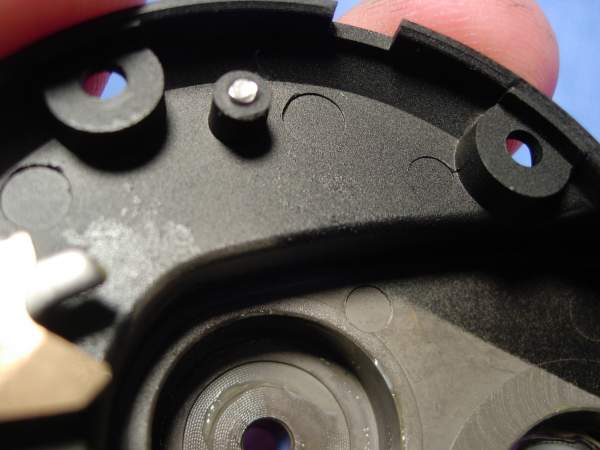
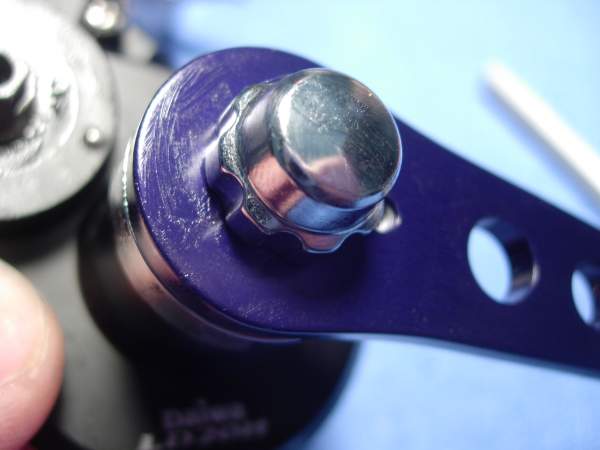
now you need to align this hole .......
...... with this peg.
there, a perfect fit.
put a dab of grease on each of the right side plate screws "D" (key #38).....
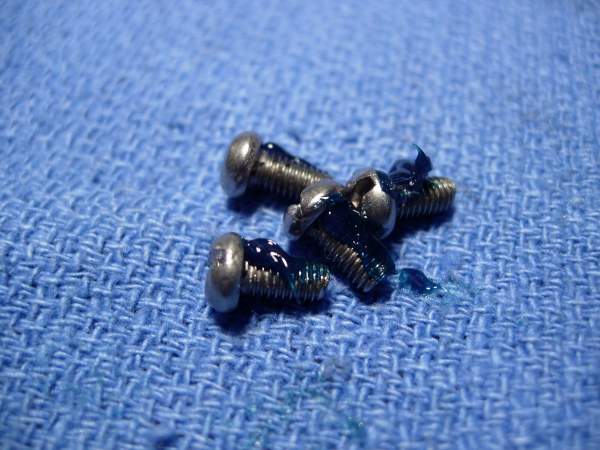
..... and installl them.
congratulations!
now for a few comments. actually, first the disclaimer. my own personal vehicles are a half ton SUV and a 2 ton SUV, both getting a whopping 12 mpg. yes, i am the one that is personally responsible for that last quarter of a degree of global warming that people have been warning about. i have always associated heft with quality and durability. hey, we all have our biases. so when someone makes something that is half the weight, it does not automatically appeal to me. i'm more about horsepower than mileage.
well, this reel appears to have both. it's light. actually, it's a little too light for my tastes but i see no reason why it can't get the job done. it has a dry carbon fiber drag washer. we can grease it. it has shielded bearings. so does everyone else, but there are 6 bearings in this reel that are at risk for corrosion. i am predicting that the saltist lever drag will have corrosion issues based on my inspection of this one reel and my experience with other saltists star drag reels. i am not happy with the anti-reverse system. anti-reverse roller bearings are known to rust and fail. the ambassaduer-style dogs can slip. if these two systems fail sequentially, they can result in injury at worst or a difficult landing at best.
still, i can't get over the weight. even working the lever of the saltist, the reel feels "tinny." a while back, i went over to my local tackle shop and pulled out four similar sized lever drag reels, an accurate, an avet, a talica and a saltist. the accurate and avet reminded me of a beer mug, the talica reminded me of a beer bottle, and the saltist reminded me of a beer can. work the levers of all of these reels and you'll see what i mean. if you service the bearings, grease the drags and keep the drag settings at 10 pounds or less then i will give this reel a thumbs up. push the drags too hard or fish this reel straight out of the box and i believe you will eventually have problems. in these situations, i would call it even, no better or worse than anyone else.
and one last parting thought. it's been said that imitation is the most sincere form of flattery. if that is the case, then avet should be very flattered........
ok, guys. settle down into a nice comfy chair and grab a cup of coffee or a drink. this is gonna be a long one. here's the new daiwa saltist lever drag 20.
you know the drill by now. we are going to grease the drag washer, clean and lube the spool bearings, pack all of the non-spool bearings with grease, spread a little grease around the non-exposed metal surfaces and grease the screws. i checked this reel and got 35 seconds of freespool.
the reel includes a clamp and a spanner wrench for the handle grip. we're not going to mess with the handle grip, so we'll set the spanner wrench aside but we'll need the clamp.
a quick scan of the schematic reveals a pretty standard design and one possible problem. i see a single anti-reverse roller bearing and a single ambassaduer-style dog.
there are four right side plate screws (key #38). they all come out.
well, that was easy enough.
hmmmm. dry as a bone. an old toothbrush with a little grease will fix this.
back out the pair of frame plate screws (key #10), add a bead of grease and zip them back in.
grease the clamp bolts (key #66) and install them.
install the rod clamp (key #67) and the clamp bolts (key #68).
ok, the frame is done. set it aside and let's move on.
now for the right side plate and spool assembly.
remove the preset drag knob (key #53).
note that the preset click spring (key #52) is still stuck inside the preset drag knob (key #53).
remove the drag knob spring (key #51).
lift off the entire drag lever assembly (key #'s 44 through 50) as a unit.
the washer (key #41) came up with it.
ok, now here's a mistake that i made and i want all of you to avoid. when i pulled out the spool assembly (key #'s 11 through 25), the drag ratchet (key #23) came with it. there was fortunately no damage to the drag pawl (key #28). when you pull the spool out, you have to leave the drag ratchet (key #23) in place. anyway, the spool is out and it needs to be serivced.
remove the pinion gear (key #25).
remove the pinion gear collar (key #70). there was supposed to be a washer (key #24) in between, but this reel did not have one.
remove the drag ratchet (key #23).
remove the drag plate (key #22).
remove the drag plate bearing "C" (key #21). it measures 5x11x4 mm.
well, this is interesting. here is a dry carbon fiber drag washer that is glued to the spool. this arrangement should sound familiar. it is the same thing that is done in the smaller avets.
remove the return spring (key #20).
just thought i'd check. you're lining everything up, right?
remove the right side spool bearing "B" (key #19). this bearing measures 5x11x4mm.
now for the left side of the spool. remove the three screws (key #17) for the drive shaft retainer (key #16).
remove the drive shaft pin "A" (key #18).
remove the drive shaft retainer (key #16).
remove the drive shaft "A" (key #15). from left to right, you have the left spool bearing "A" (key #12), a washer "A" (key #13), four drag spring washers (key #14) and a drive shaft pin (no key #). the four drag spring washers are oriented in a "(())" configuration. the bearing measures 6x13x5mm.
i'm going to pull the left spool bearing "A" (key #12) and pry out the shields, then clean them with carb cleaner and compressed air, and lube them with xtreme reel +. for a complete discussion of bearing service, review http://alantani.com/index.php?topic=13.0
the right spool bearing "B" (key #19) has a retaining ring that holds in the shield. this one will be cleaned and lubed as well.
apply a thick coat of cal's drag grease to the carbon fiber drag washer, make sure you get all of the edges, then wipe off the excess.
reassemble the left side of the drive shaft (key #s 12 through 15) and slide it into the left side of the spool.
install the drive shaft retainer (key #16) and screws (key #17).
install the right spool bearing "B" (key #19). note that both spool bearings are now open and lubed.
install the drag plate return spring (key #20).
the bare spool now spins for 120 seconds. this xtreme reel + is pretty good stuff.
the drag plate bearing ""C" (key #21) does not affect freespool, so i'm going to remove the shields, pack it with grease and reshield it.
at this point, you are actually done with the spool. we are going to install the pinion gear, ratchet and pressure plate on now just to get them out of the way. we have to install them into the right side plate later. notice also that something is MISSING!!!!!!!!!! this reel does not have a cover for the drag chamber. that's right. it's an open drag system just like an avet.
install the drive shaft pin "A" (key #18) and set the spool aside.
now for the right side plate.
remember that i mentioned a problem? well, here it is, an ambassaduer-style dog.
we have three bearings to service in this side plate. let's start by removing the handle nut screw (key #65).
remove the handle nut (key #64).
remove the handle assembly (key #'s 56 through 63).
remove the handle collar "B" (key #55).
lift the right side plate assembly (key #27) off of the drive gear assembly (key #'s 31 through 36).
first out is the right main side plate bearing "D" (key #26). it measures 7x19x6mm.
second out is the outer drive shaft bearing "F" (key #54). this bearing measures 9x17x6mm.
to get to the inner drive shaft bearing "E" (key #32), we have to remove the drive shaft nut (key #36). it's a 12mm nut and, if my memory is correct, it has left handed threads.
left to right, you see the drive shaft "B" (key #31), the inner drive shaft bearing "E" (key #32), the drive shaft washer "B" (key #33), the drive shaft pin "B" (key #34, the drive gear (key #35), and the drive shaft nut (key #36).
the inner drive shaft bearing "E" (key #32) measures 10x20x5mm and has shields that are pressed in. prying out the shields will damage them, so we are going to pull out only one side. note that the bearing is greased, but the grease does not completely fill the bearing. poorly greased like this, salt water can intrude, the shields will hold the water in and the bearing will corrode.
pack this bearing with grease on the one open side and then press the grease through to the other side using the palm of your hand.
when grease squeezes out the other side, you know that the bearing is adequately packed.
install the inner drive shaft bearing "E" (key #32) onto the drive shaft "B" (key #31).
install the drive shaft washer ""D" (key #33).
install the drive shaft pin "B" (key #34).
install the drive gear (key #35).
install the drive shaft nut (key #36).
an immediate concern about the right side plate is the fact that it is bone dry.
use an old toothbrush with a little grease on it to put a light coat of grease on the inside.
here's the same problem with the right main side plate bearing "D" (key #26).
squeeze a little grease into the bearing cup.
pack this bearing with grease using the same technique described earlier and install it "shield side out."
lube the anti-reverse roller bearing (key #37) with corrosion x.
install the drive gear assembly (key #'s 31 through 36).
here is the outer drive shaft bearing "F" (key #54). this bearing will also have to be packed with grease and then installed.
fortunately, the shields of this bearing were held in by a retaining ring that could be replaced.
install the collar "B" (key #55).
install the handle assembly (key #56 through 63).
install the handle nut (key #64) and align it with the hole for the handle nut screw (key #65).
install the handle nut screw (key #65).
finally, the home stretch!
what makes the final assembly of this reel different from most is the ambassaduer-style dog or drag pawl (key #28). the bronze "blades" of the pawl are what "grab" the drag ratchet (key #23). it is a slight backwards rotation of the drag ratchet that moves the pawl down into postion to engage the ratchet. if the blades are bent out, the pawl will not work. the final installation requires that you squeeze the blades together and then slip the ratchet in without bending the blades out again.
here goes! install the pinion gear (key #25).
install the pinion gear collar "C" (key #70).
slip the drag ratchet (key #23) in between the blades of the drag pawl (key #28) and center it over the pinion gear collar "C" (key #70).
install the drag plate (key #22) so that it seats properly between the drag ratchet (key #23) and the pinion gear collar "C" (key #70).
install the spool assembly (key #'s 11 through 21).
install the washer "B" (key #41) and the drag lever assembly (key #44 through 50) as a unit and in the "free" position as shown.
install the drag knob spring (key #51).
install the preset drag knob (key #53) and preset click spring (key #52) as a unit.
now you need to align this hole .......
...... with this peg.
there, a perfect fit.
put a dab of grease on each of the right side plate screws "D" (key #38).....
..... and installl them.
congratulations!
now for a few comments. actually, first the disclaimer. my own personal vehicles are a half ton SUV and a 2 ton SUV, both getting a whopping 12 mpg. yes, i am the one that is personally responsible for that last quarter of a degree of global warming that people have been warning about. i have always associated heft with quality and durability. hey, we all have our biases. so when someone makes something that is half the weight, it does not automatically appeal to me. i'm more about horsepower than mileage.
well, this reel appears to have both. it's light. actually, it's a little too light for my tastes but i see no reason why it can't get the job done. it has a dry carbon fiber drag washer. we can grease it. it has shielded bearings. so does everyone else, but there are 6 bearings in this reel that are at risk for corrosion. i am predicting that the saltist lever drag will have corrosion issues based on my inspection of this one reel and my experience with other saltists star drag reels. i am not happy with the anti-reverse system. anti-reverse roller bearings are known to rust and fail. the ambassaduer-style dogs can slip. if these two systems fail sequentially, they can result in injury at worst or a difficult landing at best.
still, i can't get over the weight. even working the lever of the saltist, the reel feels "tinny." a while back, i went over to my local tackle shop and pulled out four similar sized lever drag reels, an accurate, an avet, a talica and a saltist. the accurate and avet reminded me of a beer mug, the talica reminded me of a beer bottle, and the saltist reminded me of a beer can. work the levers of all of these reels and you'll see what i mean. if you service the bearings, grease the drags and keep the drag settings at 10 pounds or less then i will give this reel a thumbs up. push the drags too hard or fish this reel straight out of the box and i believe you will eventually have problems. in these situations, i would call it even, no better or worse than anyone else.
and one last parting thought. it's been said that imitation is the most sincere form of flattery. if that is the case, then avet should be very flattered........
Title: Re: daiwa saltist ld 20
Post by: alantani on January 03, 2010, 12:18:25 PM
Post by: alantani on January 03, 2010, 12:18:25 PM
Quote from: jesseaca;90496Wow and thanks all my suspicions were confirmed......
I was the Guinea pig in this case....!!!!
I purchased both the 20 and 30 one in one speed and 30 in 2 speed...
Worked great and EXTREMELY comfortable.........for 4 weeks
Fished hard core and on heavier drags around 14 lbs plus.......
DONE!!!
STUCK..... sticky anti reverse failed...........
But i found this out and am pleased to announce that if you buy one .......take it to a reputable repair shop and have what al did , done asap!!!
I have been waiting weeks for this rebuild and am greatful !!!
Thanks, i still love this reel just a little disappointed in the design !!! what do you want for $279 reel thats comfortable light as all hell and has #22 lb of drag........
Title: Re: daiwa saltist ld 20
Post by: alantani on March 30, 2010, 11:18:15 AM
Post by: alantani on March 30, 2010, 11:18:15 AM
http://www.sydneyangler.com.au/forum/showthread.php?t=18823
Quote from: djmac;184979you would hope its a rare occurence but this reel was brand new..
after doing battle with a striped marlin around the 100kg mark
this happened after about an hour into the fight running 15kg line..
when we hooked up i must admit the drag was far from smooth..very ordinary
this is why i run tiagras :)
Title: Re: daiwa saltist ld 20
Post by: chrondon on April 25, 2011, 05:41:11 AM
Post by: chrondon on April 25, 2011, 05:41:11 AM
Hey Alan,
Is it correct that you completely removed the shields for both spool bearings? I would assume that you'd reinstall the shield with the retaining ring but I'm not completely sure....
Thanks,
Charles
Is it correct that you completely removed the shields for both spool bearings? I would assume that you'd reinstall the shield with the retaining ring but I'm not completely sure....
Thanks,
Charles
Title: Re: daiwa saltist ld 20
Post by: alantani on April 25, 2011, 04:27:23 PM
Post by: alantani on April 25, 2011, 04:27:23 PM
yes. i believe that removing the shields of spool bearings gives them their best longevity.
Title: Re: daiwa saltist ld 20
Post by: SNAPS on April 29, 2012, 03:27:37 PM
Post by: SNAPS on April 29, 2012, 03:27:37 PM
Just did this reel for a friend, wish I seen your tutorial first, shuld looked a lot harder.
1) lever drag was slightly cruddy and almost not operating, the exposed micro bullet style detents with the micro size springs are a recipe for failure when a little salt spray and or bait juice mix up in there as happened on my friends reel.
2) the spool bearing key # 12 seems noisy I popped the shields and greased it still noisy, here's whats driving me crazy I can not hear any noise when the bearing is out of the spool, I place it on the shaft and roll it on a hard smooth surface and it sounds normal, turn it on the bare shaft and nothing it is quiet, but when installed and in frees pool you hear it making noise, even when I have the frame off whether it is in side or outside the frame it is noisey. With the reel assembled and in frees pool I hold the clicker side too my ear and spin the spool and I can hear the bearing clearly making noise. I lubed and installed new right side spool bearings key's # 19 and 21 so I know they are okay.
Alan I am going to buy key # 12 bearing and see what happens, great tutorial, thanks for the bearing sizes HUGE help, installing that DRAG RATCHET what a PIA, I'll stick w/ the avet.
Title: Re: daiwa saltist ld 20
Post by: alantani on April 29, 2012, 05:39:55 PM
Post by: alantani on April 29, 2012, 05:39:55 PM
for me, the frustrating thing is that they did not have to make it this hard...... :-\
Title: Re: daiwa saltist ld 20
Post by: SNAPS on April 29, 2012, 07:12:58 PM
Post by: SNAPS on April 29, 2012, 07:12:58 PM
Yep I agree, and can't believe they designed it like this, glad I never bought one, also have apart a sealine x20 sha awaiting parts.
thanks alan also thanks for turning us on to BOCA bearing great place.
stay well.
thanks alan also thanks for turning us on to BOCA bearing great place.
stay well.
Title: Re: daiwa saltist ld 20
Post by: alantani on April 29, 2012, 07:31:12 PM
Post by: alantani on April 29, 2012, 07:31:12 PM
don't forget, you can also get bearings from smoothdrag.com
Title: Re: daiwa saltist ld 20
Post by: Reelz on January 17, 2013, 10:59:49 PM
Post by: Reelz on January 17, 2013, 10:59:49 PM
I just serviced my reel. And when I crank it bearing makes some noise as well. Does anyone know what size bearing C is number 21 on the schematics. I tried ordering it from smoothdrag but they dont know what size it is as well. Heres the link. Thanks
http://www.daiwa.com/PartsDiagram/PartsDiagram/STTLD20H-LD30H.pdf
http://www.daiwa.com/PartsDiagram/PartsDiagram/STTLD20H-LD30H.pdf
Title: Re: daiwa saltist ld 20
Post by: alantani on January 18, 2013, 05:02:12 AM
Post by: alantani on January 18, 2013, 05:02:12 AM
you can measure the bearing without fancy calipers. the measurements will be in whole millimeters, so you can use a kid's ruler.
Title: Re: daiwa saltist ld 20
Post by: Reelz on January 18, 2013, 07:23:39 AM
Post by: Reelz on January 18, 2013, 07:23:39 AM
I did a search and this is what I found. According to this site. I will open it and double check to confirm.
2 x 5x11x4mm bearings, 1 x6x13x5mm bearing, 1 x 7x19x6mm bearing, 1 x 9x17x6mm bearing and 1 x 10x20x5mm bearing
Heres the link: http://www.worldseafishing.com/forums/showthread.php/1070836-Daiwa-Saltist-30-ld-2speed-Bearings
2 x 5x11x4mm bearings, 1 x6x13x5mm bearing, 1 x 7x19x6mm bearing, 1 x 9x17x6mm bearing and 1 x 10x20x5mm bearing
Heres the link: http://www.worldseafishing.com/forums/showthread.php/1070836-Daiwa-Saltist-30-ld-2speed-Bearings
Title: Re: daiwa saltist ld 20
Post by: Reelz on January 18, 2013, 11:28:55 PM
Post by: Reelz on January 18, 2013, 11:28:55 PM
I just checked it, and bearing B and C (19, 21)are 5x11x4mm.
Title: Re: daiwa saltist ld 20
Post by: madday on January 23, 2013, 03:13:22 AM
Post by: madday on January 23, 2013, 03:13:22 AM
hi alan,
planning to buy the 35 size.... but how is the "binding" feeling of this reel in high drag setting? is it bind much?
thanks..... ;)
planning to buy the 35 size.... but how is the "binding" feeling of this reel in high drag setting? is it bind much?
thanks..... ;)
Title: Re: daiwa saltist ld 20
Post by: Reelz on January 23, 2013, 05:01:28 AM
Post by: Reelz on January 23, 2013, 05:01:28 AM
I don't know about the 35 size but my ld 20 with 13 lbs of drag feels pretty rough when turning compared to when you its at 10 lbs. Even when its at 11-12 lbs still feels almost the same. If you want to fish this reel and still get a smooth crank, then set it to 10 lbs max. You can still crank it smoothly. Any higher, it just doesnt feel right.
Title: Re: daiwa saltist ld 20
Post by: madday on January 24, 2013, 10:46:13 AM
Post by: madday on January 24, 2013, 10:46:13 AM
thanks alan....
probably will buy new andros norrow instead.... ;D
probably will buy new andros norrow instead.... ;D
Title: Re: daiwa saltist ld 20
Post by: FlynHaYin on January 26, 2013, 08:14:38 AM
Post by: FlynHaYin on January 26, 2013, 08:14:38 AM
Aloha Alan. I have a Saltist LD50HSH. My problem is when I engage the drag, the harder the drag is applied, the harder it is to crank to retrieve the mainline. Feels like there is some binding issues inside the reel. The reel is fairly new and hasn't been serviced yet. Although I opened the reel up to look at what it could be, put it back together again and still have the same problem. Not sure what to do next?
Title: Re: daiwa saltist ld 20
Post by: Reelz on January 27, 2013, 03:15:43 AM
Post by: Reelz on January 27, 2013, 03:15:43 AM
Don't set the drag too high. Thats the problem with these reels. On LD 20 max drag is 22 lbs. but I will never set it that high because if I do I get the same problem. Harder to crank. If it hasn't been serviced yet. Follow the instrustions on here and do it! So you won't have any problems. Seems like its a common problem on these reels. Also check your bearings make sure all are good.
Title: Re: daiwa saltist ld 20
Post by: SoCalAngler on January 27, 2013, 06:16:12 AM
Post by: SoCalAngler on January 27, 2013, 06:16:12 AM
Drag pressure for the Saltist LD 50's should be about 17-18 lbs at strike before you start to get side load and it is harder to crank.
Title: Re: daiwa saltist ld 20
Post by: pompano joe on November 05, 2013, 04:27:01 AM
Post by: pompano joe on November 05, 2013, 04:27:01 AM
Quote from: Reelz on January 23, 2013, 05:01:28 AM
I don't know about the 35 size but my ld 20 with 13 lbs of drag feels pretty rough when turning compared to when you its at 10 lbs. Even when its at 11-12 lbs still feels almost the same. If you want to fish this reel and still get a smooth crank, then set it to 10 lbs max. You can still crank it smoothly. Any higher, it just doesnt feel right.
Alan, anybody got a fix for this. I've got a hyper speed 30 that gets way tight when you load the drag.
Title: Re: daiwa saltist ld 20
Post by: Dr. Jekyll - AKA MeL B on November 06, 2013, 03:45:16 PM
Post by: Dr. Jekyll - AKA MeL B on November 06, 2013, 03:45:16 PM
the easiest fix for this is a thrust bearing and/or angular contact bearings or tapered bearings. sometimes just changing all the bearings on the same axis with better ones helps a lot. i don't know the quality of the OEM bearings but if they are of high quality then you don't need to change them. having written that your only solution is an angular contact bearing(not cheap tho) or tapered one. better buy a better reel if i may say so, especially if one bearing will cost you an arm and a leg. hope this helps...
Title: Re: daiwa saltist ld 20
Post by: Bryan Young on November 09, 2013, 04:23:37 PM
Post by: Bryan Young on November 09, 2013, 04:23:37 PM
Have you guys ever wondered why the LD20/LD30 comes with an ARB (Anti-Reverse Bearing) and the LD20/LD30 2-Speed does not? I thought I was missing a part until I looked at the schematics...Hmm...what's up with that?
Title: Re: daiwa saltist ld 20
Post by: Dr. Jekyll - AKA MeL B on November 09, 2013, 09:59:18 PM
Post by: Dr. Jekyll - AKA MeL B on November 09, 2013, 09:59:18 PM
bryan, maybe daiwa does not want to deal with AR bearings going bust in their 2 SP... ??? ??? ??? ??? ???
Title: Re: daiwa saltist ld 20
Post by: spiderpig on December 05, 2013, 11:46:46 PM
Post by: spiderpig on December 05, 2013, 11:46:46 PM
I have a single speed LD30H that I am currently having problems with; it wont freespool. I originally thought it was a bent drive shaft so last week I ordered a new drive shaft and three new bearings for it. I installed them Tuesday and still have the same problem!!!
When I reassemble the reel, I get good freespool. Its not until I install the lever and adjust the drag that I get poor freespool. It doesnt matter if I loosen the drag right off after putting it back together, it wont come good until I pull the reel down again.
Has anyone got any ideas?
Thanks
Ryan
Title: Re: daiwa saltist ld 20
Post by: Tightlines667 on December 06, 2013, 03:15:39 AM
Post by: Tightlines667 on December 06, 2013, 03:15:39 AM
I would check free spool with the right side plate off, but everything (including pinion, etc...in place). If free spool is good you may have a spacing issue. If it is bad, disassemble individual parts until you find the culprit. Sometimes there is too much grease on the parts that spin past one another in free spool, easy fix. Sometimes the free spool can be improved by carefully polishing the inside of the pinion with some toothpaste or metal polish..not sandpaper! If its a spacing issue you may find replacing the Bellevilles w/new or reconfiguring the orientation to ((() or (()) with a shim if necessary can decrease the spacing before the drag engages slightly. Just be careful not to overshim or end up with too much pressure on the pinion under max drag. Also, this will change the drag curve to a much steeper ramp up which may not be desirable in a reel model that already has know weaknesses at higher drag settings. I don't have one of these reels myself, so someone else might be able to chime in with better placed advice?
John
John
Title: Re: daiwa saltist ld 20
Post by: spiderpig on December 06, 2013, 09:46:13 AM
Post by: spiderpig on December 06, 2013, 09:46:13 AM
I worked it out this afternoon. It was the spring one the drive shaft between the two drive shaft bearings that separate the drag plate from the washer hen the drag is disengaged. I stretched the spring and its like a new reel!!!
My first question and answer in one day, what a goose!
My first question and answer in one day, what a goose!
Title: Re: daiwa saltist ld 20
Post by: Dr. Jekyll - AKA MeL B on December 07, 2013, 01:07:38 PM
Post by: Dr. Jekyll - AKA MeL B on December 07, 2013, 01:07:38 PM
but it felt good because you found out what the problem was. "persistence" and patience sometimes takes care of things. am glad for you. tight lines!
Title: Re: daiwa saltist ld 20
Post by: redfish12 on April 01, 2014, 03:03:44 AM
Post by: redfish12 on April 01, 2014, 03:03:44 AM
I have the two speed version of this reel (LD20) and it has a similar problem as you described above. Unfortunately, it was not that spring! I have disassembled and reassembled several times and no luck resolving the issue. The reel is tight in the higher speed gear, to the point I wouldn't want to use that gear, and the drag pressure goes from almost nothing at strike to full bore at full despite adjusting.
Do you all have any ideas what could be causing this?
Do you all have any ideas what could be causing this?
Title: Re: daiwa saltist ld 20
Post by: cmaraj1 on May 11, 2014, 03:30:40 AM
Post by: cmaraj1 on May 11, 2014, 03:30:40 AM
would the 50ld have the same problems>?????
Title: Re: daiwa saltist ld 20
Post by: madday on July 29, 2015, 04:01:52 AM
Post by: madday on July 29, 2015, 04:01:52 AM
don't mind... missed Jim's post... :D
Title: Re: daiwa saltist ld 20
Post by: edgey on February 22, 2016, 09:24:45 AM
Post by: edgey on February 22, 2016, 09:24:45 AM
hi.. is there any one who could tell me if there should be any spool movement side to side on these reels when in free spool. ive got one which has around 1mm the other reel i got has no movement. cant see whats causing it..
Title: Re: daiwa saltist ld 20
Post by: Wolli on February 22, 2016, 06:33:54 PM
Post by: Wolli on February 22, 2016, 06:33:54 PM
any shim missing on the main shaft?
http://alantani.com/index.php?action=search2
http://alantani.com/index.php?action=search2
Title: Re: daiwa saltist ld 20
Post by: dirtymm on November 11, 2017, 03:11:23 AM
Post by: dirtymm on November 11, 2017, 03:11:23 AM
That was one hell of a rebuild on what looks to be a serious reel, fine job w the tutorial. I have to say, I am a mechanic, HVAC, plumbing , electrical and I fix and build computers too. If I had the money I don't think i'd buy high end reels over $150. I don't have the patience and my time is too valuable to be fixing, i'd cut my loss and retool. I give all you guys credit that can !