Title: Truth (Release) SG Tutorial by Lumberjack93
Post by: Lumberjack93 on February 21, 2016, 05:29:16 AM
Post by: Lumberjack93 on February 21, 2016, 05:29:16 AM
Ok, here is my full tutorial of the Release (Truth) SG. I bought my Release SG right before they changed their name to Truth. Anyway, the reels are identical.
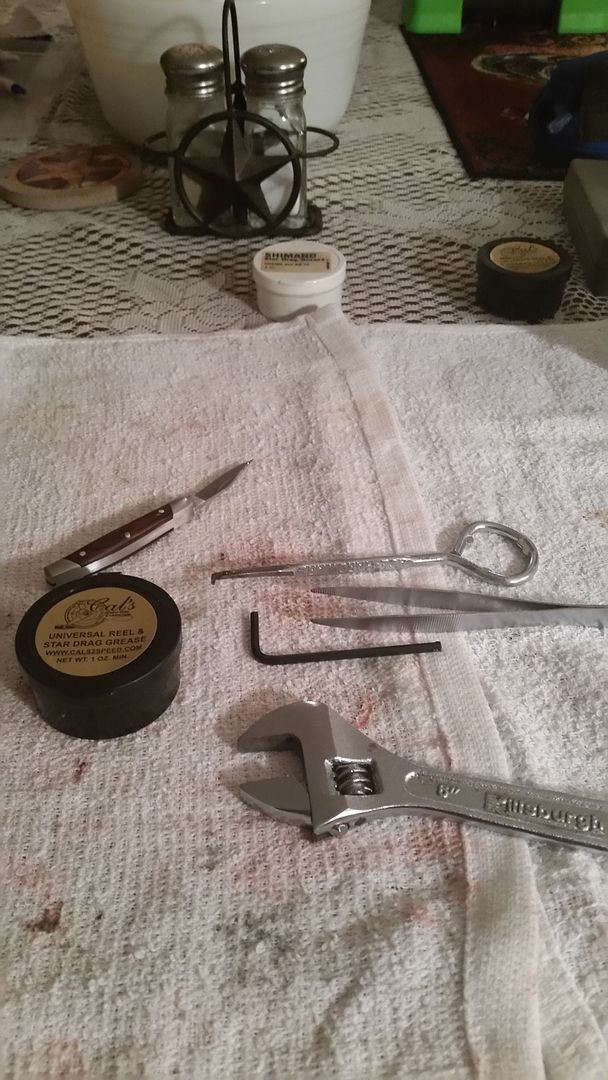
So, you'll first want to start with these simple tools. If memory serves, the Hex Key is size 3 metric. Also, the bearing puller is very helpful. I made mine from a paint can opener. Also, the tweezers are very helpful for the dog spring.
 (http://s215.photobucket.com/user/Lumberjack93/media/Release%20SG%20Takedown/10.jpg.html)
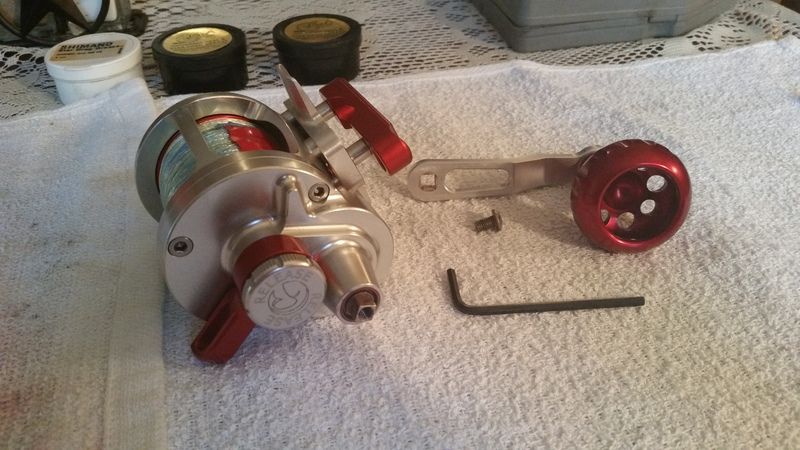
So, here is the Release (Now Truth) SG in all of it's glory.
 (http://s215.photobucket.com/user/Lumberjack93/media/Release%20SG%20Takedown/11.jpg.html)
Let's remove that handle with the size 3 Metric Hex Key.
 (http://s215.photobucket.com/user/Lumberjack93/media/Release%20SG%20Takedown/12.jpg.html)
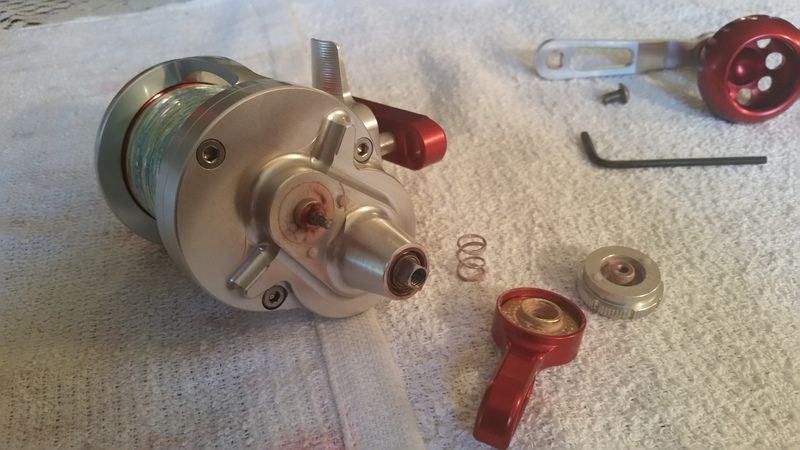
After that, let's remove the Lever Drag knob and arm by turning the Lever Drag knob counter clockwise. Remove and set aside.
 (http://s215.photobucket.com/user/Lumberjack93/media/Release%20SG%20Takedown/13.jpg.html)
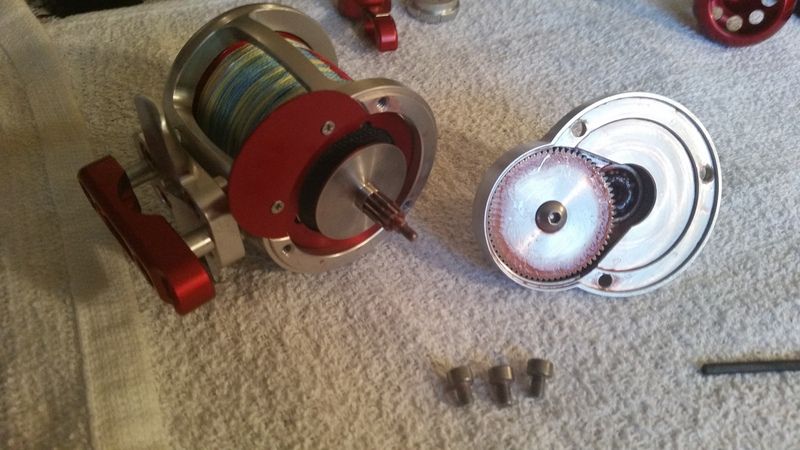
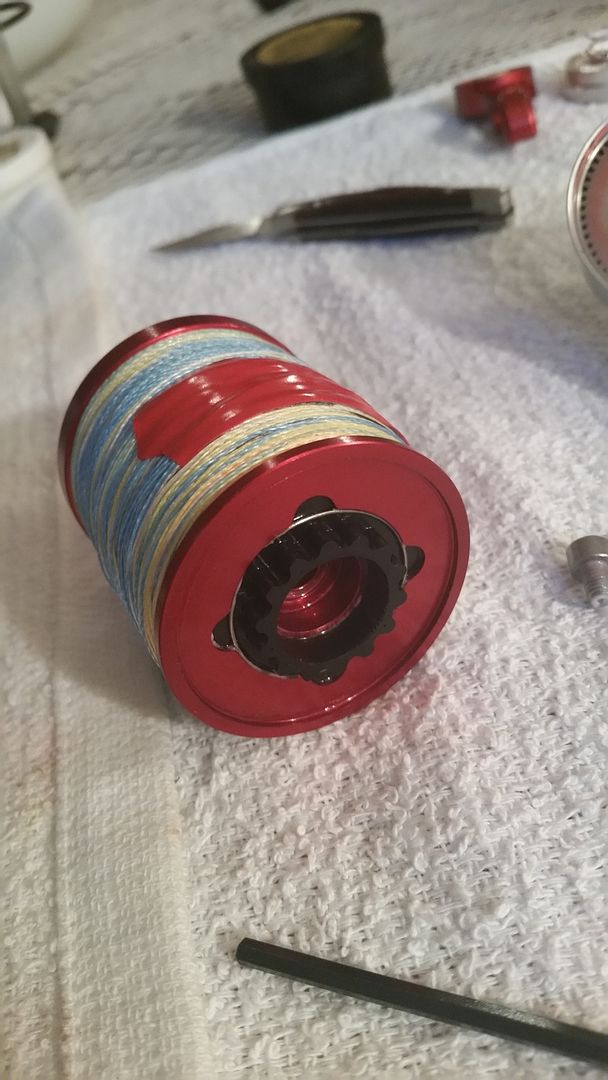
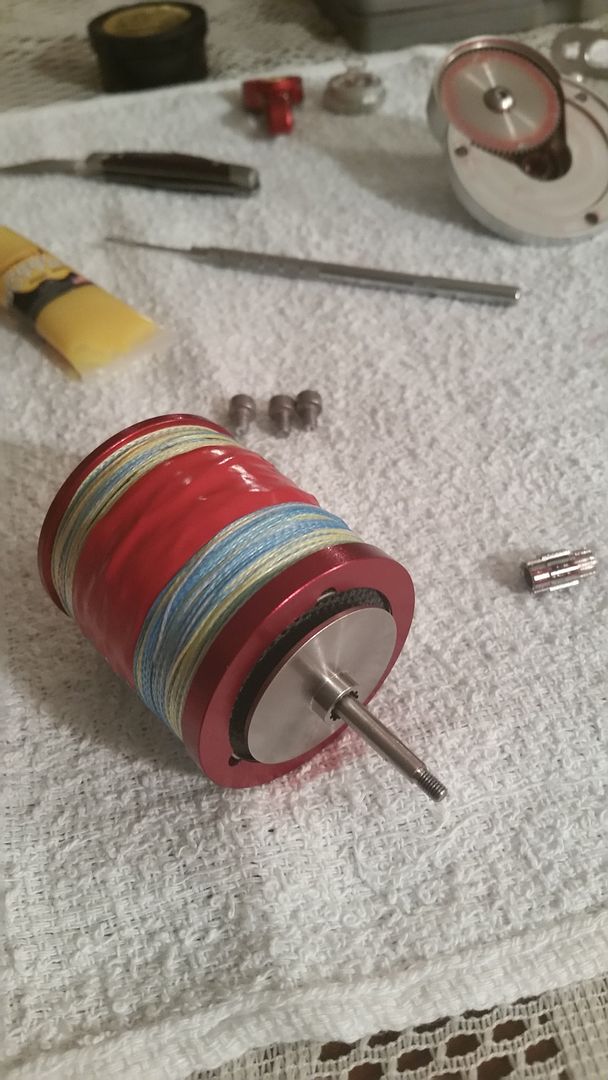
Now, we can remove the 3 right side screws and remove the right side plate from the frame and spool
 (http://s215.photobucket.com/user/Lumberjack93/media/Release%20SG%20Takedown/14.jpg.html)
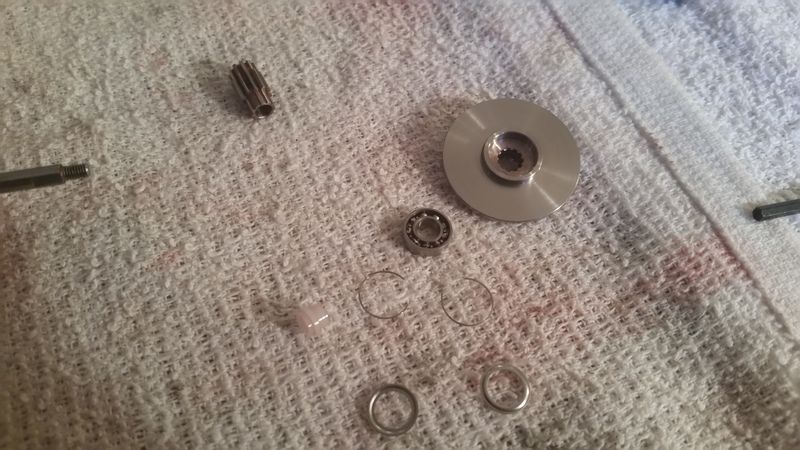
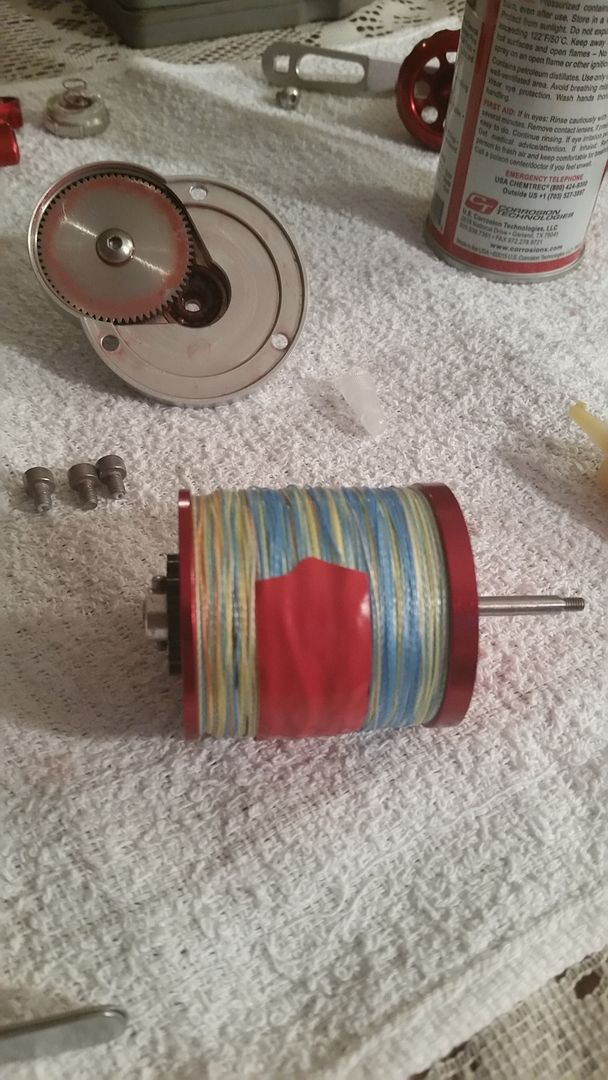
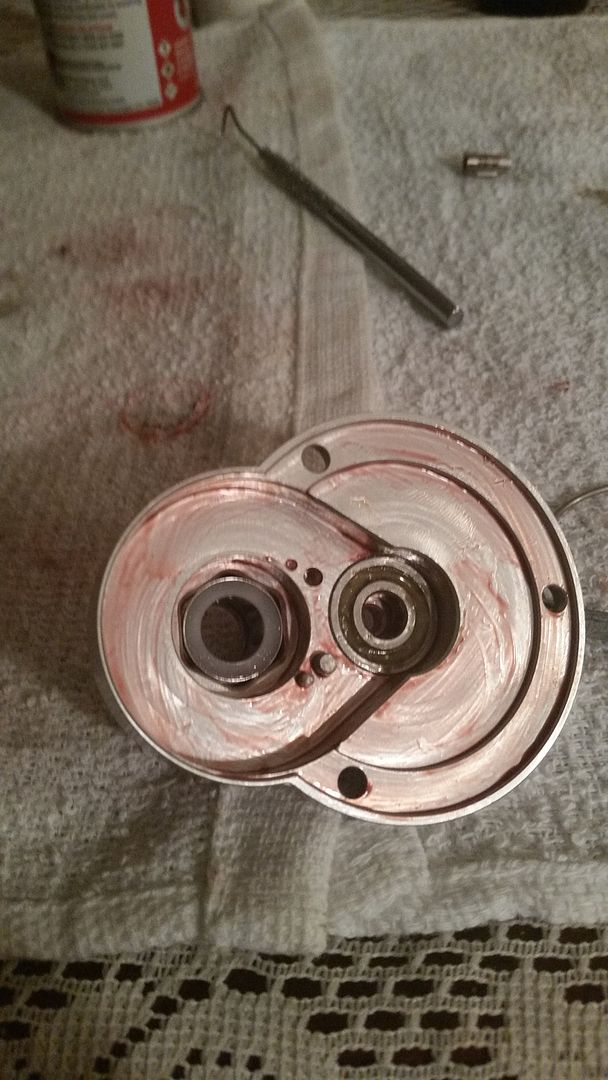
Next, let's remove the pinion gear, drag plate and bearing from the spool. I un-shielded the bearings on this reel and in the picture you can see the bearing shields and retainers. *** Also, make note of that little white apparatus. I'll get back to that later. ***
 (http://s215.photobucket.com/user/Lumberjack93/media/Release%20SG%20Takedown/15.jpg.html)
Here is a picture of the main shaft and the order in which the parts came off. Notice again that little white bearing cap.
 (http://s215.photobucket.com/user/Lumberjack93/media/Release%20SG%20Takedown/16.jpg.html)
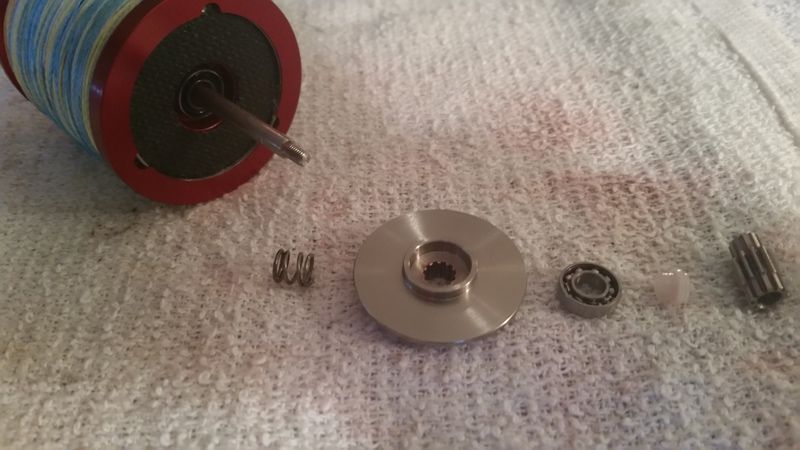
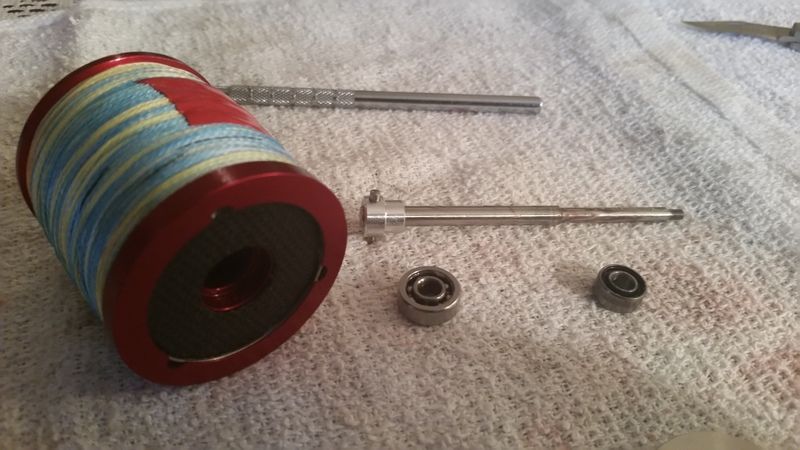
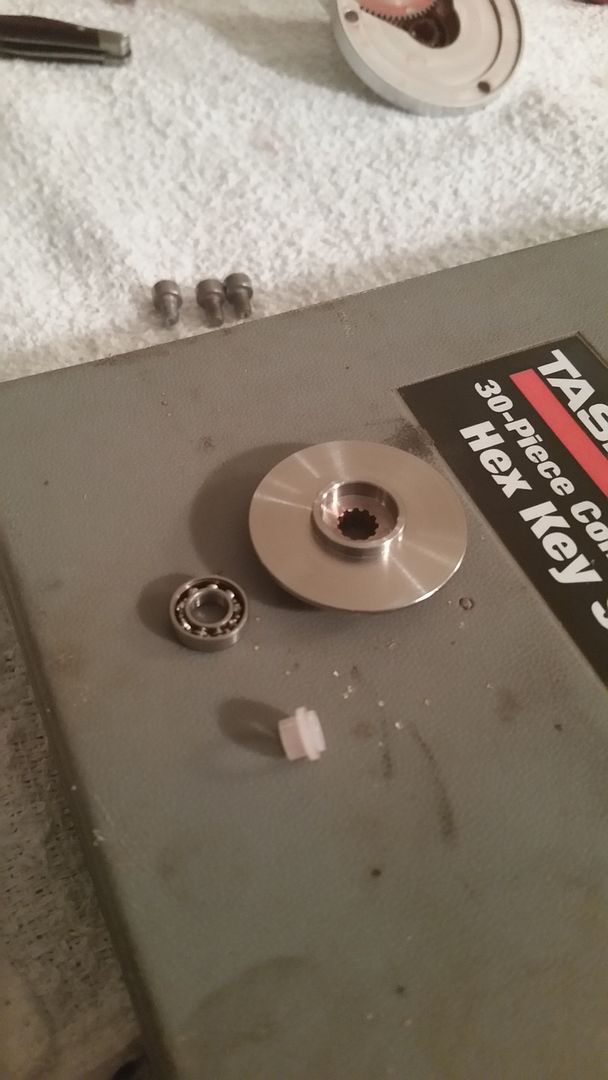
Here is a picture of the main shaft and the right and left side shaft bearings. Notice that there are no belleville washers. Grease or oil your bearings at this point and set aside.
 (http://s215.photobucket.com/user/Lumberjack93/media/Release%20SG%20Takedown/17.jpg.html)
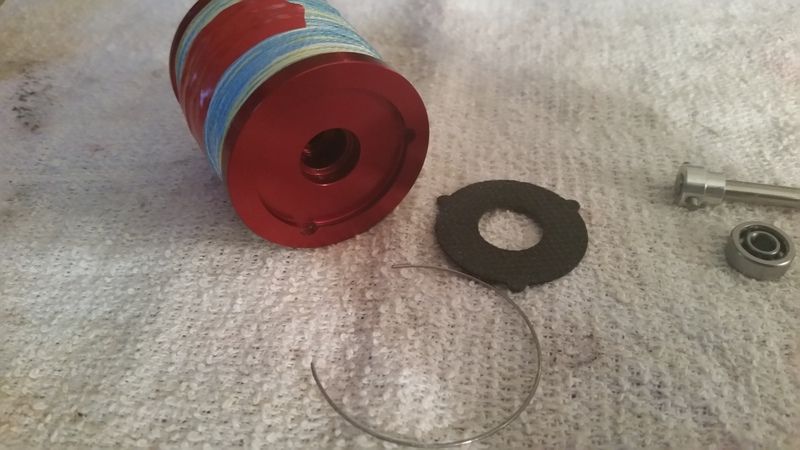
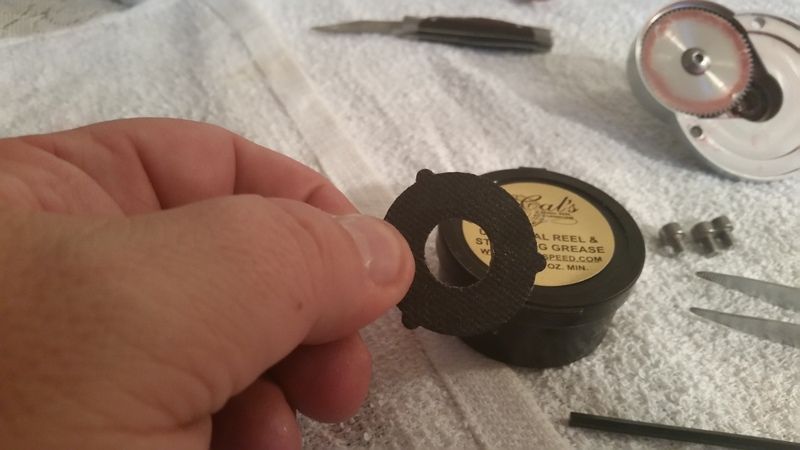
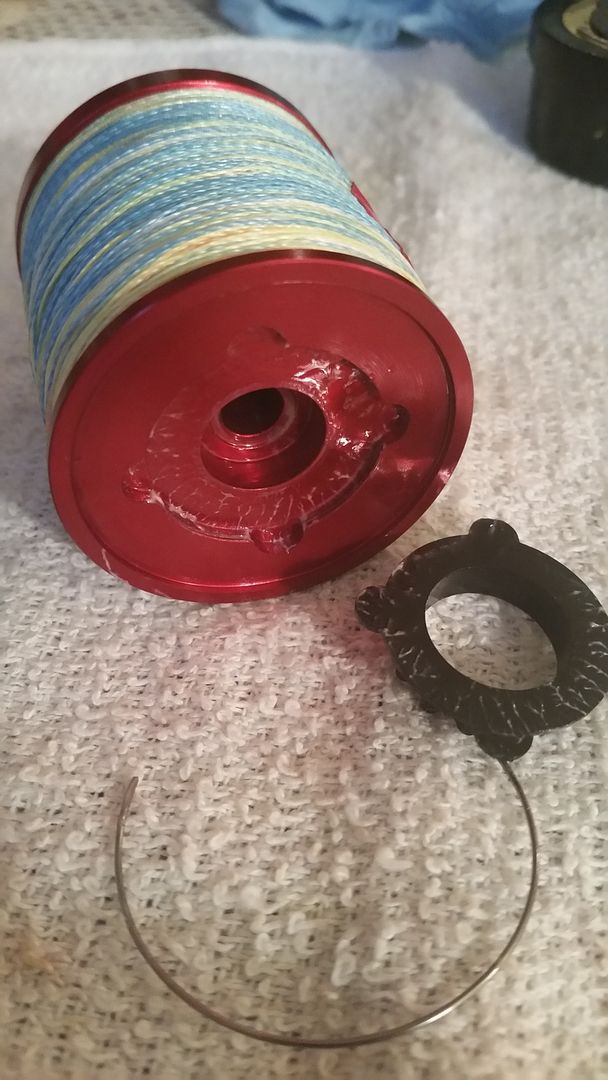
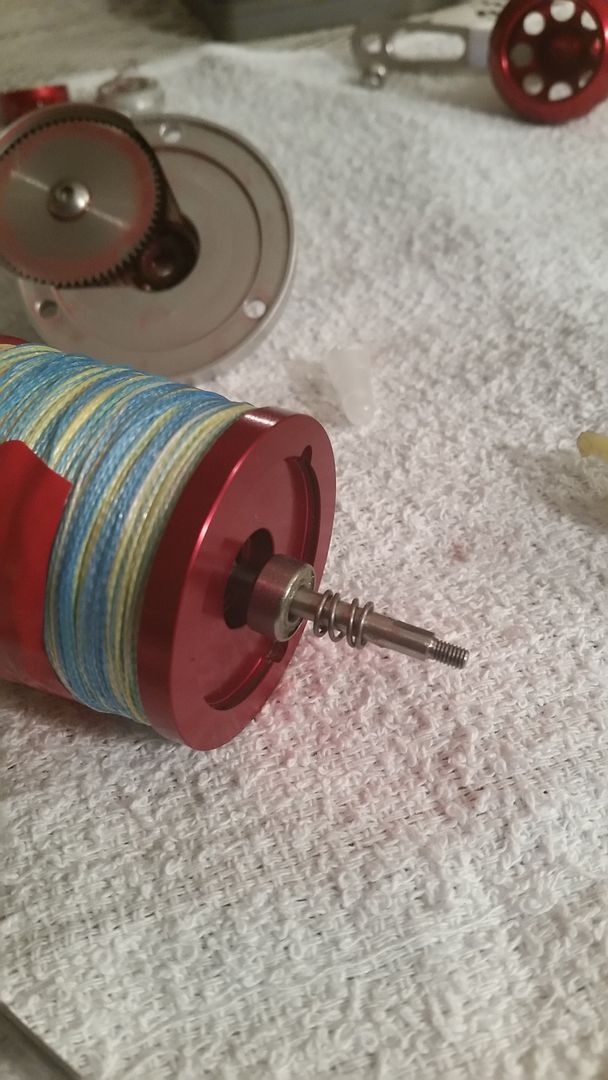
Now, lets remove that carbon fiber drag washer by removing the drag washer retaining spring. (Half moon clip)
 (http://s215.photobucket.com/user/Lumberjack93/media/Release%20SG%20Takedown/18.jpg.html)
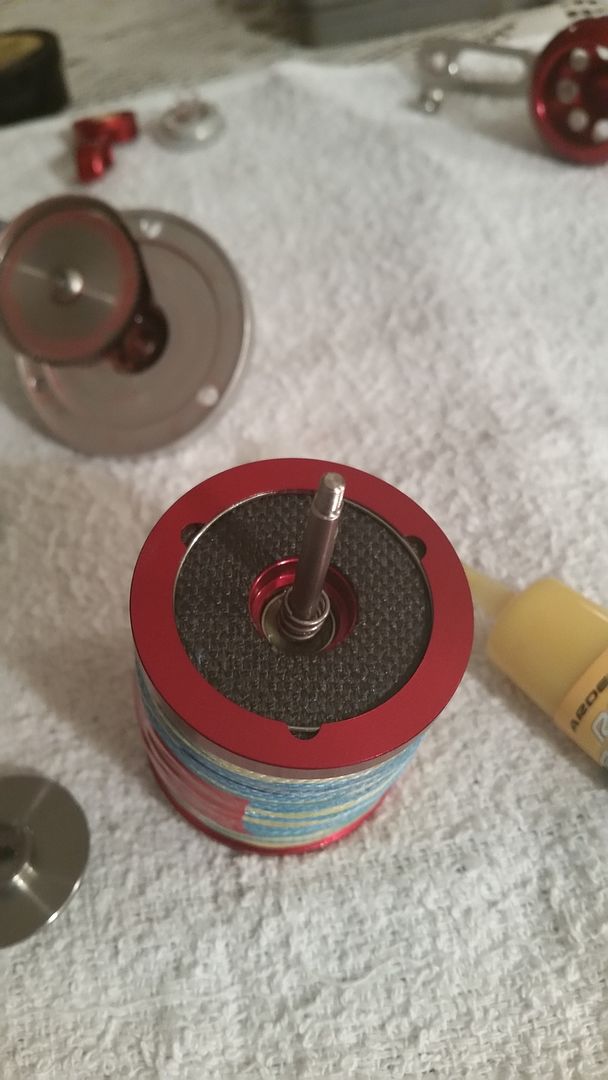
And, lets apply a little Cal's Drag Grease here. I rub it in and then wipe with a shop rag.
 (http://s215.photobucket.com/user/Lumberjack93/media/Release%20SG%20Takedown/19.jpg.html)
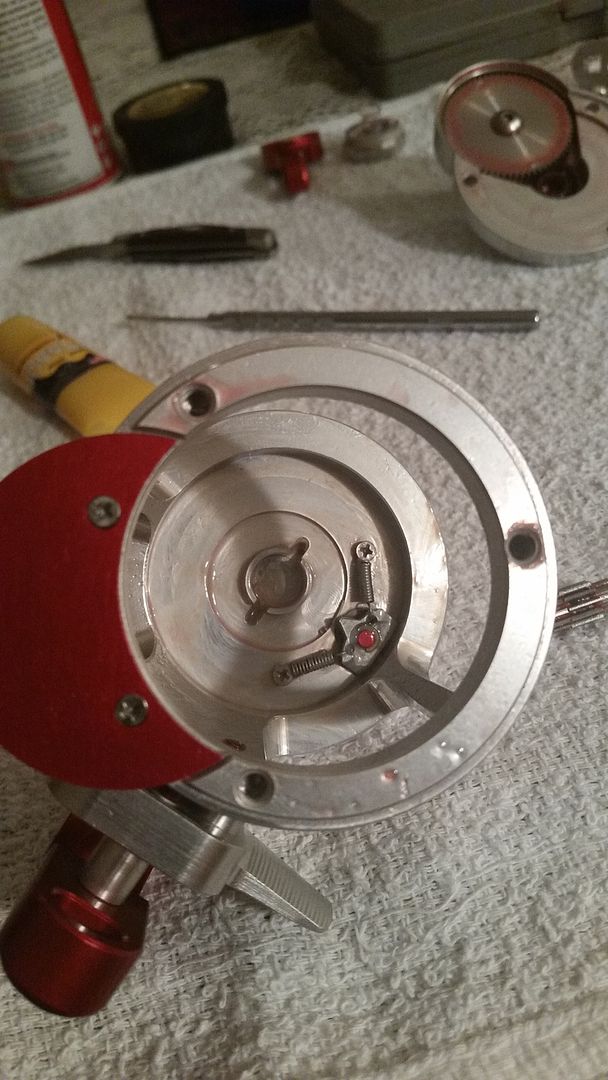
Now, here is the left side click gear and retaining spring. I removed this to give it a look.
 (http://s215.photobucket.com/user/Lumberjack93/media/Release%20SG%20Takedown/20.jpg.html)
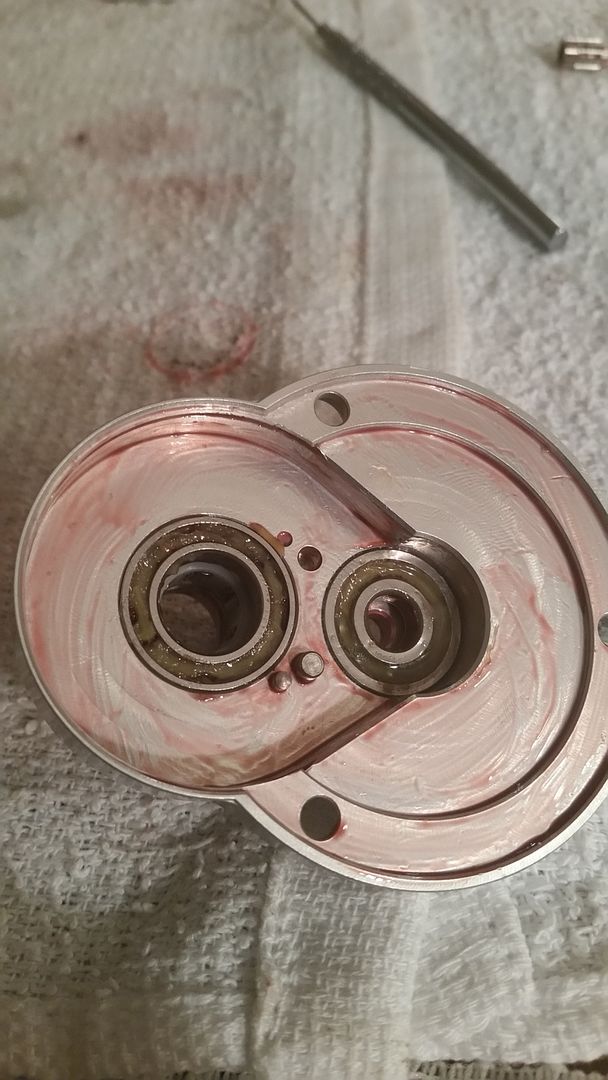
Truth Reels really had this reel well greased from the factory.
 (http://s215.photobucket.com/user/Lumberjack93/media/Release%20SG%20Takedown/21.jpg.html)
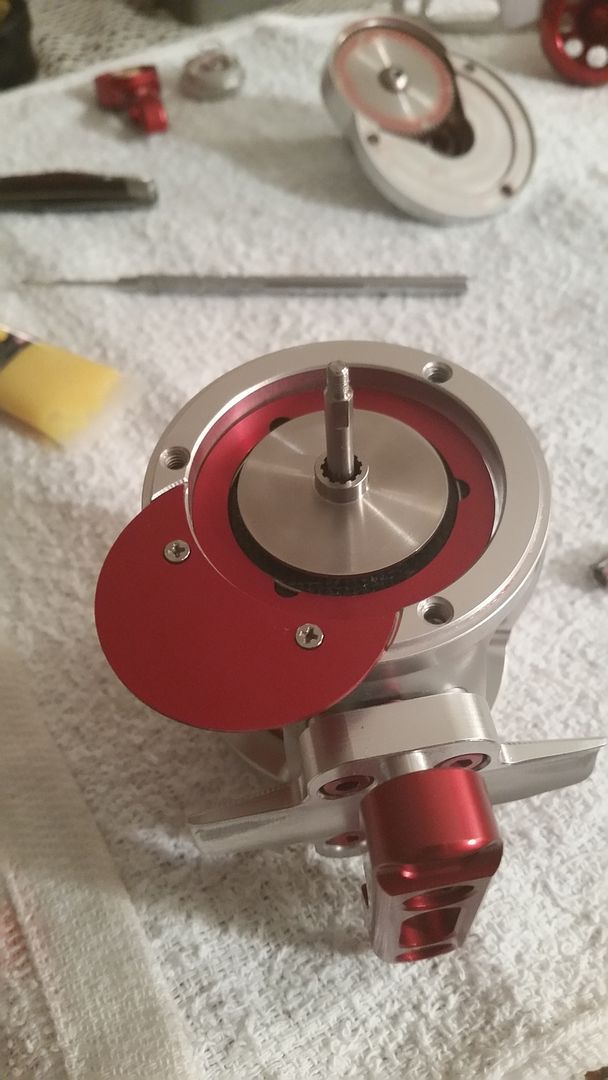
So, let's put that click gear back on and now insert the left side bearing.
 (http://s215.photobucket.com/user/Lumberjack93/media/Release%20SG%20Takedown/22.jpg.html)
Here is the spool with the main shaft inserted.
 (http://s215.photobucket.com/user/Lumberjack93/media/Release%20SG%20Takedown/23.jpg.html)
Now, let's get that right side bearing and spring back on the main shaft.
 (http://s215.photobucket.com/user/Lumberjack93/media/Release%20SG%20Takedown/24.jpg.html)
Here is another view.
 (http://s215.photobucket.com/user/Lumberjack93/media/Release%20SG%20Takedown/25.jpg.html)
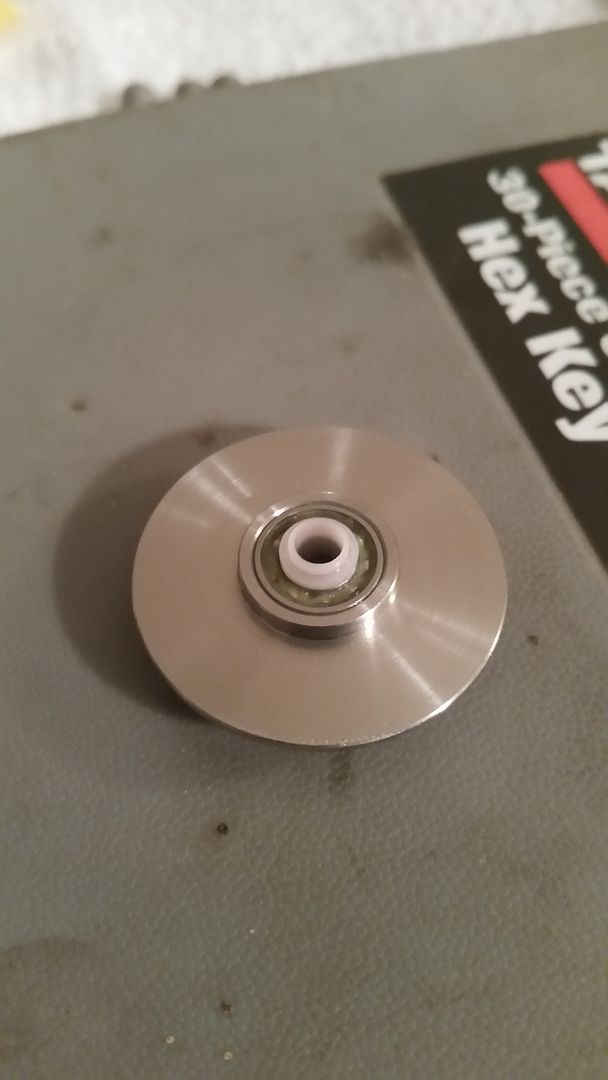
Now, let's get back to that "White Apparatus" I was talking about. It's a bearing guard of some sort. Put your bearing
back in the drag plate and then put the long side of the white bearing guard back in the bearing.
 (http://s215.photobucket.com/user/Lumberjack93/media/Release%20SG%20Takedown/26.jpg.html)
Here it is inserted back into the bearing. Note the short side goes on the outside of the bearing.
 (http://s215.photobucket.com/user/Lumberjack93/media/Release%20SG%20Takedown/27.jpg.html)
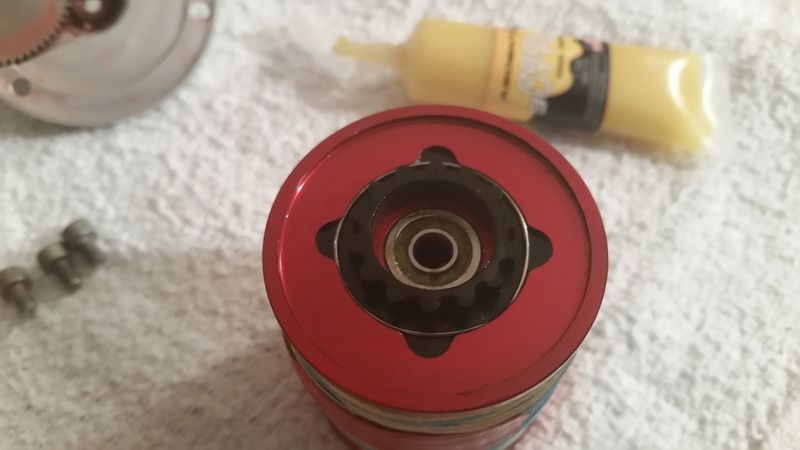
Now, let's put the drag plate back on the main shaft, against the drag washer.
 (http://s215.photobucket.com/user/Lumberjack93/media/Release%20SG%20Takedown/28.jpg.html)
Don't forget to grease the left side plate and clicker springs.
 (http://s215.photobucket.com/user/Lumberjack93/media/Release%20SG%20Takedown/29.jpg.html)
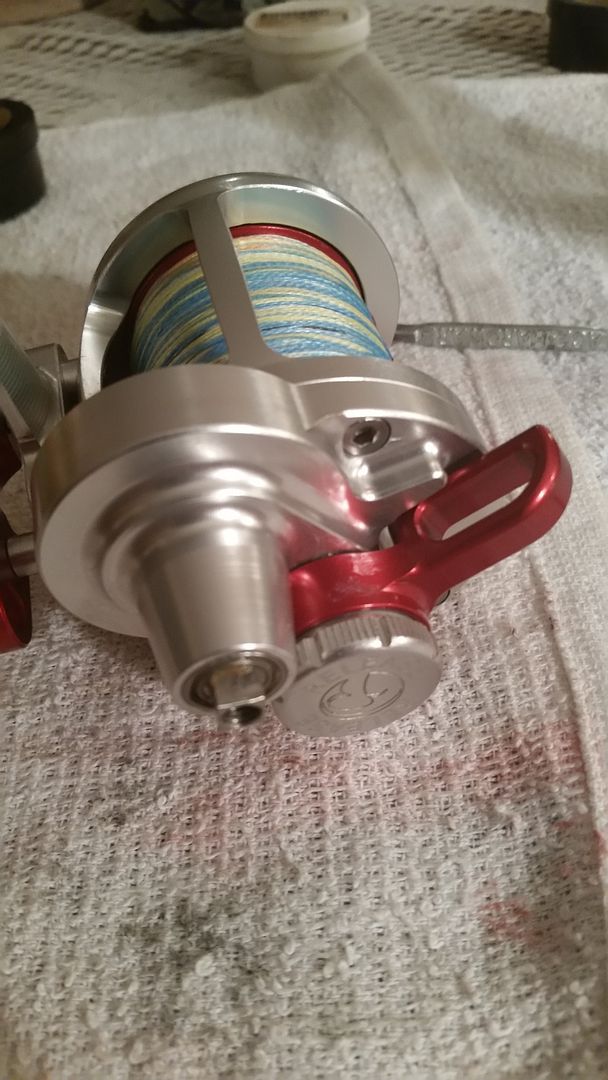
Here is a shot with the spool and drag plate installed.
 (http://s215.photobucket.com/user/Lumberjack93/media/Release%20SG%20Takedown/30.jpg.html)
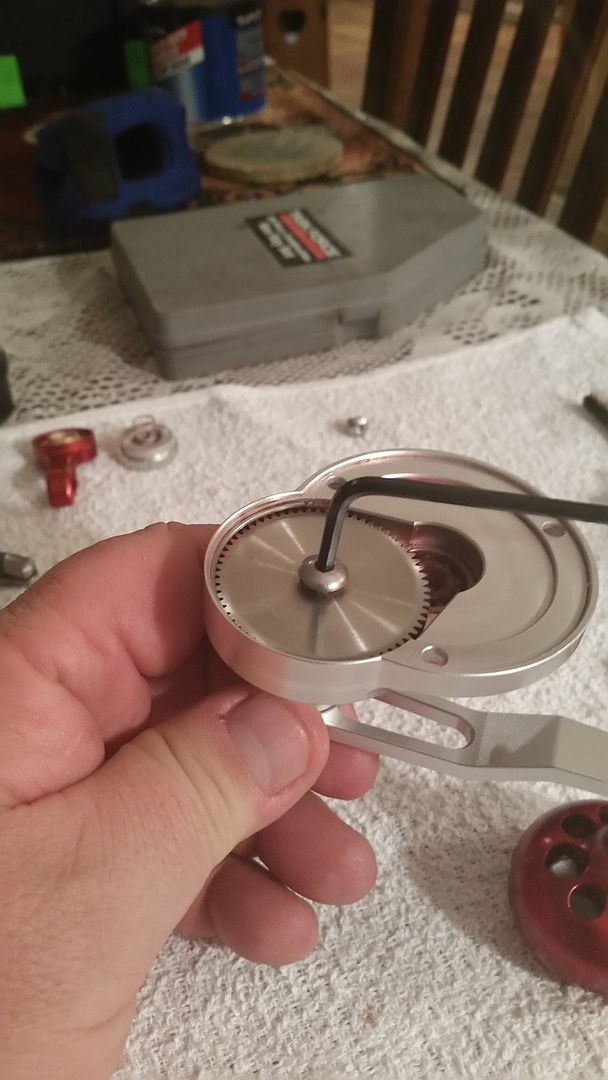
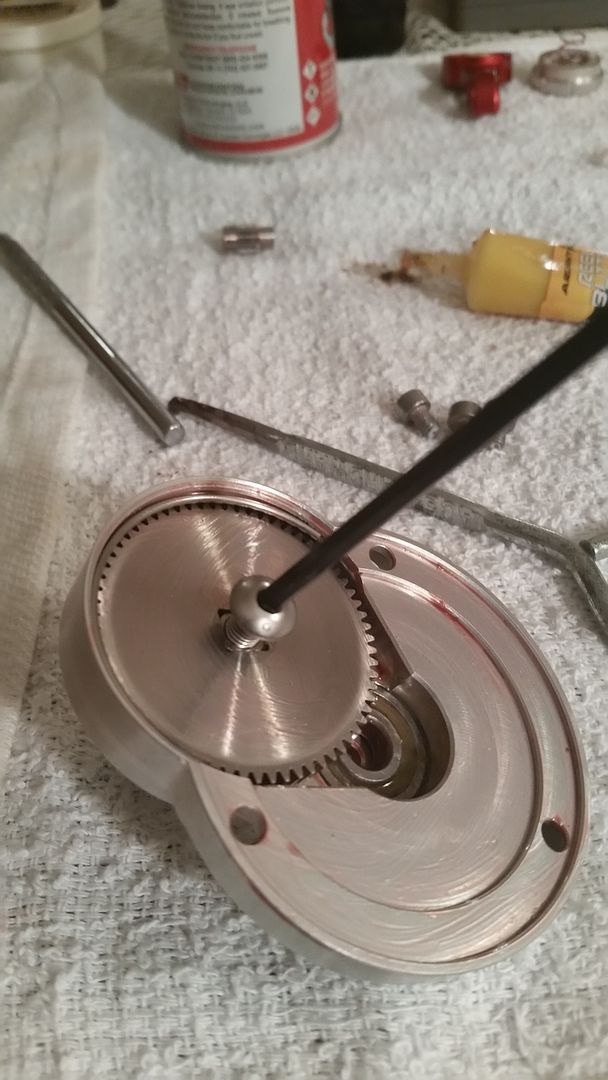
Now, let's get that main gear out by again using our Size 3 Metric Hex Key.
 (http://s215.photobucket.com/user/Lumberjack93/media/Release%20SG%20Takedown/31.jpg.html)
You'll need to temporarily put the handle back on for this step.
 (http://s215.photobucket.com/user/Lumberjack93/media/Release%20SG%20Takedown/32.jpg.html)
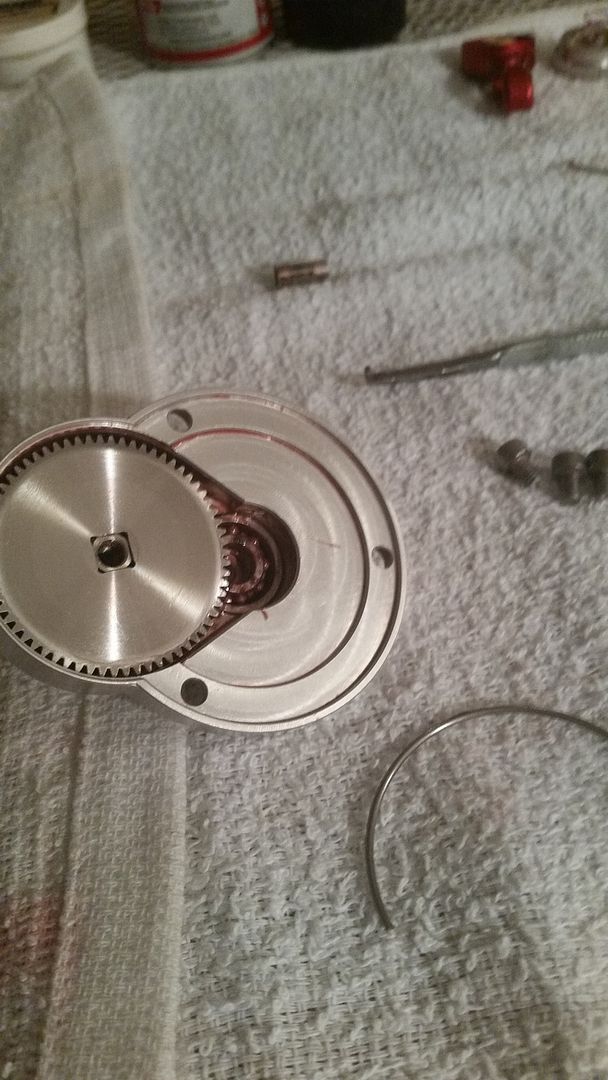
After the screw is out, you'll need to remove the half moon spring clip.
 (http://s215.photobucket.com/user/Lumberjack93/media/Release%20SG%20Takedown/33.jpg.html)
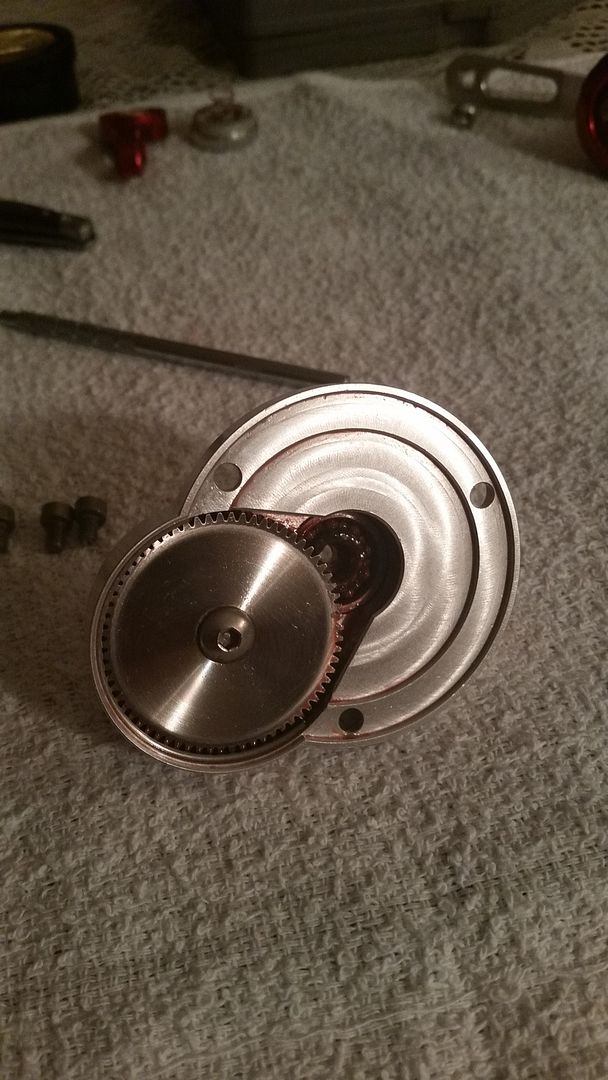
Then, the main gear, main gear bearing and dog will come out. Now is also the time to remove the anti reverse bearing. This
is where a bearing puller is very helpful. Go around the bottom of the anti reverse bearing in a clock wise rotation, lifting up with your bearing puller in the 12 o'clock, 4 o'clock and 8 o'clock positions. Keep going around, lifting up with steady pressure. The bearing will eventually come out.
 (http://s215.photobucket.com/user/Lumberjack93/media/Release%20SG%20Takedown/34.jpg.html)
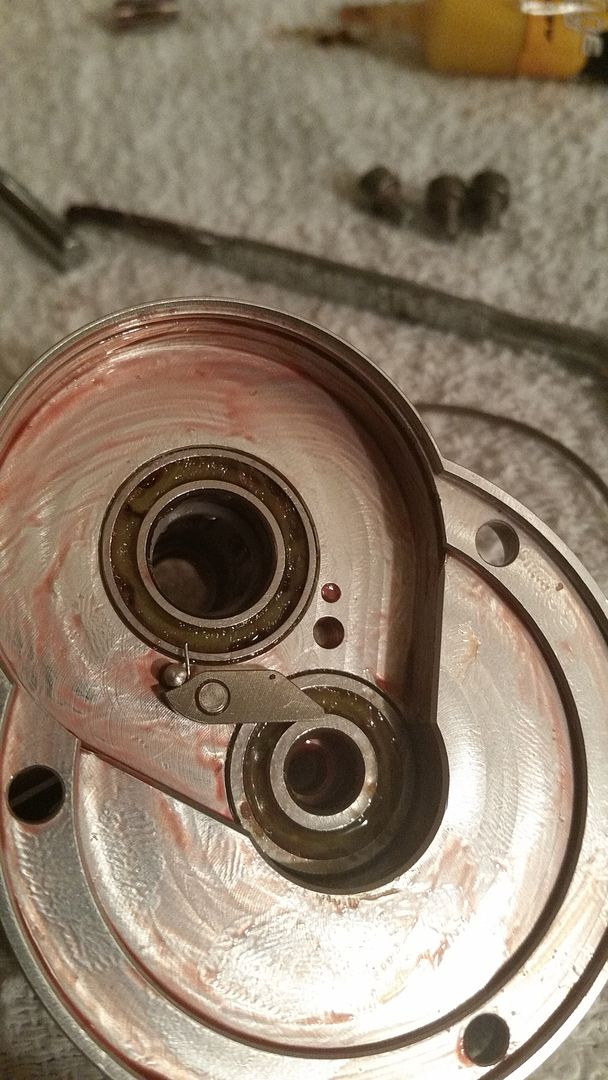
In the shot below, I have removed the anti reverse bearing, cleaned it and put it back on the shaft for testing.
Works like a charm. The shaft will only turn in one direction.
 (http://s215.photobucket.com/user/Lumberjack93/media/Release%20SG%20Takedown/35.jpg.html)
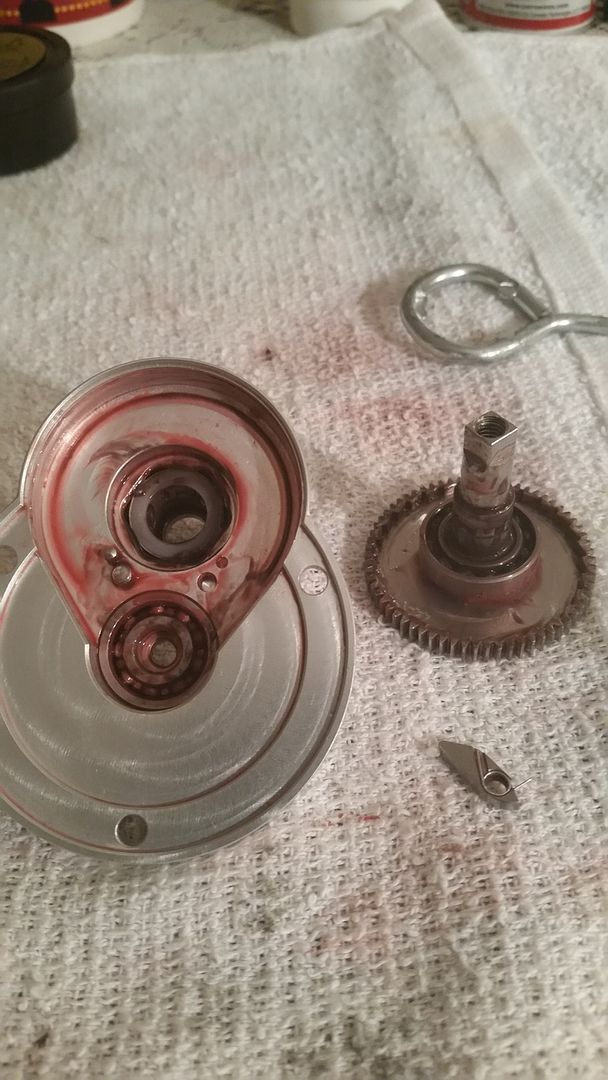
Here is a shot of the main gear and the 2 ball bearings and 1 anti reverse bearing that are associated with it.
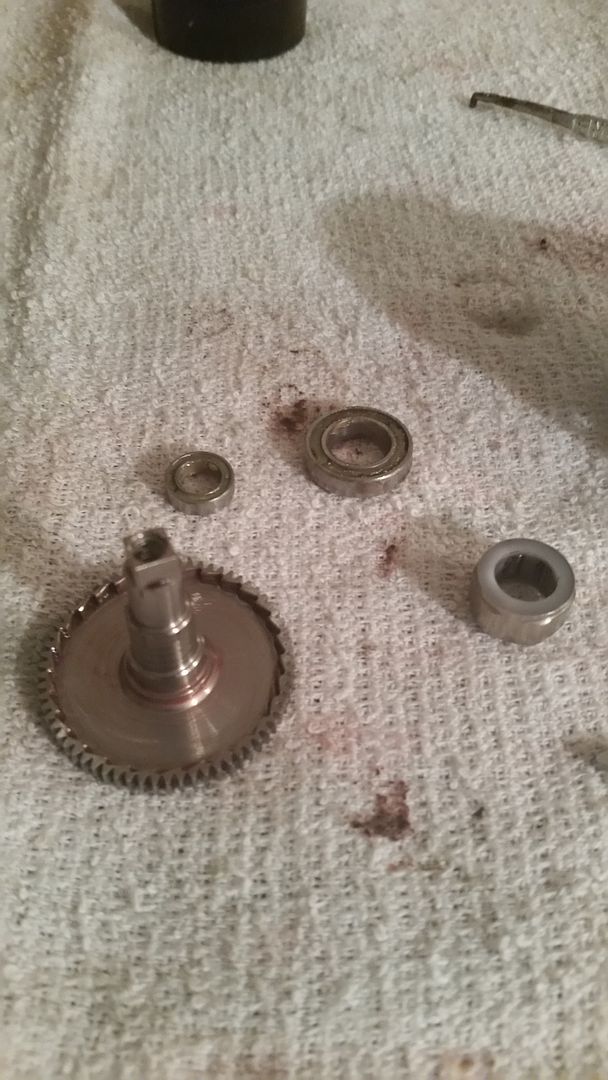 (http://s215.photobucket.com/user/Lumberjack93/media/Release%20SG%20Takedown/36.jpg.html)
Now, let's remove that right side shaft bearing and grease it.
 (http://s215.photobucket.com/user/Lumberjack93/media/Release%20SG%20Takedown/37.jpg.html)
Here is a shot of the completely taken down right side plate.
 (http://s215.photobucket.com/user/Lumberjack93/media/Release%20SG%20Takedown/38.jpg.html)
Next, let's put the right side shaft bearing back in. It should be greased at this point.
 (http://s215.photobucket.com/user/Lumberjack93/media/Release%20SG%20Takedown/39.jpg.html)
Then, we're going to put the cleaned anti reverse bearing back in. It should be cleaned and lightly oiled, along with the
main gear shaft. Too much grease on an anti reverse bearing will make it slip.
 (http://s215.photobucket.com/user/Lumberjack93/media/Release%20SG%20Takedown/40.jpg.html)
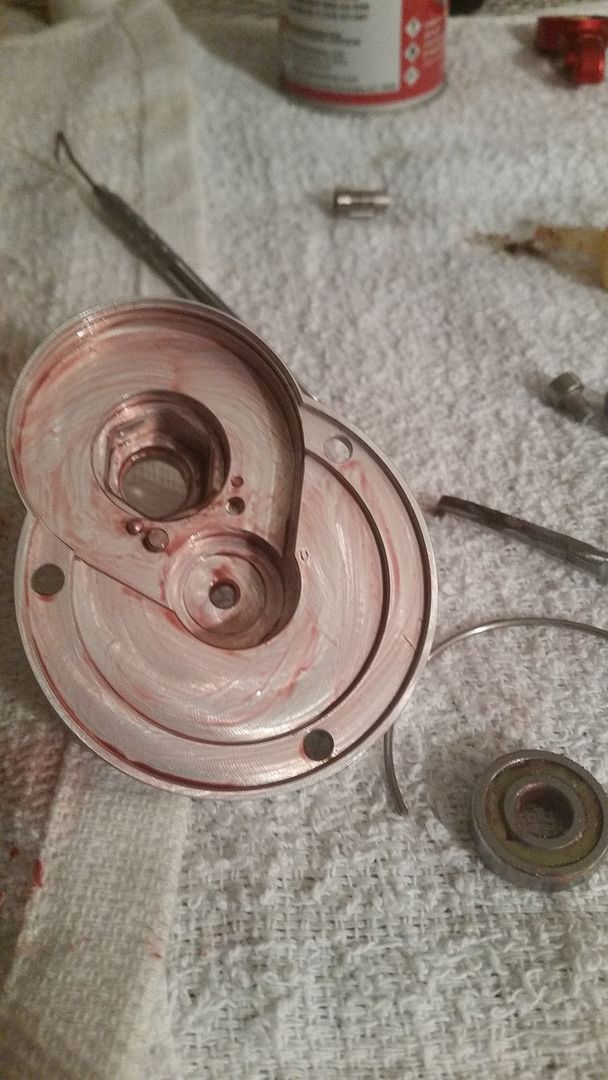
Now, lets put the large main gear bearing back in.
 (http://s215.photobucket.com/user/Lumberjack93/media/Release%20SG%20Takedown/41.jpg.html)
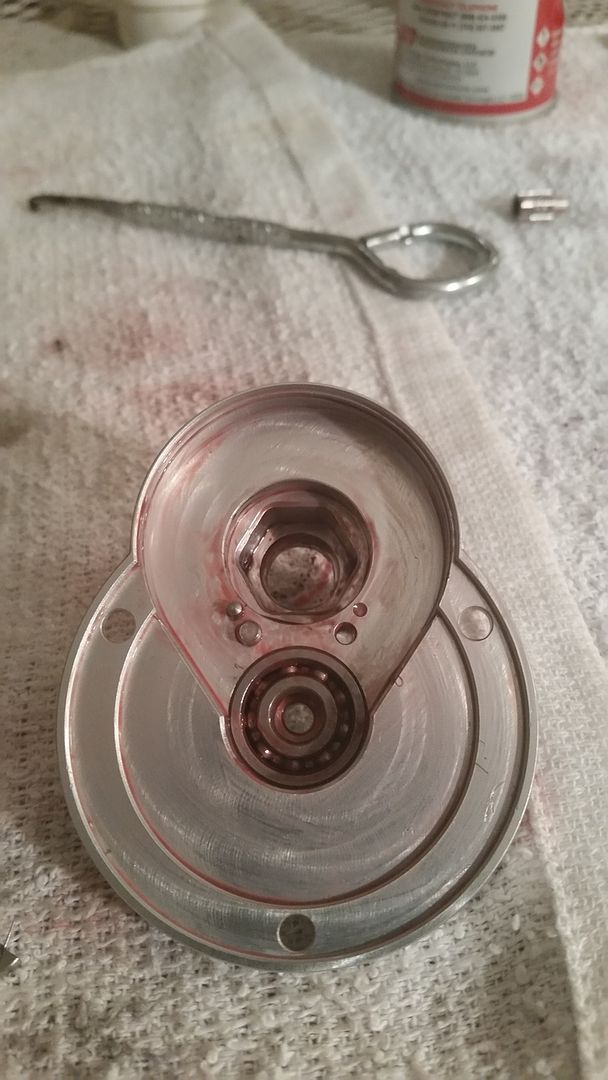
Next, flip the right side plate over and install the smaller main gear bearing.
 (http://s215.photobucket.com/user/Lumberjack93/media/Release%20SG%20Takedown/42.jpg.html)
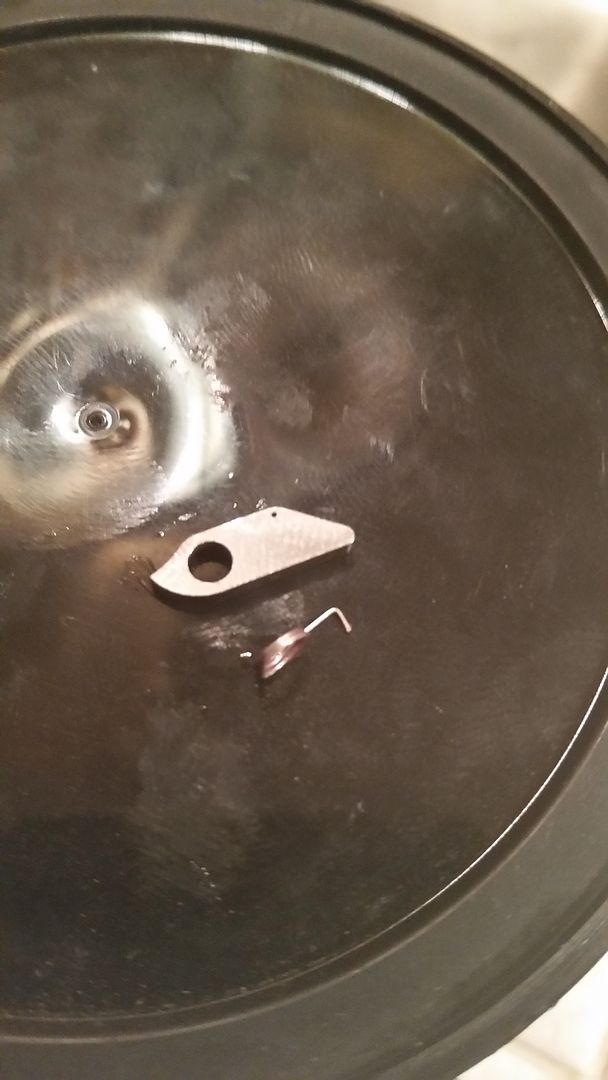
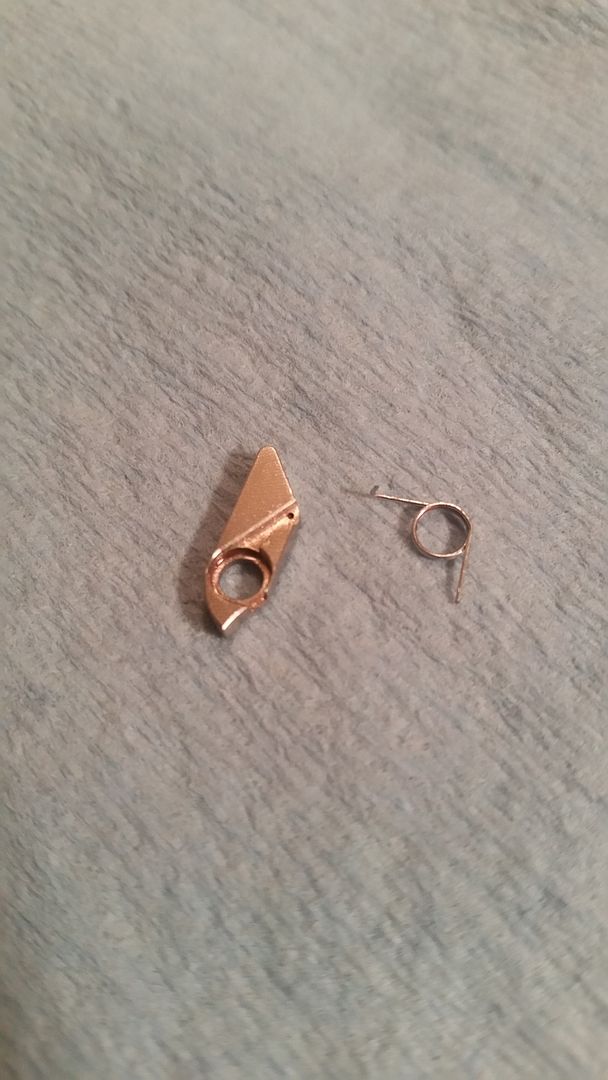
Now, it's time for the Dog. Here is a shot of the back side of the dog and the dog spring. Notice the 90 degree angle
on the dog spring?
 (http://s215.photobucket.com/user/Lumberjack93/media/Release%20SG%20Takedown/43.jpg.html)
Here is a shot of the dog and the dog spring prior to installing the spring. Notice the very small hole on the dog?
This is where the 90 bend on the dog spring will go.
 (http://s215.photobucket.com/user/Lumberjack93/media/Release%20SG%20Takedown/44.jpg.html)
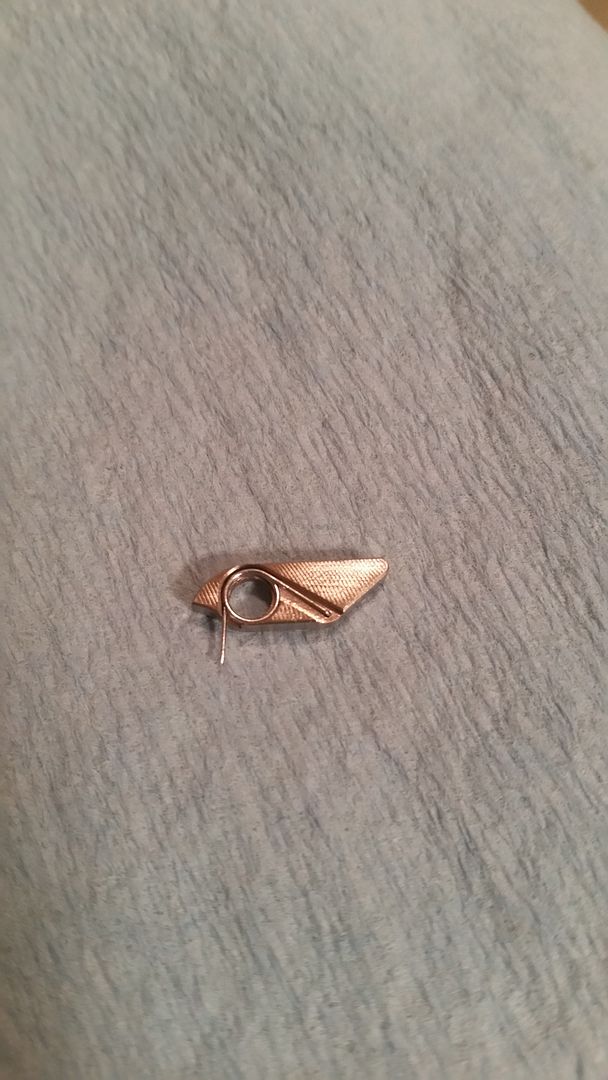
Here is a shot of a properly installed dog spring.
 (http://s215.photobucket.com/user/Lumberjack93/media/Release%20SG%20Takedown/45.jpg.html)
Now, let's install the dog and spring exactly per the shot below.
 (http://s215.photobucket.com/user/Lumberjack93/media/Release%20SG%20Takedown/46.jpg.html)
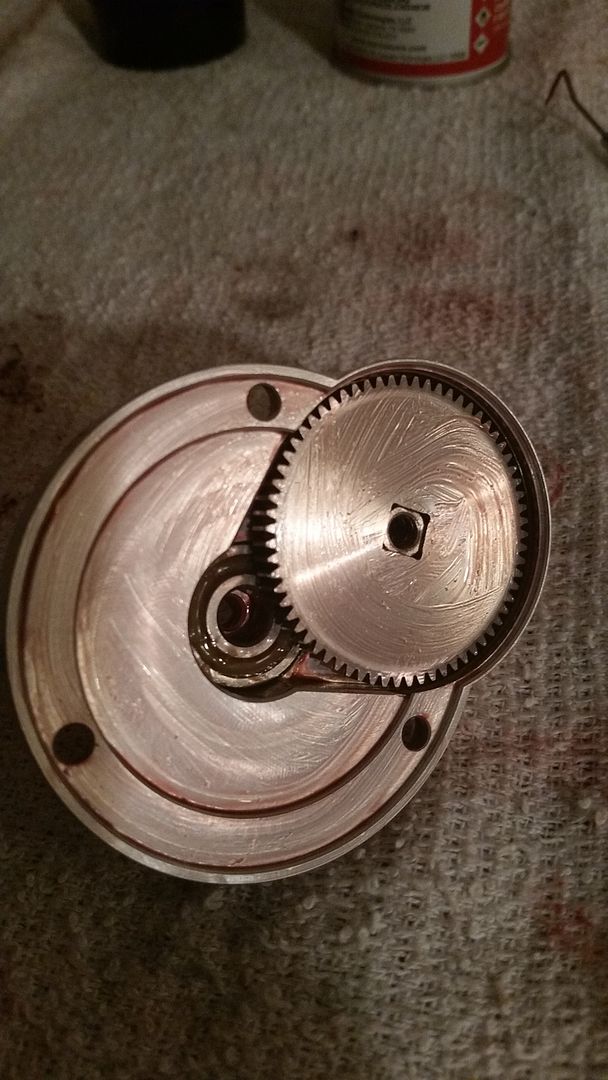
Now, we can install the main gear.
 (http://s215.photobucket.com/user/Lumberjack93/media/Release%20SG%20Takedown/47.jpg.html)
And, now, we can install the main gear screw with the #3 Hex Key. Don't forget to install the half moon spring
at this point.
 (http://s215.photobucket.com/user/Lumberjack93/media/Release%20SG%20Takedown/48.jpg.html)
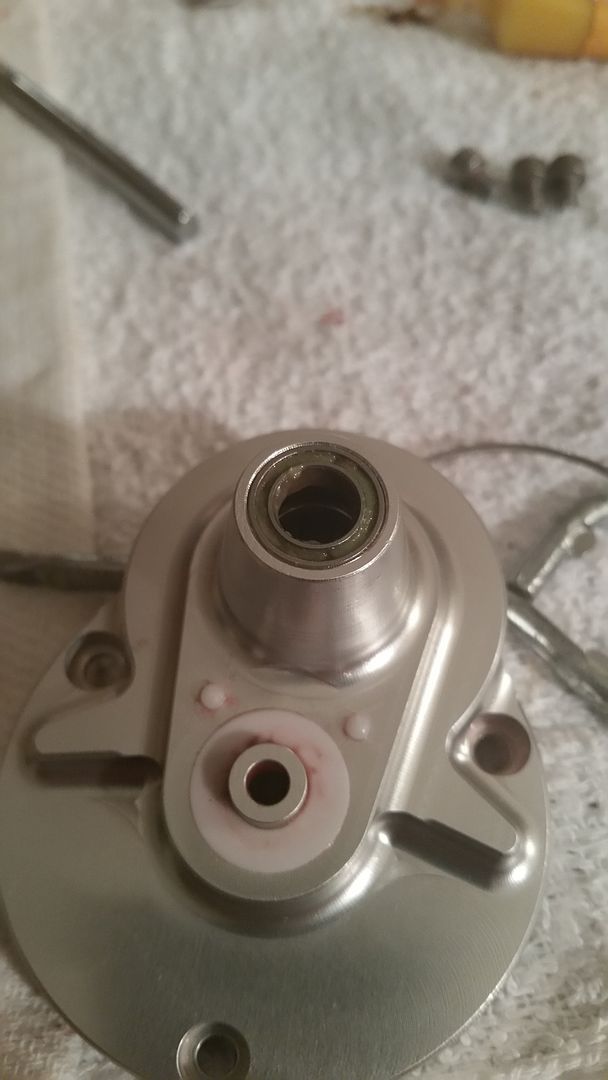
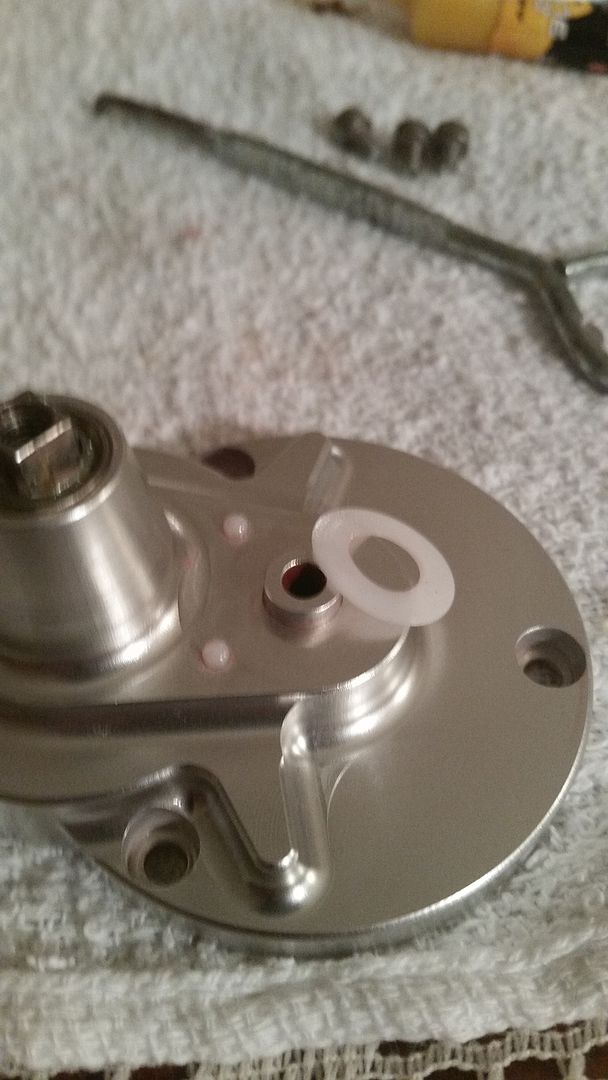
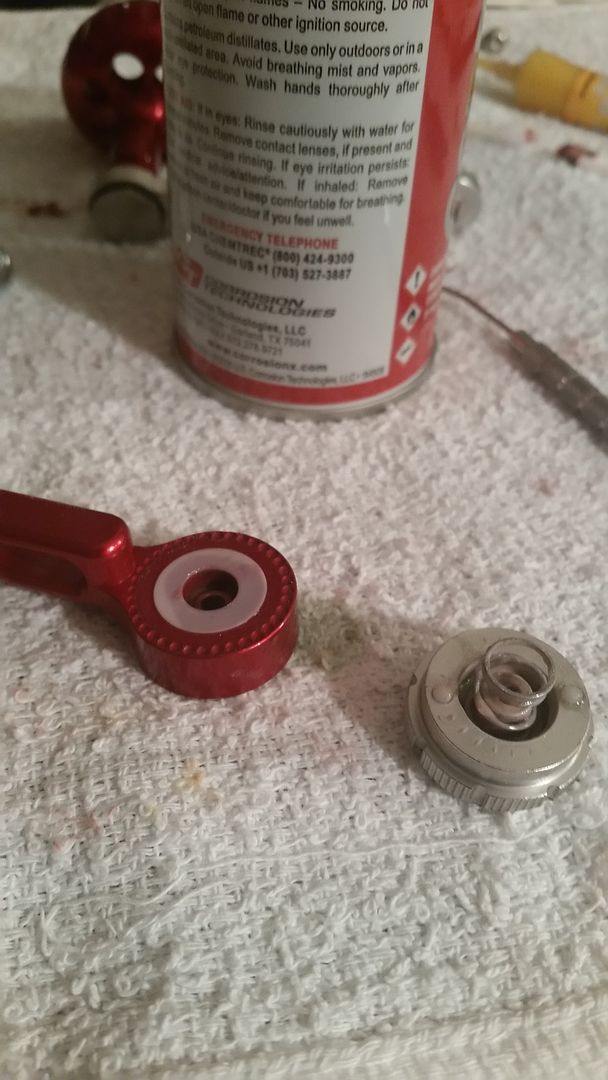
Next, flip the right side plate over and apply a small amount of grease to the white Teflon lever drag washer.
 (http://s215.photobucket.com/user/Lumberjack93/media/Release%20SG%20Takedown/49.jpg.html)
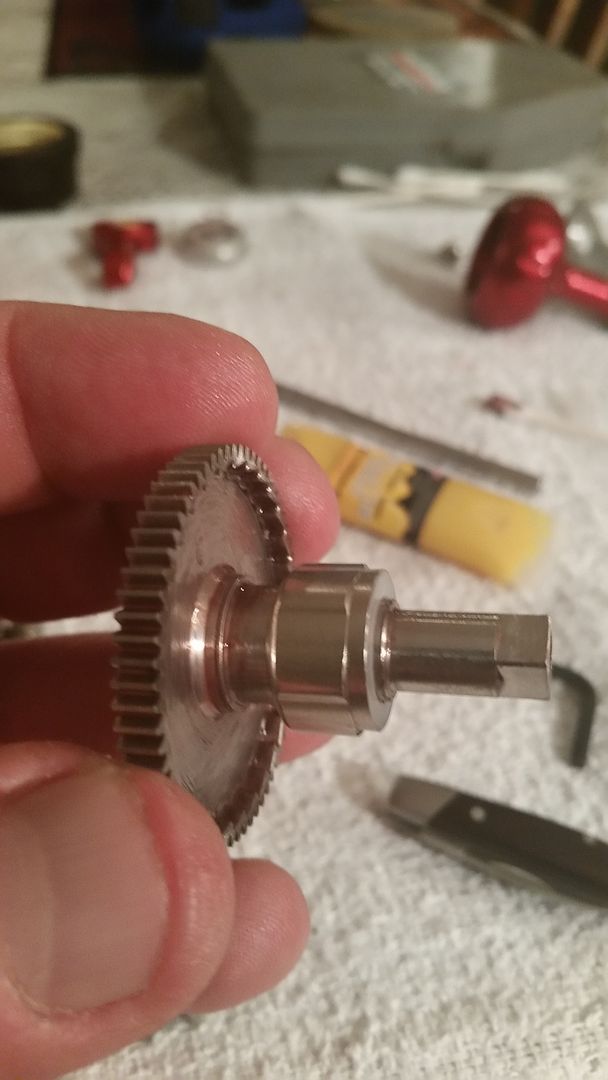
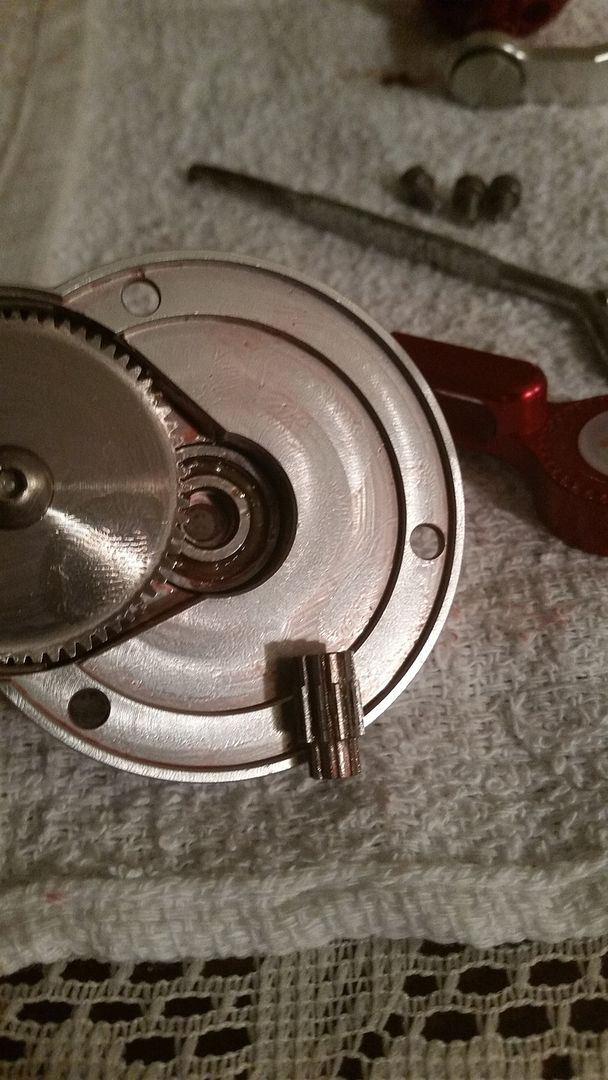
And, here is the pinion gear. You can install it by putting the large side in first.
 (http://s215.photobucket.com/user/Lumberjack93/media/Release%20SG%20Takedown/50.jpg.html)
Or, you can insert the small side of the pinion gear into the drag plate assembly. I found it easier to put the small side in the drag plate assembly first.
 (http://s215.photobucket.com/user/Lumberjack93/media/Release%20SG%20Takedown/51.jpg.html)
Now, take your 3 right side plate screws and attach the right side plate to the frame / spool assembly.
(http://s215.photobucket.com/user/Lumberjack93/media/Release%20SG%20Takedown/14.jpg.html)
Next, let's grease the lever drag arm, spring and knob.
 (http://s215.photobucket.com/user/Lumberjack93/media/Release%20SG%20Takedown/52.jpg.html)
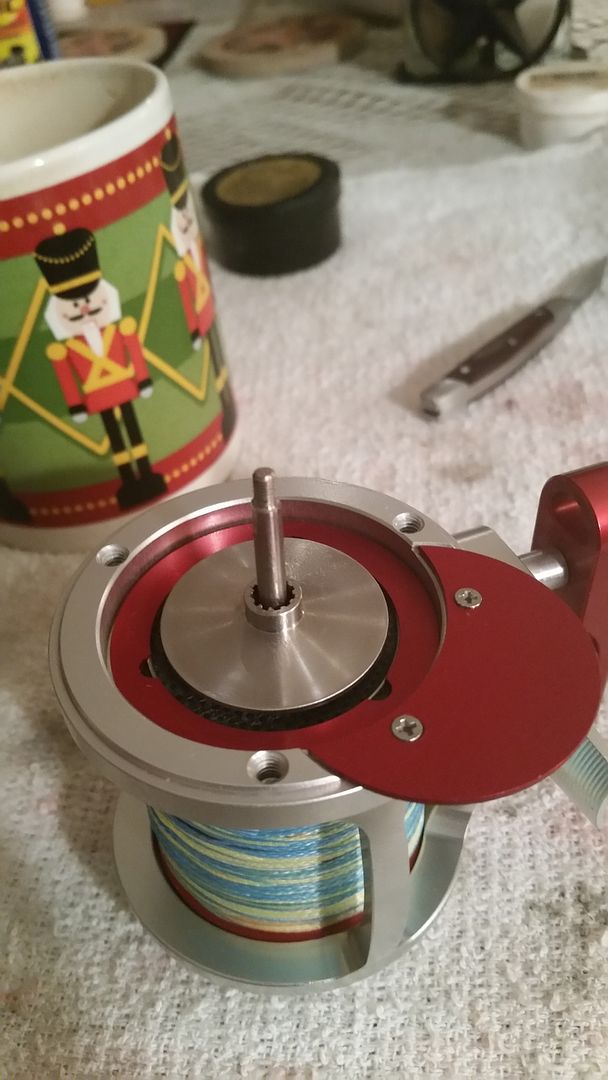
Reinstall it in the orientation show.
 (http://s215.photobucket.com/user/Lumberjack93/media/Release%20SG%20Takedown/53.jpg.html)
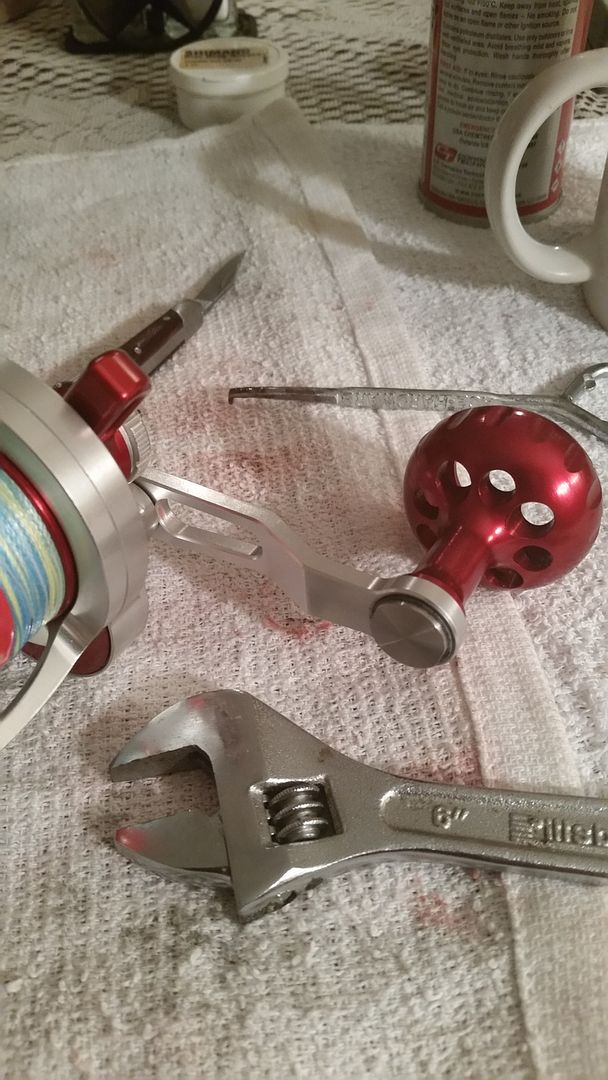
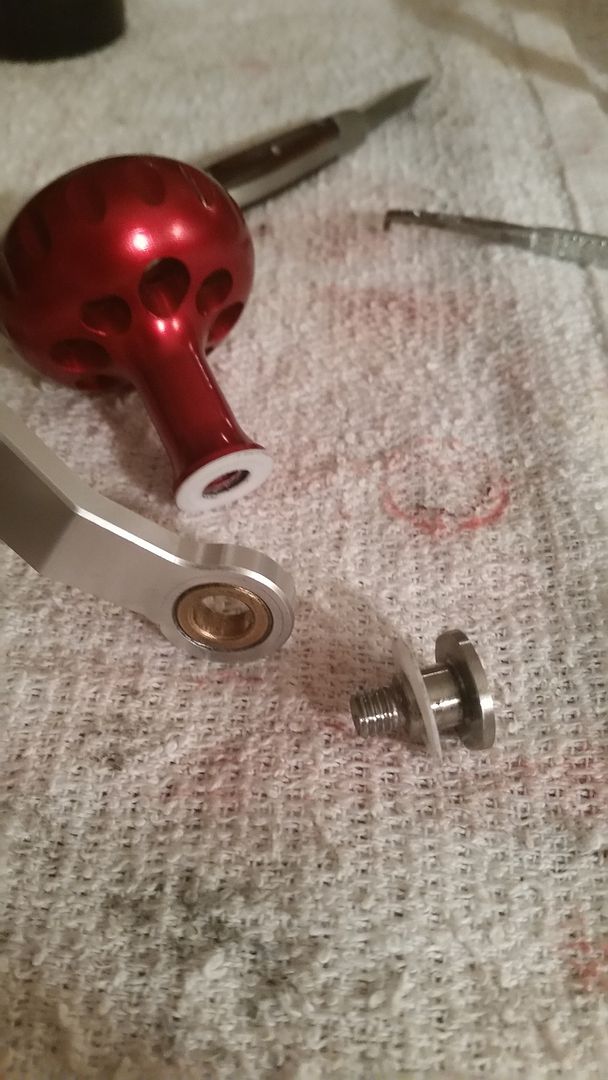
Now, let's take a look at the handle knob. It can be removed with a small crescent wrench.
 (http://s215.photobucket.com/user/Lumberjack93/media/Release%20SG%20Takedown/54.jpg.html)
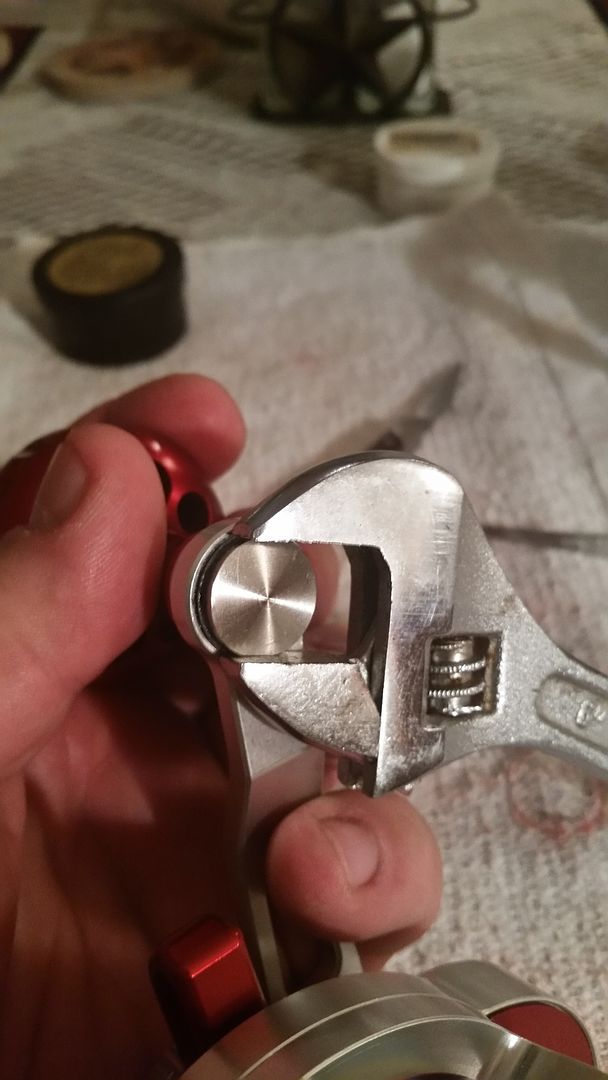
Place the wrench on the knob screw, hold it firmly and turn the knob counter clockwise.
 (http://s215.photobucket.com/user/Lumberjack93/media/Release%20SG%20Takedown/55.jpg.html)
And here it is.
 (http://s215.photobucket.com/user/Lumberjack93/media/Release%20SG%20Takedown/56.jpg.html)
Notice, there are 2 thin teflon washers that rest against the handle knob. The thin one goes directly against the the knob
while the thicker one goes against the handle arm. There is also a thick teflon washer that rests against the screw head.
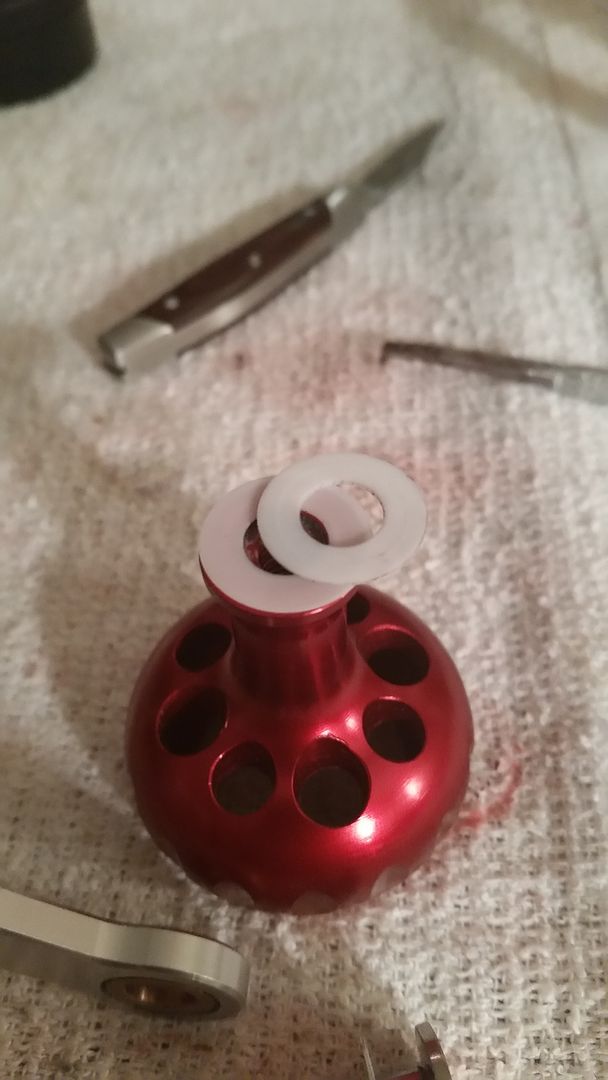 (http://s215.photobucket.com/user/Lumberjack93/media/Release%20SG%20Takedown/57.jpg.html)
Grease this assembly and reinstall it just like you took it apart.
I hope you have found this tutorial helpful.
Lumberjack93
Mike
So, you'll first want to start with these simple tools. If memory serves, the Hex Key is size 3 metric. Also, the bearing puller is very helpful. I made mine from a paint can opener. Also, the tweezers are very helpful for the dog spring.
(http://s215.photobucket.com/user/Lumberjack93/media/Release%20SG%20Takedown/10.jpg.html)So, here is the Release (Now Truth) SG in all of it's glory.
(http://s215.photobucket.com/user/Lumberjack93/media/Release%20SG%20Takedown/11.jpg.html)Let's remove that handle with the size 3 Metric Hex Key.
(http://s215.photobucket.com/user/Lumberjack93/media/Release%20SG%20Takedown/12.jpg.html)After that, let's remove the Lever Drag knob and arm by turning the Lever Drag knob counter clockwise. Remove and set aside.
(http://s215.photobucket.com/user/Lumberjack93/media/Release%20SG%20Takedown/13.jpg.html)Now, we can remove the 3 right side screws and remove the right side plate from the frame and spool
(http://s215.photobucket.com/user/Lumberjack93/media/Release%20SG%20Takedown/14.jpg.html)Next, let's remove the pinion gear, drag plate and bearing from the spool. I un-shielded the bearings on this reel and in the picture you can see the bearing shields and retainers. *** Also, make note of that little white apparatus. I'll get back to that later. ***
(http://s215.photobucket.com/user/Lumberjack93/media/Release%20SG%20Takedown/15.jpg.html)Here is a picture of the main shaft and the order in which the parts came off. Notice again that little white bearing cap.
(http://s215.photobucket.com/user/Lumberjack93/media/Release%20SG%20Takedown/16.jpg.html)Here is a picture of the main shaft and the right and left side shaft bearings. Notice that there are no belleville washers. Grease or oil your bearings at this point and set aside.
(http://s215.photobucket.com/user/Lumberjack93/media/Release%20SG%20Takedown/17.jpg.html)Now, lets remove that carbon fiber drag washer by removing the drag washer retaining spring. (Half moon clip)
(http://s215.photobucket.com/user/Lumberjack93/media/Release%20SG%20Takedown/18.jpg.html)And, lets apply a little Cal's Drag Grease here. I rub it in and then wipe with a shop rag.
(http://s215.photobucket.com/user/Lumberjack93/media/Release%20SG%20Takedown/19.jpg.html)Now, here is the left side click gear and retaining spring. I removed this to give it a look.
(http://s215.photobucket.com/user/Lumberjack93/media/Release%20SG%20Takedown/20.jpg.html)Truth Reels really had this reel well greased from the factory.
(http://s215.photobucket.com/user/Lumberjack93/media/Release%20SG%20Takedown/21.jpg.html)So, let's put that click gear back on and now insert the left side bearing.
(http://s215.photobucket.com/user/Lumberjack93/media/Release%20SG%20Takedown/22.jpg.html)Here is the spool with the main shaft inserted.
(http://s215.photobucket.com/user/Lumberjack93/media/Release%20SG%20Takedown/23.jpg.html)Now, let's get that right side bearing and spring back on the main shaft.
(http://s215.photobucket.com/user/Lumberjack93/media/Release%20SG%20Takedown/24.jpg.html)Here is another view.
(http://s215.photobucket.com/user/Lumberjack93/media/Release%20SG%20Takedown/25.jpg.html)Now, let's get back to that "White Apparatus" I was talking about. It's a bearing guard of some sort. Put your bearing
back in the drag plate and then put the long side of the white bearing guard back in the bearing.
(http://s215.photobucket.com/user/Lumberjack93/media/Release%20SG%20Takedown/26.jpg.html)Here it is inserted back into the bearing. Note the short side goes on the outside of the bearing.
(http://s215.photobucket.com/user/Lumberjack93/media/Release%20SG%20Takedown/27.jpg.html)Now, let's put the drag plate back on the main shaft, against the drag washer.
(http://s215.photobucket.com/user/Lumberjack93/media/Release%20SG%20Takedown/28.jpg.html)Don't forget to grease the left side plate and clicker springs.
(http://s215.photobucket.com/user/Lumberjack93/media/Release%20SG%20Takedown/29.jpg.html)Here is a shot with the spool and drag plate installed.
(http://s215.photobucket.com/user/Lumberjack93/media/Release%20SG%20Takedown/30.jpg.html)Now, let's get that main gear out by again using our Size 3 Metric Hex Key.
(http://s215.photobucket.com/user/Lumberjack93/media/Release%20SG%20Takedown/31.jpg.html)You'll need to temporarily put the handle back on for this step.
(http://s215.photobucket.com/user/Lumberjack93/media/Release%20SG%20Takedown/32.jpg.html)After the screw is out, you'll need to remove the half moon spring clip.
(http://s215.photobucket.com/user/Lumberjack93/media/Release%20SG%20Takedown/33.jpg.html)Then, the main gear, main gear bearing and dog will come out. Now is also the time to remove the anti reverse bearing. This
is where a bearing puller is very helpful. Go around the bottom of the anti reverse bearing in a clock wise rotation, lifting up with your bearing puller in the 12 o'clock, 4 o'clock and 8 o'clock positions. Keep going around, lifting up with steady pressure. The bearing will eventually come out.
(http://s215.photobucket.com/user/Lumberjack93/media/Release%20SG%20Takedown/34.jpg.html)In the shot below, I have removed the anti reverse bearing, cleaned it and put it back on the shaft for testing.
Works like a charm. The shaft will only turn in one direction.
(http://s215.photobucket.com/user/Lumberjack93/media/Release%20SG%20Takedown/35.jpg.html)Here is a shot of the main gear and the 2 ball bearings and 1 anti reverse bearing that are associated with it.
(http://s215.photobucket.com/user/Lumberjack93/media/Release%20SG%20Takedown/36.jpg.html)Now, let's remove that right side shaft bearing and grease it.
(http://s215.photobucket.com/user/Lumberjack93/media/Release%20SG%20Takedown/37.jpg.html)Here is a shot of the completely taken down right side plate.
(http://s215.photobucket.com/user/Lumberjack93/media/Release%20SG%20Takedown/38.jpg.html)Next, let's put the right side shaft bearing back in. It should be greased at this point.
(http://s215.photobucket.com/user/Lumberjack93/media/Release%20SG%20Takedown/39.jpg.html)Then, we're going to put the cleaned anti reverse bearing back in. It should be cleaned and lightly oiled, along with the
main gear shaft. Too much grease on an anti reverse bearing will make it slip.
(http://s215.photobucket.com/user/Lumberjack93/media/Release%20SG%20Takedown/40.jpg.html)Now, lets put the large main gear bearing back in.
(http://s215.photobucket.com/user/Lumberjack93/media/Release%20SG%20Takedown/41.jpg.html)Next, flip the right side plate over and install the smaller main gear bearing.
(http://s215.photobucket.com/user/Lumberjack93/media/Release%20SG%20Takedown/42.jpg.html)Now, it's time for the Dog. Here is a shot of the back side of the dog and the dog spring. Notice the 90 degree angle
on the dog spring?
(http://s215.photobucket.com/user/Lumberjack93/media/Release%20SG%20Takedown/43.jpg.html)Here is a shot of the dog and the dog spring prior to installing the spring. Notice the very small hole on the dog?
This is where the 90 bend on the dog spring will go.
(http://s215.photobucket.com/user/Lumberjack93/media/Release%20SG%20Takedown/44.jpg.html)Here is a shot of a properly installed dog spring.
(http://s215.photobucket.com/user/Lumberjack93/media/Release%20SG%20Takedown/45.jpg.html)Now, let's install the dog and spring exactly per the shot below.
(http://s215.photobucket.com/user/Lumberjack93/media/Release%20SG%20Takedown/46.jpg.html)Now, we can install the main gear.
(http://s215.photobucket.com/user/Lumberjack93/media/Release%20SG%20Takedown/47.jpg.html)And, now, we can install the main gear screw with the #3 Hex Key. Don't forget to install the half moon spring
at this point.
(http://s215.photobucket.com/user/Lumberjack93/media/Release%20SG%20Takedown/48.jpg.html)Next, flip the right side plate over and apply a small amount of grease to the white Teflon lever drag washer.
(http://s215.photobucket.com/user/Lumberjack93/media/Release%20SG%20Takedown/49.jpg.html)And, here is the pinion gear. You can install it by putting the large side in first.
(http://s215.photobucket.com/user/Lumberjack93/media/Release%20SG%20Takedown/50.jpg.html)Or, you can insert the small side of the pinion gear into the drag plate assembly. I found it easier to put the small side in the drag plate assembly first.
(http://s215.photobucket.com/user/Lumberjack93/media/Release%20SG%20Takedown/51.jpg.html)Now, take your 3 right side plate screws and attach the right side plate to the frame / spool assembly.
(http://s215.photobucket.com/user/Lumberjack93/media/Release%20SG%20Takedown/14.jpg.html)Next, let's grease the lever drag arm, spring and knob.
(http://s215.photobucket.com/user/Lumberjack93/media/Release%20SG%20Takedown/52.jpg.html)Reinstall it in the orientation show.
(http://s215.photobucket.com/user/Lumberjack93/media/Release%20SG%20Takedown/53.jpg.html)Now, let's take a look at the handle knob. It can be removed with a small crescent wrench.
(http://s215.photobucket.com/user/Lumberjack93/media/Release%20SG%20Takedown/54.jpg.html)Place the wrench on the knob screw, hold it firmly and turn the knob counter clockwise.
(http://s215.photobucket.com/user/Lumberjack93/media/Release%20SG%20Takedown/55.jpg.html)And here it is.
(http://s215.photobucket.com/user/Lumberjack93/media/Release%20SG%20Takedown/56.jpg.html)Notice, there are 2 thin teflon washers that rest against the handle knob. The thin one goes directly against the the knob
while the thicker one goes against the handle arm. There is also a thick teflon washer that rests against the screw head.
(http://s215.photobucket.com/user/Lumberjack93/media/Release%20SG%20Takedown/57.jpg.html)Grease this assembly and reinstall it just like you took it apart.
I hope you have found this tutorial helpful.
Lumberjack93
Mike
Title: Re: Truth (Release) SG Tutorial by Lumberjack93
Post by: Lumberjack93 on February 21, 2016, 05:43:15 AM
Post by: Lumberjack93 on February 21, 2016, 05:43:15 AM
I really like this reel. Mine runs like a Rolex watch and is very light. It also holds exactly 333 yards (1000 feet) of power pro depth hunter 50lb test braided line. With the light rod I have this mounted on, it is only slightly heavier that a bass rod & reel combo.
The one thing I would do if I were Truth reels is add a ball bearing to the handle. I would have gladly spent $10.00 more for this feature.
Other than that, I have no criticisms of this little power house.
I hope to have a report after I go fishing in the near future. If the fishing and weather gods are good to me, I'll have picks of some blackfin tuna that were taken on this reel.
Mike
Title: Re: Truth (Release) SG Tutorial by Lumberjack93
Post by: alantani on February 21, 2016, 05:58:44 AM
Post by: alantani on February 21, 2016, 05:58:44 AM
to things. one, what's the drag range? two, send me a pm with your address. i have something to mail to you. thanks! alan
Title: Re: Truth (Release) SG Tutorial by Lumberjack93
Post by: Jeri on February 21, 2016, 02:20:35 PM
Post by: Jeri on February 21, 2016, 02:20:35 PM
Hi All,
Can only answer one of Alan's questions SG = 30lb drag.
Great tutorial!
Why can't all reels be made this simply, and they work like a charm. Pulled some very big sharks through the surf with mine, and the cast like a bullet - possibly faster than a comparable Avet.
Cheers from sunny Africa.
Jeri
Can only answer one of Alan's questions SG = 30lb drag.
Great tutorial!
Why can't all reels be made this simply, and they work like a charm. Pulled some very big sharks through the surf with mine, and the cast like a bullet - possibly faster than a comparable Avet.
Cheers from sunny Africa.
Jeri
Title: Re: Truth (Release) SG Tutorial by Lumberjack93
Post by: DaBigOno on February 21, 2016, 02:49:18 PM
Post by: DaBigOno on February 21, 2016, 02:49:18 PM
Very nicely done Mike,
clear and easy to follow with excellent pics.. I gotta get me a paint can opener :)
clear and easy to follow with excellent pics.. I gotta get me a paint can opener :)
Title: Re: Truth (Release) SG Tutorial by Lumberjack93
Post by: Alto Mare on February 21, 2016, 04:12:50 PM
Post by: Alto Mare on February 21, 2016, 04:12:50 PM
Very nice tutorial Mike.
I like what they did with the spring on the dog, very clever idea. I'm not crazy about the ( 3 ) ear tabs on the carbon fiber washer though, but if they believe 30# wouldn't effect those, I guess it's ok.
I'm trying to figure out why they would use a nut on that handle knob that doesn't accept any tools Undecided, I see you got it off, but it should be easier.
al
Title: Re: Truth (Release) SG Tutorial by Lumberjack93
Post by: Lumberjack93 on February 21, 2016, 04:26:04 PM
Post by: Lumberjack93 on February 21, 2016, 04:26:04 PM
Quote from: Alto Mare on February 21, 2016, 04:12:50 PM
Very nice tutorial Mike.
I like what they did with the spring on the dog, very clever idea. I'm not crazy about the ( 3 ) ear tabs on the carbon fiber washer though, but if they believe 30# wouldn't effect those, I guess it's ok.
I'm trying to figure out why they would use a nut on that handle knob that doesn't accept any tools Undecided, I see you got it off, but it should be easier.
al
Sal, I totally agree with you. I have only put 22 lbs of drag on this reel. I don't intend to ever fish it past that. I don't want to blow out a right side bearing. I do know that their bearings are made by Boca Bearings and are abec 5 stainless steel. Very high quality, but again, I won't run mine at 30 lbs of drag. I also un-shielded all of the bearings on this reel.
The knob on the handle could use a bearing in my opinion. I stated earlier that I wouldn't mind paying a little more for that part of the reel to be shored up. And yes, it is a pain to get that knob off. I'm sure that like any product, refinements will come with each new model.
Mike
Title: Re: Truth (Release) SG Tutorial by Lumberjack93
Post by: Lumberjack93 on February 21, 2016, 04:33:37 PM
Post by: Lumberjack93 on February 21, 2016, 04:33:37 PM
Quote from: alantani on February 21, 2016, 05:58:44 AM
to things. one, what's the drag range? two, send me a pm with your address. i have something to mail to you. thanks! alan
Alan, the most I've ran it up to is 22 lbs of drag on my shimano drag scale. I'm sure I could get more, but that is the max I intend to fish the reel. In truth, I'll probably only fish it up to 20 lbs.
Plus, I'm a fan of the "only run your drag up to 33% of the line rating". On 50lb line that would be 16.5 lbs of drag. While 22 is going over that limit, it's not hard fast rule, only a guideline ;D
Mike
Title: Re: Truth (Release) SG Tutorial by Lumberjack93
Post by: Lumberjack93 on February 21, 2016, 06:05:41 PM
Post by: Lumberjack93 on February 21, 2016, 06:05:41 PM
Quote from: DaBigOno on February 21, 2016, 02:49:18 PM
Very nicely done Mike,
clear and easy to follow with excellent pics.. I gotta get me a paint can opener :)
I'd like to take credit for coming up with that idea, but I can't. I saw that in a post on this forum a long time back.
Great tool to have though if you intend to service reels. Especially anti reverse bearings. They can be tough to get out.
Mike
Title: Re: Truth (Release) SG Tutorial by Lumberjack93
Post by: Robbr on May 10, 2016, 11:06:20 PM
Post by: Robbr on May 10, 2016, 11:06:20 PM
Does anyone have working knowledge on how the LG performs in bottom fishing scenarios? I'm in Ft Lauderdale and mostly fish bottom from 80'-200' for Muttons and Grouper. Also, I'm fishing 3 3 day trips in Late June, Labor Day and late October. Two of the three are Yankee Captain trips and the deepest will be in the 350-450' range. On a side note, I'm currently fishing the new Torium 30, a old Gold faced 50 Trinidad and a 113HLW as a back up. Your imput is greatly appreciated.
Title: Re: Truth (Release) SG Tutorial by Lumberjack93
Post by: Bill B on May 17, 2016, 04:56:37 AM
Post by: Bill B on May 17, 2016, 04:56:37 AM
Mike great tutorial....I dont have one of those reels yet, but I could tear it down no problem now.....Bill
Title: Re: Truth (Release) SG Tutorial by Lumberjack93
Post by: pwall1988 on August 12, 2016, 12:12:28 PM
Post by: pwall1988 on August 12, 2016, 12:12:28 PM
Great Break down and Pictures to go with it!!! Kudos!!!
Title: Re: Truth (Release) SG Tutorial by Lumberjack93
Post by: handi2 on April 29, 2017, 10:15:16 PM
Post by: handi2 on April 29, 2017, 10:15:16 PM
I just finished a few of the Release SG reels and they both had double stacked anti reverse bearings plus the anti reverse dog. It also looked like the spool bearings were smaller than the ones in your post.
They were 5x11x5 and 5x14x5. The right side pinion bearing is 7x19x5.
I also found no need to remove the main gear from its shaft.
Both reels had ruined pinion gears and spool bearings.
They were 5x11x5 and 5x14x5. The right side pinion bearing is 7x19x5.
I also found no need to remove the main gear from its shaft.
Both reels had ruined pinion gears and spool bearings.
Title: Re: Truth (Release) SG Tutorial by Lumberjack93
Post by: Goby on August 10, 2017, 06:25:56 AM
Post by: Goby on August 10, 2017, 06:25:56 AM
Hi new to this forum,
First off, Great tutorial mate, but would be better if I could see the pictures. Pretty much computer illiterate apart from programs I used for work!
I have a couple of questions of you guys.
I have two lefty SGs and about a year ago started having problems with the drag, one reel far worse than the other. During fishing the drag will suddenly tighten (very occasionally loosen). Both reels are spoiled with PE4 and the drags set at 10lb direct pull or about 13 through the rod. Any ideas? I have had no reply from Seigler or Justin the site moderator, or another forum and as I live in Australia don't really want to send them back to the States.
Second question. As I like to fish lefties for jigging, lures and soft plastics (am right handed and completely uncoordinated when it comes working jigs etc with right hand retrieve reels) my reel choice is limited. Am looking for a small reel, if the drag issue is easily fixed and not common any thoughts on the SGN? Other reel I'm considering is a Maxel Hybrid 20. As I have just moved to Augusta, Western Australia, where the Southern and Indian oceans meet (big swells and seas) most of my fishing is in relatively sheltered and shallow waters (3-20 metres), but we still get big YTK and their relative the Samson fish. So want a reel with a good drag that can work jigs, metals and plastics and, if possible, but not necessary, cast six inch pilchards.
Thanks in anticipation,
Howard
Title: Re: Truth (Release) SG Tutorial by Lumberjack93
Post by: Bryan Young on August 10, 2017, 01:50:58 PM
Post by: Bryan Young on August 10, 2017, 01:50:58 PM
Hi Howard,
Very interesting. I have not heard of the drag tightening before. When the drag tightens is it constant or spotty like you have an uneven drag pressure?
Bryan
Very interesting. I have not heard of the drag tightening before. When the drag tightens is it constant or spotty like you have an uneven drag pressure?
Bryan
Title: Re: Truth (Release) SG Tutorial by Lumberjack93
Post by: Goby on August 10, 2017, 02:42:10 PM
Post by: Goby on August 10, 2017, 02:42:10 PM
Thanks for the reply Bryan. Once it goes higher, it effectively locks up and it's constant, when it occasionally backs off it's almost freespool. Back the drag off move the preset back and forward a couple of clicks and back to where it was and everything's back to normal. The better of the two just seems to go a bit heavier, and that may just may be my paranoia! I really like the reels and apart from this would be buying a SGN (as I believe it has a thinner reel seat and would be perfect for a PE1-3 jig rod I have), but now considering the Maxel Hybrid 20.
Kind regards,
Howard
Kind regards,
Howard
Title: Re: Truth (Release) SG Tutorial by Lumberjack93
Post by: Goby on August 16, 2017, 03:10:41 PM
Post by: Goby on August 16, 2017, 03:10:41 PM
Played with one of the reels today and noticed that when the drag was increased the preset knob moved up a few clicks and went down when backing lever back to freespool. Never noticed this on any of my other lever drags. Anyone know if this is normal for Release/Truth/Seigler. Could it be that over a days jigging in shallow water with the the drag being constantly changed from on to off to on many many times that it sometimes doesn't go back to the original setting and increases over the day? Any ideas?
Cheers,
Howard
Cheers,
Howard
Title: Re: Truth (Release) SG Tutorial by Lumberjack93
Post by: nik33134 on September 30, 2017, 06:32:14 PM
Post by: nik33134 on September 30, 2017, 06:32:14 PM
Hi Howard, I answered regarding your problem on the other thread. Shame about the photos on this tutorial, I can no longer view them.
Title: Re: Truth (Release) SG Tutorial by Lumberjack93
Post by: alantani on September 30, 2017, 06:39:42 PM
Post by: alantani on September 30, 2017, 06:39:42 PM
Quote from: nik33134 on September 30, 2017, 06:32:14 PM
Hi Howard, I answered regarding your problem on the other thread. Shame about the photos on this tutorial, I can no longer view them.
you need the plug in! http://alantani.com/index.php?topic=22861.0
Title: Re: Truth (Release) SG Tutorial by Lumberjack93
Post by: Lumberjack93 on March 29, 2018, 05:22:56 PM
Post by: Lumberjack93 on March 29, 2018, 05:22:56 PM
Alan, I installed the plugin. Can everyone see the images now?
I can.
Hope this helps.
Lumberjack93
I can.
Hope this helps.
Lumberjack93
Title: Re: Truth (Release) SG Tutorial by Lumberjack93
Post by: Lumberjack93 on March 29, 2018, 05:25:24 PM
Post by: Lumberjack93 on March 29, 2018, 05:25:24 PM
Quote from: alantani on September 30, 2017, 06:39:42 PMQuote from: nik33134 on September 30, 2017, 06:32:14 PM
Hi Howard, I answered regarding your problem on the other thread. Shame about the photos on this tutorial, I can no longer view them.
you need the plug in! http://alantani.com/index.php?topic=22861.0
Howard, can you see them now? I installed the plugin.
I plan to move the pics to Flickr. Anyone know if they have issues with 3rd party hosting?
Lumberjack93
Title: Re: Truth (Release) SG Tutorial by Lumberjack93
Post by: oc1 on March 29, 2018, 07:25:01 PM
Post by: oc1 on March 29, 2018, 07:25:01 PM
Installing the plug-in lets you see blocked photos. It does not let other people see blocked photos unless they have installed the plug-in too.
I think the same thing could happen with any of the third party photo sharing sites. To maintain complete control put them on your own web site with a link here. When you loose interest or kick the bucket and abandon the wed site they become permanently inaccessible. Or, put them in the Alan Tani dot com gallery where they will be available for as long as this forum is active. Perhaps nothing is permanent.
-steve
Title: Re: Truth (Release) SG Tutorial by Lumberjack93
Post by: swill88 on March 29, 2018, 11:41:25 PM
Post by: swill88 on March 29, 2018, 11:41:25 PM
Quote from: oc1 on March 29, 2018, 07:25:01 PM
Or, put them in the Alan Tani dot com gallery where they will be available for as long as this forum is active. Perhaps nothing is permanent.
-steve
-steve, -steve, -steve! you're breaking my heart!
steve