Title: Tutorial: Garcia Mitchell 3-0-0 Spinning Reel Service
Post by: treidm on March 13, 2012, 03:06:56 AM
Post by: treidm on March 13, 2012, 03:06:56 AM
Tutorial: Garcia Mitchell 3-0-0 Spinning Reel Service
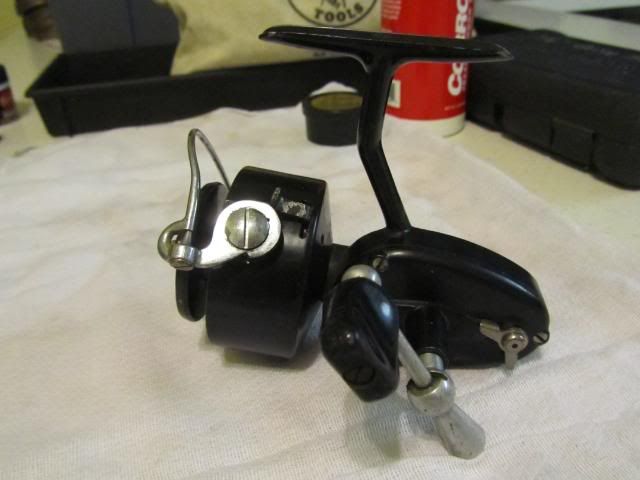
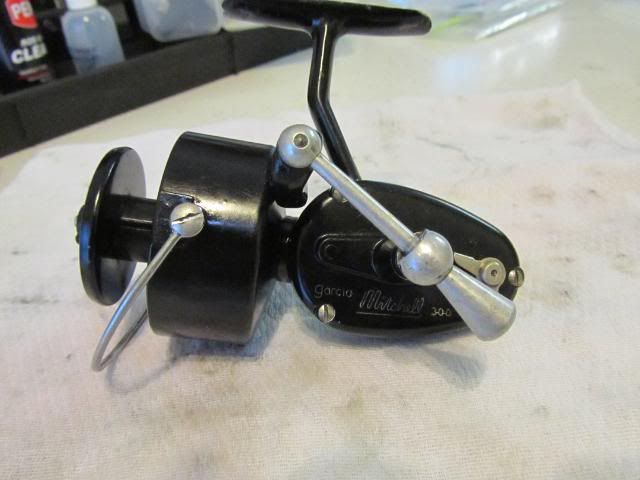
1958 Garcia Mitchell 3-0-0 (Version 6)
Bail is very stiff and sticky
Handle turn is stiff and sounds very noisy, whirring and some grinding
Finish is really not too bad with normal looking rubs around foot, back and bottom (Chip on front of foot)
Cover screws are mildly boogered, but not too bad
Serial number: 21xx752
I will use the following:
Flat Tip Screwdrivers
12mm Mitchell Wrench
Corrosion X
Aluminum Complex NLGI #2 Marine Grease
Cal's Teflon Drag Grease
Penn Reel Cleaner
3 in 1 Oil
"The first step which is skipped in tutorial for all screws is to first apply 3 in 1 oil, tap & let set before attempting to loosen"
(Part numbers will be in parenthesis)
Schematic used
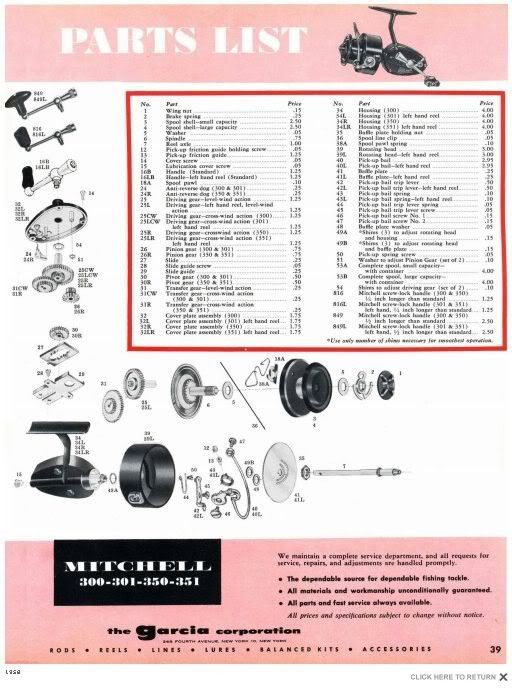
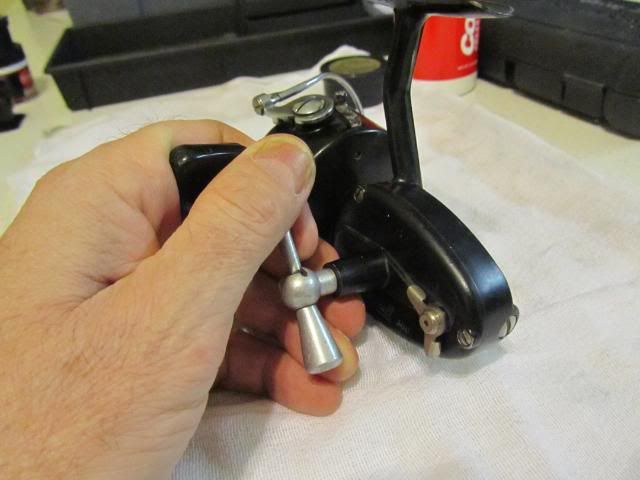
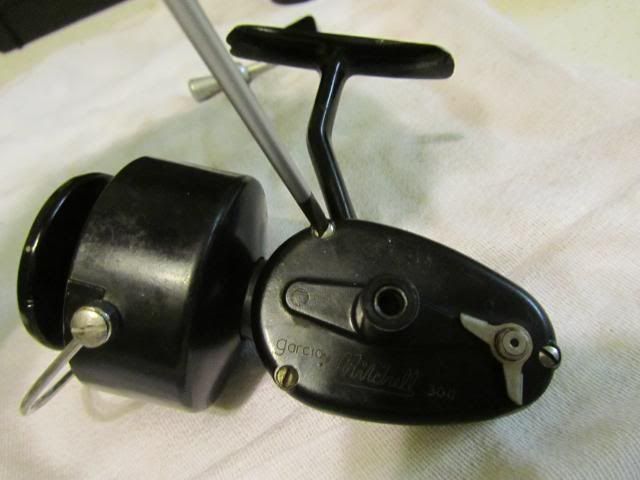
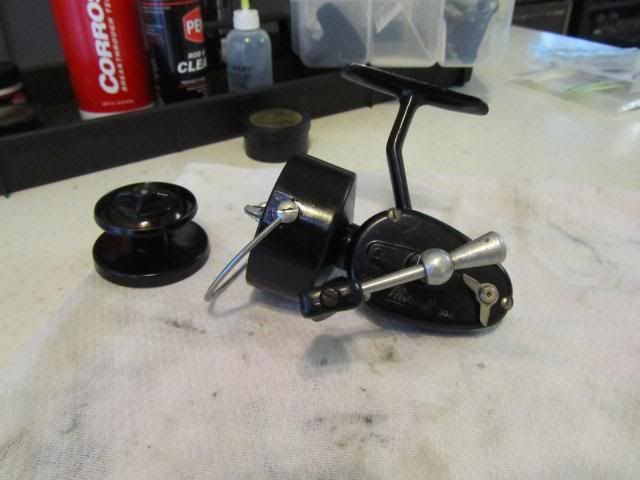
And here is the Reel....
Remove the handle (16B) by unscrewing it (note it is reverse threaded)
And remove screw holding handle on the shaft/arm

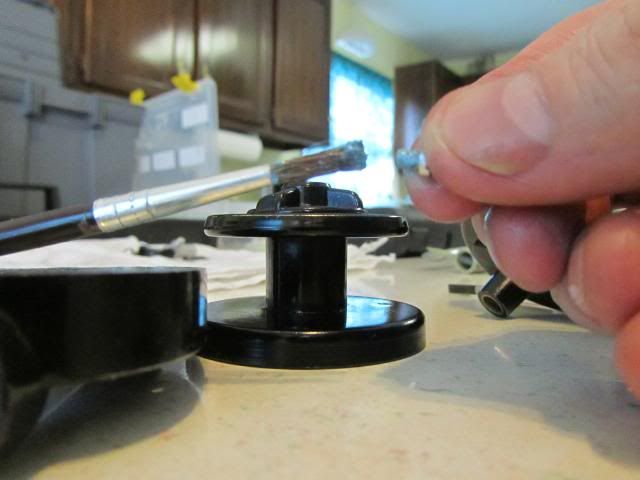
Push release button on spool, remove and set aside

Remove the three cover screws (14)
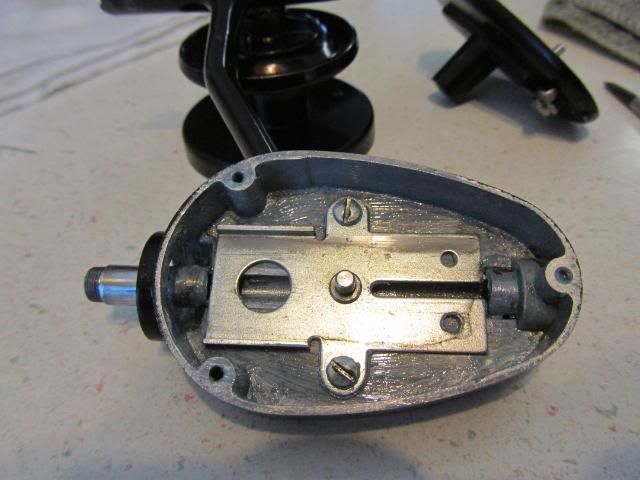
Open the reel like a book (This way parts won't tend to fall out)
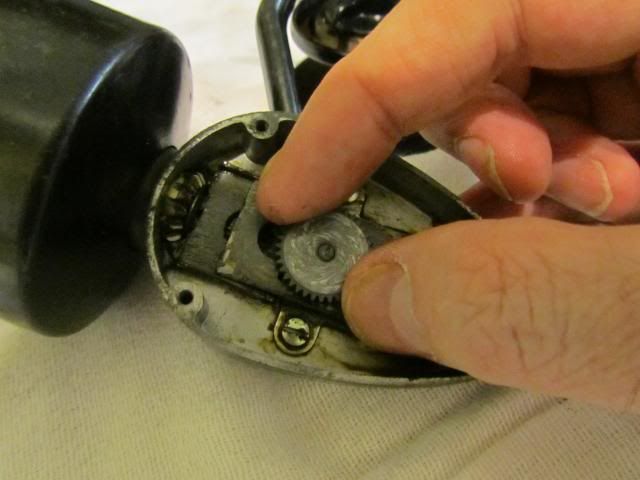
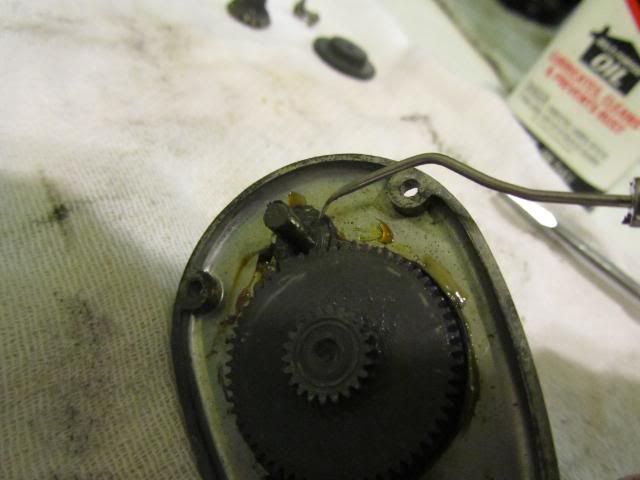
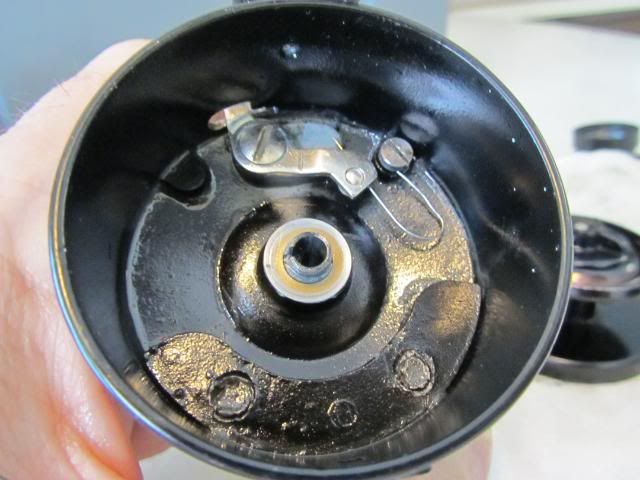
Here's what we have inside

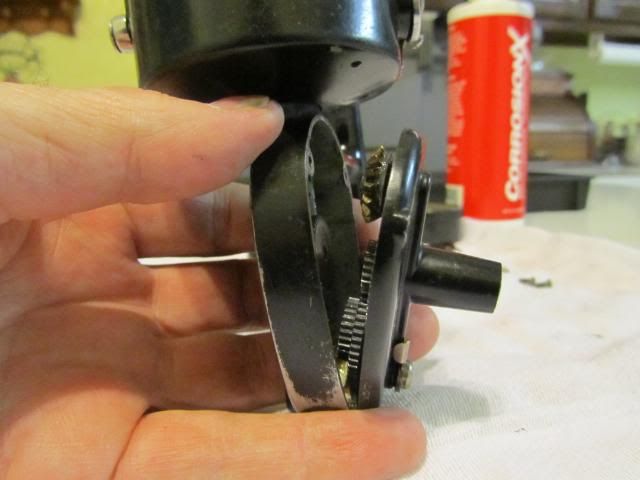
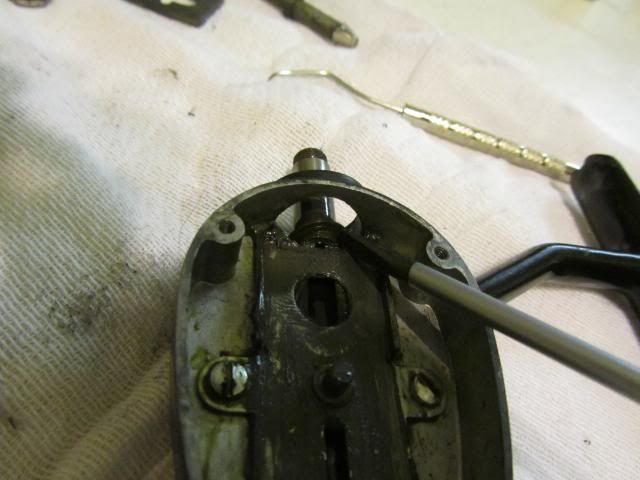
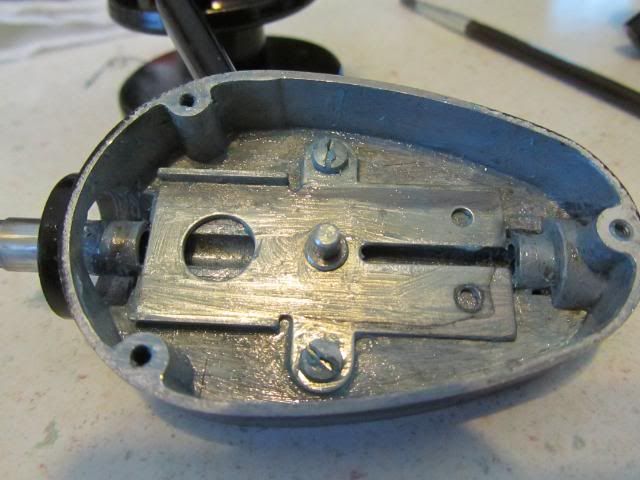
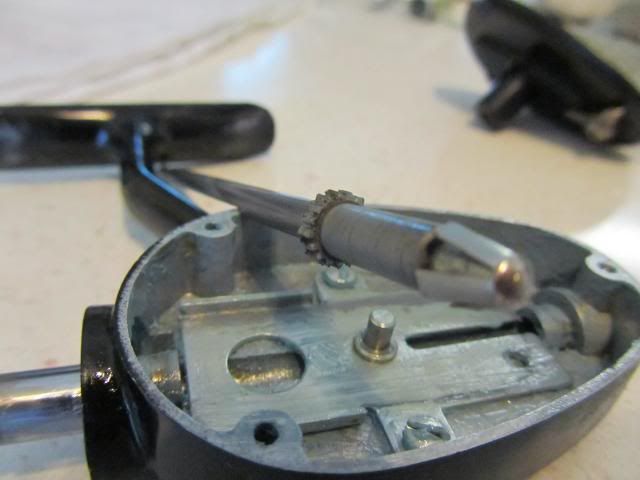
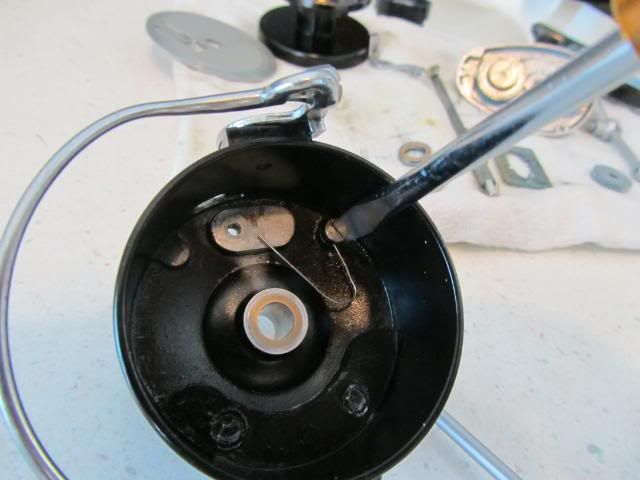
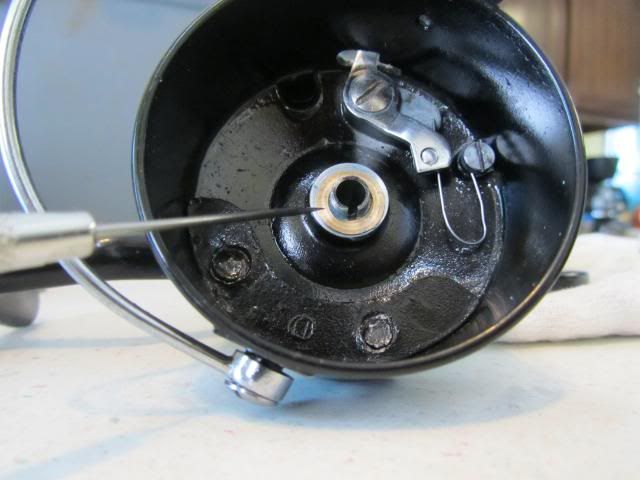
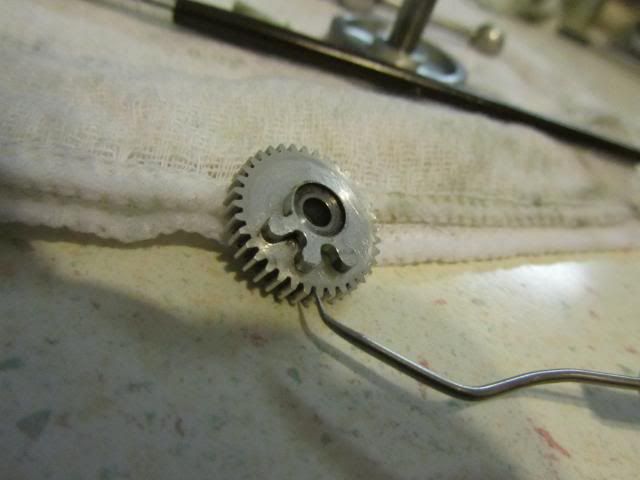
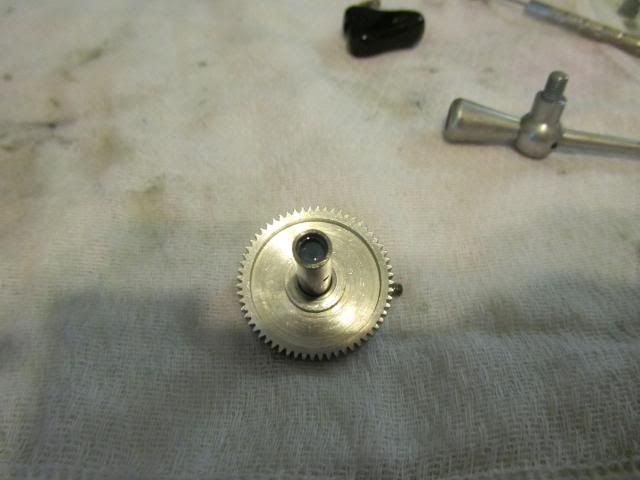
Remove the pivot gear (30)
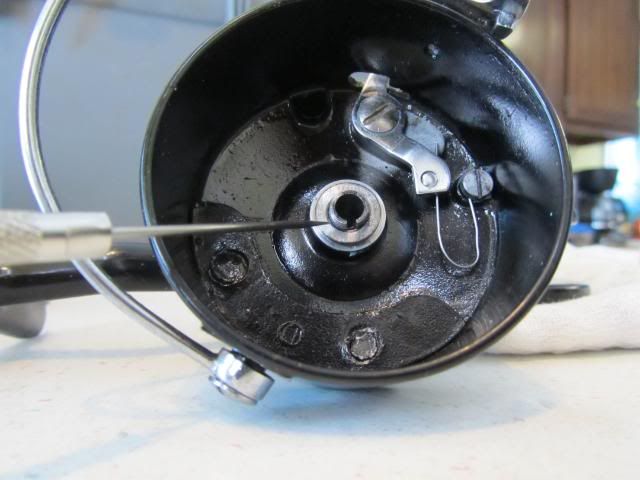
Gently pry up and remove the slide (27)
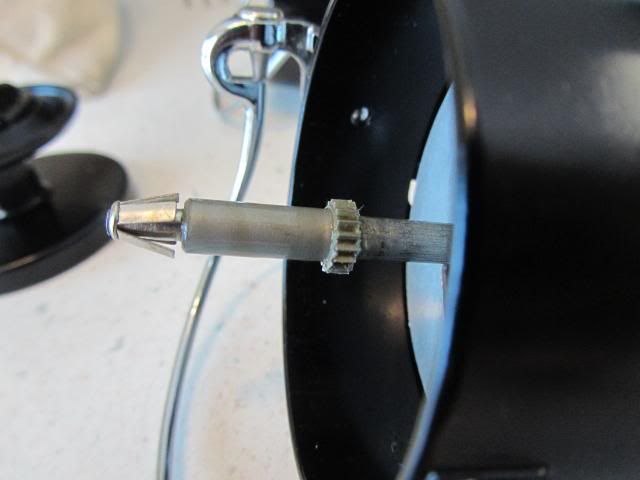
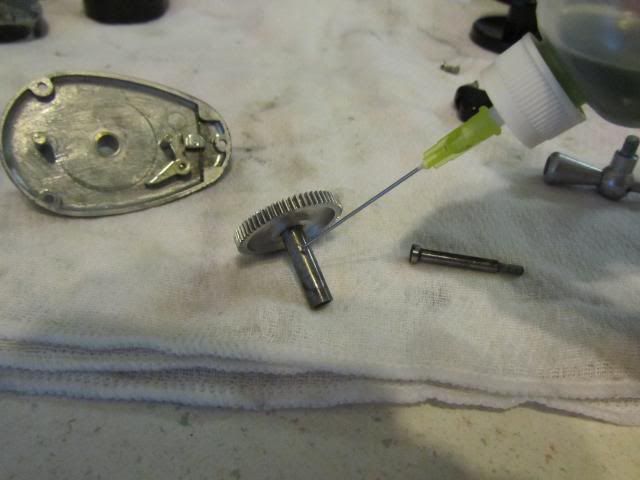
Now you can pull out the reel axle (7)
Sometimes they can be really stuck with hardened grease or oil residue that has turned to varnish
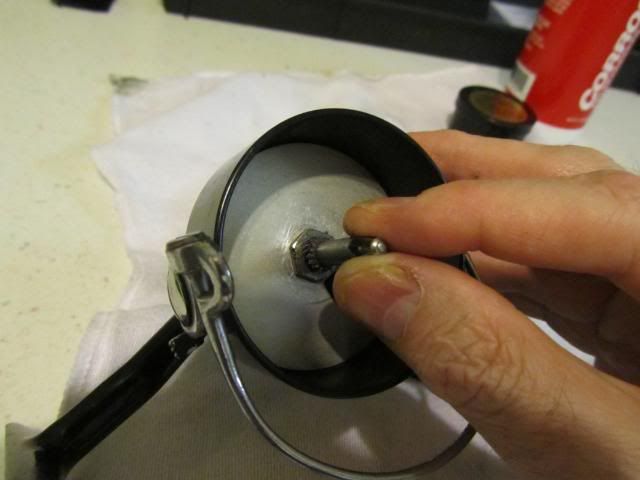
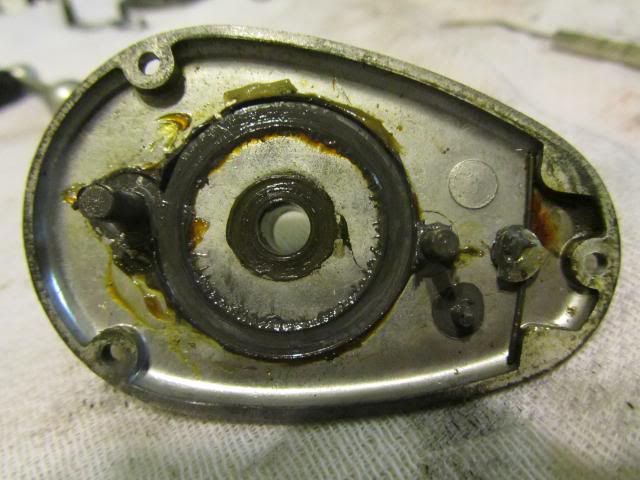
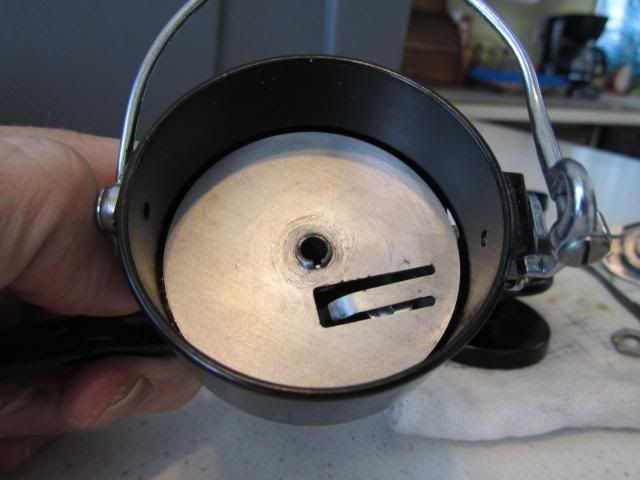
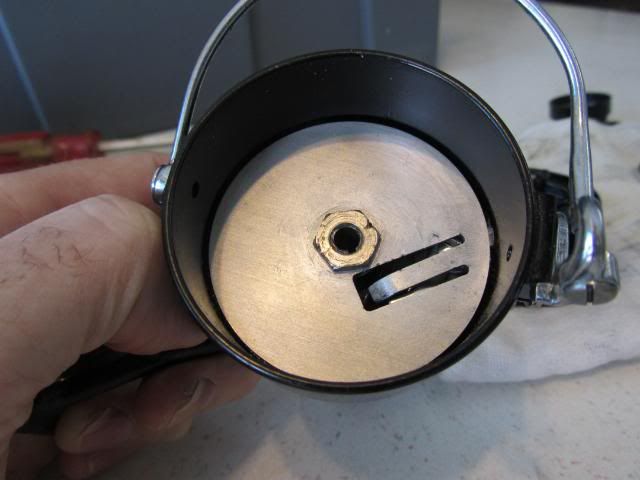
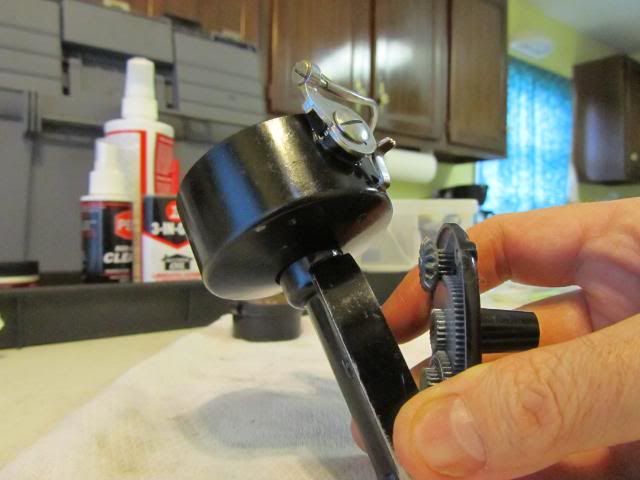
Loosen the 12mm baffle plate nut (35) and remove
Gently pull the rotating head (39) up and off the housing (34) threads
This will free the baffle plate (41)
Note there will be a washer (48) under baffle plate and there may be one or more shims (49B) also
Be sure to look for them; don't lose them in the cleaning process
Here you see the baffle plate washer (48) stuck on underside
Looked to see if shim (49B) was in rotating head, but none were present
You will see later, that there was one, but it was installed in wrong location
Remove any shims (49A) that are present here
Note, they may be stuck underneath rotating head gearing, rub finger across it to see
Ended up finding the misplaced 49B shim, along with two 49A shims

Remove housing lubrication screw (15)
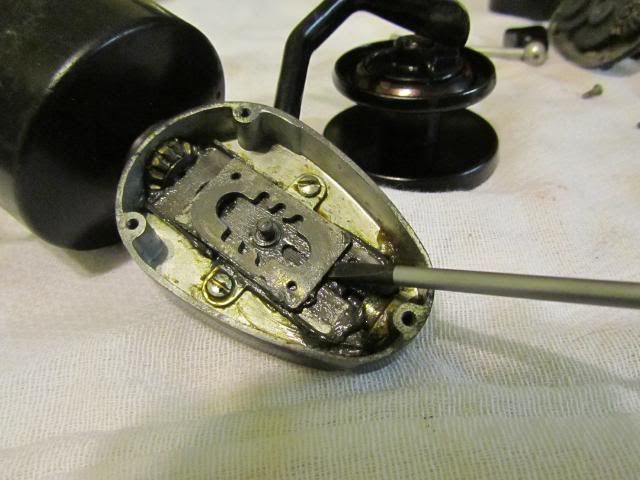
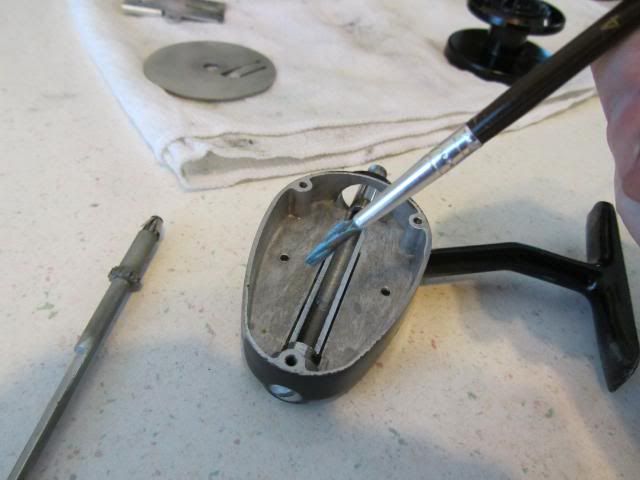
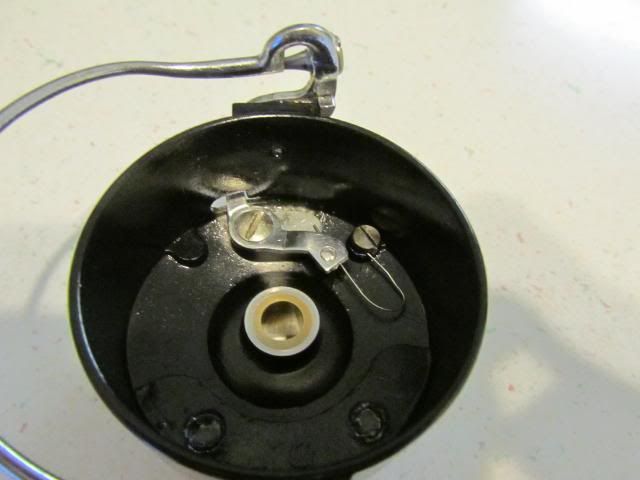
Remove the two slide guide mount screws (28)

Gently pry up and remove the slide guide (29)
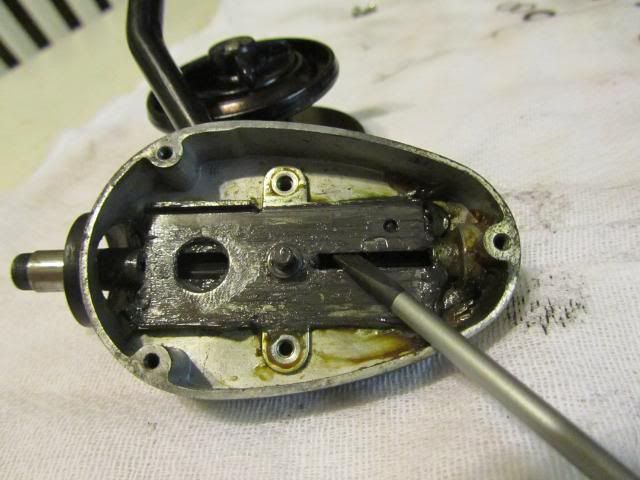
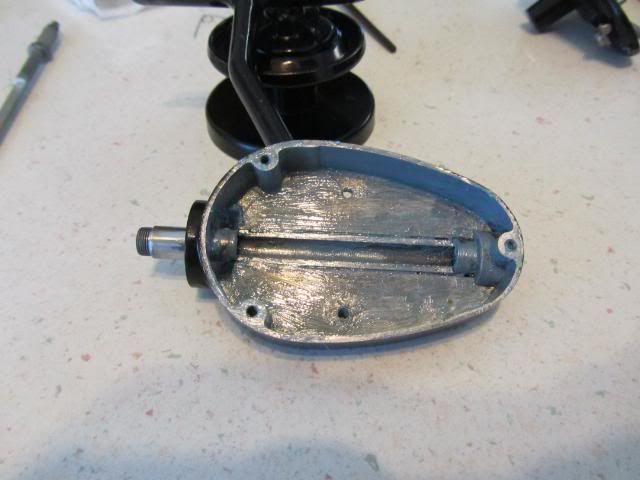
Here we have the stripped out housing (34) ready for cleaning

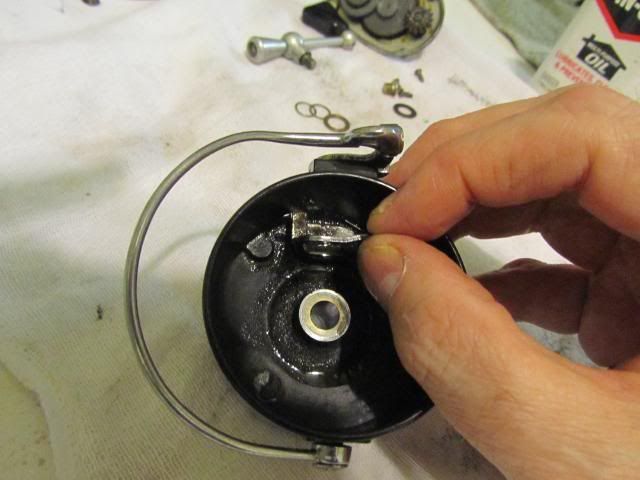
We will now move to the rotating head (39)
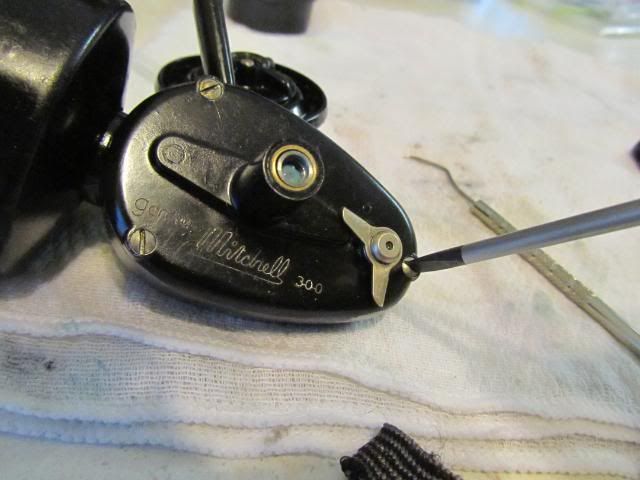
The liquid you see is the 3 in 1 oil that has been soaking for a while to loosen screws
You can see someone in the past has boogered one of the screw heads, by trying to force it with wrong size screwdriver
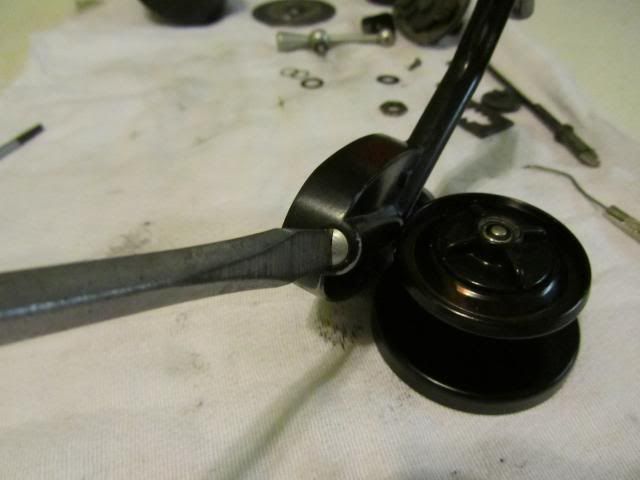
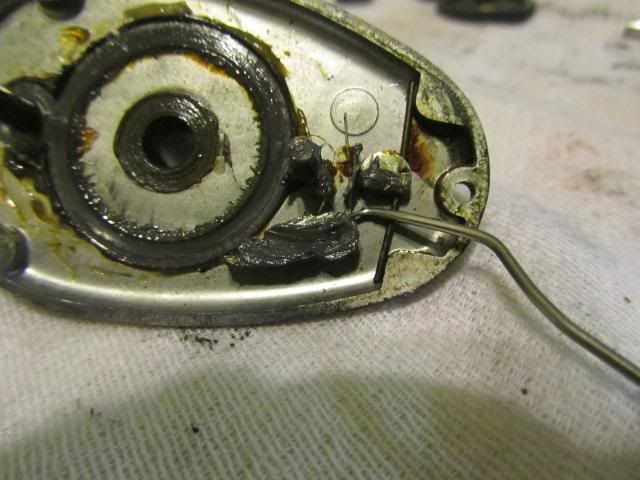
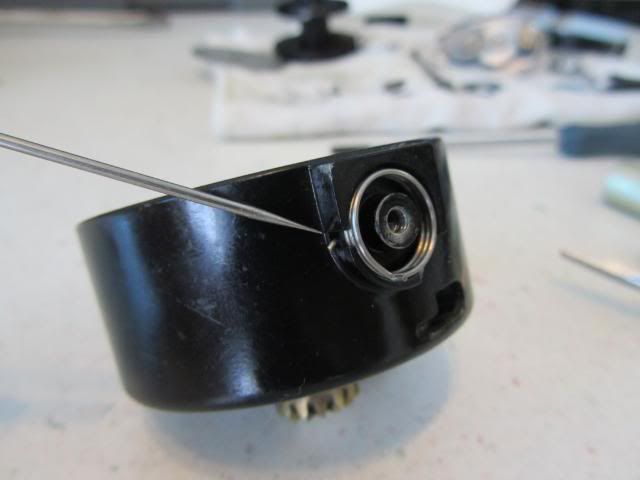
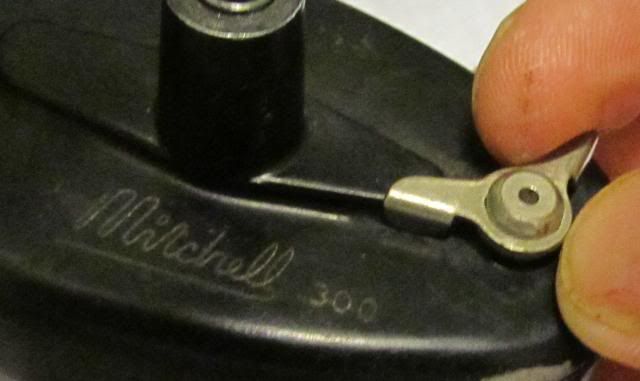
Remove the larger bail trip lever screw (45) and pull trip lever (42) out from the inside
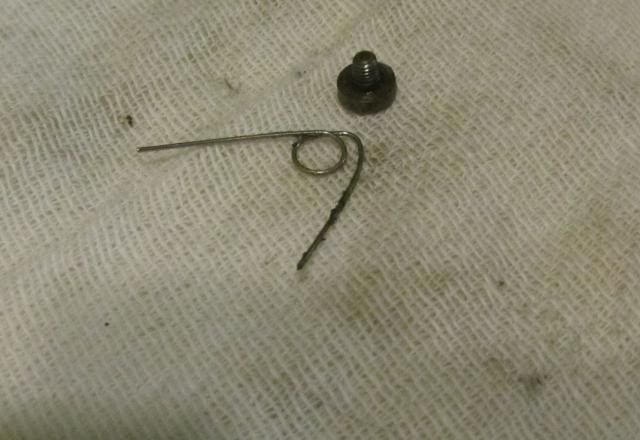
Next we will remove the trip lever spring screw (50) and the trip lever spring (44)
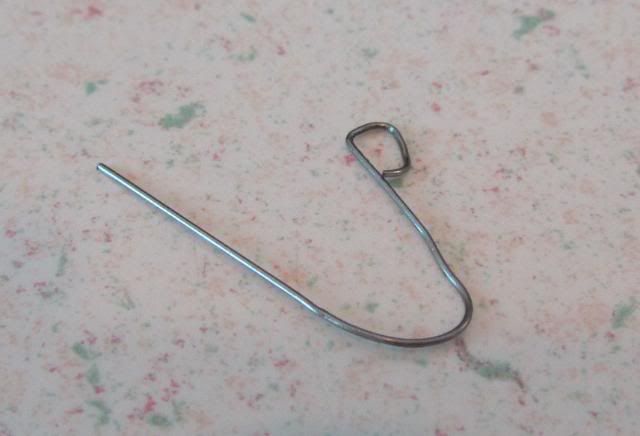
Notice the shape of spring looks odd

Here it is out and yes the spring has been bent to a very odd shape, which we will correct later before re-installing
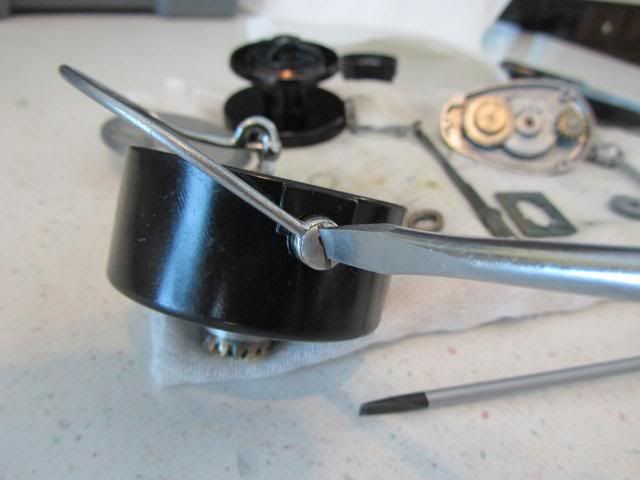
Now remove the bail (40), by removing the two screws (46 and 47)
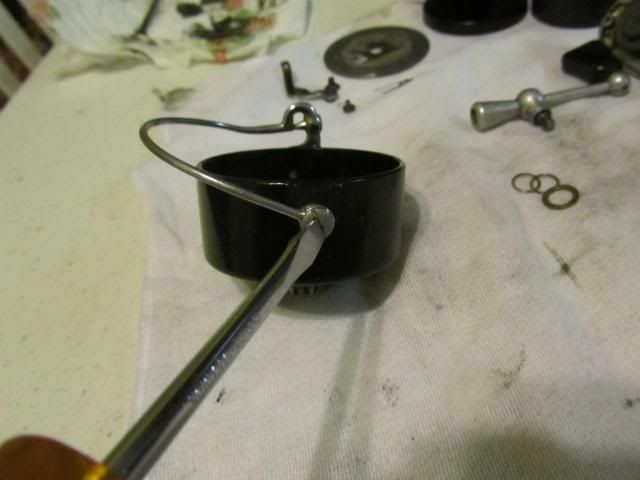
Bail spring (43) should come out also, if not pull it out
We can see how gunked up the bail spring is, no wonder it wasn't working properly
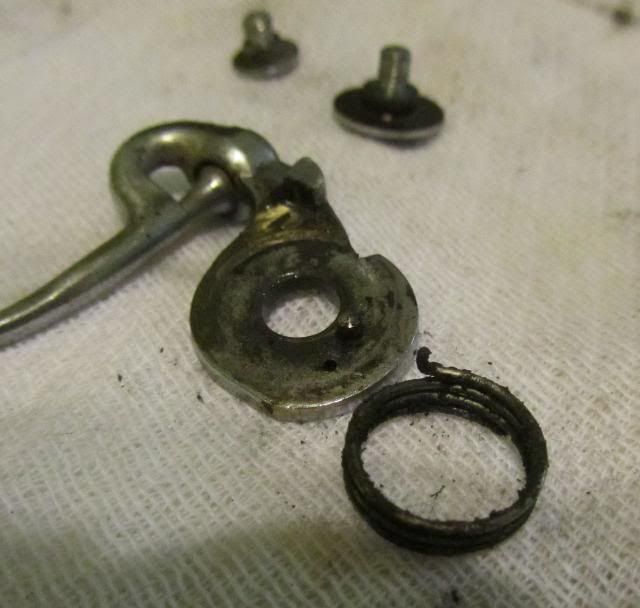
Here is the rotating head (39) stripped and ready for cleaning
I found that the counterweight inside was a little loose
This is NOT the kind with screws that can just be tightened
We will fix this by using Loctite 620 to bond the counterweight to the rotating head after cleaning
(This was a recommended product that I had not used before, but is working well, so far)
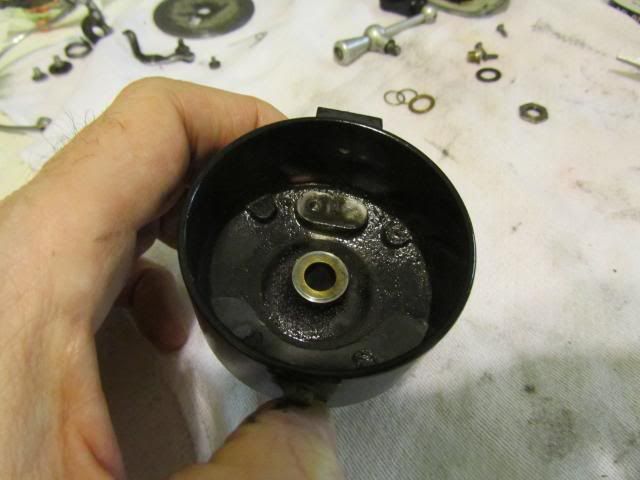
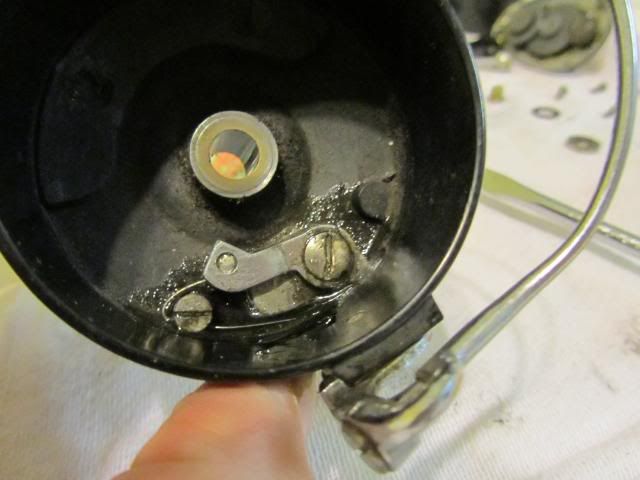
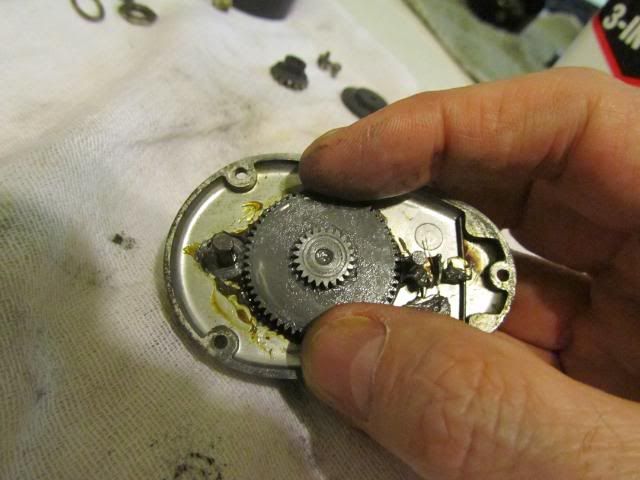
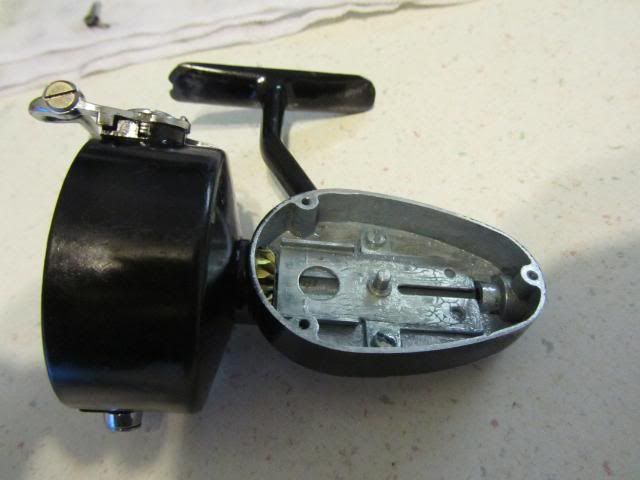
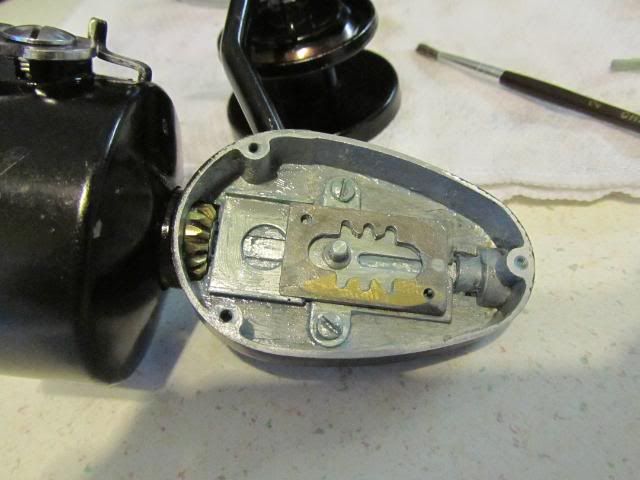
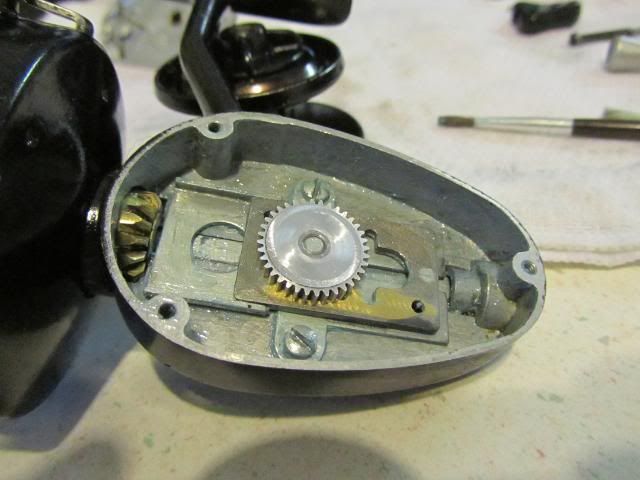
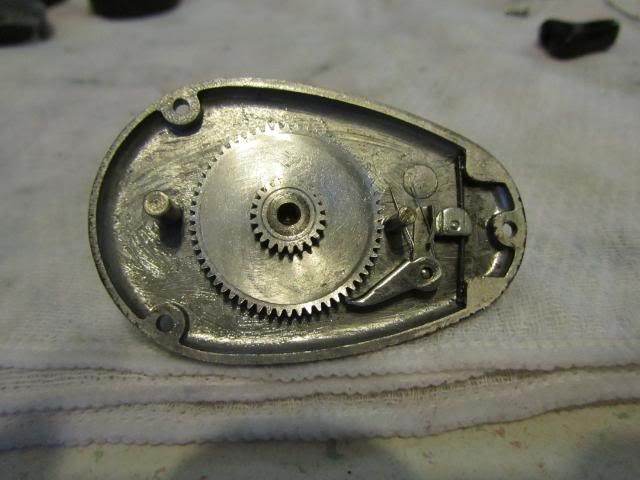
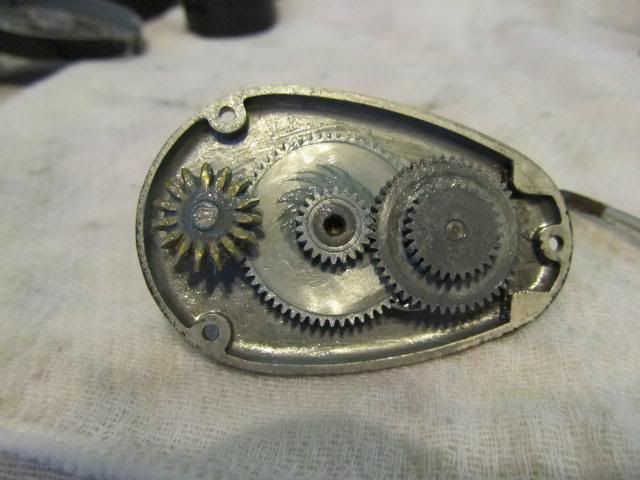
Here is the cover plate assembly (32)
Notice the gearing is cross-wind (CW) type, not level-wind
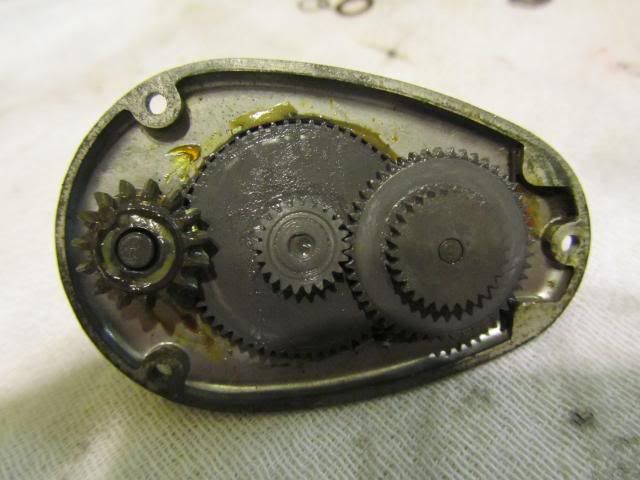
Lift up off the stud, the transfer gear (31CW)

Lift up off the stud, the pinion gear (26)
Look underneath for shims stuck to bottom of pinion gear
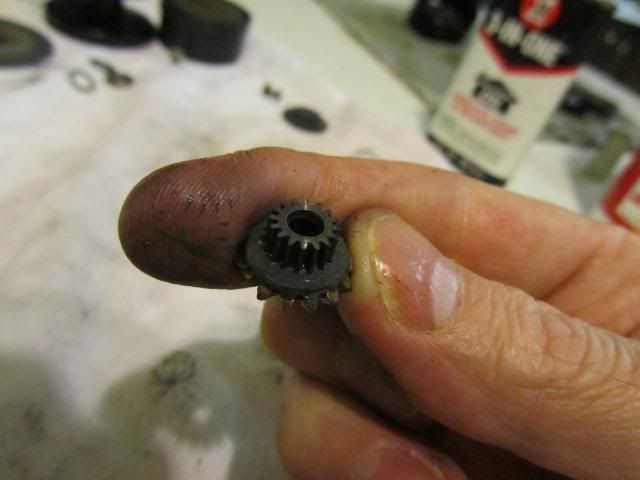
Or still on the stud
Here under the grease WAS a shim (51)
Lift out the main drive gear (25CW)
Look for any shims (54) that might be present
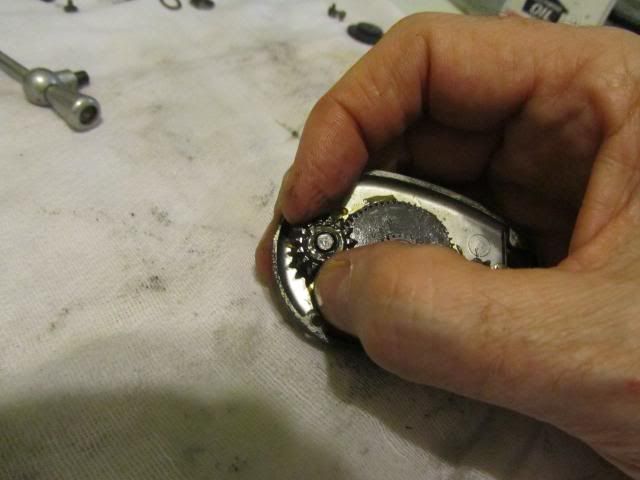
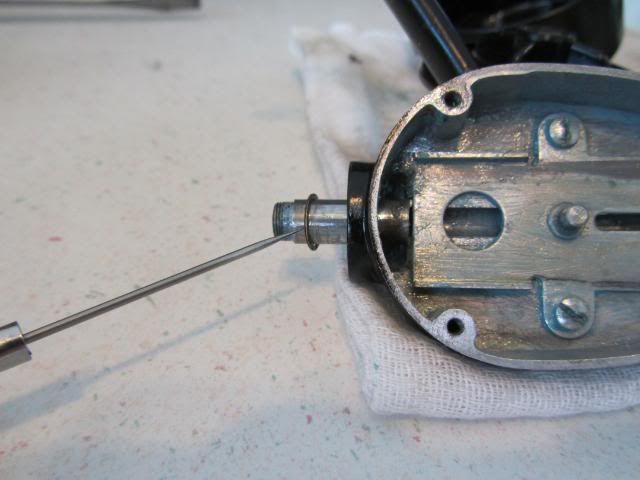
Check to see if the main gear shaft has a cotton insert, stuffed inside, if so pull it out
You can see it here being pulled out
Lift out the anti-reverse dog (24)
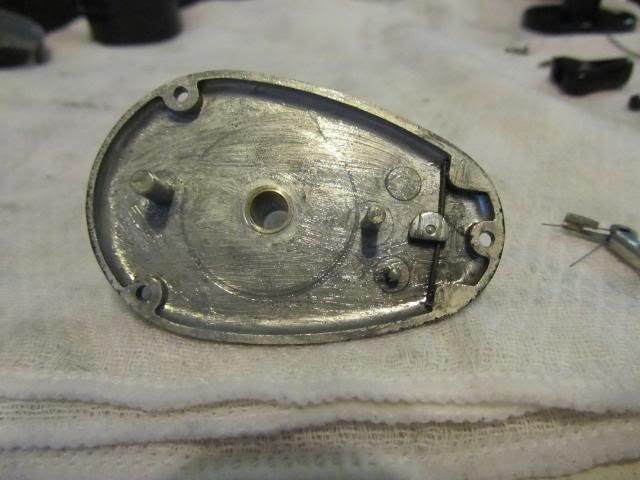
Here is the cover plate assembly (32) stripped and ready for cleaning
The cleaning process is not covered, but is:
Manually removing all grease & debris
Clean with warm soapy water and tooth brush
Drying
Cleaning any stubborn spots and displacing any residual moisture with Penn Reel Cleaner
Finally a full wipe down with cloth dampened with Corrosion X
If a more forceful means is needed, use a brass brush NOT a stainless steel one
Here are the parts processed and ready for assembly, minus the spool which will be covered last
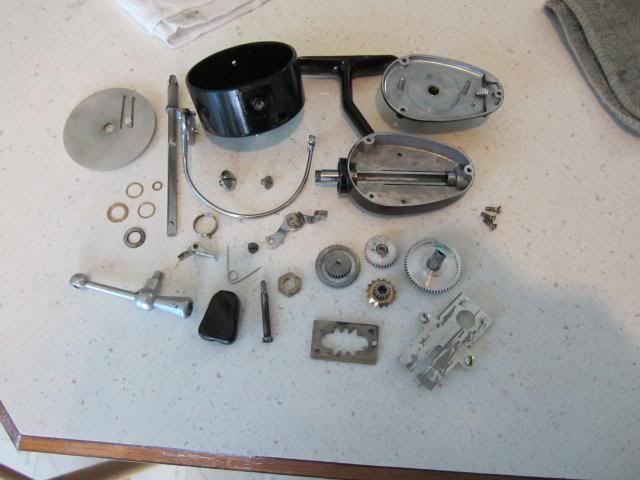
The inside of reel housing will get a very light coating of an aluminum complex NLGI #2 marine grease
NOTE: All screws before being re-installed will first get a coating of grease
Install slide guide (29) with two screws (28)
Again a light coating of marine grease
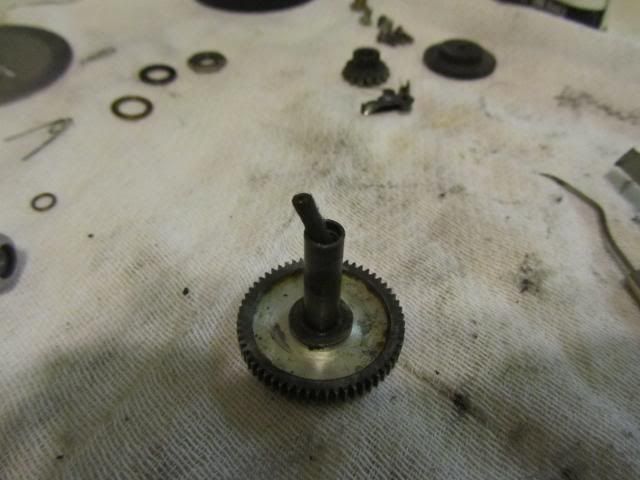
Notice the slight damage to two of the teeth on the axle (7)
We will be replacing this axle with an undamaged one
Install the Bail (40) and bail spring (43) with the two screws (46 & 47)
Notice the bail spring has two end points
One points out, the other points up or down, depending on how you are looking at it
The one that points up or down goes into the tiny hole (right by the stud) on the rounded face part of the bail
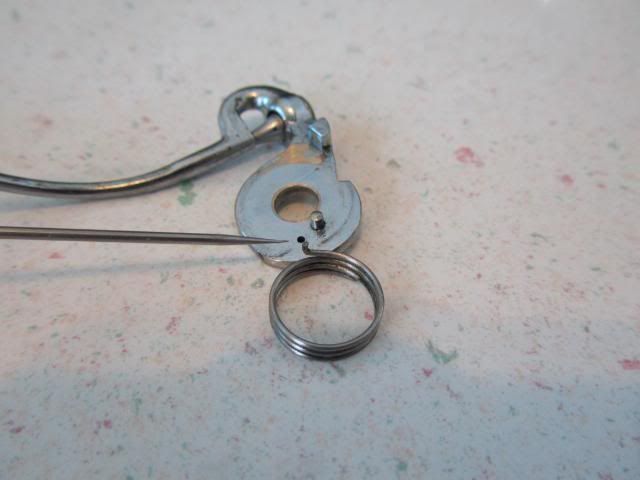
The part that points out fits in slot on rotating head bracket
And then you spin around to load spring

And finally install the two screws
Lightly grease where trip lever and trip lever spring install
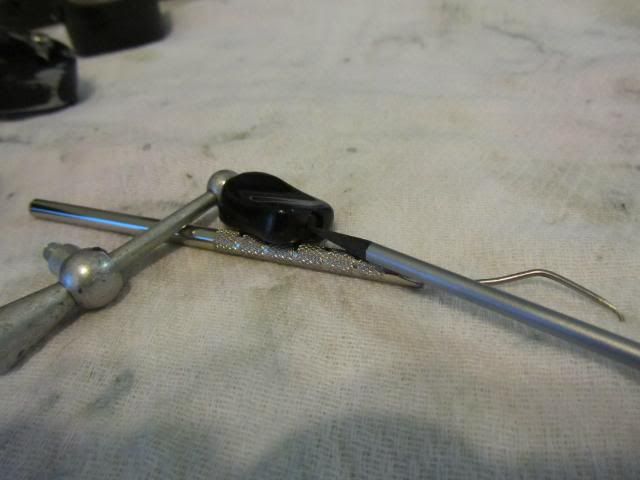
Reshape the trip lever spring (44) to a proper/usable shape, as shown
And install with screw (50)
Install trip lever (42) with screw (45)
Slip the two smaller shims (49A) on threaded shaft of housing
And install rotating head
Complete rotating head with fixed counterweight after curing for 32 hours
Slip the larger shim (49B) that was out of place on to the threaded collar inside the rotating head
Then add the washer (48)
Install the baffle plate (41)
Notice it is keyed
Install the 12mm Baffle plate nut (35) and tighten
At this point spin the rotating head to make sure it spins freely
If not, you will need to adjust the shims on one or both sides, until it spins freely and quietly
Install the axle through rotating head and into the housing (Flat side towards you)
Notice this is the new, undamaged one
Then, lightly grease the slide (27) and notice the stud

This stud will fit into the hole on axle that is now installed
Then lightly grease
Notice on the bottom on pivot gear (30) there are three raised appendages
They fit into the grooves/slots on the slide
Make sure the slide is shifted towards the back of reel housing

Install pivot gear (30) down onto stud (three appendages facing the rear) and wiggle until it fits in
Next turn pivot gear and make sure the axle cycles in and out as it should with no binding
Here is the cleaned cover plate (32)
Notice the wear marks from the main drive gear...
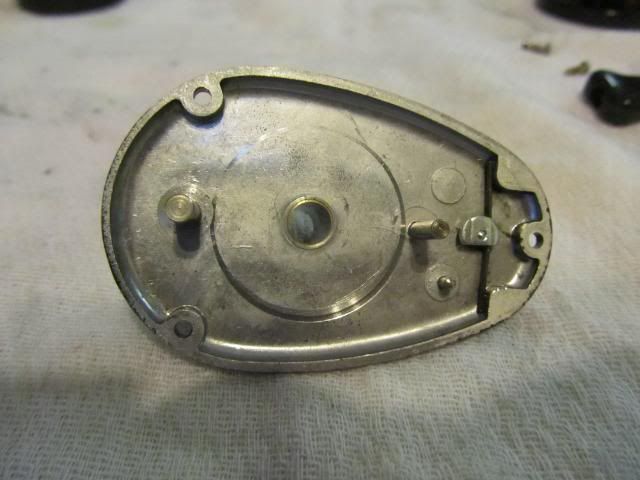
We are going to add a shim here (54) later, when we install the main drive gear
Since this will raise the gear slightly, we are going to also add another shim under the pinion gear
There are four main shim points on the 300 series reels
First number is the newer part number
The number in bracket is the older part number that I use in this thread
81012 [49B] Baffle Plate to Head
81024 [49A] Head to Housing
81047 [51] Pinion Gear
81035 [54] Main Drive Gear
These four points are where you can experiment to make them run smoother and quieter
Again lightly grease the inside
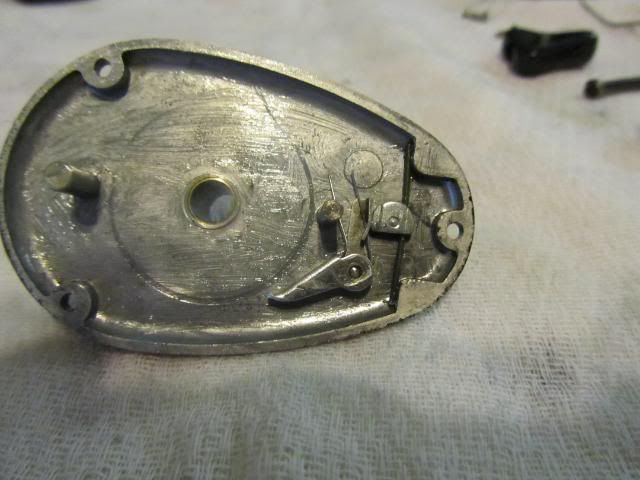
Install the anti-reverse dog
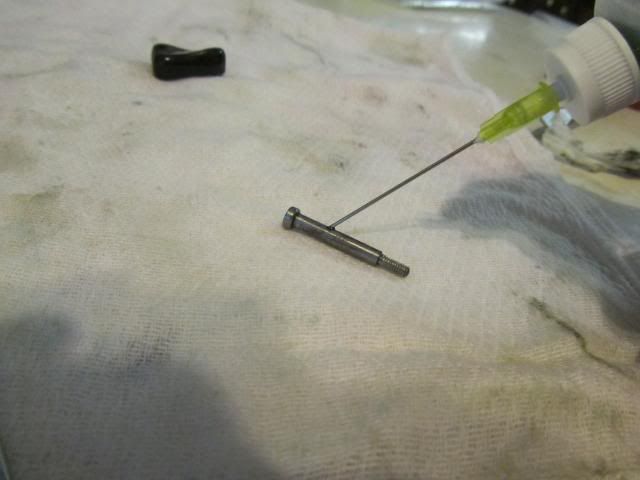
Take the main drive gear (25CW) and fill the shaft with grease
Screw in handle and remove, to see how much is needed
Excess will come out weep hole on shaft
Clean outer shaft of excess grease and apply a small amount of Corrosion X on outside of shaft
I use a needle oiler for this
Install a shim (54) on gear shaft then slide main drive gear (25CW) in
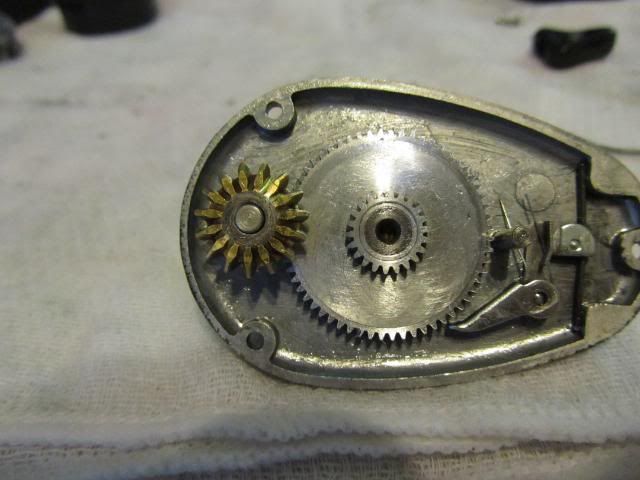
Here is cover plate (32) with main drive gear (25CW) and anti-reverse dog (24) installed
I added an extra shim here, so a total of two pinion gear shims (51) are installed on stud

Install pinion gear (26) on stud
Lightly grease everything
Then install Transfer gear (31CW)
Then lightly grease the transfer gear
Next manually turn gearing to ensure everything is working properly
Reach under and manipulate the anti-reverse knob (boomerang shaped on this one)
See that reel runs in one direction only
Change position and see that the reel will run in both directions
"Smoothly and quietly"
Here it is checked out and completed
Lightly grease the faces where cover and housing will meet
Now put together the housing (34) and cover (32) like a book
Wiggle if needed, as gearing falls in together
Install the cover screws (14)
Apply small amount of Corrosion X on handle screw
Slip screw through handle and attach to handle arm/shank
Screw on handle (16B) remembering that it is reverse threaded
Now, check the operation of the reel
Make sure no shim adjustments are needed or something is not meshing correctly
Now for the Spool...
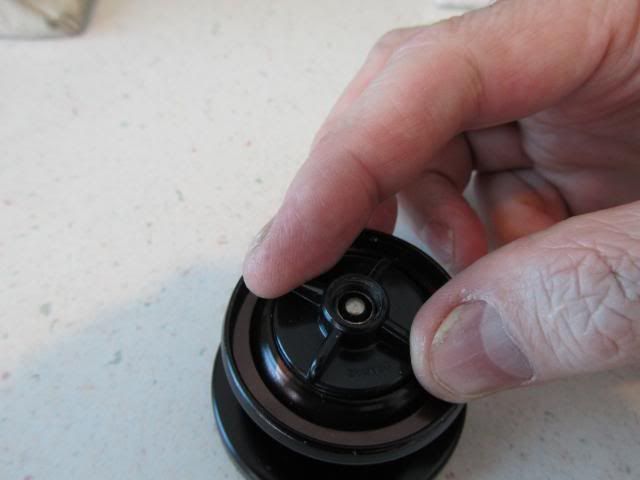
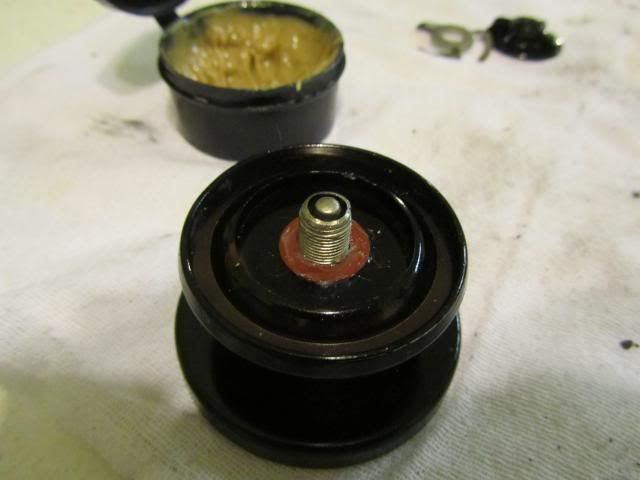
Take spool and unscrew the drag adjusting nut (1)
Remove the drag nut (1)
Remove the brake spring (2)
Remove the drag washer (5)
Separate into two pieces, spindle (6) and spool shell (4)
There may be another drag washer on spindle inside, although this one didn't have one
It is in excellent condition and doesn't need any cleaning
A little Corrosion X on some points and it's ready for assembly
Here it is broken down

You can make changes to the drag by using another washer under shell, on spindle inside
Changing to the newer Teflon washers
Or if you really want to bump up the drag pressure, you can use Carbon Fiber ones
(Penn HT100), the correct size is 6-60 or 6-155 depending on OD needed (Inset type or not)
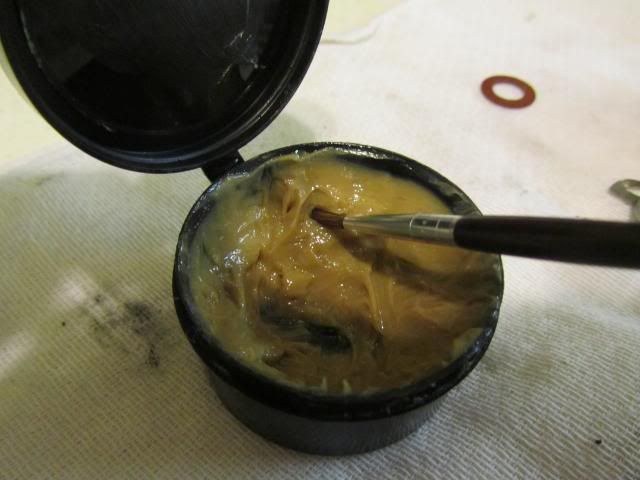
All I will be doing is greasing the regular fiber one, which will make it smoother in operation
Just a small amount is all you need
I will be using Cal's Drag grease for the drag
USE ONLY A TEFLON BASED DRAG GREASE!!
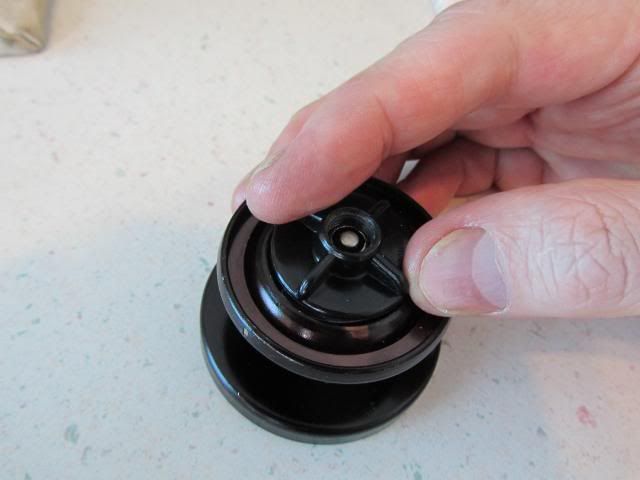
Put spindle back into the spool shell and rotate until the gearing meshes and it goes completely in
Then, lightly grease the drag washer (5) and install on spindle
Lightly grease the bottom of the brake spring (2)
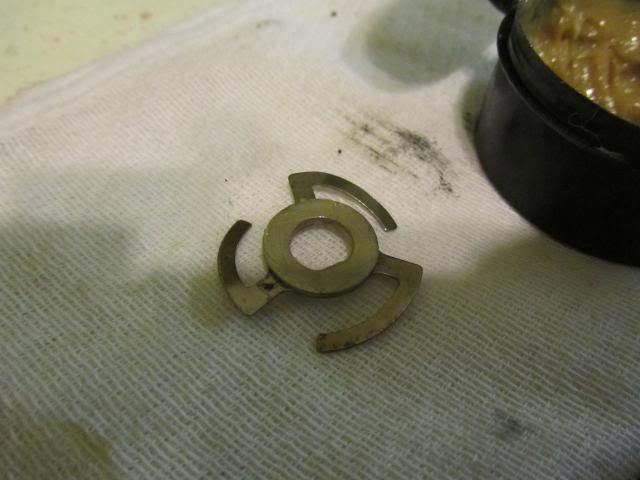
And install (Notice it is keyed)
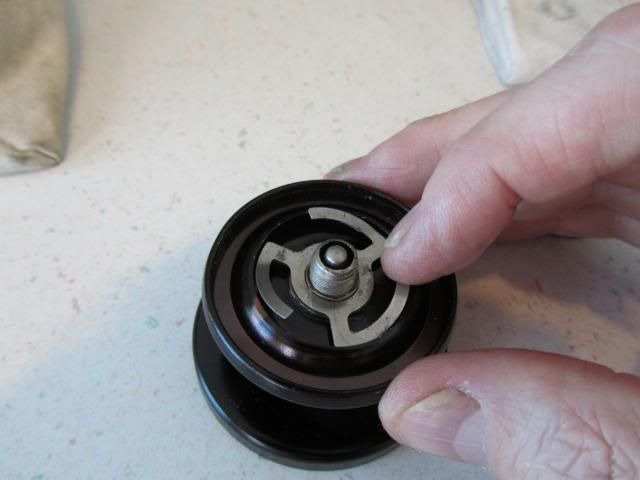
Screw on the drag adjusting nut (1) and the spool is complete
Here is the finished reel and spool
It runs very smooth now and bail works like new
Very quiet now also with the new shimming
Last thing is to snap the spool into place on reel
Flip handle to storage position
And you're done...
1958 Garcia Mitchell 3-0-0 (Version 6)
Bail is very stiff and sticky
Handle turn is stiff and sounds very noisy, whirring and some grinding
Finish is really not too bad with normal looking rubs around foot, back and bottom (Chip on front of foot)
Cover screws are mildly boogered, but not too bad
Serial number: 21xx752
I will use the following:
Flat Tip Screwdrivers
12mm Mitchell Wrench
Corrosion X
Aluminum Complex NLGI #2 Marine Grease
Cal's Teflon Drag Grease
Penn Reel Cleaner
3 in 1 Oil
"The first step which is skipped in tutorial for all screws is to first apply 3 in 1 oil, tap & let set before attempting to loosen"
(Part numbers will be in parenthesis)
Schematic used
And here is the Reel....
Remove the handle (16B) by unscrewing it (note it is reverse threaded)
And remove screw holding handle on the shaft/arm
Push release button on spool, remove and set aside
Remove the three cover screws (14)
Open the reel like a book (This way parts won't tend to fall out)
Here's what we have inside
Remove the pivot gear (30)
Gently pry up and remove the slide (27)
Now you can pull out the reel axle (7)
Sometimes they can be really stuck with hardened grease or oil residue that has turned to varnish
Loosen the 12mm baffle plate nut (35) and remove
Gently pull the rotating head (39) up and off the housing (34) threads
This will free the baffle plate (41)
Note there will be a washer (48) under baffle plate and there may be one or more shims (49B) also
Be sure to look for them; don't lose them in the cleaning process
Here you see the baffle plate washer (48) stuck on underside
Looked to see if shim (49B) was in rotating head, but none were present
You will see later, that there was one, but it was installed in wrong location
Remove any shims (49A) that are present here
Note, they may be stuck underneath rotating head gearing, rub finger across it to see
Ended up finding the misplaced 49B shim, along with two 49A shims
Remove housing lubrication screw (15)
Remove the two slide guide mount screws (28)
Gently pry up and remove the slide guide (29)
Here we have the stripped out housing (34) ready for cleaning
We will now move to the rotating head (39)
The liquid you see is the 3 in 1 oil that has been soaking for a while to loosen screws
You can see someone in the past has boogered one of the screw heads, by trying to force it with wrong size screwdriver
Remove the larger bail trip lever screw (45) and pull trip lever (42) out from the inside
Next we will remove the trip lever spring screw (50) and the trip lever spring (44)
Notice the shape of spring looks odd
Here it is out and yes the spring has been bent to a very odd shape, which we will correct later before re-installing
Now remove the bail (40), by removing the two screws (46 and 47)
Bail spring (43) should come out also, if not pull it out
We can see how gunked up the bail spring is, no wonder it wasn't working properly
Here is the rotating head (39) stripped and ready for cleaning
I found that the counterweight inside was a little loose
This is NOT the kind with screws that can just be tightened
We will fix this by using Loctite 620 to bond the counterweight to the rotating head after cleaning
(This was a recommended product that I had not used before, but is working well, so far)
Here is the cover plate assembly (32)
Notice the gearing is cross-wind (CW) type, not level-wind
Lift up off the stud, the transfer gear (31CW)
Lift up off the stud, the pinion gear (26)
Look underneath for shims stuck to bottom of pinion gear
Or still on the stud
Here under the grease WAS a shim (51)
Lift out the main drive gear (25CW)
Look for any shims (54) that might be present
Check to see if the main gear shaft has a cotton insert, stuffed inside, if so pull it out
You can see it here being pulled out
Lift out the anti-reverse dog (24)
Here is the cover plate assembly (32) stripped and ready for cleaning
The cleaning process is not covered, but is:
Manually removing all grease & debris
Clean with warm soapy water and tooth brush
Drying
Cleaning any stubborn spots and displacing any residual moisture with Penn Reel Cleaner
Finally a full wipe down with cloth dampened with Corrosion X
If a more forceful means is needed, use a brass brush NOT a stainless steel one
Here are the parts processed and ready for assembly, minus the spool which will be covered last
The inside of reel housing will get a very light coating of an aluminum complex NLGI #2 marine grease
NOTE: All screws before being re-installed will first get a coating of grease
Install slide guide (29) with two screws (28)
Again a light coating of marine grease
Notice the slight damage to two of the teeth on the axle (7)
We will be replacing this axle with an undamaged one
Install the Bail (40) and bail spring (43) with the two screws (46 & 47)
Notice the bail spring has two end points
One points out, the other points up or down, depending on how you are looking at it
The one that points up or down goes into the tiny hole (right by the stud) on the rounded face part of the bail
The part that points out fits in slot on rotating head bracket
And then you spin around to load spring
And finally install the two screws
Lightly grease where trip lever and trip lever spring install
Reshape the trip lever spring (44) to a proper/usable shape, as shown
And install with screw (50)
Install trip lever (42) with screw (45)
Slip the two smaller shims (49A) on threaded shaft of housing
And install rotating head
Complete rotating head with fixed counterweight after curing for 32 hours
Slip the larger shim (49B) that was out of place on to the threaded collar inside the rotating head
Then add the washer (48)
Install the baffle plate (41)
Notice it is keyed
Install the 12mm Baffle plate nut (35) and tighten
At this point spin the rotating head to make sure it spins freely
If not, you will need to adjust the shims on one or both sides, until it spins freely and quietly
Install the axle through rotating head and into the housing (Flat side towards you)
Notice this is the new, undamaged one
Then, lightly grease the slide (27) and notice the stud
This stud will fit into the hole on axle that is now installed
Then lightly grease
Notice on the bottom on pivot gear (30) there are three raised appendages
They fit into the grooves/slots on the slide
Make sure the slide is shifted towards the back of reel housing
Install pivot gear (30) down onto stud (three appendages facing the rear) and wiggle until it fits in
Next turn pivot gear and make sure the axle cycles in and out as it should with no binding
Here is the cleaned cover plate (32)
Notice the wear marks from the main drive gear...
We are going to add a shim here (54) later, when we install the main drive gear
Since this will raise the gear slightly, we are going to also add another shim under the pinion gear
There are four main shim points on the 300 series reels
First number is the newer part number
The number in bracket is the older part number that I use in this thread
81012 [49B] Baffle Plate to Head
81024 [49A] Head to Housing
81047 [51] Pinion Gear
81035 [54] Main Drive Gear
These four points are where you can experiment to make them run smoother and quieter
Again lightly grease the inside
Install the anti-reverse dog
Take the main drive gear (25CW) and fill the shaft with grease
Screw in handle and remove, to see how much is needed
Excess will come out weep hole on shaft
Clean outer shaft of excess grease and apply a small amount of Corrosion X on outside of shaft
I use a needle oiler for this
Install a shim (54) on gear shaft then slide main drive gear (25CW) in
Here is cover plate (32) with main drive gear (25CW) and anti-reverse dog (24) installed
I added an extra shim here, so a total of two pinion gear shims (51) are installed on stud
Install pinion gear (26) on stud
Lightly grease everything
Then install Transfer gear (31CW)
Then lightly grease the transfer gear
Next manually turn gearing to ensure everything is working properly
Reach under and manipulate the anti-reverse knob (boomerang shaped on this one)
See that reel runs in one direction only
Change position and see that the reel will run in both directions
"Smoothly and quietly"
Here it is checked out and completed
Lightly grease the faces where cover and housing will meet
Now put together the housing (34) and cover (32) like a book
Wiggle if needed, as gearing falls in together
Install the cover screws (14)
Apply small amount of Corrosion X on handle screw
Slip screw through handle and attach to handle arm/shank
Screw on handle (16B) remembering that it is reverse threaded
Now, check the operation of the reel
Make sure no shim adjustments are needed or something is not meshing correctly
Now for the Spool...
Take spool and unscrew the drag adjusting nut (1)
Remove the drag nut (1)
Remove the brake spring (2)
Remove the drag washer (5)
Separate into two pieces, spindle (6) and spool shell (4)
There may be another drag washer on spindle inside, although this one didn't have one
It is in excellent condition and doesn't need any cleaning
A little Corrosion X on some points and it's ready for assembly
Here it is broken down
You can make changes to the drag by using another washer under shell, on spindle inside
Changing to the newer Teflon washers
Or if you really want to bump up the drag pressure, you can use Carbon Fiber ones
(Penn HT100), the correct size is 6-60 or 6-155 depending on OD needed (Inset type or not)
All I will be doing is greasing the regular fiber one, which will make it smoother in operation
Just a small amount is all you need
I will be using Cal's Drag grease for the drag
USE ONLY A TEFLON BASED DRAG GREASE!!
Put spindle back into the spool shell and rotate until the gearing meshes and it goes completely in
Then, lightly grease the drag washer (5) and install on spindle
Lightly grease the bottom of the brake spring (2)
And install (Notice it is keyed)
Screw on the drag adjusting nut (1) and the spool is complete
Here is the finished reel and spool
It runs very smooth now and bail works like new
Very quiet now also with the new shimming
Last thing is to snap the spool into place on reel
Flip handle to storage position
And you're done...
Title: Re: TEST
Post by: alantani on March 13, 2012, 03:33:29 AM
Post by: alantani on March 13, 2012, 03:33:29 AM
houston, we have lift off! ;D
Title: Re: TEST
Post by: Bryan Young on March 13, 2012, 04:02:56 AM
Post by: Bryan Young on March 13, 2012, 04:02:56 AM
Excellent.
I do replace those fiber washers with grease carbon fiber drags.
I do replace those fiber washers with grease carbon fiber drags.
Title: Re: Tutorial: Garcia Mitchell 3-0-0 Spinning Reel Service
Post by: redsetta on March 13, 2012, 06:15:10 AM
Post by: redsetta on March 13, 2012, 06:15:10 AM
Great work Reid - comprehensive and detailed.
Cheers, Justin
Cheers, Justin
Title: Re: Tutorial: Garcia Mitchell 3-0-0 Spinning Reel Service
Post by: saltydog on September 18, 2012, 01:38:35 PM
Post by: saltydog on September 18, 2012, 01:38:35 PM
Great tutorial very easy to follow.
Title: Re: Tutorial: Garcia Mitchell 3-0-0 Spinning Reel Service
Post by: johndtuttle on February 01, 2014, 04:59:53 AM
Post by: johndtuttle on February 01, 2014, 04:59:53 AM
Sorry I missed this one way back when.
What a fine tutorial on an old classic :).
I'll ask admin to move this to the spinning reel section where it can get more attention next to it's brethren.
best
What a fine tutorial on an old classic :).
I'll ask admin to move this to the spinning reel section where it can get more attention next to it's brethren.
best
Title: Re: Tutorial: Garcia Mitchell 3-0-0 Spinning Reel Service
Post by: Mr.Grinta on July 02, 2014, 06:39:43 PM
Post by: Mr.Grinta on July 02, 2014, 06:39:43 PM
Simply Superb.
leonard
leonard
Title: Re: Tutorial: Garcia Mitchell 3-0-0 Spinning Reel Service
Post by: treidm on July 07, 2014, 08:54:18 PM
Post by: treidm on July 07, 2014, 08:54:18 PM
I enjoyed making it and had hoped it could help someone. (I had lots of trouble when I started working on these old school reels, so passing along what I learned from my mistakes)
This was my attempt to try and pay back this site for being good to me.
I am surprised that now in 2014, it still got noticed....
~Reid~
This was my attempt to try and pay back this site for being good to me.
I am surprised that now in 2014, it still got noticed....
~Reid~
Title: Re: Tutorial: Garcia Mitchell 3-0-0 Spinning Reel Service
Post by: redsetta on July 07, 2014, 09:26:04 PM
Post by: redsetta on July 07, 2014, 09:26:04 PM
QuoteThis was my attempt to try and pay back this site for being good to me.And this is exactly what makes Alan's place so great.
Cheers, Justin
Title: Re: Tutorial: Garcia Mitchell 3-0-0 Spinning Reel Service
Post by: DANFORDMAN on June 18, 2015, 02:55:13 AM
Post by: DANFORDMAN on June 18, 2015, 02:55:13 AM
When Installing the Bail (40) and bail spring (43) with the two screws (Noting the bail spring has two end points) With one pointing out, and the other pointing up or down, depending on how you are looking at it. I place one that points up or down goes into the tiny hole (right by the stud) on the rounded face part of the bail. Is it Absolutely necessary to remove the housing from to the rotating head to spin around and load spring? I am attempting t install the new bail spring with the housing attached to the rotating head and I still am having a problem with the bail snapping back with the new bail spring. This is the only thing I have'nt tried. Any insight would be greatly appreciated.
Title: Re: Tutorial: Garcia Mitchell 3-0-0 Spinning Reel Service
Post by: foakes on June 18, 2015, 05:14:55 AM
Post by: foakes on June 18, 2015, 05:14:55 AM
No,
It is easy enough to replace the bail spring without removing the rotating head from the body.
Reid just suggested to do it this way since he already had everything apart and ready to go back together.
And it is a little easier, sometimes.
You need to just install the bail spring into the pin hole and appropriate slot -- then keep things in place when loading the spring -- make sure the return bail lever is eased over the stop shoulder piece on the rotating head -- when set, screw the bail screw into place.
Even with cleaning the assembly and oiling -- it is still only a 5 minute job.
Best,
Fred
Title: Re: Tutorial: Garcia Mitchell 3-0-0 Spinning Reel Service
Post by: steelfish on September 23, 2016, 04:07:12 AM
Post by: steelfish on September 23, 2016, 04:07:12 AM
Wow, superdetailed job, congrats
Title: Re: Tutorial: Garcia Mitchell 3-0-0 Spinning Reel Service
Post by: bluefish69 on October 20, 2016, 12:19:25 AM
Post by: bluefish69 on October 20, 2016, 12:19:25 AM
Thanks
I just used this for my Mitchell 300. My reel is a little different - The handle shaft looks like it was pressed in, I removed it with a lot of effort & cleaned it & put back in place. The drag handle is different on my reel. It's straight & the Dog inside is plastic with a spring on it.
Mike
I just used this for my Mitchell 300. My reel is a little different - The handle shaft looks like it was pressed in, I removed it with a lot of effort & cleaned it & put back in place. The drag handle is different on my reel. It's straight & the Dog inside is plastic with a spring on it.
Mike
Title: Re: Tutorial: Garcia Mitchell 3-0-0 Spinning Reel Service
Post by: Gfish on October 20, 2016, 05:30:47 AM
Post by: Gfish on October 20, 2016, 05:30:47 AM
What's your source for extra shims?
Title: Re: Tutorial: Garcia Mitchell 3-0-0 Spinning Reel Service
Post by: bluefish69 on October 20, 2016, 03:09:58 PM
Post by: bluefish69 on October 20, 2016, 03:09:58 PM
McMaster & Carr
Title: Re: Tutorial: Garcia Mitchell 3-0-0 Spinning Reel Service
Post by: foakes on October 20, 2016, 05:07:00 PM
Post by: foakes on October 20, 2016, 05:07:00 PM
Hi G --
Mike is right -- M&C should have these.
But the right thickness and specs are critical on these old Mitchells -- and it might be kind of expensive for just 3 spacers for shipping.
If you have not made arrangements yet, and could use 3 (Mitchell recommends 1-3, as needed) just PM your address and mailing information -- and I will send some out at N/C.
These are the shims for the Pinion, Body, under Rotor assembly -- to take out the roughness for better gear alignment on the pinion.
There are also shims for under the baffle plate, if this is what you need. Have those too.
Best,
Fred
Title: Re: Tutorial: Garcia Mitchell 3-0-0 Spinning Reel Service
Post by: triumphrick on August 31, 2018, 06:29:05 PM
Post by: triumphrick on August 31, 2018, 06:29:05 PM
This brings back some memories..... 8)
I was twelve in 1959 and this was the first reel that I ever took apart. It was only a year or so old, but I fished every day with it as a kid growing up in Florida...and it had a few issues.
A newspaper on the dining room table and a tin of 3in1 oil and I was off...
I will always remember the first time I had the bail spring out, and could not get it to seat back in place.....a very trying experience for a twelve year old!
Title: Re: Tutorial: Garcia Mitchell 3-0-0 Spinning Reel Service
Post by: happyhooker on August 31, 2018, 08:12:50 PM
Post by: happyhooker on August 31, 2018, 08:12:50 PM
We all have to start somewhere.
Frank
Frank
Title: Re: Tutorial: Garcia Mitchell 3-0-0 Spinning Reel Service
Post by: handi2 on November 05, 2018, 10:45:37 PM
Post by: handi2 on November 05, 2018, 10:45:37 PM
Quote from: triumphrick on August 31, 2018, 06:29:05 PM
This brings back some memories..... 8)
I was twelve in 1959 and this was the first reel that I ever took apart. It was only a year or so old, but I fished every day with it as a kid growing up in Florida...and it had a few issues.
A newspaper on the dining room table and a tin of 3in1 oil and I was off...
I will always remember the first time I had the bail spring out, and could not get it to seat back in place.....a very trying experience for a twelve year old!
Me too Rick. Those were the only reels available for me to fish with. I fished the Pensacola Beach Pier with a 300 and a 302. We had to fix them ourselves back then.
Title: Re: Tutorial: Garcia Mitchell 3-0-0 Spinning Reel Service
Post by: Jdurbin92 on August 07, 2019, 01:50:33 AM
Post by: Jdurbin92 on August 07, 2019, 01:50:33 AM
I'm new to this forum.
Upgrading to carbon fiber drag washers on 300/301 Mitchell's
How do you know which spot the carbon washer goes in? Do you still use the other washers?
I buy the carbon drag washers off eBay. They are sold in set of 2
Thanks
Upgrading to carbon fiber drag washers on 300/301 Mitchell's
How do you know which spot the carbon washer goes in? Do you still use the other washers?
I buy the carbon drag washers off eBay. They are sold in set of 2
Thanks
Title: Re: Tutorial: Garcia Mitchell 3-0-0 Spinning Reel Service
Post by: happyhooker on August 08, 2019, 01:14:11 AM
Post by: happyhooker on August 08, 2019, 01:14:11 AM
Greetings, Jdurbin, from Minnesota, USA.
I myself do not use carbon fiber on my 300 and related Mitchell reels. I know some others that do. I look forward to their (and anybody else's) comments on your question, particularly in light of the fact that Mitchell offered many different spools for the 300, some metal and some not, and I wonder if the answer varies depending on what spool might be in use.
Frank
Title: Re: Tutorial: Garcia Mitchell 3-0-0 Spinning Reel Service
Post by: Jdurbin92 on August 09, 2019, 01:22:37 AM
Post by: Jdurbin92 on August 09, 2019, 01:22:37 AM
Crickets chirping
Title: Re: Tutorial: Garcia Mitchell 3-0-0 Spinning Reel Service
Post by: Swami805 on August 09, 2019, 03:12:43 AM
Post by: Swami805 on August 09, 2019, 03:12:43 AM
Pretty sure you just replace the stock washers with the greased CF. As long as they're the same size you're just replacing one material with another. If the kit you're buying has more washers than the stock reel consult with the vendor for that particular kit. If they're thinner but the same number of washers you might need to double one up to increase the height of the stack. Other than that good general service as discussed you should be good to go
Title: Re: Tutorial: Garcia Mitchell 3-0-0 Spinning Reel Service
Post by: Jdurbin92 on August 09, 2019, 12:47:09 PM
Post by: Jdurbin92 on August 09, 2019, 12:47:09 PM
Thank you
Which type of grease do you use on carbon fiber washers?
Just apply grease to the top side?
Which type of grease do you use on carbon fiber washers?
Just apply grease to the top side?
Title: Re: Tutorial: Garcia Mitchell 3-0-0 Spinning Reel Service
Post by: Irish1 on September 15, 2019, 02:59:24 PM
Post by: Irish1 on September 15, 2019, 02:59:24 PM
Is Photobucket making these images blurry now so they can no longer be seen? Great tutorial and it's a shame that you can no longer use the pictures for reference.
Title: Re: Tutorial: Garcia Mitchell 3-0-0 Spinning Reel Service
Post by: Midway Tommy on September 16, 2019, 03:47:11 AM
Post by: Midway Tommy on September 16, 2019, 03:47:11 AM
Quote from: Irish1 on September 15, 2019, 02:59:24 PM
Is Photobucket making these images blurry now so they can no longer be seen?
Yep, they're hijacking photos again for a fee!
Title: Re: Tutorial: Garcia Mitchell 3-0-0 Spinning Reel Service
Post by: jgp12000 on January 07, 2020, 09:37:24 PM
Post by: jgp12000 on January 07, 2020, 09:37:24 PM
I just found this wish I could see the pics now ?
Title: Re: Tutorial: Garcia Mitchell 3-0-0 Spinning Reel Service
Post by: Fullbail on February 14, 2020, 05:05:08 AM
Post by: Fullbail on February 14, 2020, 05:05:08 AM
jgp12000,
You might try right clicking on a blurred out photobucket image. The window that appears lists various choices. If you select "View Image" with your cursor, your computer should open up a separate window with a clear image. I am using a PC.
Good Luck,
Bill :)
You might try right clicking on a blurred out photobucket image. The window that appears lists various choices. If you select "View Image" with your cursor, your computer should open up a separate window with a clear image. I am using a PC.
Good Luck,
Bill :)
Title: Re: Tutorial: Garcia Mitchell 3-0-0 Spinning Reel Service
Post by: oc1 on February 14, 2020, 07:08:08 AM
Post by: oc1 on February 14, 2020, 07:08:08 AM
Quote from: Fullbail on February 14, 2020, 05:05:08 AM
jgp12000,
You might try right clicking on a blurred out photobucket image. The window that appears lists various choices. If you select "View Image" with your cursor, your computer should open up a separate window with a clear image. I am using a PC.
Good Luck,
Bill :)
I don't get VIEW IMAGE as one of the right click options. I have to right click, then click PROPETIES and copy/paste the URL address into a new window.
-steve
Title: Re: Tutorial: Garcia Mitchell 3-0-0 Spinning Reel Service
Post by: Midway Tommy on February 14, 2020, 07:29:28 PM
Post by: Midway Tommy on February 14, 2020, 07:29:28 PM
Quote from: oc1 on February 14, 2020, 07:08:08 AMQuote from: Fullbail on February 14, 2020, 05:05:08 AM
jgp12000,
You might try right clicking on a blurred out photobucket image. The window that appears lists various choices. If you select "View Image" with your cursor, your computer should open up a separate window with a clear image. I am using a PC.
Good Luck,
Bill :)
I don't get VIEW IMAGE as one of the right click options. I have to right click, then click PROPETIES and copy/paste the URL address into a new window.
-steve
IDK, Steve, it works for me. I get a box with "Open image in new tab", "Save image as...", "Copy Image", "Copy image address", "Search Google for image", and then below a line "Inspect Ctrl+Shift+l". You can only open one image at time in new tabs, though, but you can have multiple tabs with images.
Title: Re: Tutorial: Garcia Mitchell 3-0-0 Spinning Reel Service
Post by: oc1 on February 15, 2020, 03:55:53 AM
Post by: oc1 on February 15, 2020, 03:55:53 AM
I normally use old Internet Explorer. Just tried it with Mozilla Firefox and it has the VIEW IMAGE option. Thank you very much.
-steve
-steve