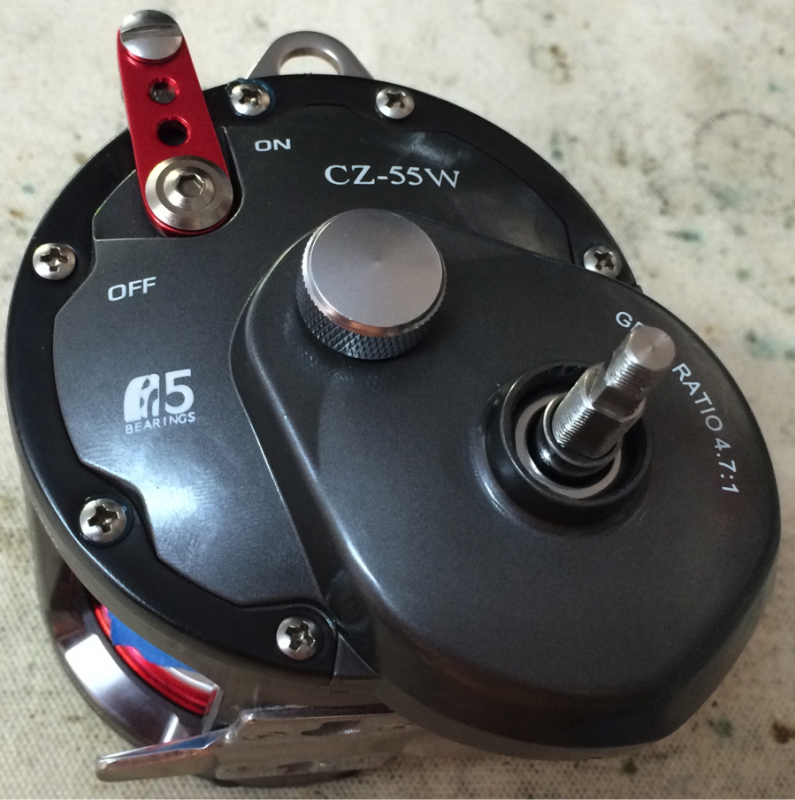
Title: Okuma Cortez CZ-55W
Post by: uluahunta on December 31, 2013, 09:56:15 AM
Post by: uluahunta on December 31, 2013, 09:56:15 AM
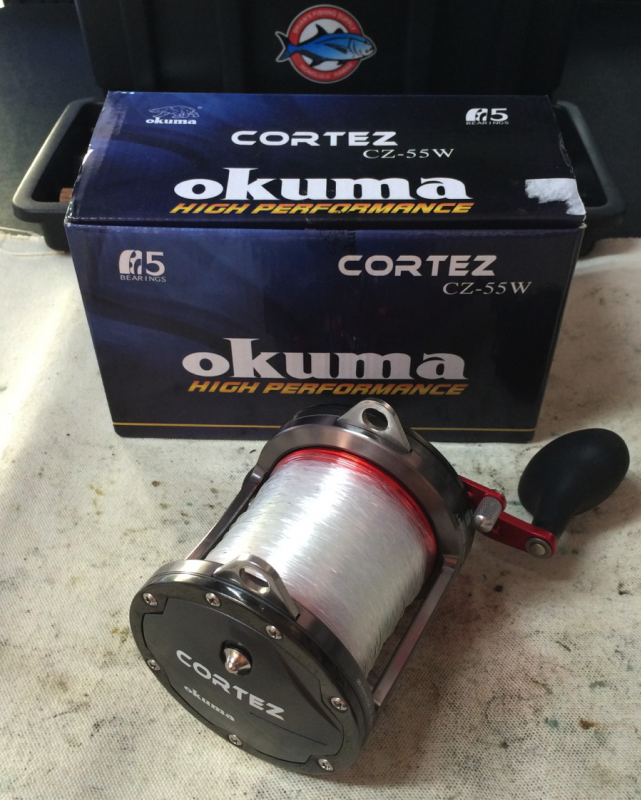
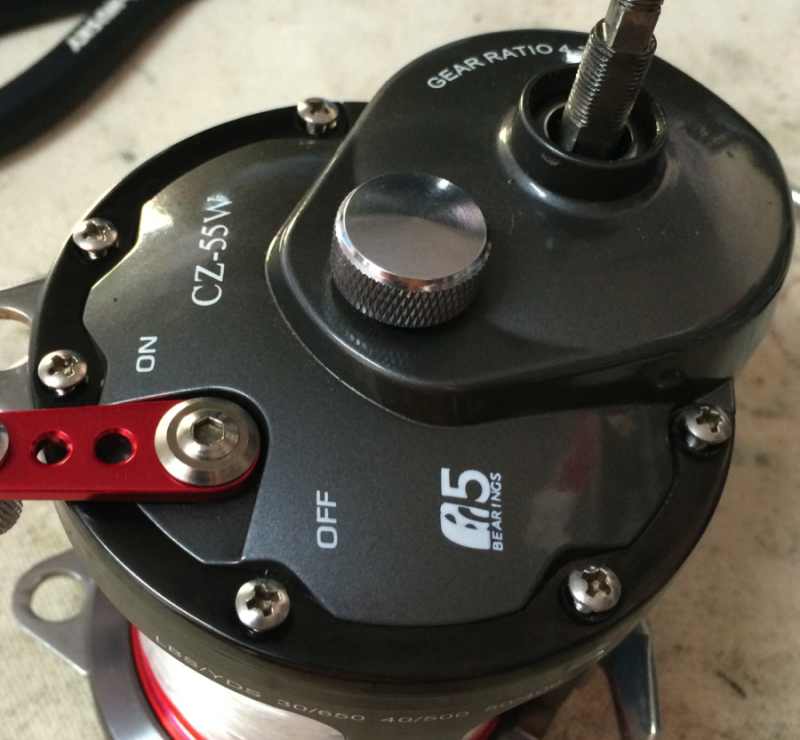
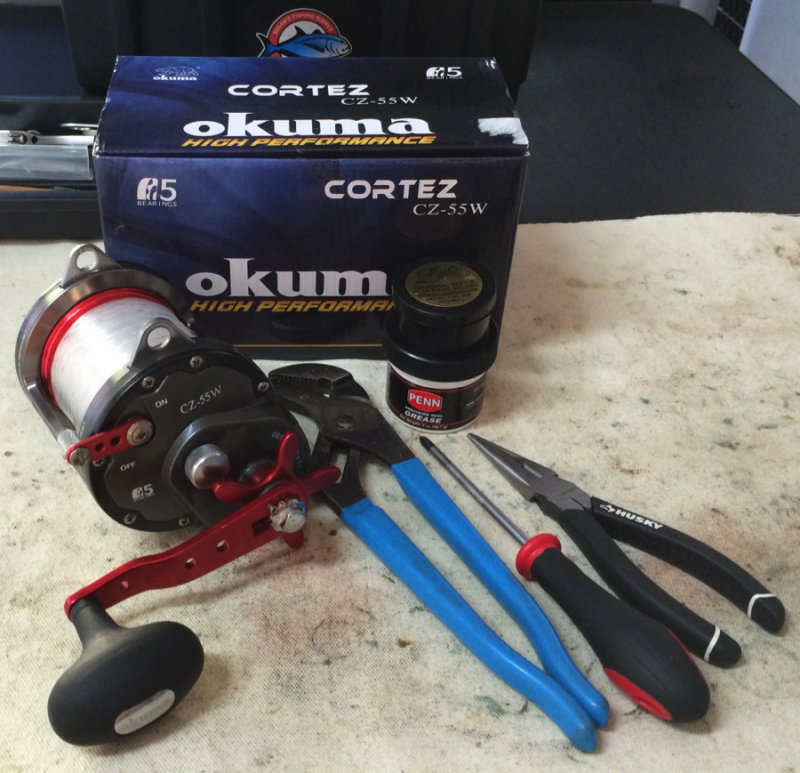
I'm a die hard Penn fan but couldn't pass up the deal on this Okuma Cortez CZ-55W.
Disclaimer: This is by no means a Reel Service but rather just a take down and put back together session because I was curious of how the internals looked on this reel. I'm not a professional reel repair guy so please bear with me.
 (http://smg.photobucket.com/user/ryagi/media/1_zpsaa33f4d0.png.html)
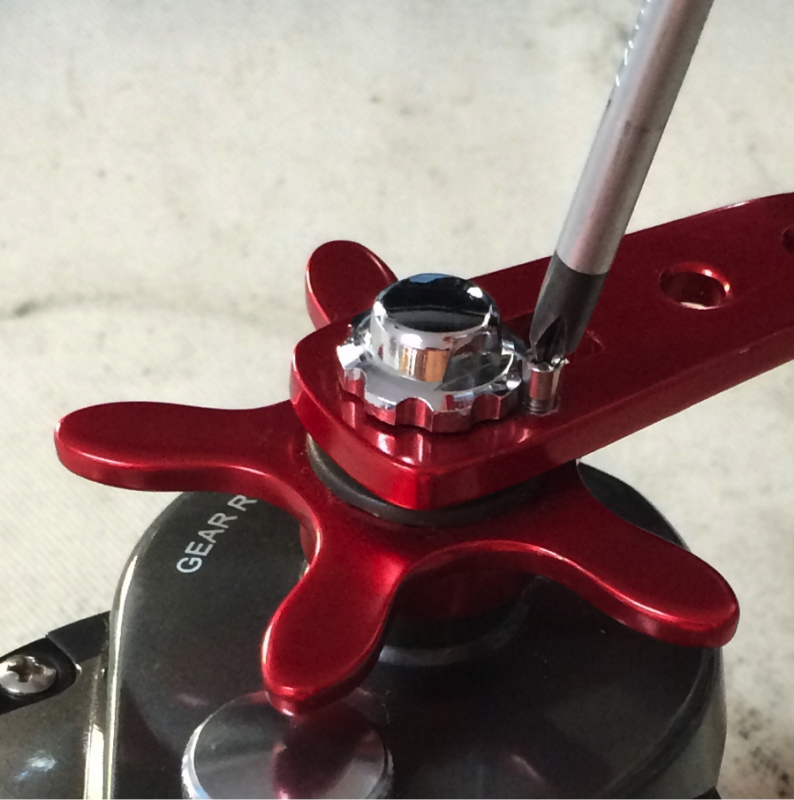
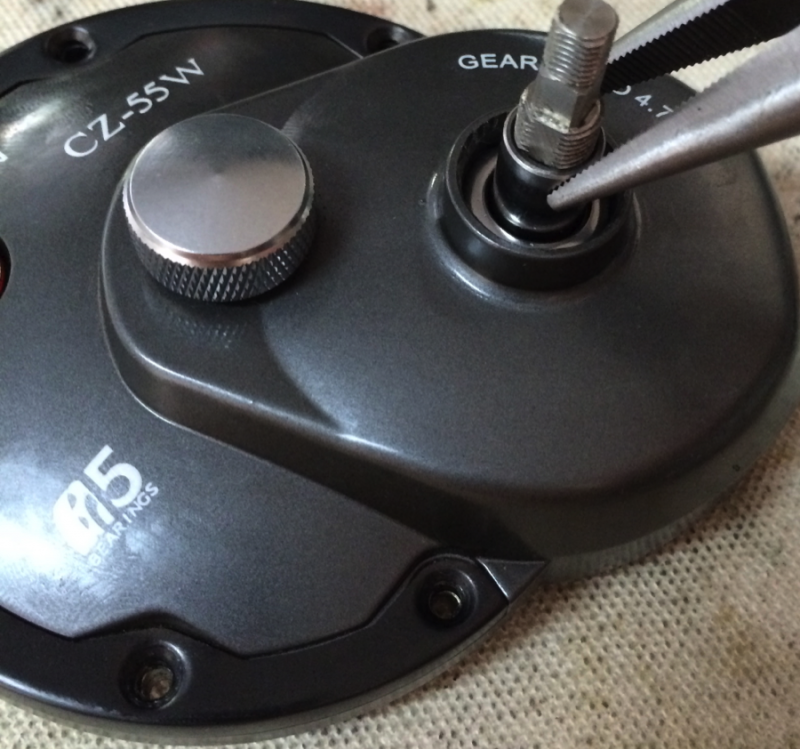
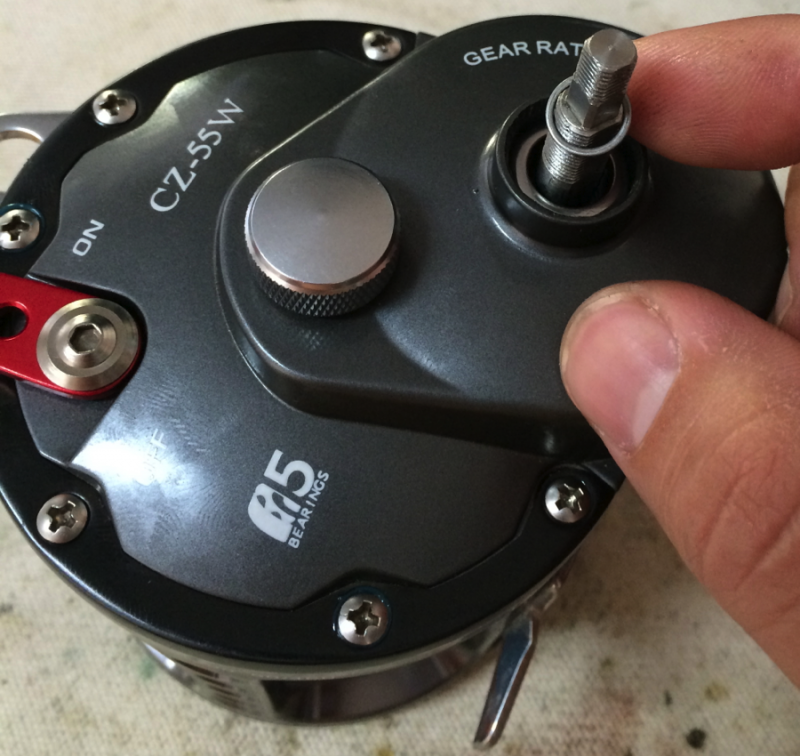
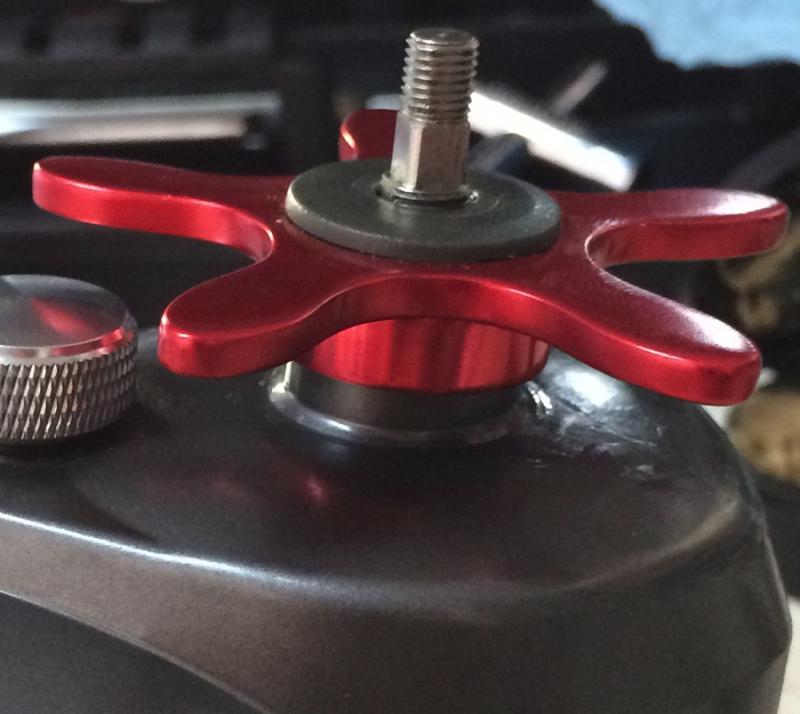
First remove the Handle Screw (key# 515)
 (http://smg.photobucket.com/user/ryagi/media/47_zps248282ae.png.html)
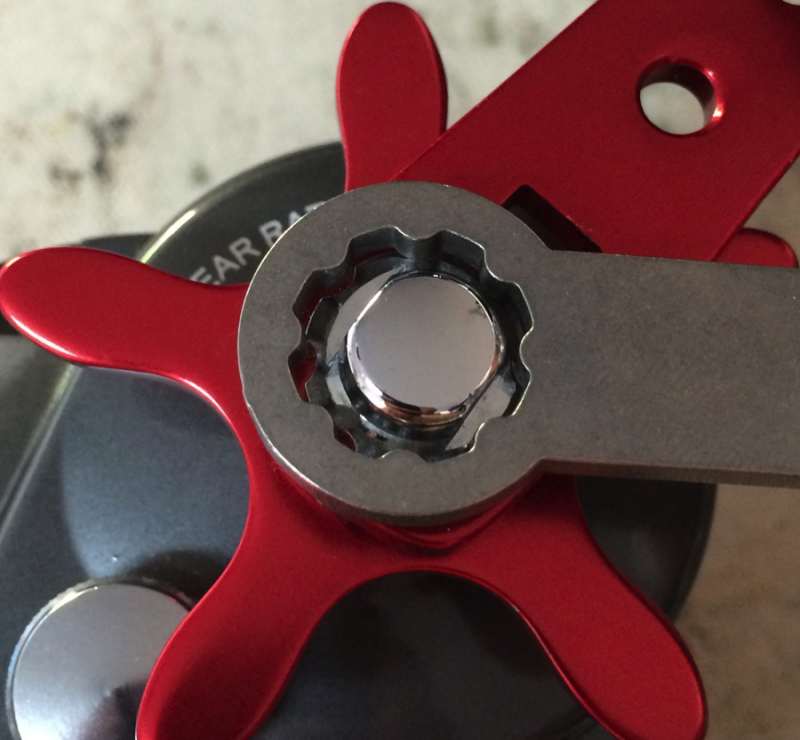
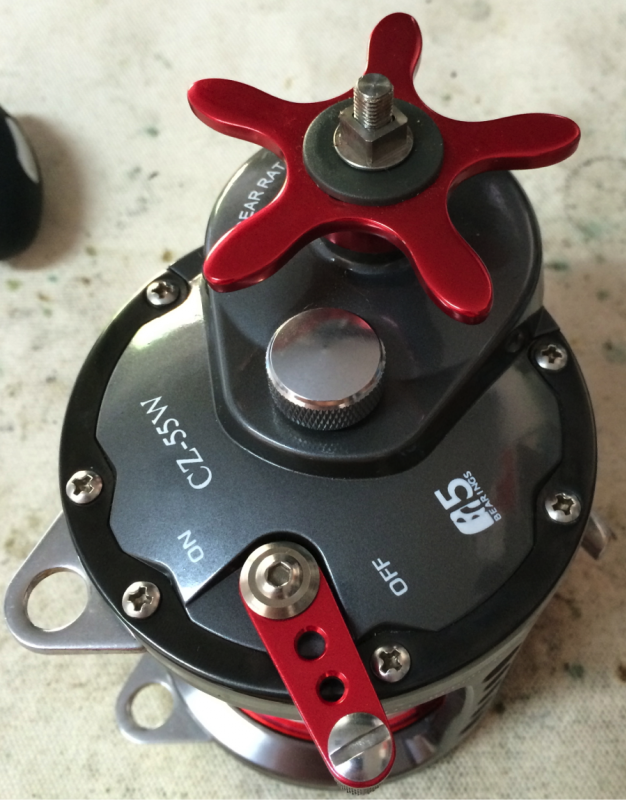
As you can see, the Alan Tani Handle Nut Wrench does not fit on the handle nut.
 (http://smg.photobucket.com/user/ryagi/media/3_zpsbd445f5f.png.html)
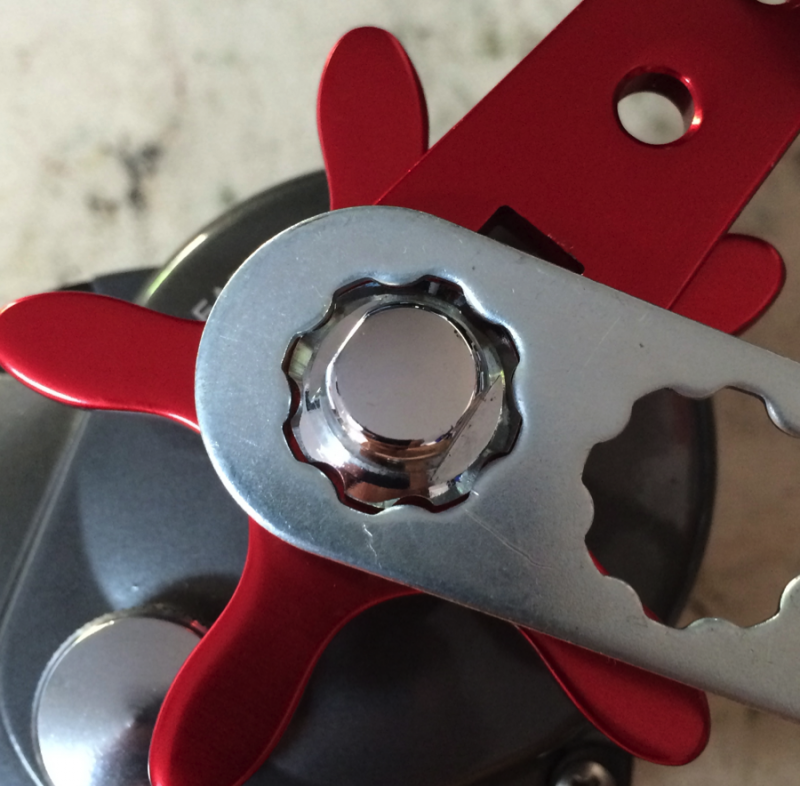
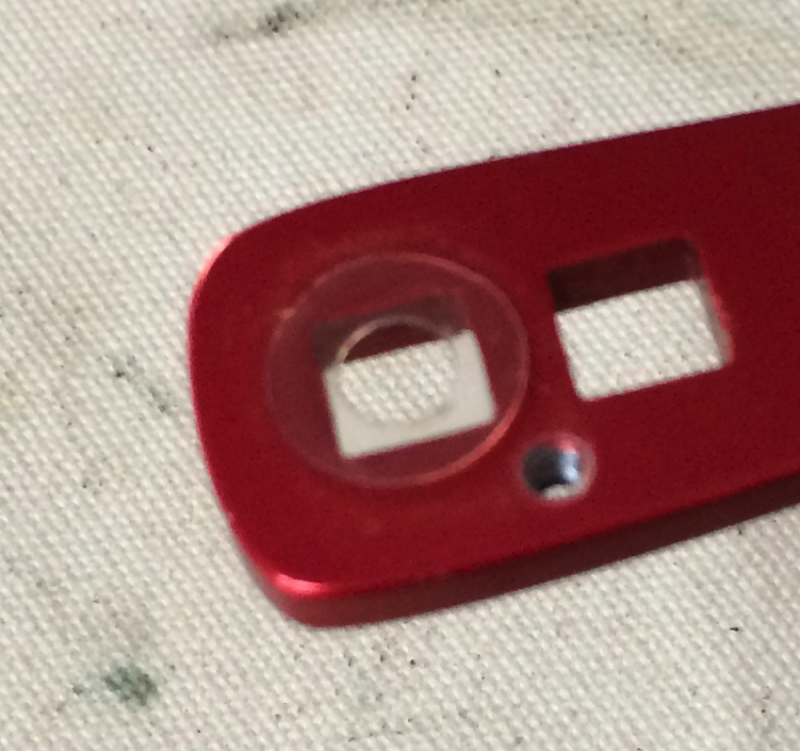
And neither does the 8 in 1 wrench.
 (http://smg.photobucket.com/user/ryagi/media/4_zps10af6b20.png.html)
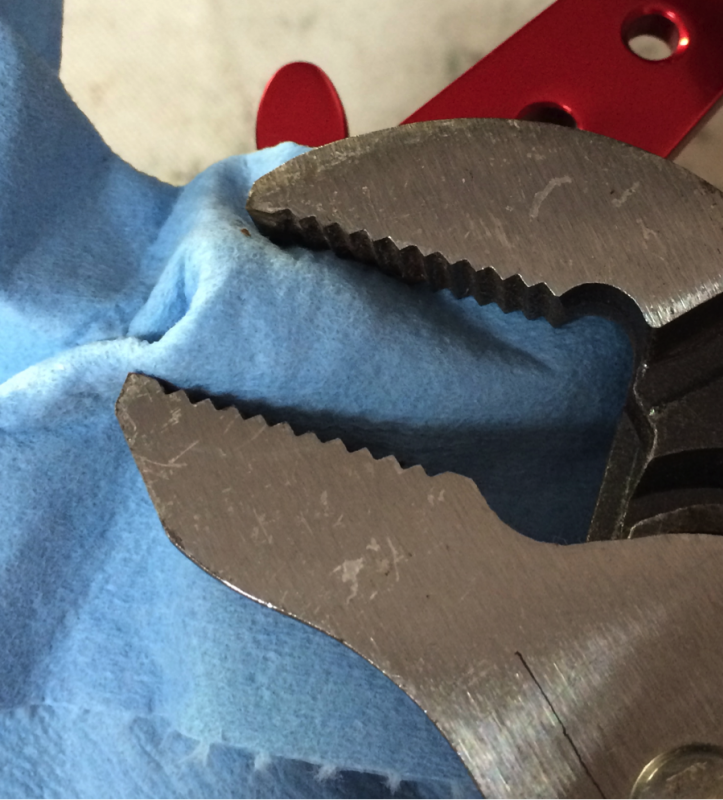
So, lacking the proper tool, I had to use Channel Locks to take the Handle Nut off. Make sure if you go this route, use some kind of material in between the handle nut and Channel Lock teeth to prevent marring. In this case, I just used a shop towel which seemed to do the trick.
 (http://smg.photobucket.com/user/ryagi/media/5_zps12d800bc.png.html)
Take note of this Plastic Washer (key# 0920133) which sits under the Handle Nut – Okuma calls this a Retainer Nut (key# 117) when taking off the Handle Assembly (key# 500).
 (http://smg.photobucket.com/user/ryagi/media/6_zps6657e70f.png.html)
Next remove the Keyed Handle Bushing - Okuma calls this a Drag Washer (key# 520) and Star Drag Assembly (key# 615)
 (http://smg.photobucket.com/user/ryagi/media/7_zps977c1a8f.png.html)
Now remove the Washer (key# 0920326), Click Gear (key# 401-2), Belleville Washers – Okuma calls these Drag Spring Washers (key# 609) & Drive Gear Shaft Bushing (key# 720-1)
 (http://smg.photobucket.com/user/ryagi/media/43_zpsb7b893c8.png.html)
Remove the Spacing Sleeve – Okuma calls this another Drive Gear Shaft Bushing (key# 720)
 (http://smg.photobucket.com/user/ryagi/media/35_zps4ff4883a.png.html)
Now remove all 6 Screws (key# 09301224) which secure the Handle Side Plate (key# 200) to the Frame/Main Body Assembly (key# 100).
 (http://smg.photobucket.com/user/ryagi/media/10_zps8e529a38.png.html)
Remove the Harness Lug – Okuma calls this a Hanger (key # 108)
 (http://smg.photobucket.com/user/ryagi/media/11_zps807c36a1.png.html)
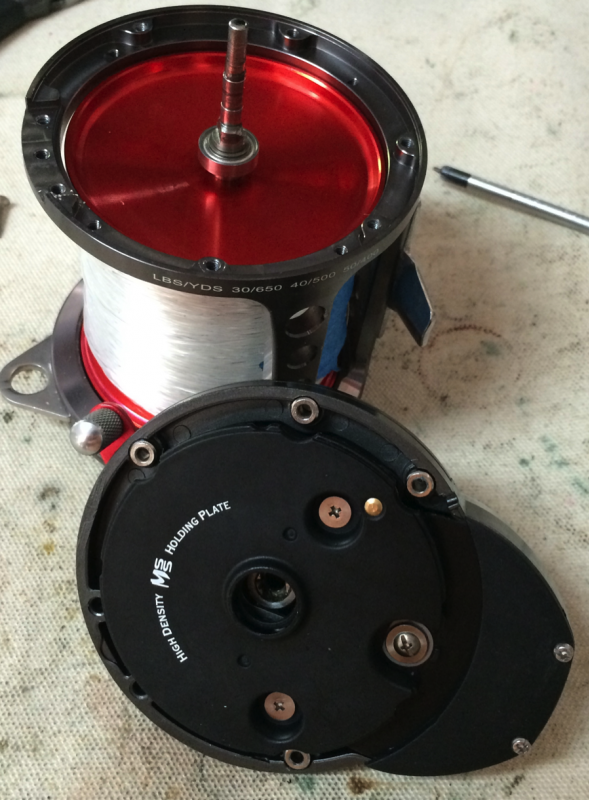
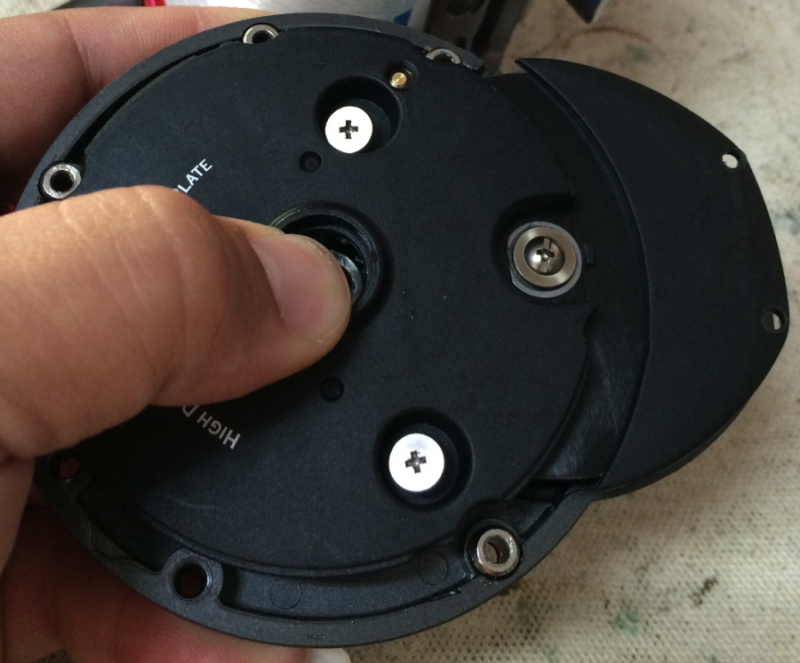
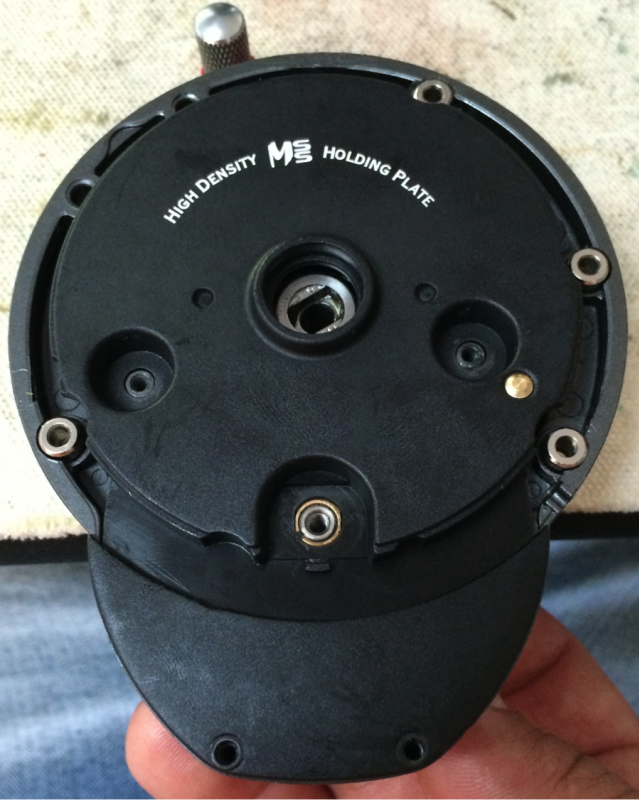
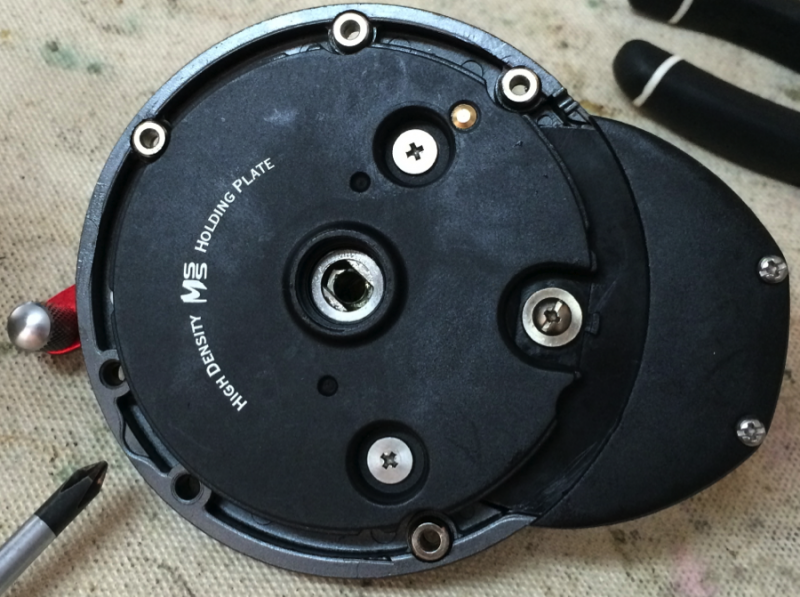
Just a pic of the High Density Holding Plate aka Holded Plate (key# 207) in Okuma lingo, which holds all the internals together so be careful when removing it.
 (http://smg.photobucket.com/user/ryagi/media/12_zpscd3a06c5.png.html)
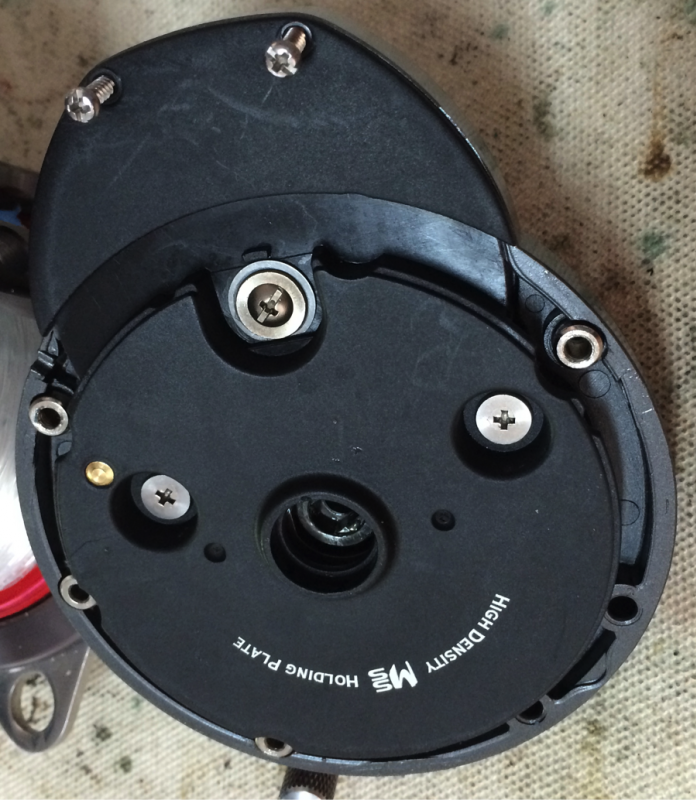
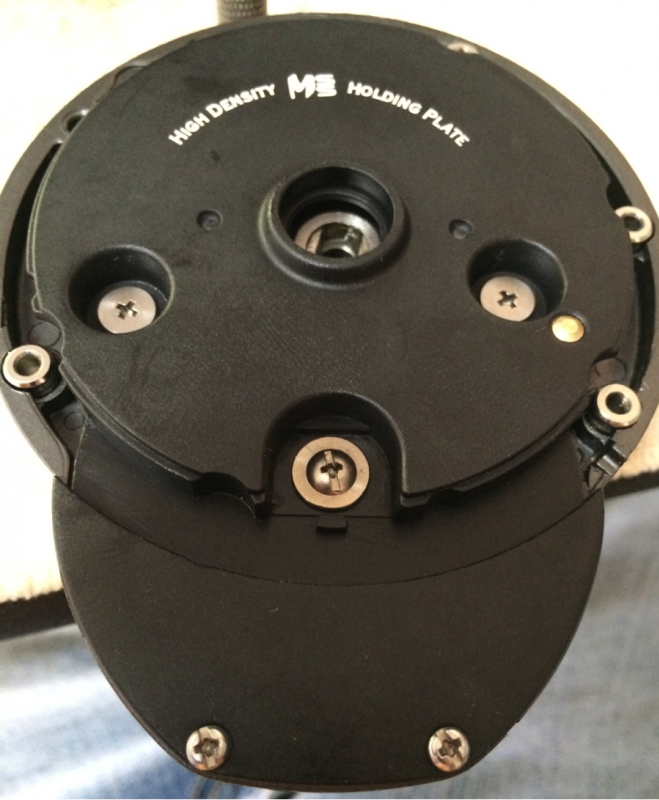
Remove the 5 screws (2x key# 0930060)(2x key# 0930651) & (1x key# 0930202) while holding everything together. The Middle Screw (key# 0930202) is actually holding the Drive Gear Shaft (key# 701) to the Holded Plate (key# 207) so to remove it you will need to put the Drag Washer/Handle Bushing (key# 520) and the Handle Assembly (key# 500) back on so that you can hold the Drive Gear Shaft (key# 701) from moving while undoing the screw. (I should have removed the handle after I took off the sideplate. Oh well, lesson learned.)
 (http://smg.photobucket.com/user/ryagi/media/13_zps3f09aa57.png.html)
 (http://smg.photobucket.com/user/ryagi/media/14_zps7e92ae7b.png.html)
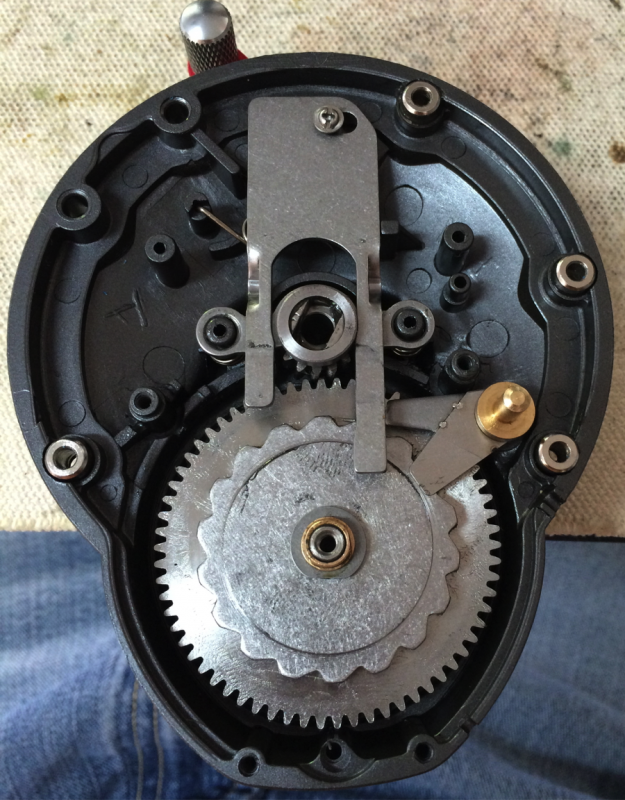
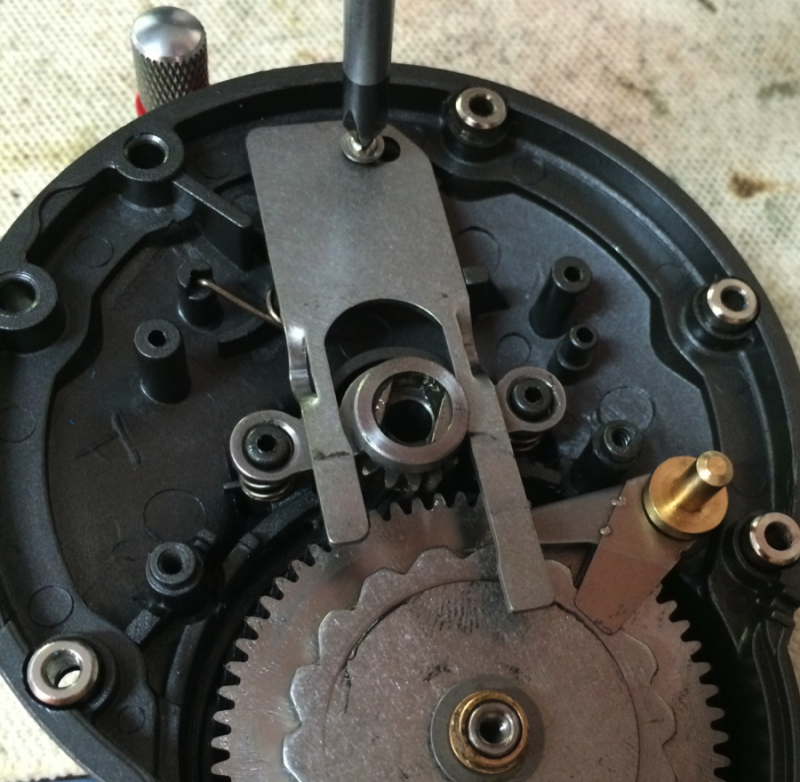
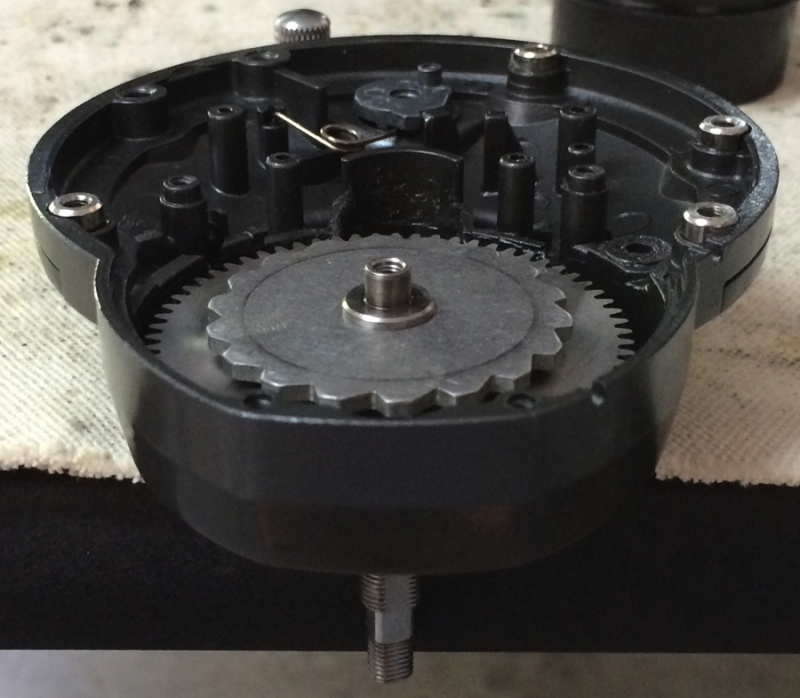
Now you should be looking at something like this.
 (http://smg.photobucket.com/user/ryagi/media/15_zps4569a00b.png.html)
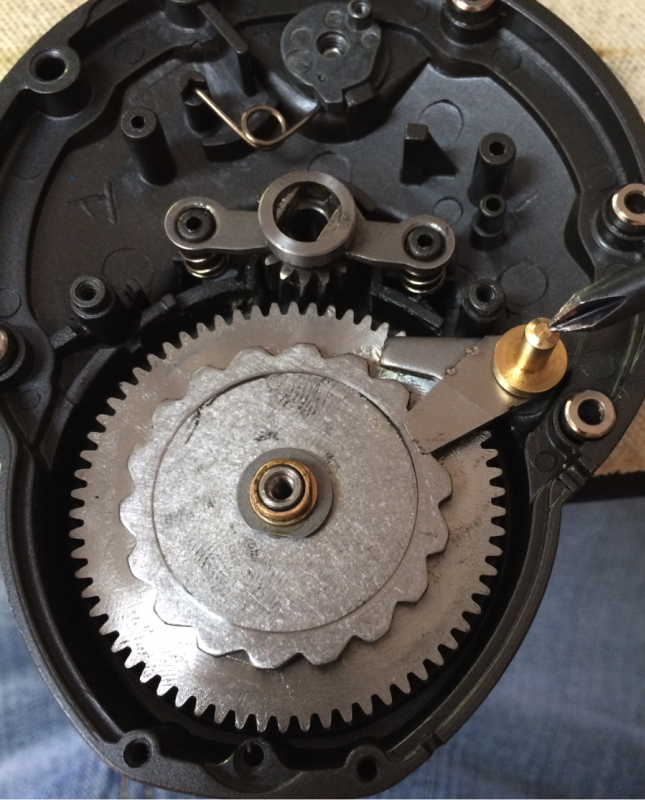
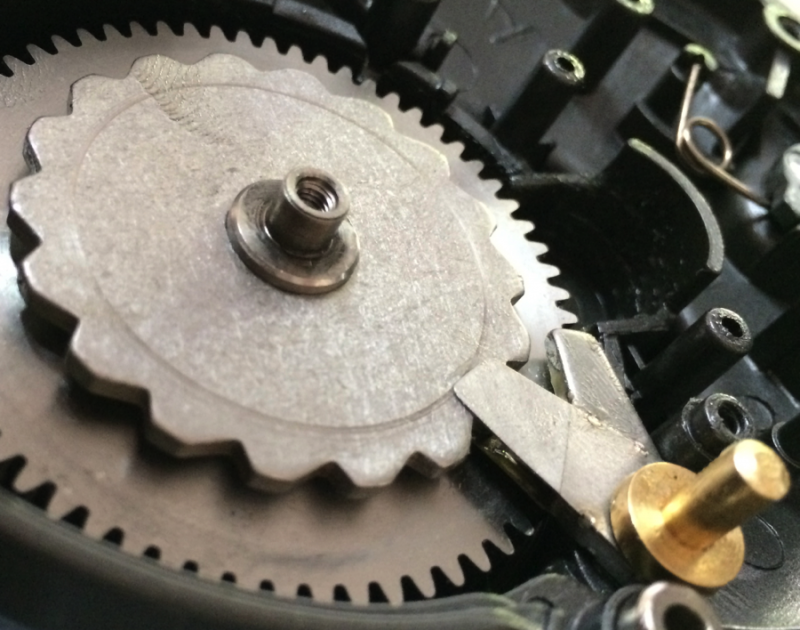
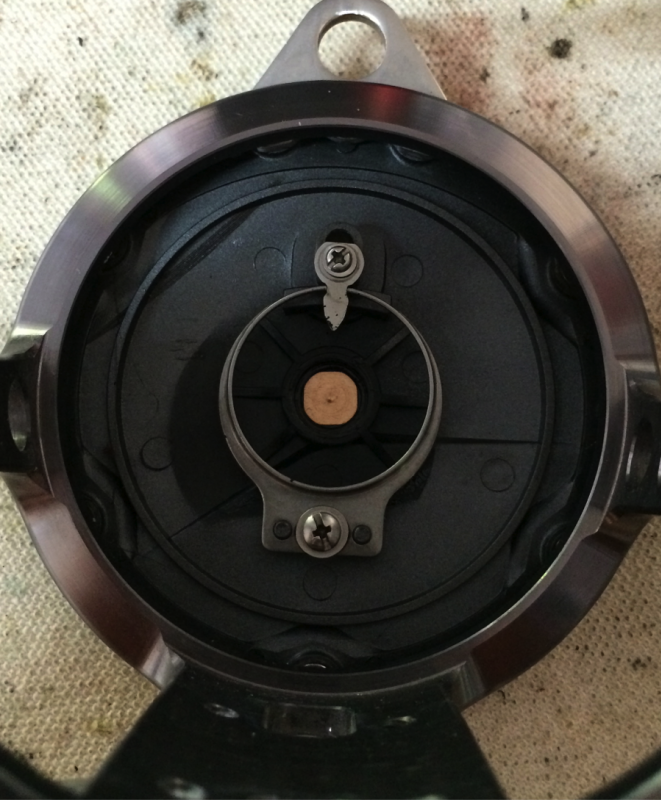
Remove the Eccentric Jack Screw/Clutch Slider Screw (key# 0930194) & Eccentric Jack – Okuma calls this a Clutch Slider (key# 804).
 (http://smg.photobucket.com/user/ryagi/media/16_zpse486e880.png.html)
Remove the Anti-Reverse Pawl Pin (key# 211) and Dog/Anti-Reverse Pawl (key# 201).
 (http://smg.photobucket.com/user/ryagi/media/17_zpsdd7fe2e4.png.html)
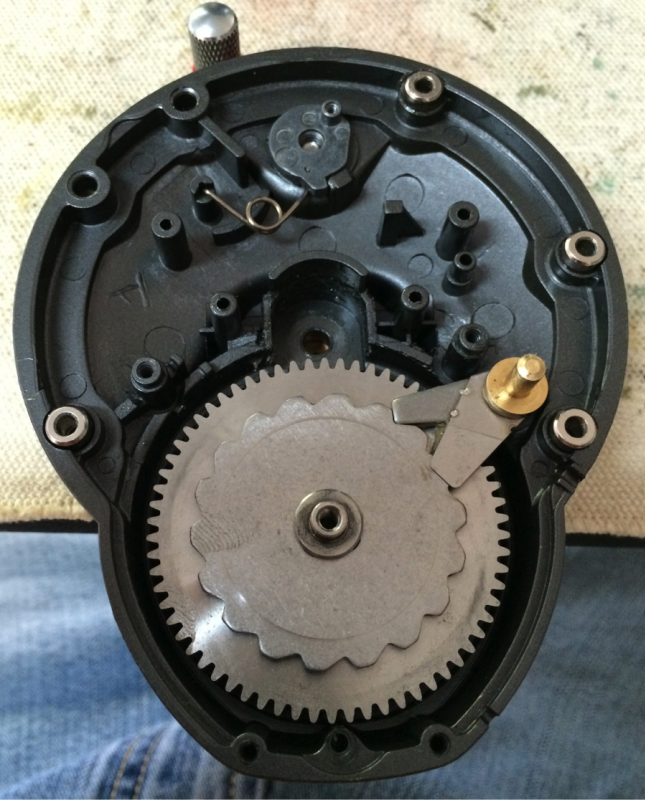
Remove the Pinion Gear Assembly (key# 702), Pinion Gear Yoke (key# 805) & Yoke Springs (key# 806), Main Drive Gear (key# 700) & Drive Gear Shaft (key# 701).
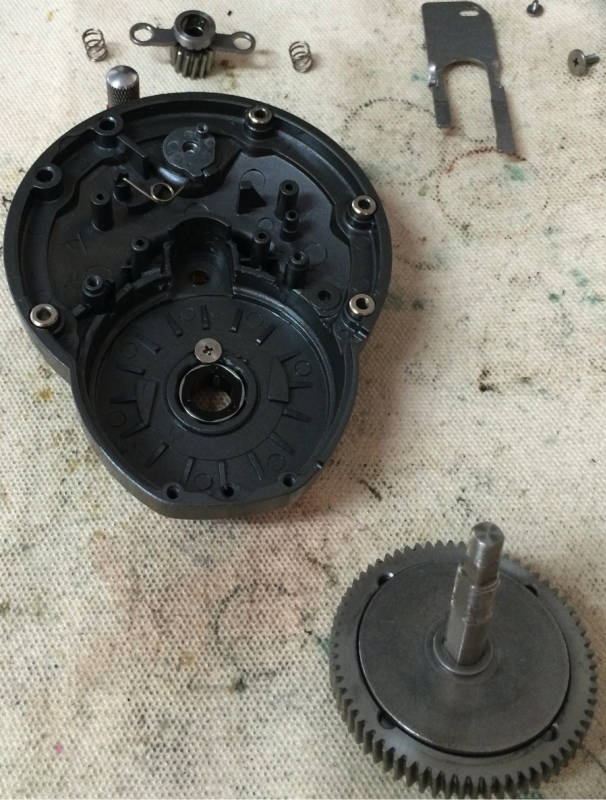 (http://smg.photobucket.com/user/ryagi/media/18_zpse18b88cf.png.html)
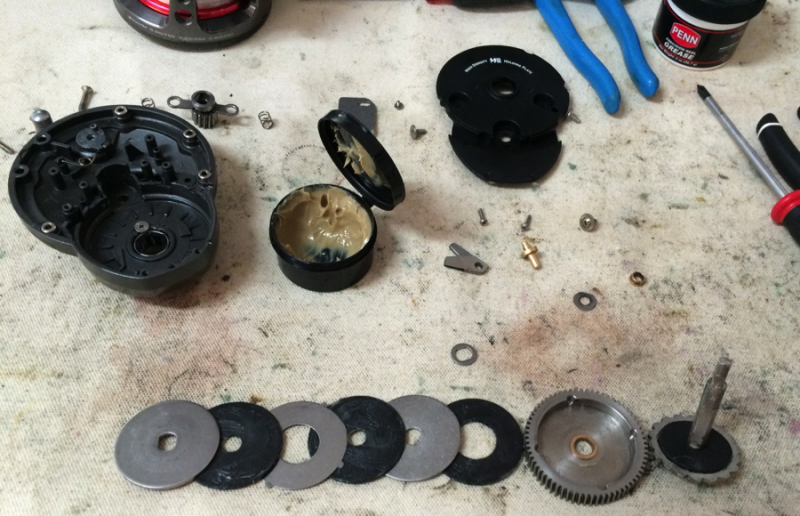
Take the Main Drive Gear (key# 700) off of the Drive Gear Shaft (key# 701) along with the Under Gear Drag Washer (key# 0920488). Then remove the Drag Stack (Keyed Drag Washer (key# 612-1), Small Hole Carbon Drag Washer (key# 610), Eared Drag Washer (key# 611), Small Hole Carbon Drag Washer (key# 610), Keyed Drag Washer (key# 612) & Big Hole Carbon Drag Washer (key# 610-1)) and Top Keyed Washer (key# 612-2).
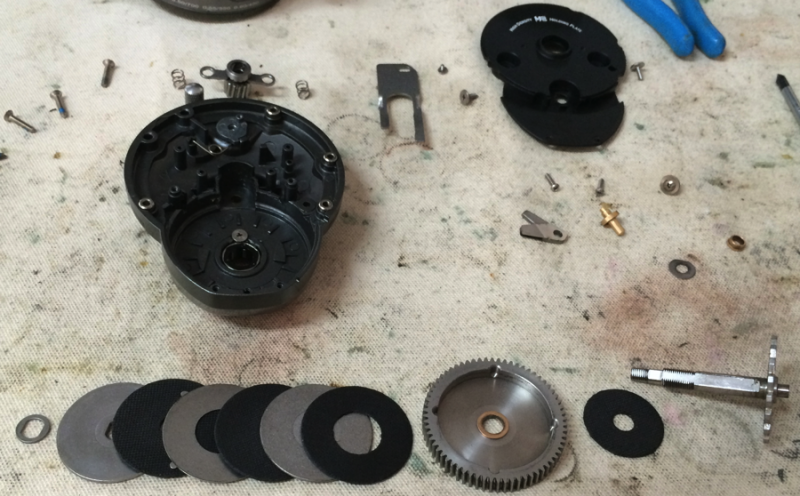 (http://smg.photobucket.com/user/ryagi/media/19_zps91ba09af.png.html)
Just wanted to show how much bigger the drags were compared to the Penn 113H 4/0 drags.
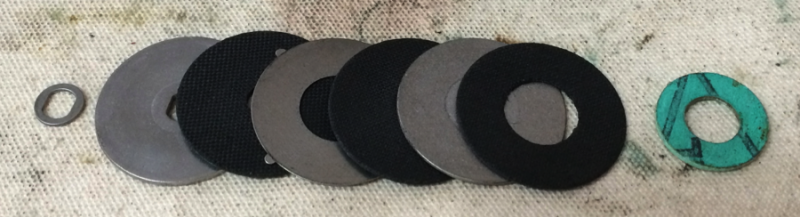 (http://smg.photobucket.com/user/ryagi/media/20_zpsff0a5305.png.html)
Since the Drag Washers were out anyway, I figured I'd just grease them up with some Cal's. Don't forget to put some grease on the Anti-Reverse Bearing (key# 0910153).
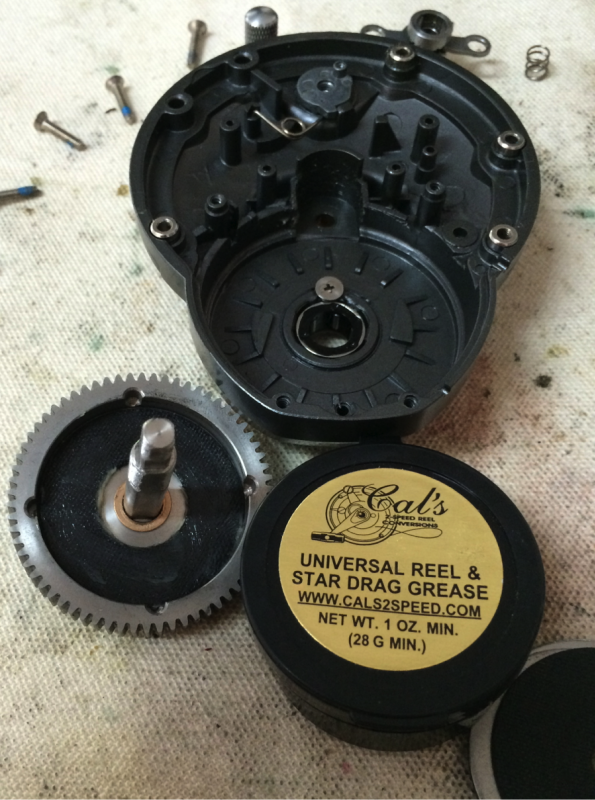 (http://smg.photobucket.com/user/ryagi/media/21_zps8f8cf09e.png.html)
Notice the order of the Drag Stack - Keyed Drag Washer (key# 612-1), Small Hole Carbon Drag Washer (key# 610), Eared Drag Washer (key# 611), Small Hole Carbon Drag Washer (key# 610), Keyed Drag Washer (key# 612) & Big Hole Carbon Drag Washer (key# 610-1)
 (http://smg.photobucket.com/user/ryagi/media/22_zps4e13090d.png.html)
Now to reassemble..... Put the Under Drag Washer (key# 0920488), Main Drive Gear (key# 700) & Drag Stack – [(Top to Bottom) Keyed Drag Washer (key# 612-1), Small Hole Carbon Drag Washer (key# 610), Eared Drag Washer (key# 611), Small Hole Carbon Drag Washer (key# 610), Keyed Drag Washer (key# 612) & Big Hole Carbon Drag Washer (key# 610-1)] back onto the Drive Gear Shaft (key# 701) in the correct order and install it back into the Handle Side Plate (key# 200).
 (http://smg.photobucket.com/user/ryagi/media/23_zpsf9b027f6.png.html)
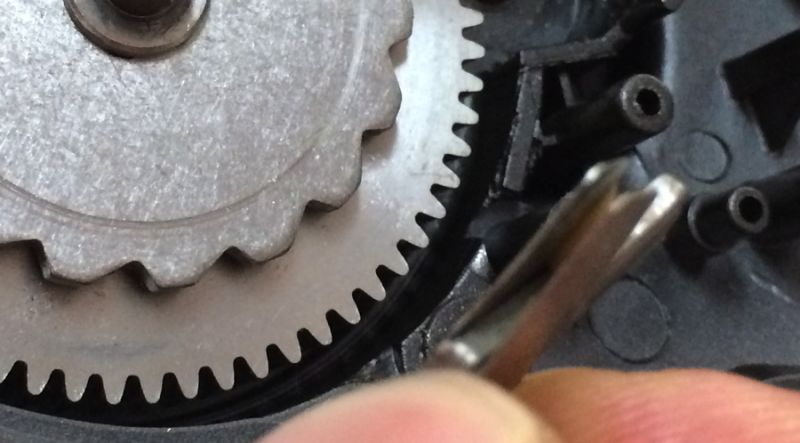
Install the Dog/Anti-Reverse Pawl (key# 201) and Anti-Reverse Pawl Pin (key# 211). Notice how the Dog sits (Good dog haha.)
 (http://smg.photobucket.com/user/ryagi/media/24_zpsb33edb76.png.html)
 (http://smg.photobucket.com/user/ryagi/media/25_zps7300eb45.png.html)
 (http://smg.photobucket.com/user/ryagi/media/26_zps442de3d1.png.html)
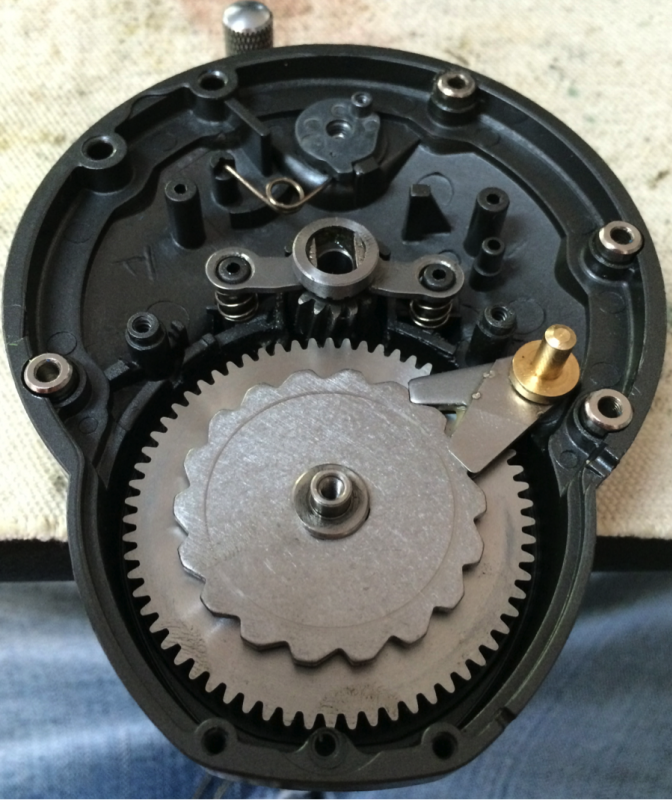
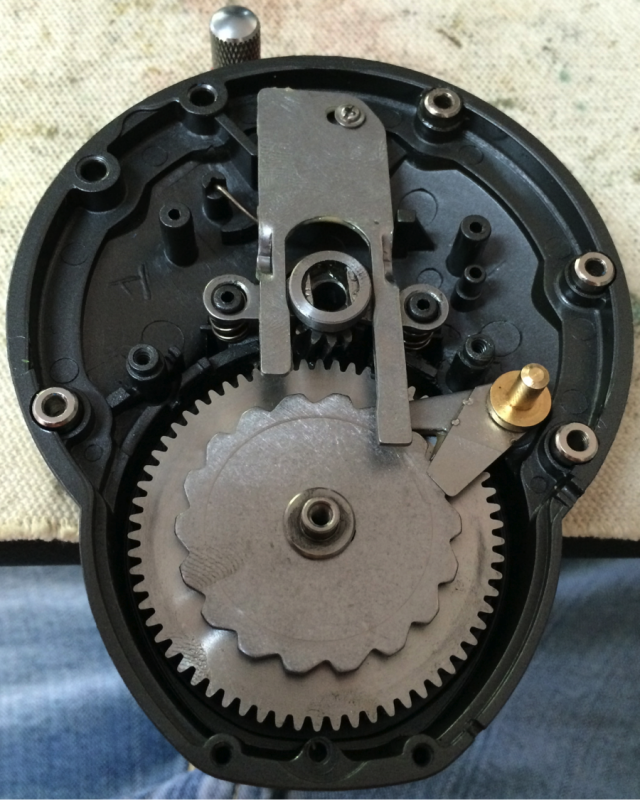
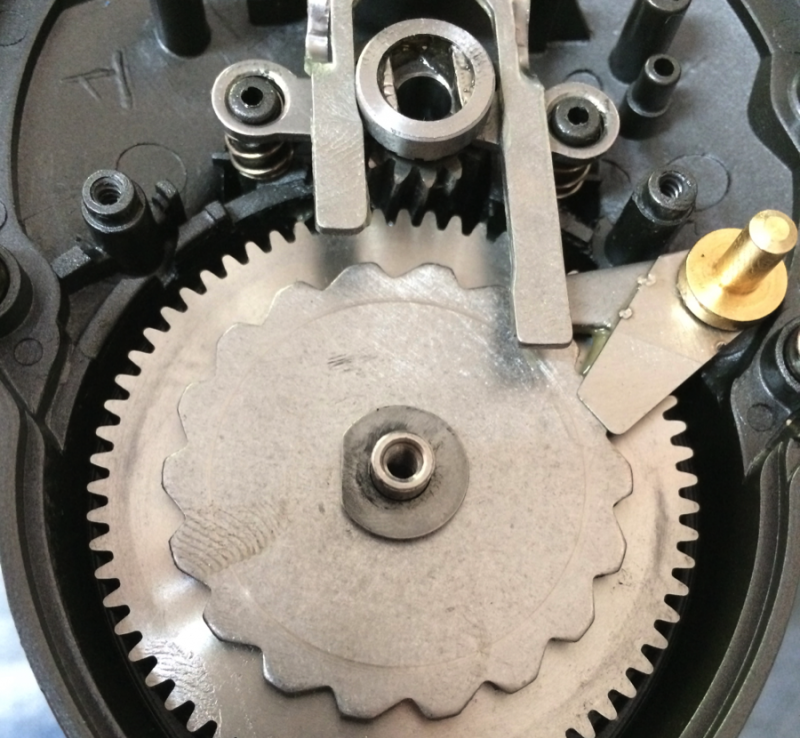
Install the Yoke Springs (key# 806), Pinion Gear Yoke (key# 805) & Pinion Gear Assembly (key# 702).
 (http://smg.photobucket.com/user/ryagi/media/27_zps8a7ac5e9.png.html)
Install the Eccentric Jack/Clutch Slider (key# 804) & Eccentric Jack/Clutch Slider Screw (key# 0930194).
 (http://smg.photobucket.com/user/ryagi/media/28_zpsf24fc989.png.html)
Install the crescent moon shaped Washer (key# 0920435).
 (http://smg.photobucket.com/user/ryagi/media/29_zps8ef6957b.png.html)
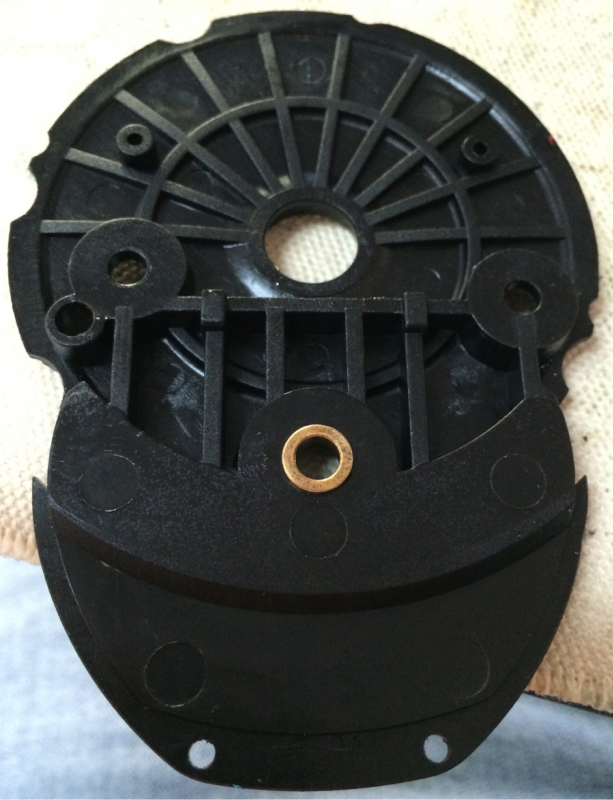
Install the Hold Plate Bushing (key# 215) into the Holded Plate (key# 207).
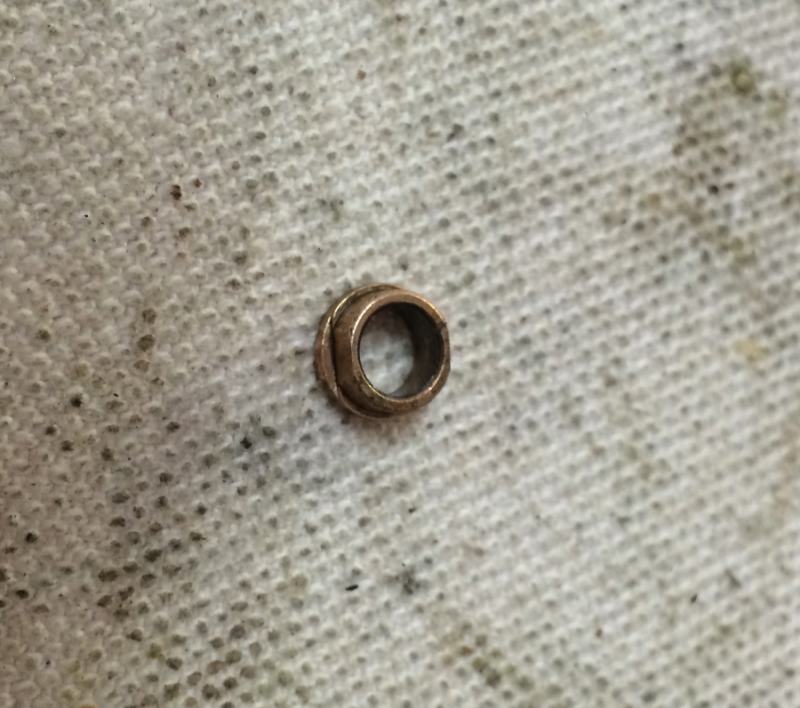 (http://smg.photobucket.com/user/ryagi/media/30_zpsd4cb6b9d.png.html)
 (http://smg.photobucket.com/user/ryagi/media/31_zps796efddd.png.html)
Put the Holded Plate (key# 207) back onto the Handle Side Plate Assembly (key# 200). Make sure everything lines up.
 (http://smg.photobucket.com/user/ryagi/media/32_zps53850a4a.png.html)
Take the 5 Screws from earlier [(2x key# 0930060)(2x key# 0930651) & (1x key# 0930202)] and lock down the Holded Plate (key# 207) & Drive Gear Shaft (key# 701). You may need to install the Handle Bushing/Drag Washer (key# 520) and Handle Assembly (key# 500) to lock down the Drive Gear Shaft Screw (key# 0930202).
 (http://smg.photobucket.com/user/ryagi/media/33_zpsa6941513.png.html)
Turn the Handle Side Plate (key# 200) right side up and install the small Washer (key# 0920161).
 (http://smg.photobucket.com/user/ryagi/media/34_zps3b5bc8fb.png.html)
Install the Spacing Sleeve/Drive Gear Shaft Bushing (key# 720).
(http://smg.photobucket.com/user/ryagi/media/35_zps4ff4883a.png.html)
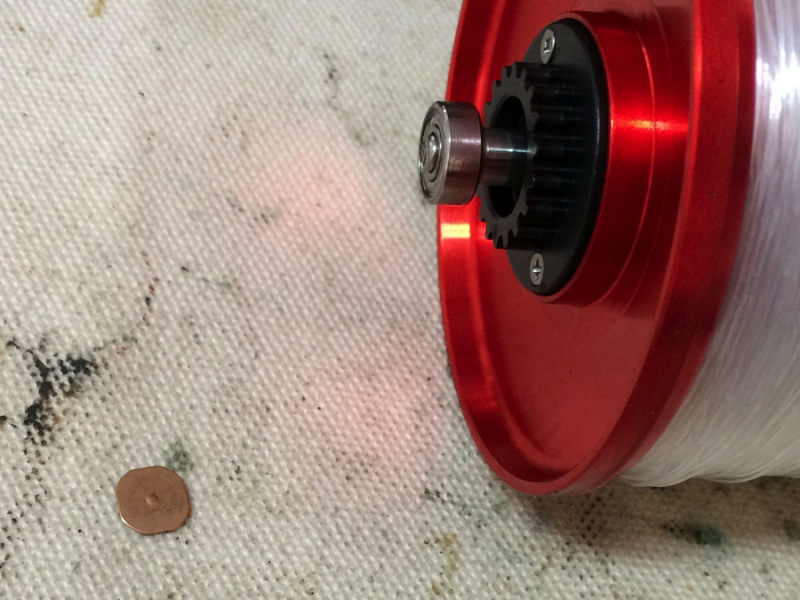
When pulling out the Spool Assembly (key# 400) from the Left Side Plate – Okuma calls this the Vice Side Plate (key# 300) be careful not to lose the Under Bearing Shim/Spacer/Washer (key# 302).
 (http://smg.photobucket.com/user/ryagi/media/36_zpsac2b7e66.png.html)
 (http://smg.photobucket.com/user/ryagi/media/37_zps0b20fc64.png.html)
Just a pic of the Spool Shaft with its Bearing (key# 0910278).
 (http://smg.photobucket.com/user/ryagi/media/38_zps5125cadb.png.html)
Notice the little knurl on the Handle Side Plate (key# 200), it tells you how to mate the Side Plate to the Frame/Main Body Assembly (key# 100). The knurl is where the Harness Lug/Hanger (key# 108) should go.
 (http://smg.photobucket.com/user/ryagi/media/39_zps19dc95a0.png.html)
Install the Handle Side Plate (key# 200) back onto the Frame/Main Body Assembly (key# 100) with the 6 Screws from earlier (key# 09301224) taking note of the Harness Lug/Hanger (key# 108) position.
 (http://smg.photobucket.com/user/ryagi/media/40_zpsda3c09e8.png.html)
This is the order that the Handle should be installed (Bottom to Top)
 (http://smg.photobucket.com/user/ryagi/media/41_zps47e9fe1a.png.html)
Install the Drive Gear Shaft Bushing (key# 720-1) then the Belleville/Drag Spring Washers (key# 609) – Notice the way the Bellevilles are positioned "()".
 (http://smg.photobucket.com/user/ryagi/media/42_zps85cc95f6.png.html)
Install the Click Gear (key# 401-2) and Washer (key# 0920326)
(http://smg.photobucket.com/user/ryagi/media/43_zpsb7b893c8.png.html)
Install the Star Drag Assembly (key# 615).
 (http://smg.photobucket.com/user/ryagi/media/44_zpsbb9ddca7.png.html)
Install the Keyed Handle Bushing/Drag Washer (key# 520).
 (http://smg.photobucket.com/user/ryagi/media/45_zpsfee5e90e.png.html)
Install the Handle Assembly (key# 500) and Plastic Washer (key# 0920133).
 (http://smg.photobucket.com/user/ryagi/media/46_zps783edfc8.png.html)
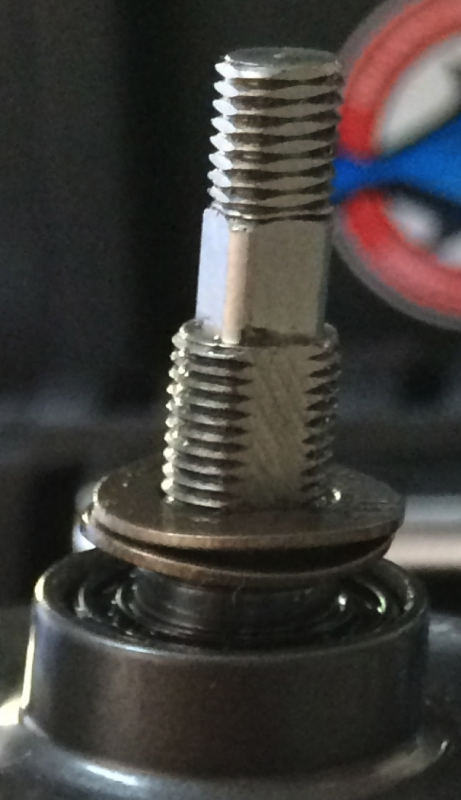
Lastly, install the Handle/Retainer Nut (key# 117) and Handle Screw (key# 515).
(http://smg.photobucket.com/user/ryagi/media/47_zps248282ae.png.html)
DONE! I didn't show pictures of it but during reassembly I put a thin layer of grease between the Frame, Sideplates & Frame Rings – Okuma calls these Side Plate Covers (key#'s 208 & 311) on both sides as well as some grease in all of the screw holes.
 (http://smg.photobucket.com/user/ryagi/media/48_zps24714ef1.png.html)
Hope this helps anyone attempting to service this reel. Thanks for your time.
Disclaimer: This is by no means a Reel Service but rather just a take down and put back together session because I was curious of how the internals looked on this reel. I'm not a professional reel repair guy so please bear with me.
(http://smg.photobucket.com/user/ryagi/media/1_zpsaa33f4d0.png.html)First remove the Handle Screw (key# 515)
(http://smg.photobucket.com/user/ryagi/media/47_zps248282ae.png.html)As you can see, the Alan Tani Handle Nut Wrench does not fit on the handle nut.
(http://smg.photobucket.com/user/ryagi/media/3_zpsbd445f5f.png.html)And neither does the 8 in 1 wrench.
(http://smg.photobucket.com/user/ryagi/media/4_zps10af6b20.png.html)So, lacking the proper tool, I had to use Channel Locks to take the Handle Nut off. Make sure if you go this route, use some kind of material in between the handle nut and Channel Lock teeth to prevent marring. In this case, I just used a shop towel which seemed to do the trick.
(http://smg.photobucket.com/user/ryagi/media/5_zps12d800bc.png.html)Take note of this Plastic Washer (key# 0920133) which sits under the Handle Nut – Okuma calls this a Retainer Nut (key# 117) when taking off the Handle Assembly (key# 500).
(http://smg.photobucket.com/user/ryagi/media/6_zps6657e70f.png.html)Next remove the Keyed Handle Bushing - Okuma calls this a Drag Washer (key# 520) and Star Drag Assembly (key# 615)
(http://smg.photobucket.com/user/ryagi/media/7_zps977c1a8f.png.html)Now remove the Washer (key# 0920326), Click Gear (key# 401-2), Belleville Washers – Okuma calls these Drag Spring Washers (key# 609) & Drive Gear Shaft Bushing (key# 720-1)
(http://smg.photobucket.com/user/ryagi/media/43_zpsb7b893c8.png.html)Remove the Spacing Sleeve – Okuma calls this another Drive Gear Shaft Bushing (key# 720)
(http://smg.photobucket.com/user/ryagi/media/35_zps4ff4883a.png.html)Now remove all 6 Screws (key# 09301224) which secure the Handle Side Plate (key# 200) to the Frame/Main Body Assembly (key# 100).
(http://smg.photobucket.com/user/ryagi/media/10_zps8e529a38.png.html)Remove the Harness Lug – Okuma calls this a Hanger (key # 108)
(http://smg.photobucket.com/user/ryagi/media/11_zps807c36a1.png.html)Just a pic of the High Density Holding Plate aka Holded Plate (key# 207) in Okuma lingo, which holds all the internals together so be careful when removing it.
(http://smg.photobucket.com/user/ryagi/media/12_zpscd3a06c5.png.html)Remove the 5 screws (2x key# 0930060)(2x key# 0930651) & (1x key# 0930202) while holding everything together. The Middle Screw (key# 0930202) is actually holding the Drive Gear Shaft (key# 701) to the Holded Plate (key# 207) so to remove it you will need to put the Drag Washer/Handle Bushing (key# 520) and the Handle Assembly (key# 500) back on so that you can hold the Drive Gear Shaft (key# 701) from moving while undoing the screw. (I should have removed the handle after I took off the sideplate. Oh well, lesson learned.)
(http://smg.photobucket.com/user/ryagi/media/13_zps3f09aa57.png.html) (http://smg.photobucket.com/user/ryagi/media/14_zps7e92ae7b.png.html)Now you should be looking at something like this.
(http://smg.photobucket.com/user/ryagi/media/15_zps4569a00b.png.html)Remove the Eccentric Jack Screw/Clutch Slider Screw (key# 0930194) & Eccentric Jack – Okuma calls this a Clutch Slider (key# 804).
(http://smg.photobucket.com/user/ryagi/media/16_zpse486e880.png.html)Remove the Anti-Reverse Pawl Pin (key# 211) and Dog/Anti-Reverse Pawl (key# 201).
(http://smg.photobucket.com/user/ryagi/media/17_zpsdd7fe2e4.png.html)Remove the Pinion Gear Assembly (key# 702), Pinion Gear Yoke (key# 805) & Yoke Springs (key# 806), Main Drive Gear (key# 700) & Drive Gear Shaft (key# 701).
(http://smg.photobucket.com/user/ryagi/media/18_zpse18b88cf.png.html)Take the Main Drive Gear (key# 700) off of the Drive Gear Shaft (key# 701) along with the Under Gear Drag Washer (key# 0920488). Then remove the Drag Stack (Keyed Drag Washer (key# 612-1), Small Hole Carbon Drag Washer (key# 610), Eared Drag Washer (key# 611), Small Hole Carbon Drag Washer (key# 610), Keyed Drag Washer (key# 612) & Big Hole Carbon Drag Washer (key# 610-1)) and Top Keyed Washer (key# 612-2).
(http://smg.photobucket.com/user/ryagi/media/19_zps91ba09af.png.html)Just wanted to show how much bigger the drags were compared to the Penn 113H 4/0 drags.
(http://smg.photobucket.com/user/ryagi/media/20_zpsff0a5305.png.html)Since the Drag Washers were out anyway, I figured I'd just grease them up with some Cal's. Don't forget to put some grease on the Anti-Reverse Bearing (key# 0910153).
(http://smg.photobucket.com/user/ryagi/media/21_zps8f8cf09e.png.html)Notice the order of the Drag Stack - Keyed Drag Washer (key# 612-1), Small Hole Carbon Drag Washer (key# 610), Eared Drag Washer (key# 611), Small Hole Carbon Drag Washer (key# 610), Keyed Drag Washer (key# 612) & Big Hole Carbon Drag Washer (key# 610-1)
(http://smg.photobucket.com/user/ryagi/media/22_zps4e13090d.png.html)Now to reassemble..... Put the Under Drag Washer (key# 0920488), Main Drive Gear (key# 700) & Drag Stack – [(Top to Bottom) Keyed Drag Washer (key# 612-1), Small Hole Carbon Drag Washer (key# 610), Eared Drag Washer (key# 611), Small Hole Carbon Drag Washer (key# 610), Keyed Drag Washer (key# 612) & Big Hole Carbon Drag Washer (key# 610-1)] back onto the Drive Gear Shaft (key# 701) in the correct order and install it back into the Handle Side Plate (key# 200).
(http://smg.photobucket.com/user/ryagi/media/23_zpsf9b027f6.png.html)Install the Dog/Anti-Reverse Pawl (key# 201) and Anti-Reverse Pawl Pin (key# 211). Notice how the Dog sits (Good dog haha.)
(http://smg.photobucket.com/user/ryagi/media/24_zpsb33edb76.png.html) (http://smg.photobucket.com/user/ryagi/media/25_zps7300eb45.png.html) (http://smg.photobucket.com/user/ryagi/media/26_zps442de3d1.png.html)Install the Yoke Springs (key# 806), Pinion Gear Yoke (key# 805) & Pinion Gear Assembly (key# 702).
(http://smg.photobucket.com/user/ryagi/media/27_zps8a7ac5e9.png.html)Install the Eccentric Jack/Clutch Slider (key# 804) & Eccentric Jack/Clutch Slider Screw (key# 0930194).
(http://smg.photobucket.com/user/ryagi/media/28_zpsf24fc989.png.html)Install the crescent moon shaped Washer (key# 0920435).
(http://smg.photobucket.com/user/ryagi/media/29_zps8ef6957b.png.html)Install the Hold Plate Bushing (key# 215) into the Holded Plate (key# 207).
(http://smg.photobucket.com/user/ryagi/media/30_zpsd4cb6b9d.png.html) (http://smg.photobucket.com/user/ryagi/media/31_zps796efddd.png.html)Put the Holded Plate (key# 207) back onto the Handle Side Plate Assembly (key# 200). Make sure everything lines up.
(http://smg.photobucket.com/user/ryagi/media/32_zps53850a4a.png.html)Take the 5 Screws from earlier [(2x key# 0930060)(2x key# 0930651) & (1x key# 0930202)] and lock down the Holded Plate (key# 207) & Drive Gear Shaft (key# 701). You may need to install the Handle Bushing/Drag Washer (key# 520) and Handle Assembly (key# 500) to lock down the Drive Gear Shaft Screw (key# 0930202).
(http://smg.photobucket.com/user/ryagi/media/33_zpsa6941513.png.html)Turn the Handle Side Plate (key# 200) right side up and install the small Washer (key# 0920161).
(http://smg.photobucket.com/user/ryagi/media/34_zps3b5bc8fb.png.html)Install the Spacing Sleeve/Drive Gear Shaft Bushing (key# 720).
(http://smg.photobucket.com/user/ryagi/media/35_zps4ff4883a.png.html)When pulling out the Spool Assembly (key# 400) from the Left Side Plate – Okuma calls this the Vice Side Plate (key# 300) be careful not to lose the Under Bearing Shim/Spacer/Washer (key# 302).
(http://smg.photobucket.com/user/ryagi/media/36_zpsac2b7e66.png.html) (http://smg.photobucket.com/user/ryagi/media/37_zps0b20fc64.png.html)Just a pic of the Spool Shaft with its Bearing (key# 0910278).
(http://smg.photobucket.com/user/ryagi/media/38_zps5125cadb.png.html)Notice the little knurl on the Handle Side Plate (key# 200), it tells you how to mate the Side Plate to the Frame/Main Body Assembly (key# 100). The knurl is where the Harness Lug/Hanger (key# 108) should go.
(http://smg.photobucket.com/user/ryagi/media/39_zps19dc95a0.png.html)Install the Handle Side Plate (key# 200) back onto the Frame/Main Body Assembly (key# 100) with the 6 Screws from earlier (key# 09301224) taking note of the Harness Lug/Hanger (key# 108) position.
(http://smg.photobucket.com/user/ryagi/media/40_zpsda3c09e8.png.html)This is the order that the Handle should be installed (Bottom to Top)
(http://smg.photobucket.com/user/ryagi/media/41_zps47e9fe1a.png.html)Install the Drive Gear Shaft Bushing (key# 720-1) then the Belleville/Drag Spring Washers (key# 609) – Notice the way the Bellevilles are positioned "()".
(http://smg.photobucket.com/user/ryagi/media/42_zps85cc95f6.png.html)Install the Click Gear (key# 401-2) and Washer (key# 0920326)
(http://smg.photobucket.com/user/ryagi/media/43_zpsb7b893c8.png.html)Install the Star Drag Assembly (key# 615).
(http://smg.photobucket.com/user/ryagi/media/44_zpsbb9ddca7.png.html)Install the Keyed Handle Bushing/Drag Washer (key# 520).
(http://smg.photobucket.com/user/ryagi/media/45_zpsfee5e90e.png.html)Install the Handle Assembly (key# 500) and Plastic Washer (key# 0920133).
(http://smg.photobucket.com/user/ryagi/media/46_zps783edfc8.png.html)Lastly, install the Handle/Retainer Nut (key# 117) and Handle Screw (key# 515).
(http://smg.photobucket.com/user/ryagi/media/47_zps248282ae.png.html)DONE! I didn't show pictures of it but during reassembly I put a thin layer of grease between the Frame, Sideplates & Frame Rings – Okuma calls these Side Plate Covers (key#'s 208 & 311) on both sides as well as some grease in all of the screw holes.
(http://smg.photobucket.com/user/ryagi/media/48_zps24714ef1.png.html)Hope this helps anyone attempting to service this reel. Thanks for your time.
Title: Re: Okuma Cortez CZ-55W
Post by: Dominick on December 31, 2013, 06:23:08 PM
Post by: Dominick on December 31, 2013, 06:23:08 PM
Uluahunta: That was one terrific tutorial with great pictures. Alan usually sends one of his wrenches when someone does a tutorial but in your case the Alan Tani wrench did not fit. He is now under pressure to think of something else. ??? Thanks for sharing that takedown. Dominick
Title: Re: Okuma Cortez CZ-55W
Post by: uluahunta on December 31, 2013, 06:56:47 PM
Post by: uluahunta on December 31, 2013, 06:56:47 PM
Quote from: Pescachaser on December 31, 2013, 06:23:08 PM
Uluahunta: That was one terrific tutorial with great pictures. Alan usually sends one of his wrenches when someone does a tutorial but in your case the Alan Tani wrench did not fit. He is now under pressure to think of something else. ??? Thanks for sharing that takedown. Dominick
Thanks Dominick! Yup, im hoping Alan can come up with something because I have emailed Okuma for a wrench and they have yet to respond.
Title: Re: Okuma Cortez CZ-55W
Post by: alantani on December 31, 2013, 07:02:24 PM
Post by: alantani on December 31, 2013, 07:02:24 PM
a wrench is going into the mail. many thanks! and it should work on the okuma.
Title: Re: Okuma Cortez CZ-55W
Post by: uluahunta on December 31, 2013, 07:20:34 PM
Post by: uluahunta on December 31, 2013, 07:20:34 PM
Quote from: alantani on December 31, 2013, 07:02:24 PM
a wrench is going into the mail. many thanks! and it should work on the okuma.
Thanks Alan!
Title: Re: Okuma Cortez CZ-55W
Post by: Bryan Young on December 31, 2013, 07:51:03 PM
Post by: Bryan Young on December 31, 2013, 07:51:03 PM
Aloha & Mahalo Mista UluaHunta.
I've always wanted to see inside of that reel. Looks similar to the Cataina Series reels with lighter aluminum frame.
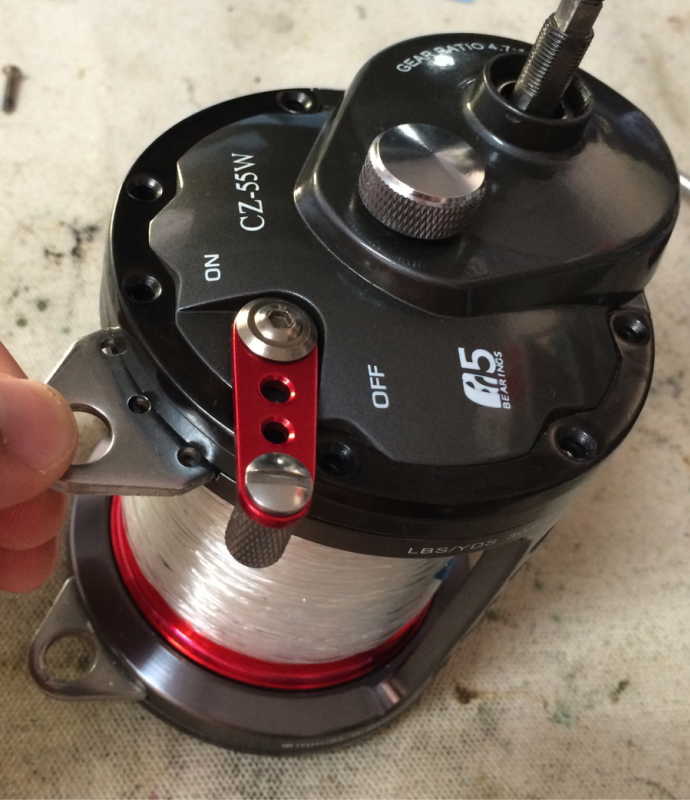
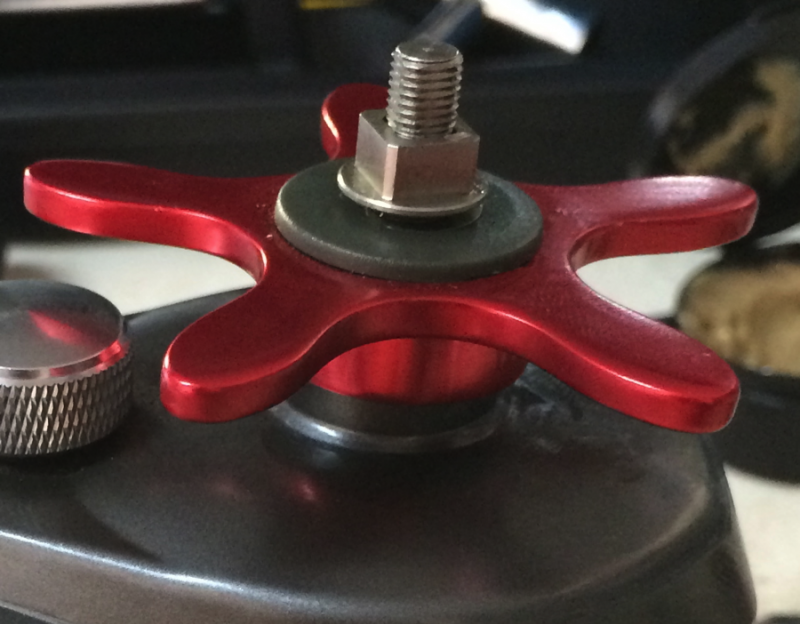
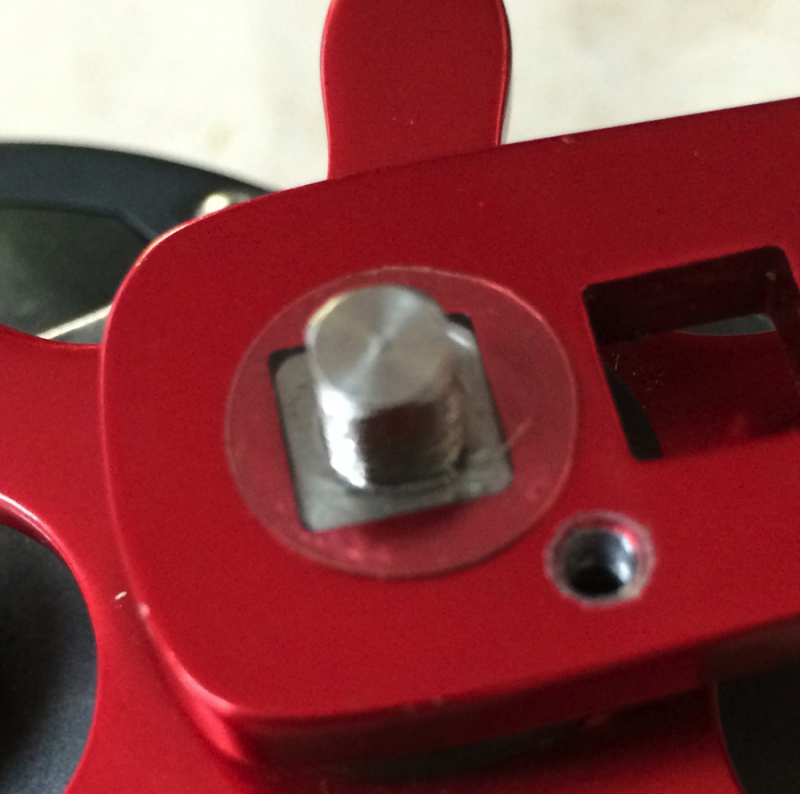
By the way, if you didn't notice, you could use a cresent or open box. There are two flat sides on the top of the nut. See below.
Aloha & Mahalo,
Bryan

I've always wanted to see inside of that reel. Looks similar to the Cataina Series reels with lighter aluminum frame.
By the way, if you didn't notice, you could use a cresent or open box. There are two flat sides on the top of the nut. See below.
Aloha & Mahalo,
Bryan
Title: Re: Okuma Cortez CZ-55W
Post by: uluahunta on December 31, 2013, 08:12:43 PM
Post by: uluahunta on December 31, 2013, 08:12:43 PM
Quote from: Bryan Young on December 31, 2013, 07:51:03 PM
Aloha & Mahalo Mista UluaHunta.
I've always wanted to see inside of that reel. Looks similar to the Cataina Series reels with lighter aluminum frame.
By the way, if you didn't notice, you could use a cresent or open box. There are two flat sides on the top of the nut. See below.
Aloha & Mahalo,
Bryan
Thanks Bryan!
Haha, nope didn't notice that, i guess i was just so intent on making the wrenches fit lol!
Title: Re: Okuma Cortez CZ-55W
Post by: Bryan Young on December 31, 2013, 08:18:29 PM
Post by: Bryan Young on December 31, 2013, 08:18:29 PM
I discovered that on my Catelinas. I was like, what? no wrench?
Title: Re: Okuma Cortez CZ-55W
Post by: uluahunta on December 31, 2013, 08:46:31 PM
Post by: uluahunta on December 31, 2013, 08:46:31 PM
Quote from: Bryan Young on December 31, 2013, 08:18:29 PM
I discovered that on my Catelinas. I was like, what? no wrench?
Haha, yup, i was getting so frustrated already. Probably the reason why i didn't notice that i could have jus used an open end and went straight for the channel locks instead lol.
Title: Re: Okuma Cortez CZ-55W
Post by: Magilla on January 04, 2014, 09:13:32 PM
Post by: Magilla on January 04, 2014, 09:13:32 PM
Very nice tutorial uluahunta.
Anyone with one of these reels would have no problem servicing them by following your instructions.
I am also very impressed with the machining of the internals of this reel, very nice and better than many reels I have seen that cost a lot more.
Anyone with one of these reels would have no problem servicing them by following your instructions.
I am also very impressed with the machining of the internals of this reel, very nice and better than many reels I have seen that cost a lot more.
Title: Re: Okuma Cortez CZ-55W
Post by: uluahunta on January 06, 2014, 05:38:25 AM
Post by: uluahunta on January 06, 2014, 05:38:25 AM
Quote from: Magilla on January 04, 2014, 09:13:32 PM
Very nice tutorial uluahunta.
Anyone with one of these reels would have no problem servicing them by following your instructions.
I am also very impressed with the machining of the internals of this reel, very nice and better than many reels I have seen that cost a lot more.
Thanks!
Title: Re: Okuma Cortez CZ-55W
Post by: erikpowell on January 06, 2014, 07:20:52 AM
Post by: erikpowell on January 06, 2014, 07:20:52 AM
Bula!
That was a great job uluahunta, much appreciated !
I haven't even seen that Okuma reel before...new?....
It seems to hold a little more line than a TLD25, (which I spool with 65lb powerpro and 50-80lb topshot)
Can I ask what you spooled it with (does it really hold 500yds of 40?)
Were the bearings greased & oiled from the factory?
and do you have any drag numbers for us to salivate over? ;D
Cheers
Erik
Title: Re: Okuma Cortez CZ-55
Post by: uluahunta on January 06, 2014, 08:58:36 AM
Post by: uluahunta on January 06, 2014, 08:58:36 AM
Quote from: erikpowell on January 06, 2014, 07:20:52 AM
Bula!
That was a great job uluahunta, much appreciated !
I haven't even seen that Okuma reel before...new?....
It seems to hold a little more line than a TLD25, (which I spool with 65lb powerpro and 50-80lb topshot)
Can I ask what you spooled it with (does it really hold 500yds of 40?)
Were the bearings greased & oiled from the factory?
and do you have any drag numbers for us to salivate over? ;D
Cheers
Erik
Thanks!.....
I believe this reel was actually made for us Hawaii Ulua Fishermen so they released it here first but i think you can get it online now.
I have 60lb Berkely Trilene Big Game on it. Not too sure what the yardage is but im guessing its in the 300yd+ range judging from the size of the spool compared to my Penn Extended 4/0's.
Yup bearings were greased from the factory however I shud have cleaned out their grease and put my own (I normally would use Xtreme Reel+ on the spool bearings).
Sorry, no drag numbers but it locksdown pretty good and is very smoooth. If I had to compare it to something, it locksdown better than my hot-rodded 4/0's but not as good as my Tiagra's ;)
It casts pretty good too using my 13ft IRW Slider Ulua Rod and 10oz. Bank Sinker.
Title: Re: Okuma Cortez CZ-55W
Post by: franky on February 06, 2014, 01:44:06 AM
Post by: franky on February 06, 2014, 01:44:06 AM
Does anyone have the schematic for this reel? If so, can you please post it.
Thanks, :)
Thanks, :)
Title: Re: Okuma Cortez CZ-55W
Post by: uluahunta on February 06, 2014, 10:06:33 AM
Post by: uluahunta on February 06, 2014, 10:06:33 AM
Quote from: franky on February 06, 2014, 01:44:06 AM
Does anyone have the schematic for this reel? If so, can you please post it.
Thanks, :)
Howzit franky,
There's a link to the schematic on the bottom of my original post.
Title: Re: Okuma Cortez CZ-55W
Post by: franky on February 06, 2014, 06:09:50 PM
Post by: franky on February 06, 2014, 06:09:50 PM
Thank you Uluahunta.
Title: Re: Okuma Cortez CZ-55W
Post by: franky on May 03, 2017, 07:20:40 PM
Post by: franky on May 03, 2017, 07:20:40 PM
Quote from: uluahunta on February 06, 2014, 10:06:33 AMQuote from: franky on February 06, 2014, 01:44:06 AM
Does anyone have the schematic for this reel? If so, can you please post it.
Thanks, :)
Howzit franky,
There's a link to the schematic on the bottom of my original post.
Gosh, its been 3 years since I've opened one of these. My eyes must be getting bad...Does anyone see the schematic link at the bottom of this original post? :-\
Title: Re: Okuma Cortez CZ-55W
Post by: Yogi_fish808 on May 04, 2017, 07:56:27 AM
Post by: Yogi_fish808 on May 04, 2017, 07:56:27 AM
Howzit Braddah Frank!
http://alantani.com/index.php?action=dlattach;topic=9302.0;attach=5380
Just copy and paste that one. The link is still working on the bottom of his post. Happy wrenching
http://alantani.com/index.php?action=dlattach;topic=9302.0;attach=5380
Just copy and paste that one. The link is still working on the bottom of his post. Happy wrenching
Title: Re: Okuma Cortez CZ-55W
Post by: bgreen on April 27, 2018, 10:54:07 PM
Post by: bgreen on April 27, 2018, 10:54:07 PM
Hi I cant get to view the phots on here.. comes up with the photobucket pic... is there something I am doing wrong.. thanks Bruce
Title: Re: Okuma Cortez CZ-55W
Post by: ez2cdave on October 28, 2019, 08:38:39 PM
Post by: ez2cdave on October 28, 2019, 08:38:39 PM
Here is the Schematic ( PDF )
Tight Lines !
Tight Lines !
Title: Re: Okuma Cortez CZ-55W
Post by: ez2cdave on October 28, 2019, 10:07:30 PM
Post by: ez2cdave on October 28, 2019, 10:07:30 PM
Here is the entire tutorial, in PDF format, for easy downloading ! ( No "Photoshop BS" )
Tight Lines !
Tight Lines !