Title: Shimano Stella SW 20000
Post by: Clem on August 01, 2011, 07:26:42 PM
Post by: Clem on August 01, 2011, 07:26:42 PM
Kia Ora all,
Thought this might be of some use to those with Stella's that are contemplating doing their own service or inspections. I can disassemble the reel completely if required but this is far as most people would need to go.
Its worth making sure you have a bit of time and all the basics ready to go...once you have done it a few times it will be easy. The first time I did it I used Alan Hawke's breakdown as a guide; hopefully this will be easy to follow....
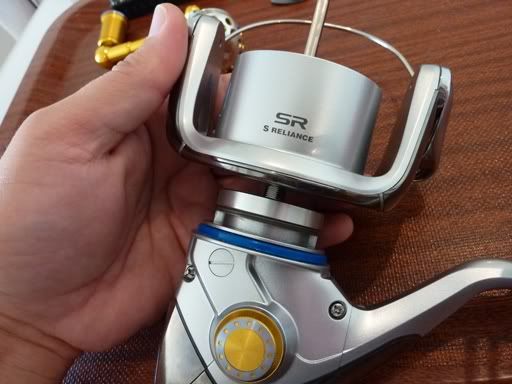
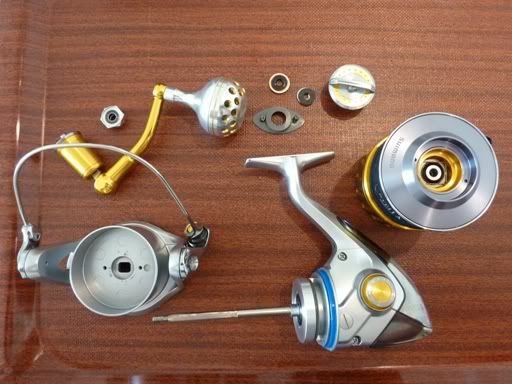
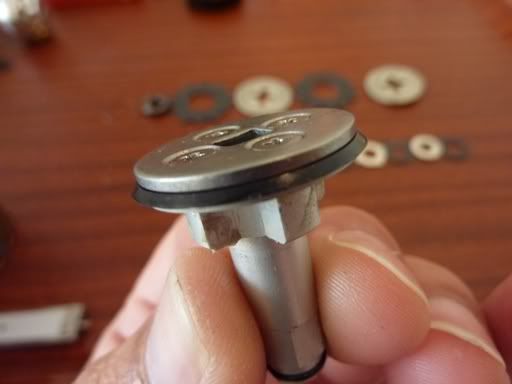
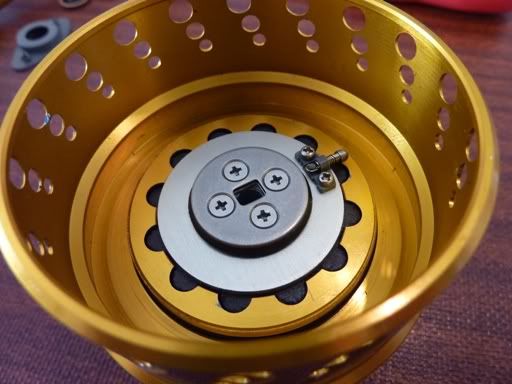
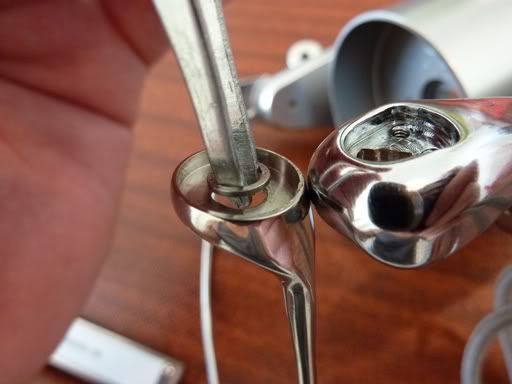
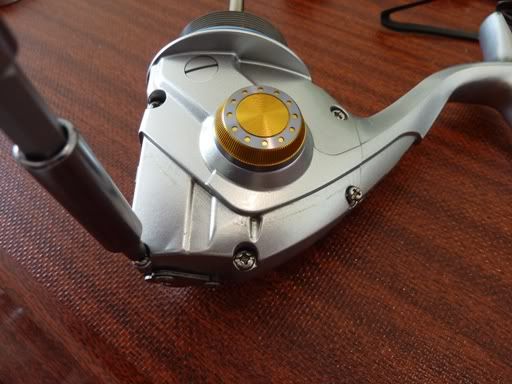
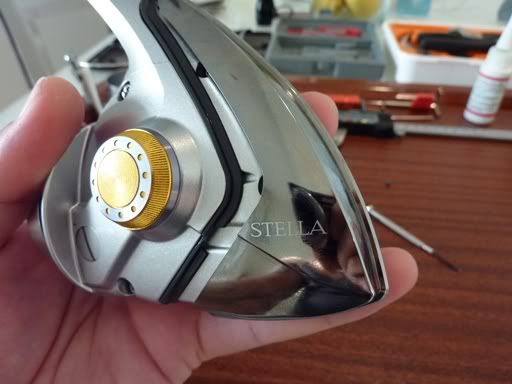
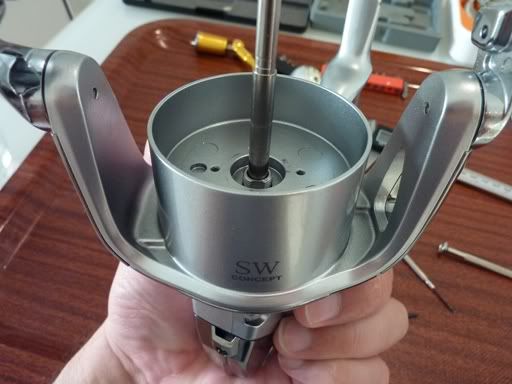
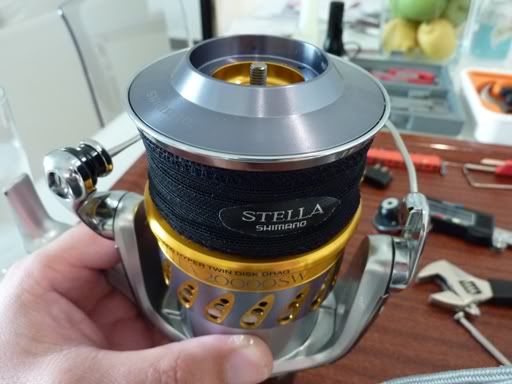
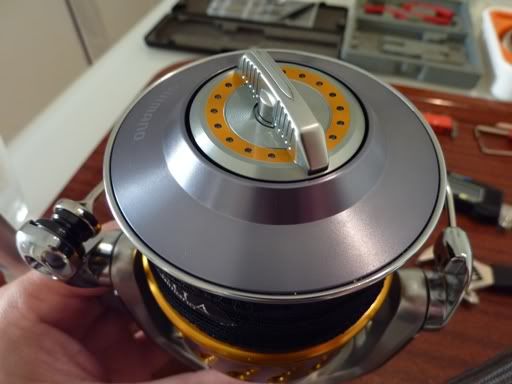
Ok, lets go..here's the reel, I have a JM round knob on it which works really well - remove the drag knob and spool from the body

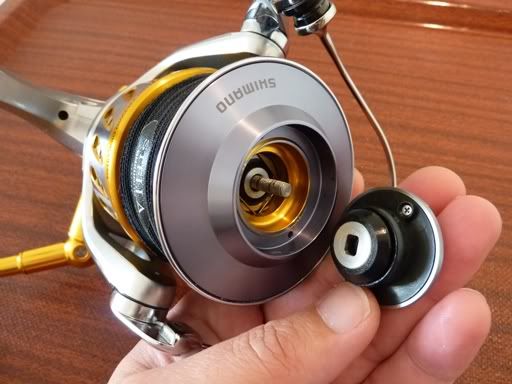
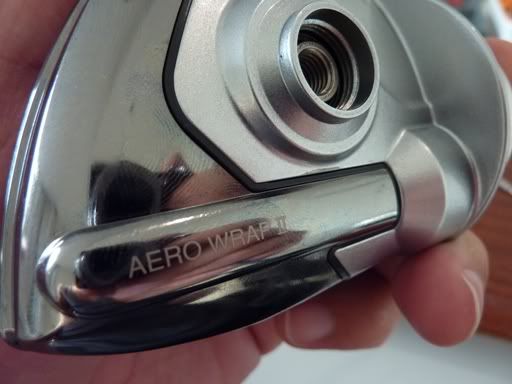
This will expose 2 fibre washers and 1 metal washer, the fibre washers are a tight fit so take care when removing from the shaft - best to support from the bottom
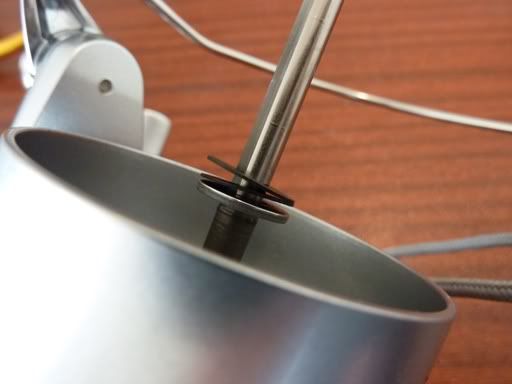
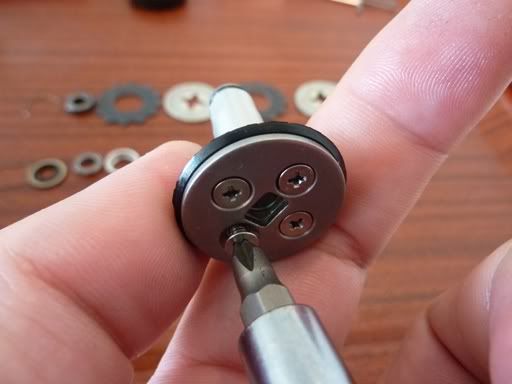
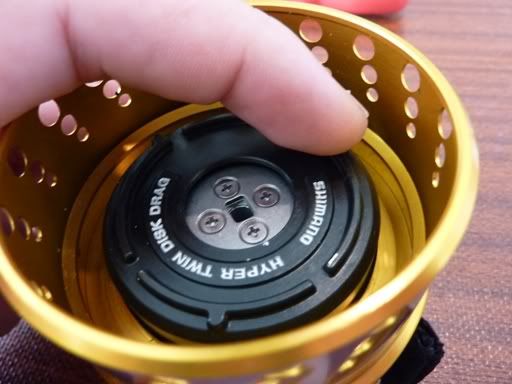
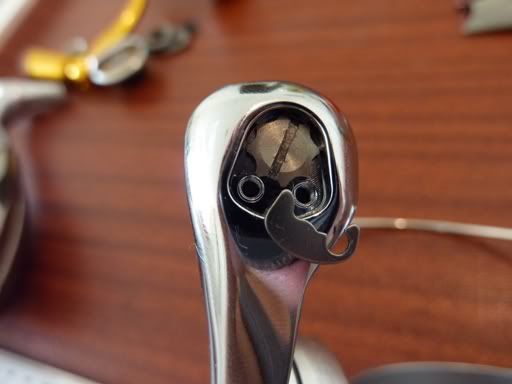
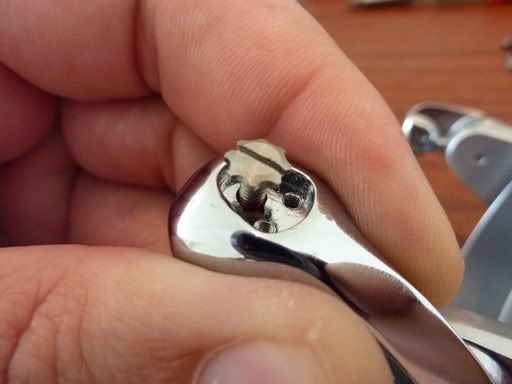
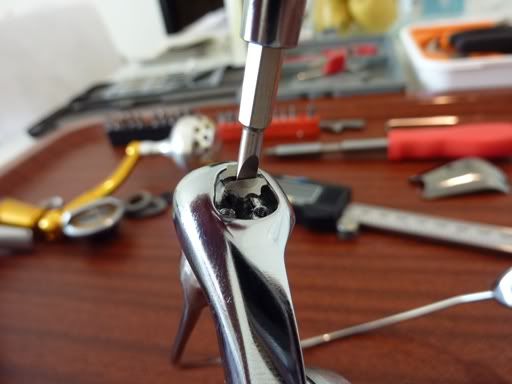
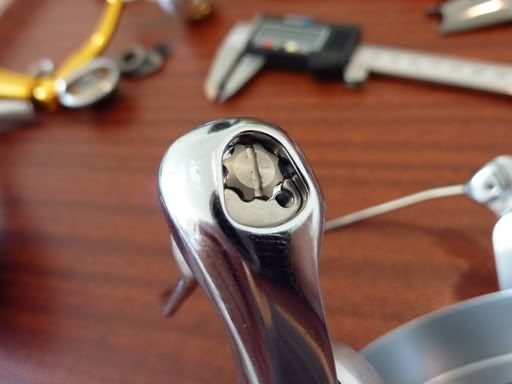
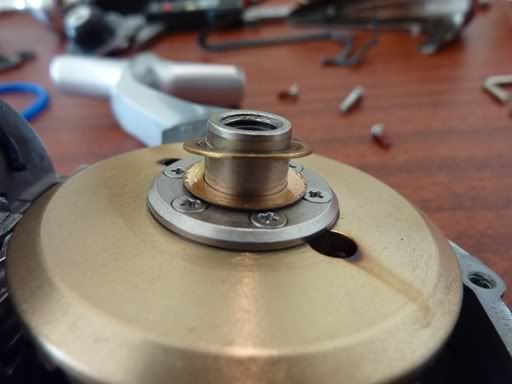
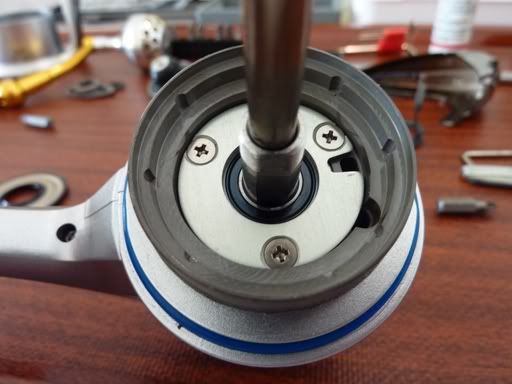
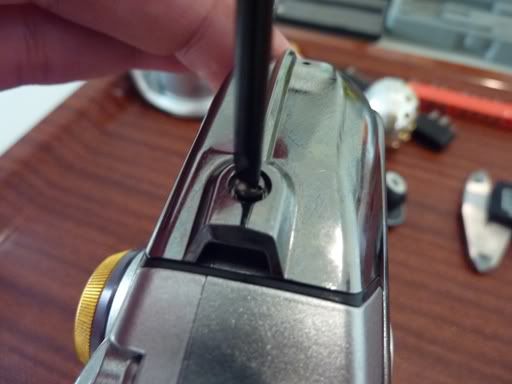
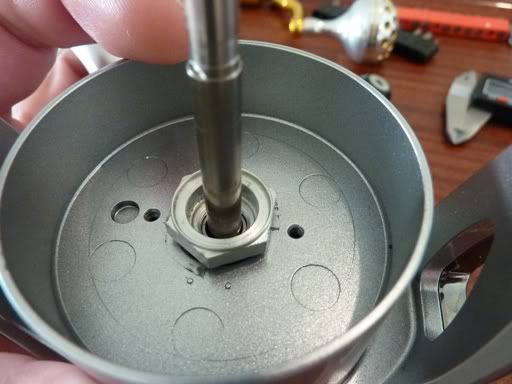
Remove the 2 screws holding the rotor lock plate to expose the washer
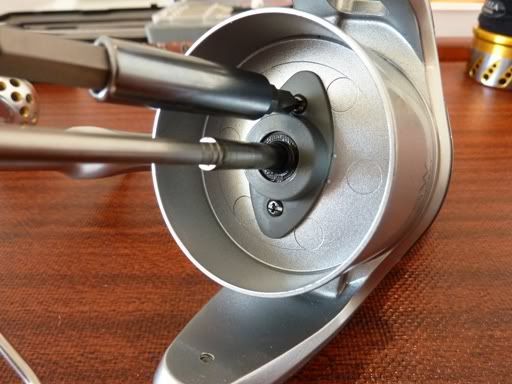
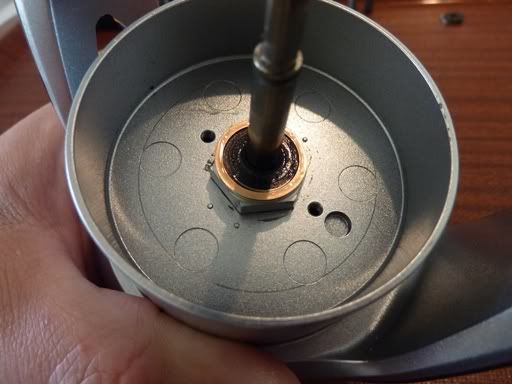
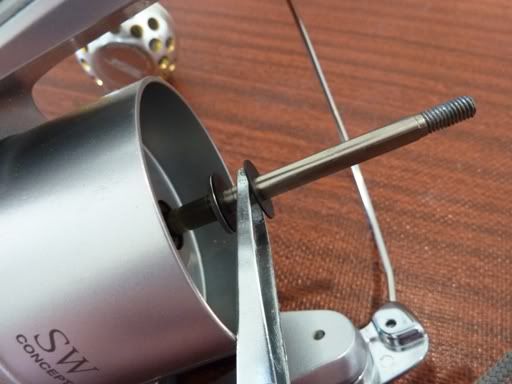
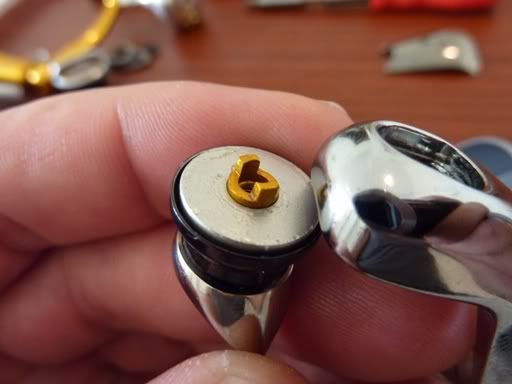
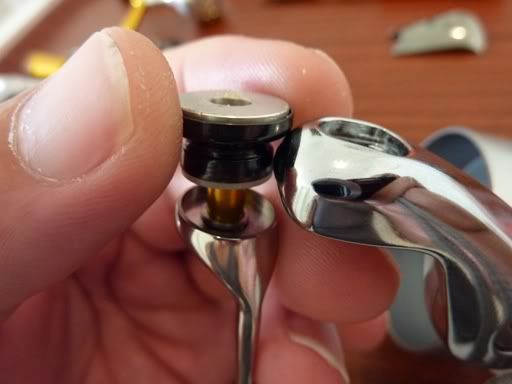
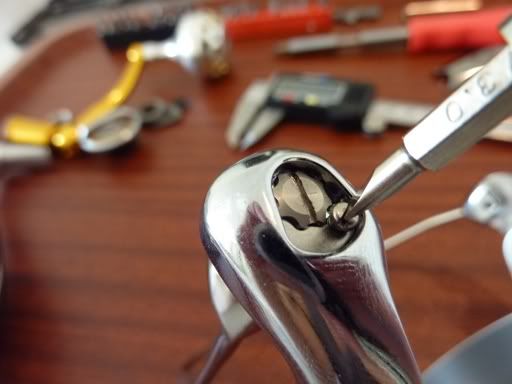
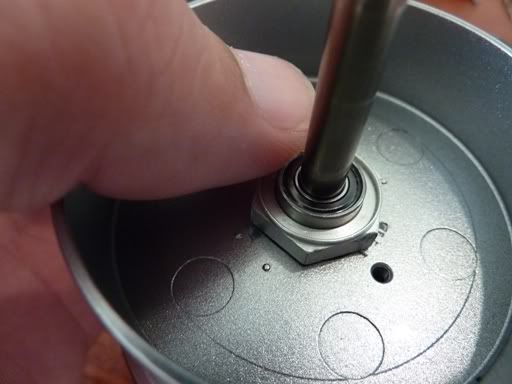
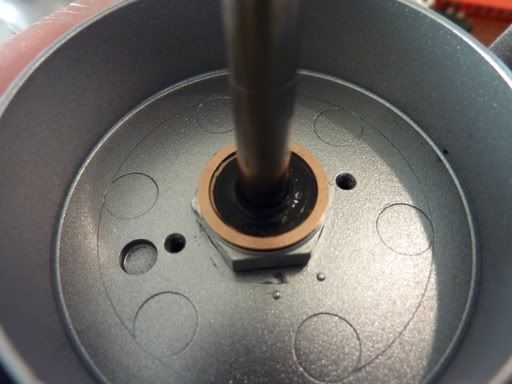
Remove the washer and unscrew the rotor nut and bearing
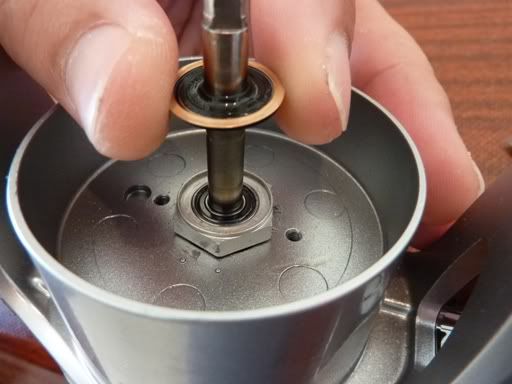
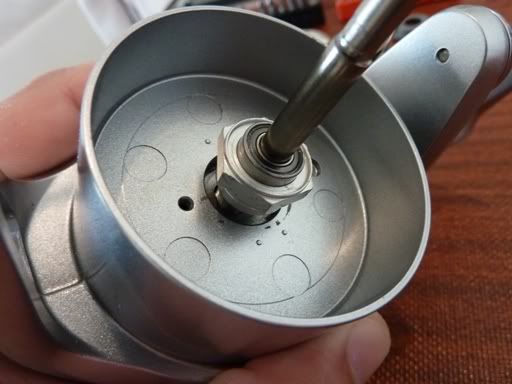
Separate the rotor assy from the main body, we now have 3 sub assemblies which we will work on one at a time
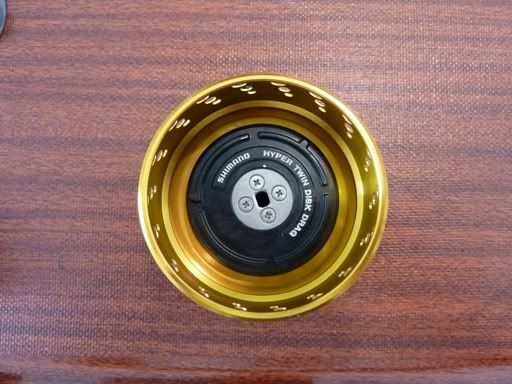
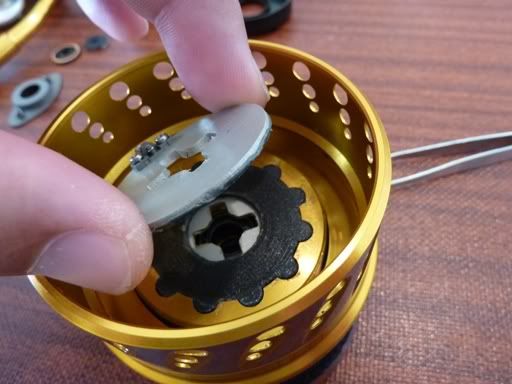
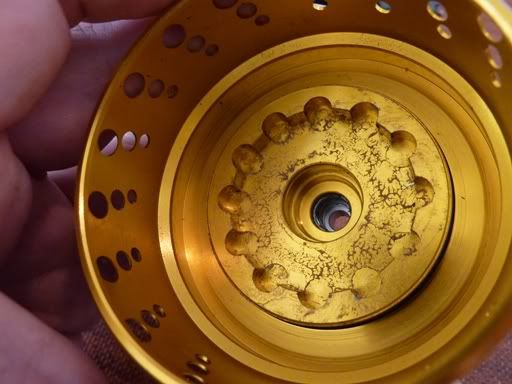
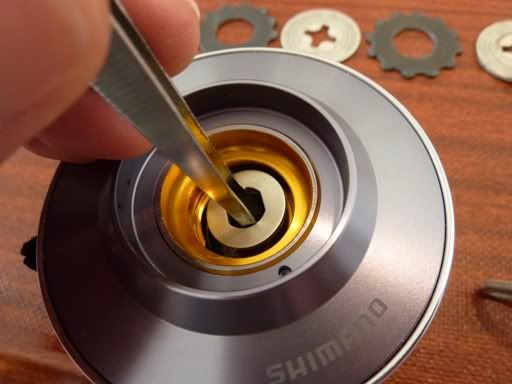
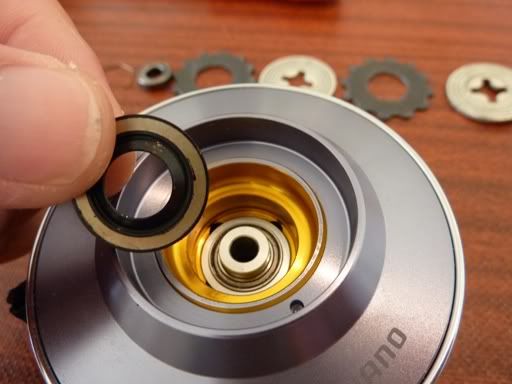
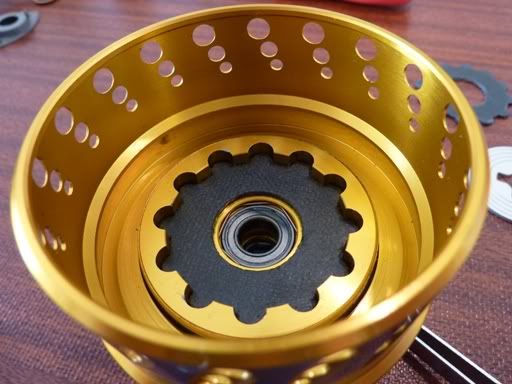
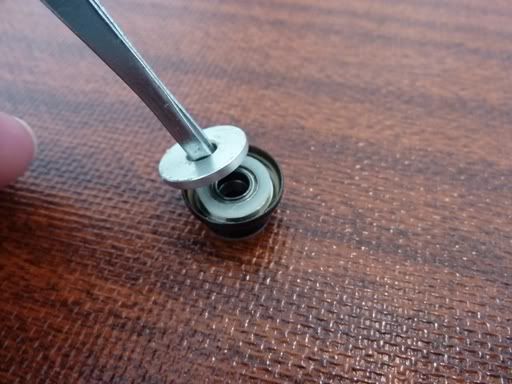
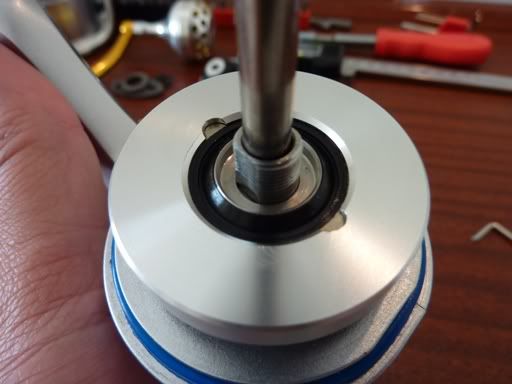
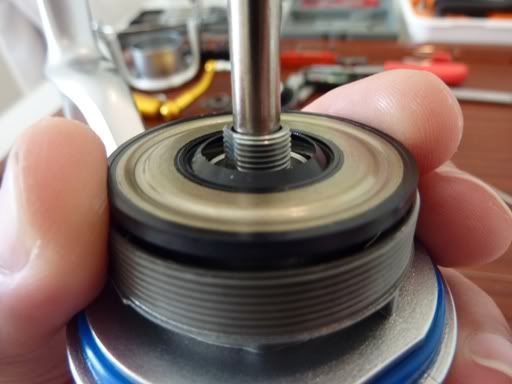
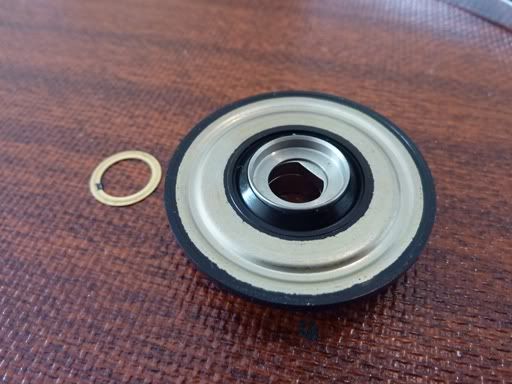
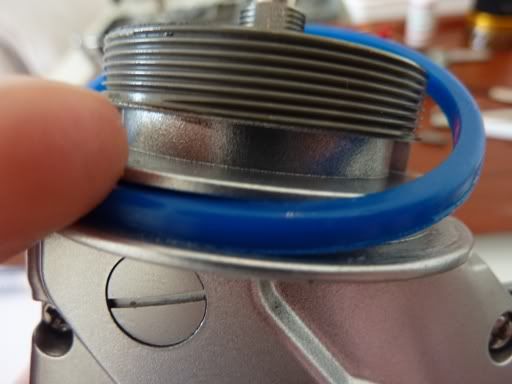
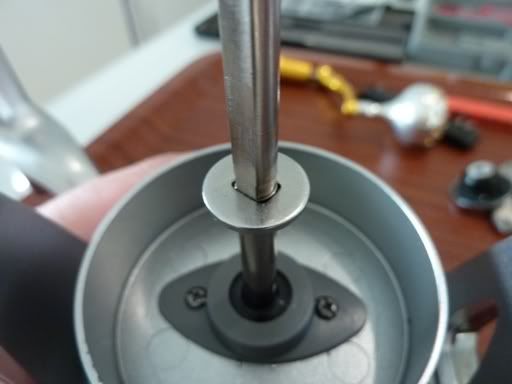
Lets tackle the spool first, remove the drag cover (normal thread - anti clockwise to remove) there is probably a special tool, but a allen key across the top works fine
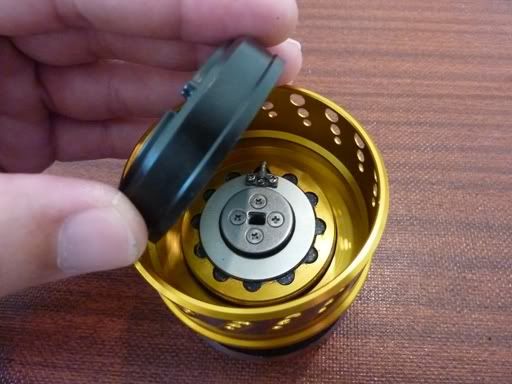
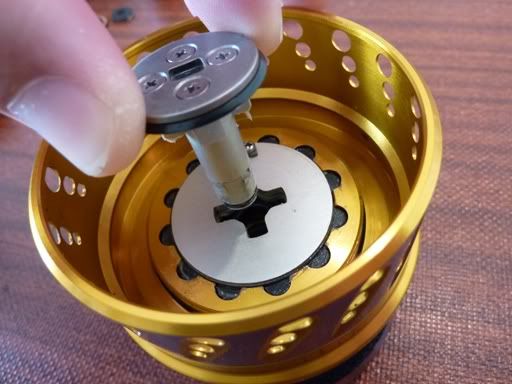
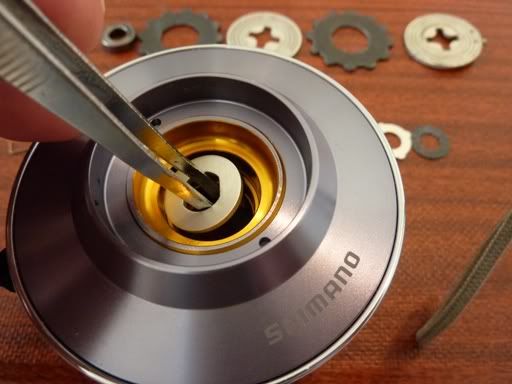
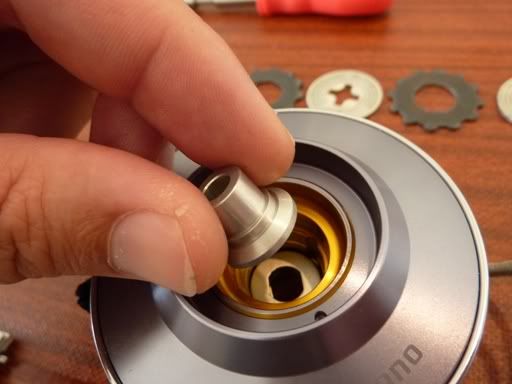
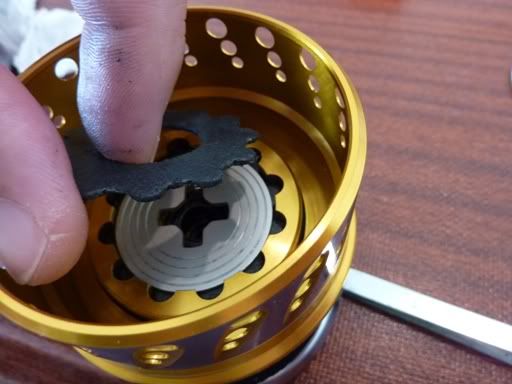
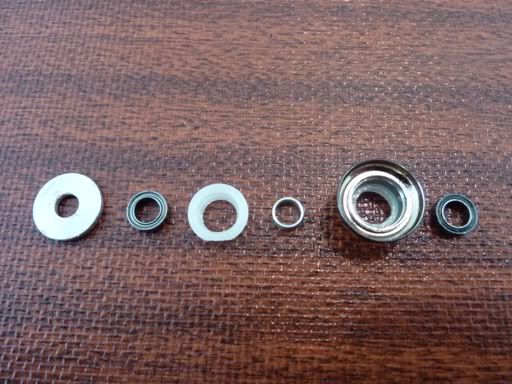
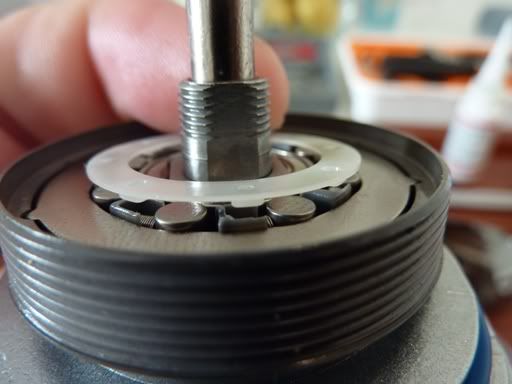
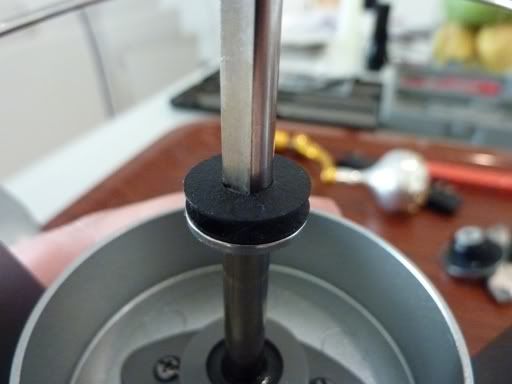
Remove the bearing bushing (just pull straight up) and place to the side, remove the first metal drag washer (includes clicker)
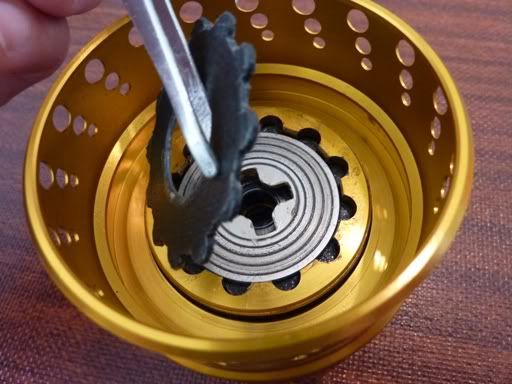
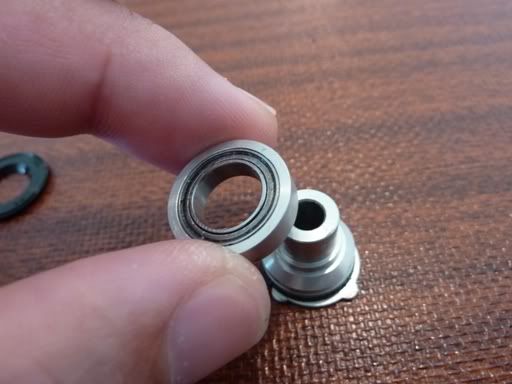
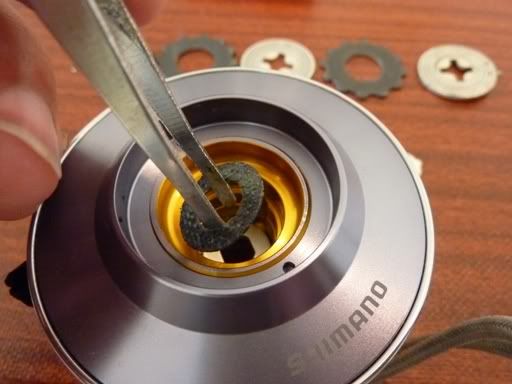
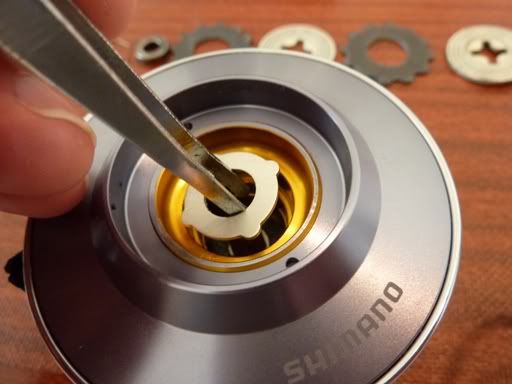
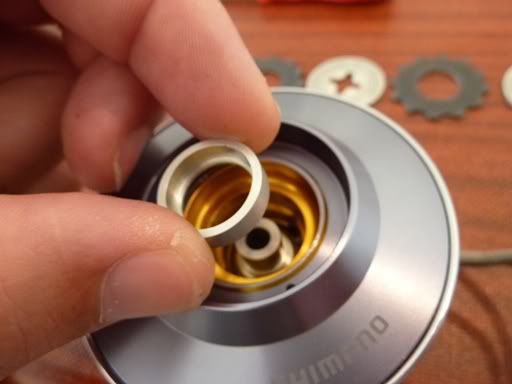
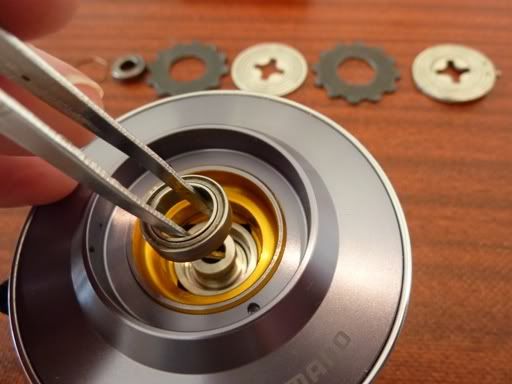
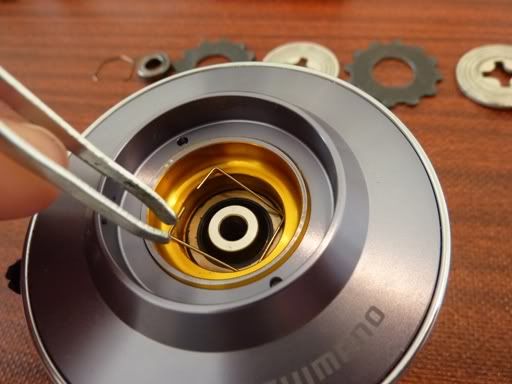
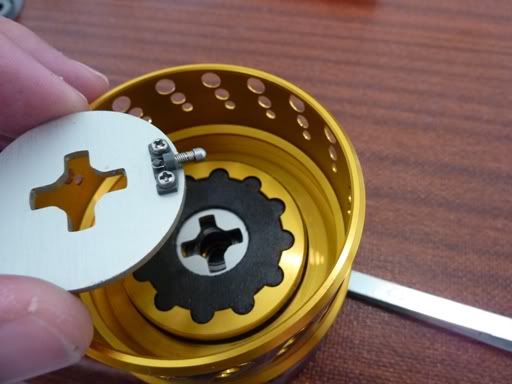
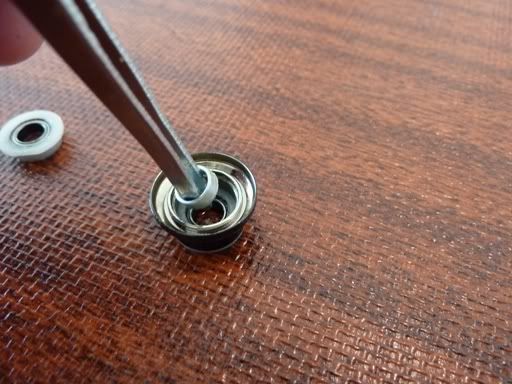
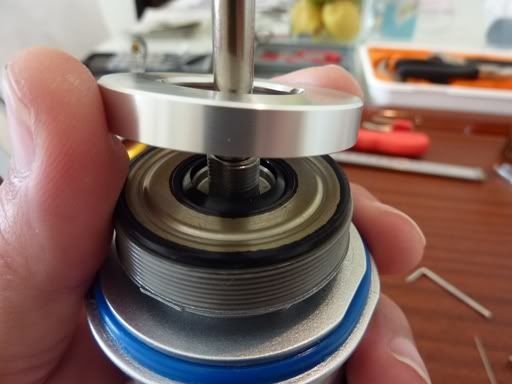
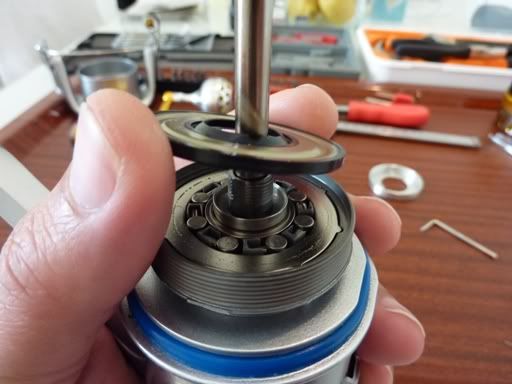
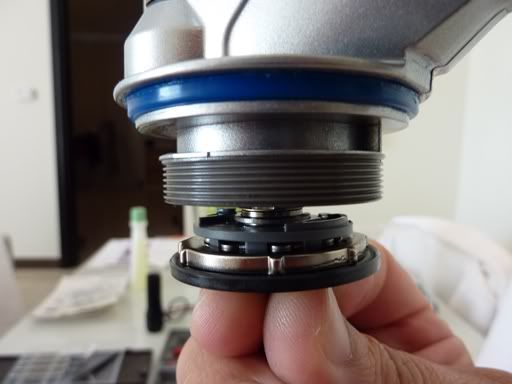
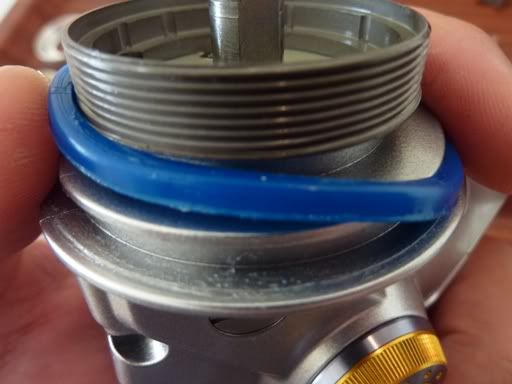
Remove the first carbon washer and the last metal washer (not sure what grease is on them from the factory, blue color) This will expose the bearing retainer which needs to be removed
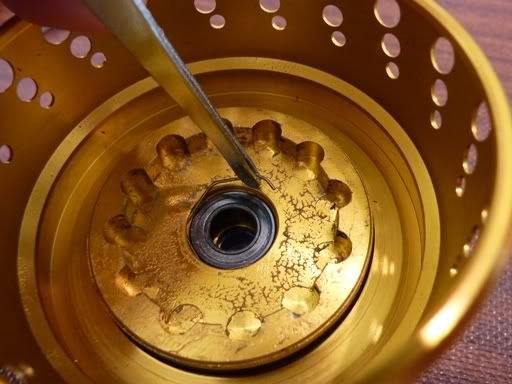
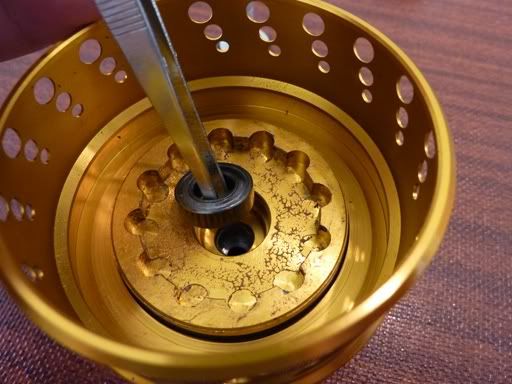
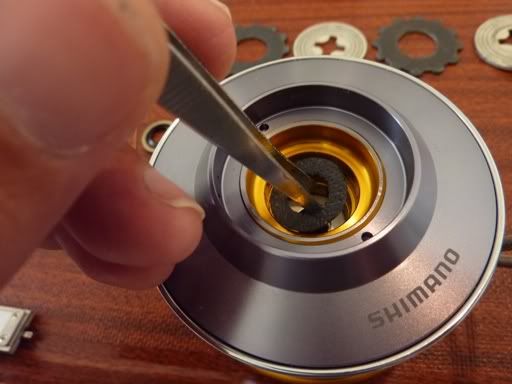
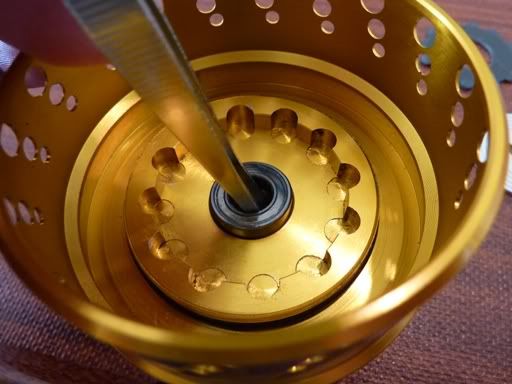
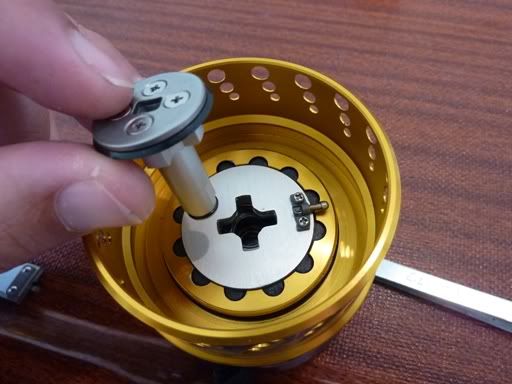
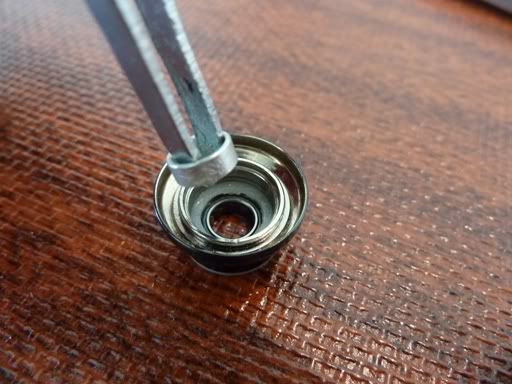
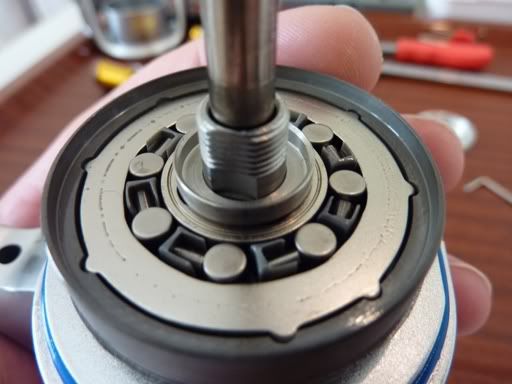
Pull the bearing and clean out the bottom of the spool
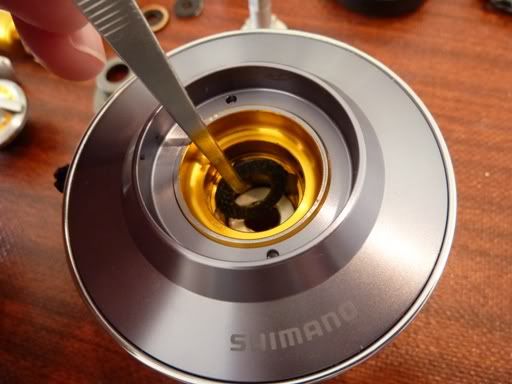
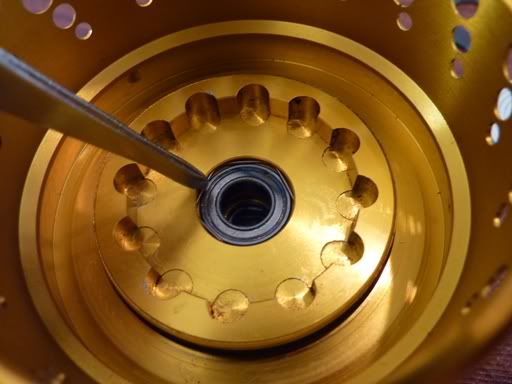
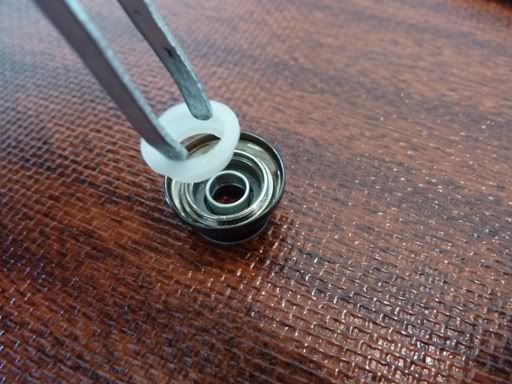
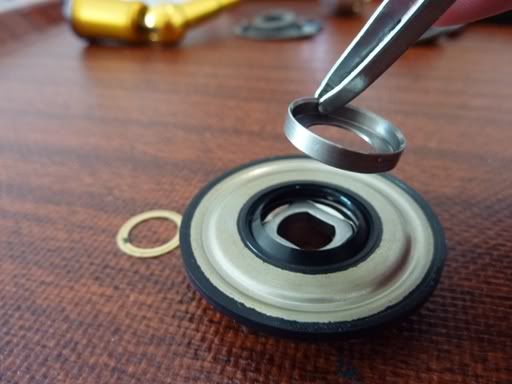
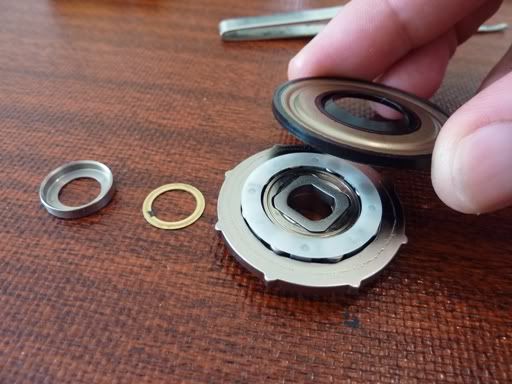
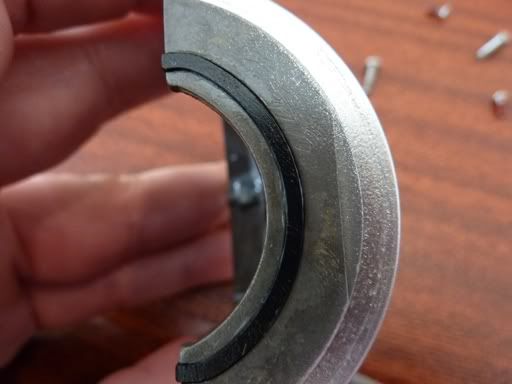
Flip the spool over and remove the retaining wire, remove the sealing washer and housing - like in the photo, the housing and some of the washers may come out at the same time, just keep them in order
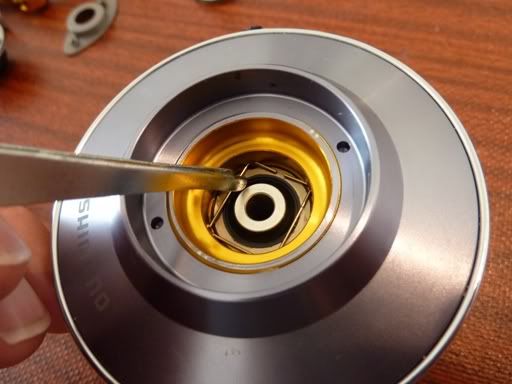
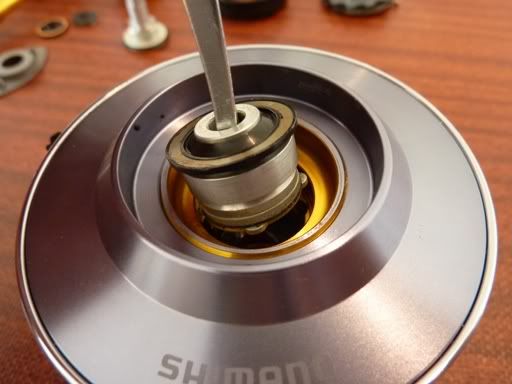
Remove the washer and bearing from the bearing support
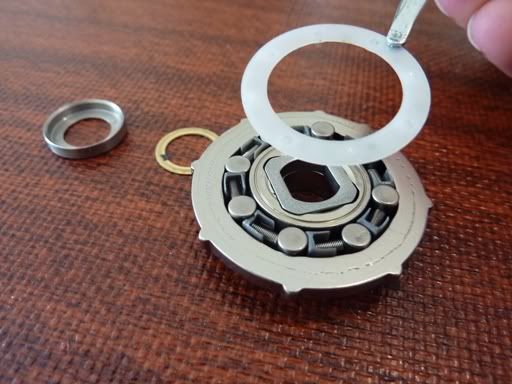
Separate the washers and continue to pull the last ones from the spool
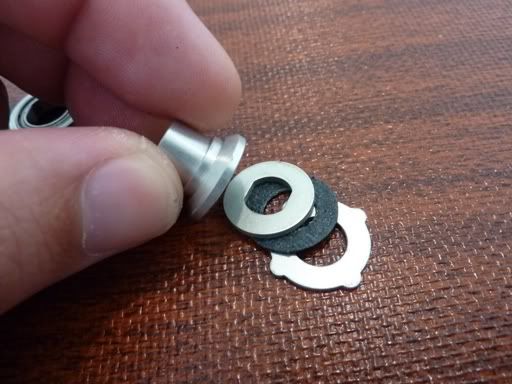
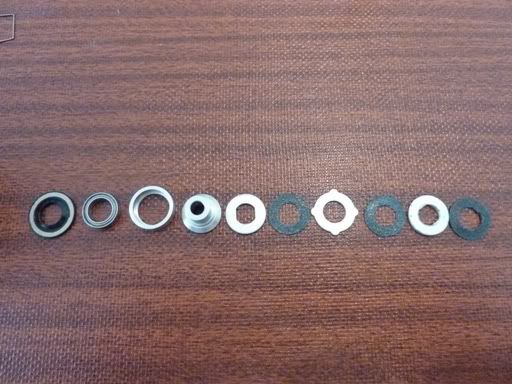
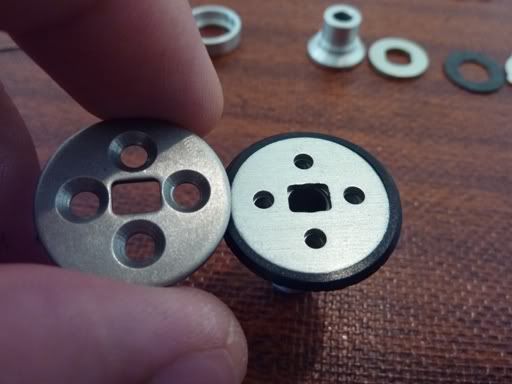
Once you are done you should end up with this
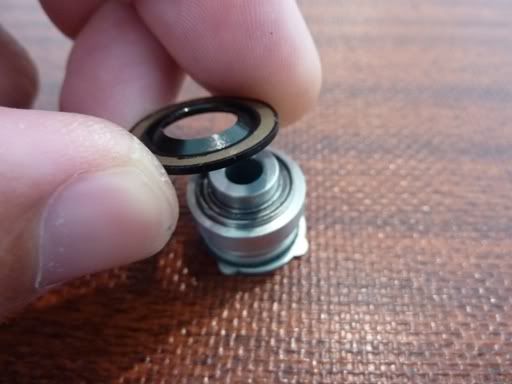
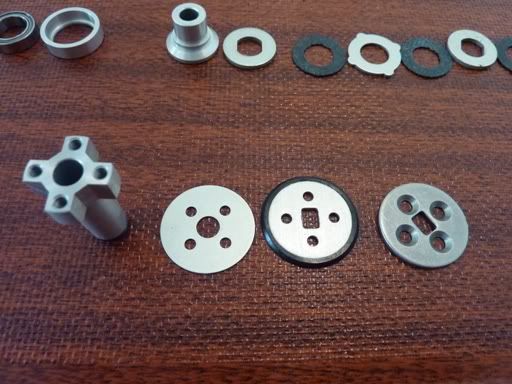
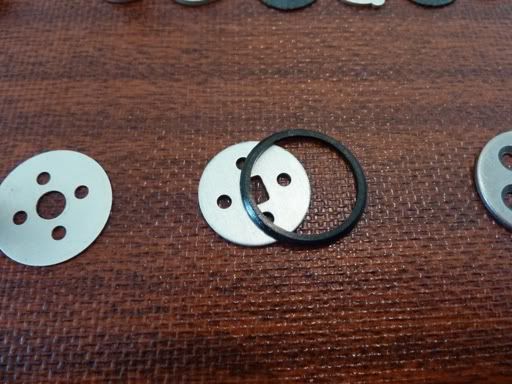
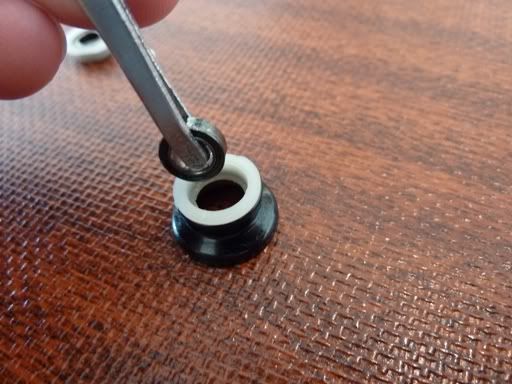
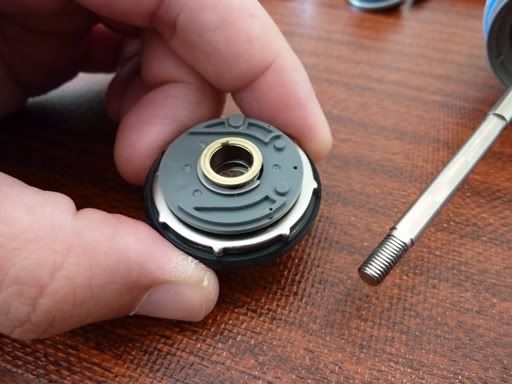
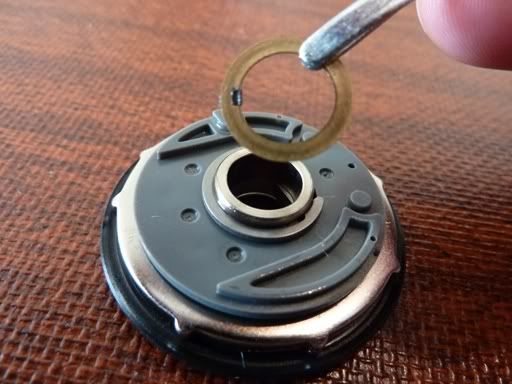
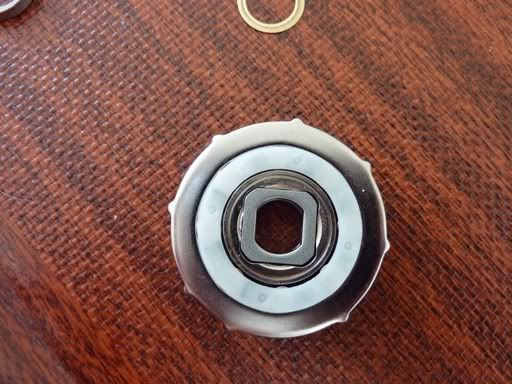
The bearing bushing from the underside of the spool is actually 4 pieces, remove the 4 screws to separate
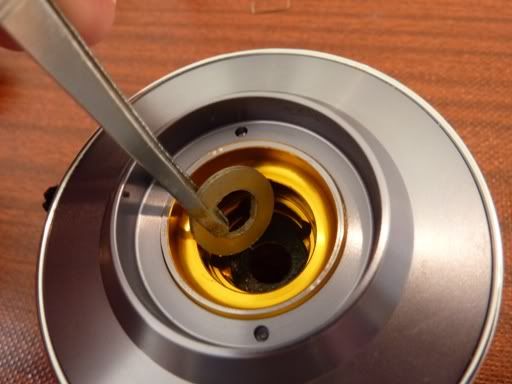
The rubber o ring can be removed easily
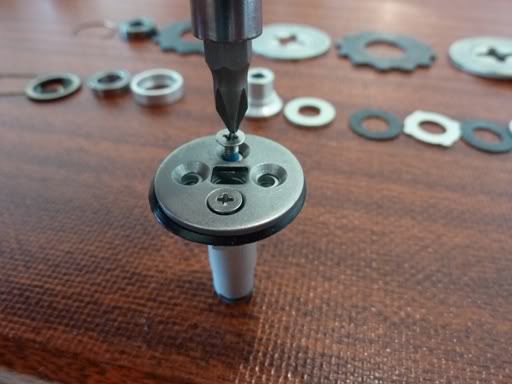
All back together, sealing washer in the center
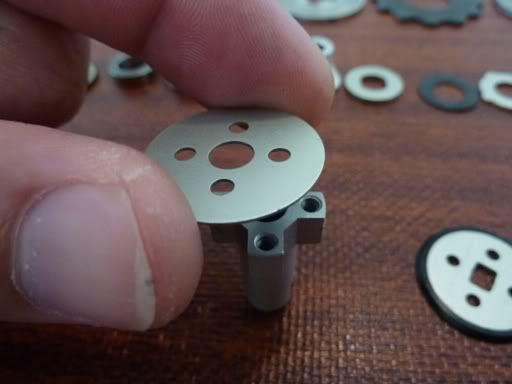
Screws back in and then start to replace the washers in the top of the spool, carbon washer first
Carbon and then a metal eared washer
Carbon and then the last metal washer
Bearing support back in along with the bearing housing
Bearing back in and then the sealing washer
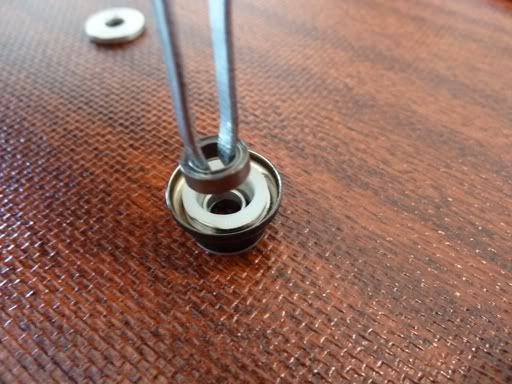
Once that is done the retaining wire can go back in - flip it over and start on the underside, bearing back in
Retaining wire back in and the first carbon washer
Metal washer, Carbon washer and finally the metal washer with the clicker (make sure the metal washers are in line)
Once in line replace the bearing bushing assy (you may have to fiddle with it a bit to line it all up and seat the bushing)
Replace the drag cover (reverse thread and the spool is done. Now we will start on the rotor (line roller assy)
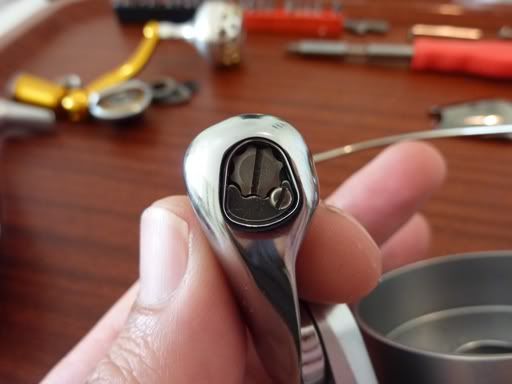
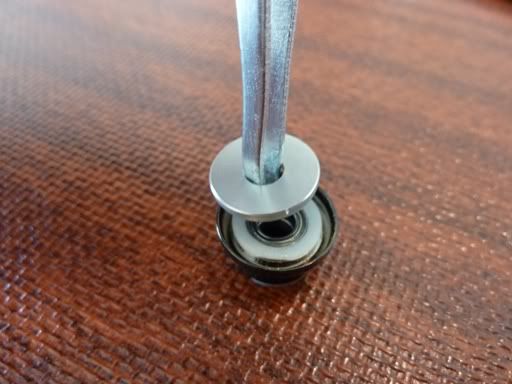
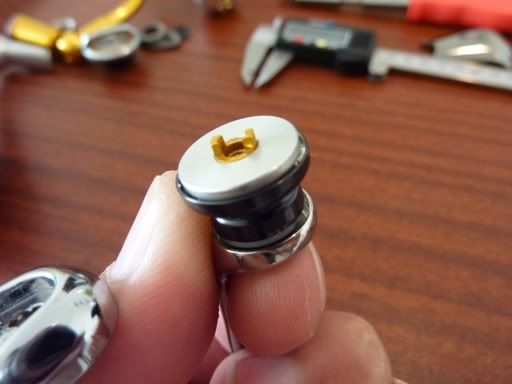
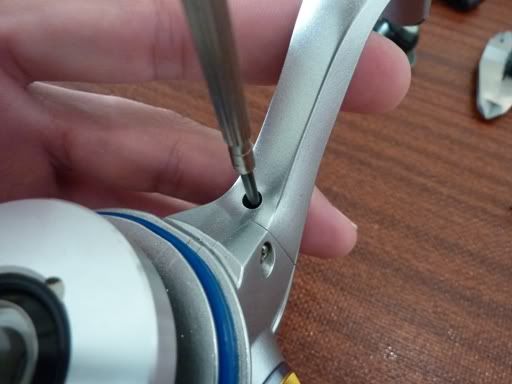
Remove the retaining screw and the retainer
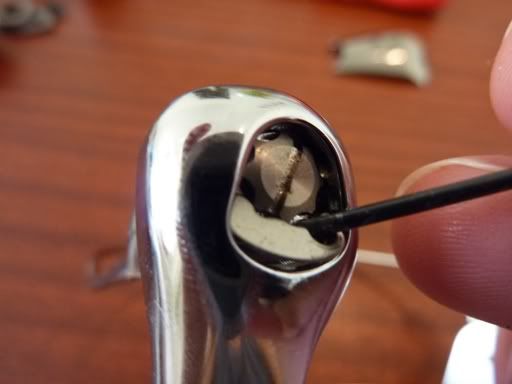
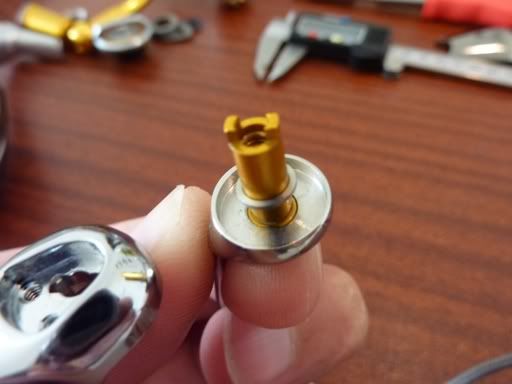
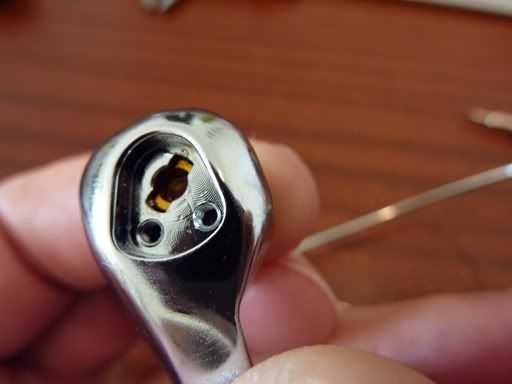
Remove the main screw and separate the roller assy from the rotor frame - start to drop the (gold) roller support shaft
Remove the roller assy and the support shaft washer
Disassemble the roller assy, remove the washer, bearing/bushing and the bearing spacer
Flip it over and remove the bearing, should end up with this
Reassemble, spacer back in followed by the bushing and bearing
Bearing and washer, including the bottom bearing
Roller support and washer back in, re seat roller assy
Realign roller support with rotor assy and replace main assy screw
Retainer back in along with retaining screw
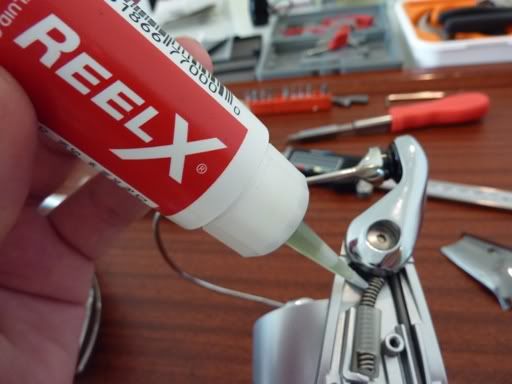
To get access to bail spring remover the cover and lightly oil (reelx from Alan, thank you again) - Rotor complete we can start on the main body (clutch assy)
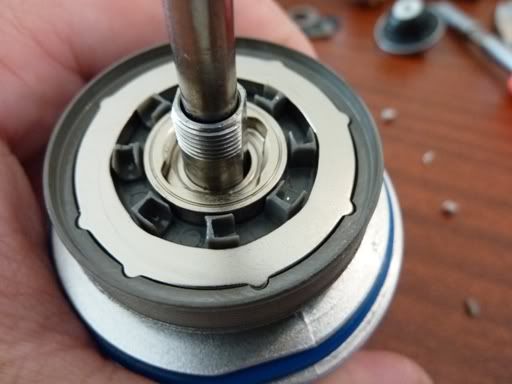
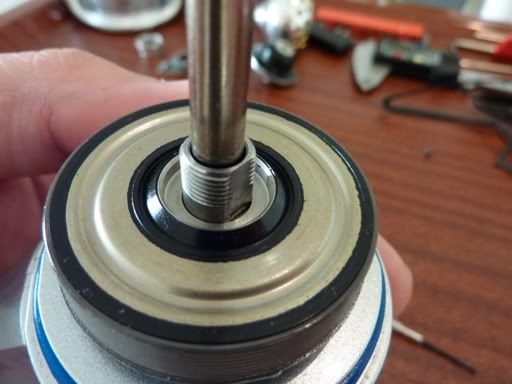
Unscrew the cover and carefully lift the sealing washer - this will expose the clutch assy
It should look like this, the easiest way to remove the assy is to replace the sealing washer and carefully turn the main body upside down
Hold the sealing washer from underneath and slowly lower the assy and separate from the shaft
Remove the washer and carefully turn assy over
Remove the rotor ring and the sealing washer
Remove the roller clutch reinforce ring and the steel ring
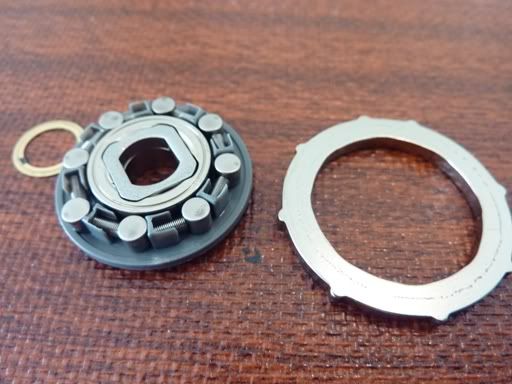
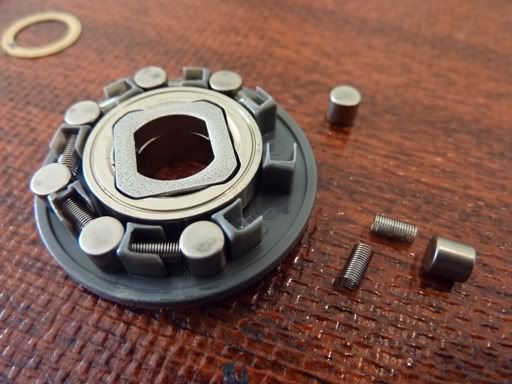
Rollers and springs can be serviced - 8 of each. Now we can start on the main body, remove the bottom screw of the cover (2 x cover screws)
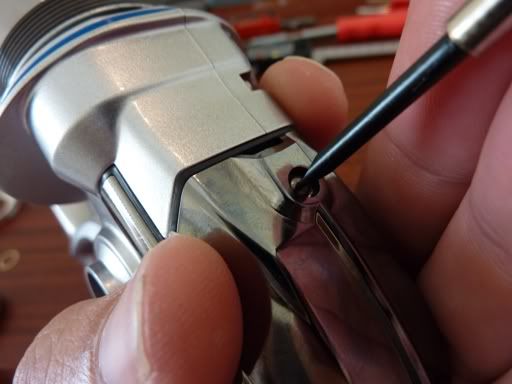
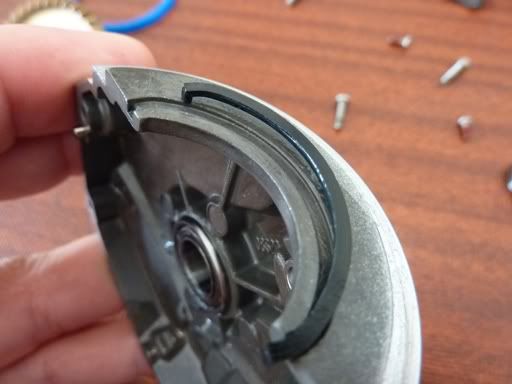
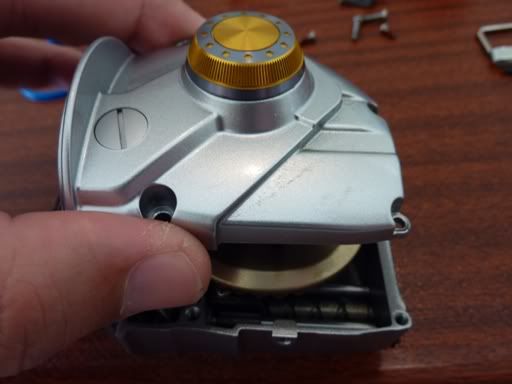
Remove the top cover crew and separate the cover from the body - rear shield will come off at the same time
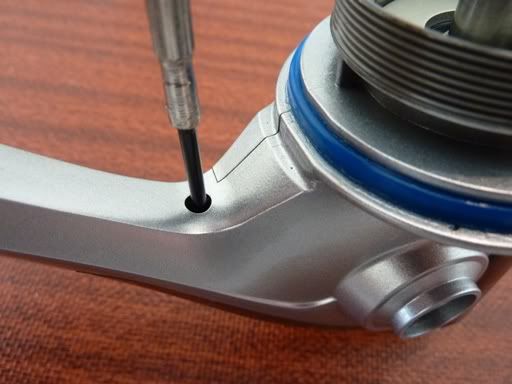

Remove the blue friction ring and start to unscrew the main body cover (2 screw sizes here)
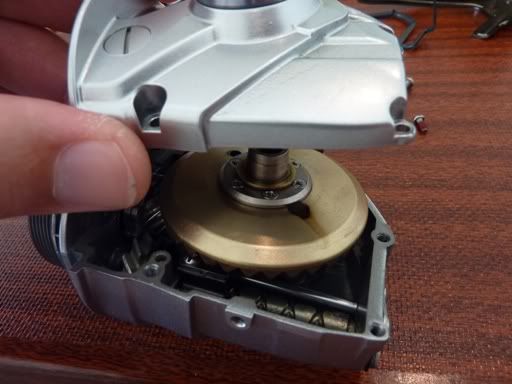
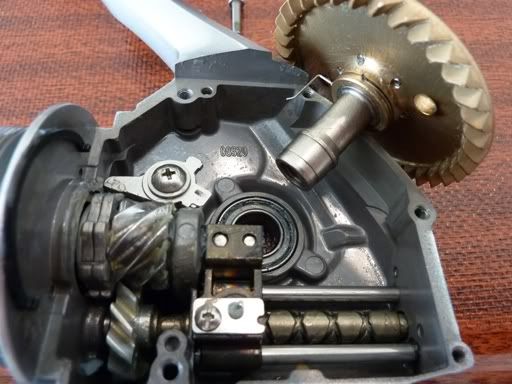
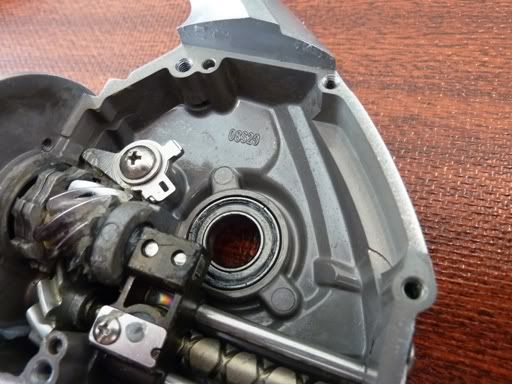
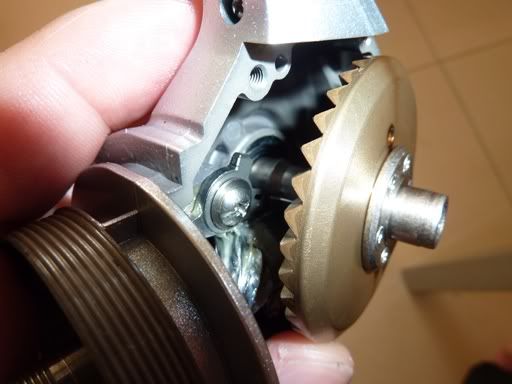
Remover the cover (in this case the bearing has remained in the cover) and you will see the main gear
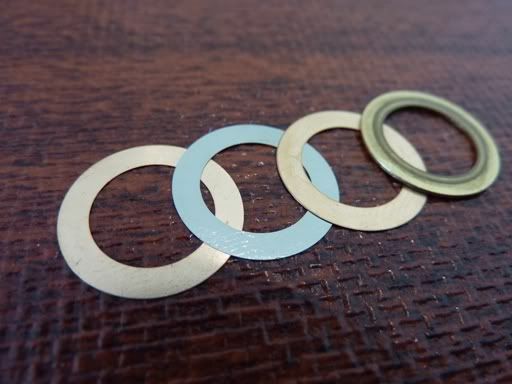
From here we can remove the washers (4) and carefully pull the main gear
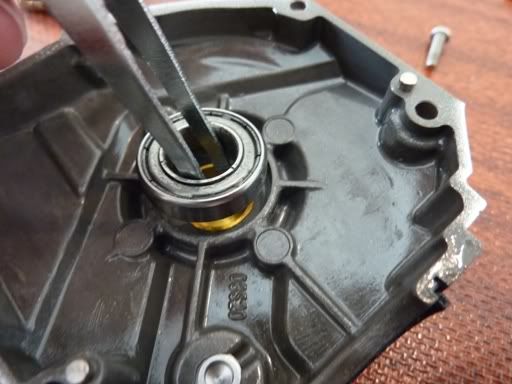
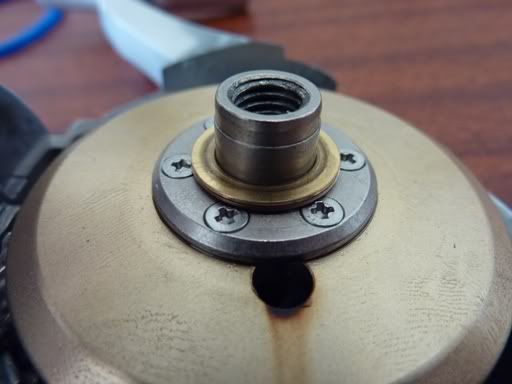
Remove the side bearing and the flange seal
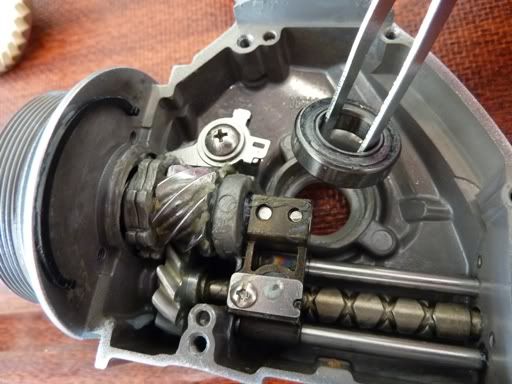
When reassembling the flange seal should fit like this, other pic showing the bearing from the main body cover
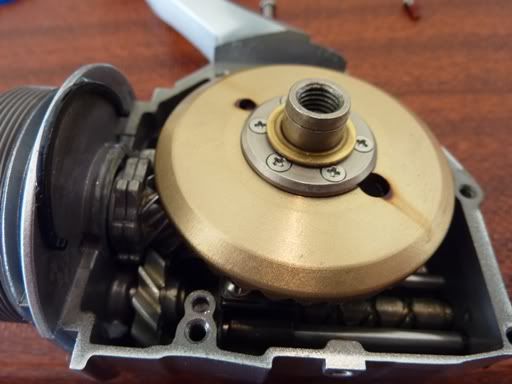
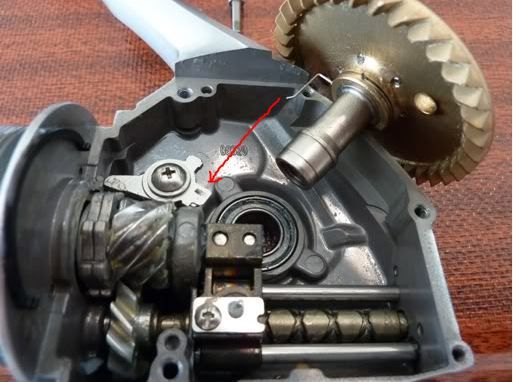
This is as far as I'm going this time but you can see that it is fairly simply to access the guts of the reel - You can also see the pawl spring on the main gear, this must go through the hole in the back of the pawl when you replace the main gear
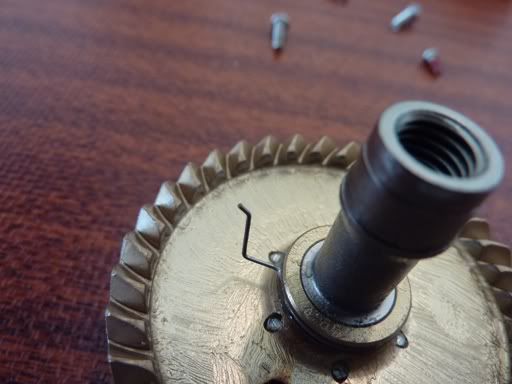
Little bit hard to see but I am replacing the main gear and the pawl spring goes through the rectangular hole at the rear of the pawl. Replace the main gear washers (4) shown in the next pic
Washers and the cover going back on the main body
Friction ring back on and then on to the clutch assy
Take the assy (make sure the washer is on) and the main body (upside down) and replace assy

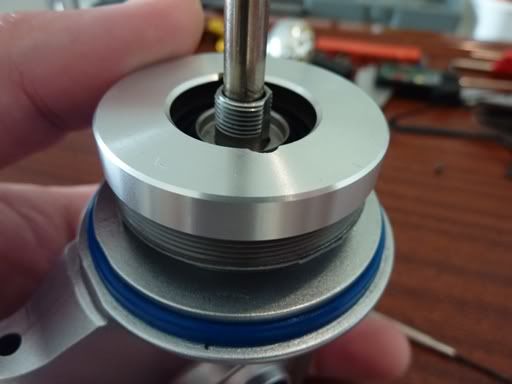
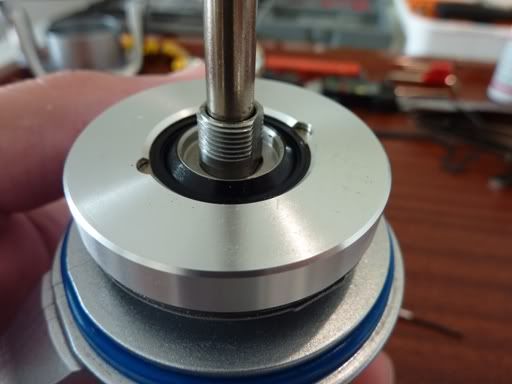
Turn the main body back over and remove the sealing washer - it should look like the 2nd photo, then replace the white reinforce ring. This whole thing can be fiddly so have patience, if it doesn't work for you just replace the rollers and springs one by one with the main body the right way up...hope that makes sense

Like this, either way once done the sealing washer should be flush with rotor housing and the stopper and rotor ring back in place
Clutch cover back on
Rear shield and cover fitted, make sure all fits well
Screws back in, bottom and top
Rotor back on to main body, rotor nut back in
Bearing back in and the washer back on
Retaining plate back on and replace metal washer
Fibre washers back on (tight fit) and ready to slide spool back on
And done (whew)..
Well, I hope that helps someone - I have removed the main gear assy twice before (just to see how it all goes together) but it would add another 20 photo's and I'm assuming that most people would not go that far..if you want the info let me know and I'll add it (as soon as I get some time)
If you are going to take it apart, just take your time - use this as a reference along with the schematic and you should be fine (the first time I did it I dropped the clutch assy on the floor and couldn't find one of the springs for 3 hours....suffice to say I wasn't happy, eventually found it on the rotor assy)
Anyway, a great reel - actually a wedding present from my wife...(I know, every mans dream) she loves fishing so it's all good..
Any questions , just let me know
Thought this might be of some use to those with Stella's that are contemplating doing their own service or inspections. I can disassemble the reel completely if required but this is far as most people would need to go.
Its worth making sure you have a bit of time and all the basics ready to go...once you have done it a few times it will be easy. The first time I did it I used Alan Hawke's breakdown as a guide; hopefully this will be easy to follow....
Ok, lets go..here's the reel, I have a JM round knob on it which works really well - remove the drag knob and spool from the body
This will expose 2 fibre washers and 1 metal washer, the fibre washers are a tight fit so take care when removing from the shaft - best to support from the bottom
Remove the 2 screws holding the rotor lock plate to expose the washer
Remove the washer and unscrew the rotor nut and bearing
Separate the rotor assy from the main body, we now have 3 sub assemblies which we will work on one at a time
Lets tackle the spool first, remove the drag cover (normal thread - anti clockwise to remove) there is probably a special tool, but a allen key across the top works fine
Remove the bearing bushing (just pull straight up) and place to the side, remove the first metal drag washer (includes clicker)
Remove the first carbon washer and the last metal washer (not sure what grease is on them from the factory, blue color) This will expose the bearing retainer which needs to be removed
Pull the bearing and clean out the bottom of the spool
Flip the spool over and remove the retaining wire, remove the sealing washer and housing - like in the photo, the housing and some of the washers may come out at the same time, just keep them in order
Remove the washer and bearing from the bearing support
Separate the washers and continue to pull the last ones from the spool
Once you are done you should end up with this
The bearing bushing from the underside of the spool is actually 4 pieces, remove the 4 screws to separate
The rubber o ring can be removed easily
All back together, sealing washer in the center
Screws back in and then start to replace the washers in the top of the spool, carbon washer first
Carbon and then a metal eared washer
Carbon and then the last metal washer
Bearing support back in along with the bearing housing
Bearing back in and then the sealing washer
Once that is done the retaining wire can go back in - flip it over and start on the underside, bearing back in
Retaining wire back in and the first carbon washer
Metal washer, Carbon washer and finally the metal washer with the clicker (make sure the metal washers are in line)
Once in line replace the bearing bushing assy (you may have to fiddle with it a bit to line it all up and seat the bushing)
Replace the drag cover (reverse thread and the spool is done. Now we will start on the rotor (line roller assy)
Remove the retaining screw and the retainer
Remove the main screw and separate the roller assy from the rotor frame - start to drop the (gold) roller support shaft
Remove the roller assy and the support shaft washer
Disassemble the roller assy, remove the washer, bearing/bushing and the bearing spacer
Flip it over and remove the bearing, should end up with this
Reassemble, spacer back in followed by the bushing and bearing
Bearing and washer, including the bottom bearing
Roller support and washer back in, re seat roller assy
Realign roller support with rotor assy and replace main assy screw
Retainer back in along with retaining screw
To get access to bail spring remover the cover and lightly oil (reelx from Alan, thank you again) - Rotor complete we can start on the main body (clutch assy)
Unscrew the cover and carefully lift the sealing washer - this will expose the clutch assy
It should look like this, the easiest way to remove the assy is to replace the sealing washer and carefully turn the main body upside down
Hold the sealing washer from underneath and slowly lower the assy and separate from the shaft
Remove the washer and carefully turn assy over
Remove the rotor ring and the sealing washer
Remove the roller clutch reinforce ring and the steel ring
Rollers and springs can be serviced - 8 of each. Now we can start on the main body, remove the bottom screw of the cover (2 x cover screws)
Remove the top cover crew and separate the cover from the body - rear shield will come off at the same time
Remove the blue friction ring and start to unscrew the main body cover (2 screw sizes here)
Remover the cover (in this case the bearing has remained in the cover) and you will see the main gear
From here we can remove the washers (4) and carefully pull the main gear
Remove the side bearing and the flange seal
When reassembling the flange seal should fit like this, other pic showing the bearing from the main body cover
This is as far as I'm going this time but you can see that it is fairly simply to access the guts of the reel - You can also see the pawl spring on the main gear, this must go through the hole in the back of the pawl when you replace the main gear
Little bit hard to see but I am replacing the main gear and the pawl spring goes through the rectangular hole at the rear of the pawl. Replace the main gear washers (4) shown in the next pic
Washers and the cover going back on the main body
Friction ring back on and then on to the clutch assy
Take the assy (make sure the washer is on) and the main body (upside down) and replace assy
Turn the main body back over and remove the sealing washer - it should look like the 2nd photo, then replace the white reinforce ring. This whole thing can be fiddly so have patience, if it doesn't work for you just replace the rollers and springs one by one with the main body the right way up...hope that makes sense
Like this, either way once done the sealing washer should be flush with rotor housing and the stopper and rotor ring back in place
Clutch cover back on
Rear shield and cover fitted, make sure all fits well
Screws back in, bottom and top
Rotor back on to main body, rotor nut back in
Bearing back in and the washer back on
Retaining plate back on and replace metal washer
Fibre washers back on (tight fit) and ready to slide spool back on
And done (whew)..
Well, I hope that helps someone - I have removed the main gear assy twice before (just to see how it all goes together) but it would add another 20 photo's and I'm assuming that most people would not go that far..if you want the info let me know and I'll add it (as soon as I get some time)
If you are going to take it apart, just take your time - use this as a reference along with the schematic and you should be fine (the first time I did it I dropped the clutch assy on the floor and couldn't find one of the springs for 3 hours....suffice to say I wasn't happy, eventually found it on the rotor assy)
Anyway, a great reel - actually a wedding present from my wife...(I know, every mans dream) she loves fishing so it's all good..
Any questions , just let me know
Title: Re: Shimano Stella SW 20000
Post by: redsetta on August 01, 2011, 09:12:54 PM
Post by: redsetta on August 01, 2011, 09:12:54 PM
Great tutorial Clem.
And people think Baitrunners have a lot of parts! ;D
They can be a bit of a nightmare if they haven't been maintained (particularly the line roller assembly), but Stellas are currently the best of their breed.
Cheers, Justin
And people think Baitrunners have a lot of parts! ;D
They can be a bit of a nightmare if they haven't been maintained (particularly the line roller assembly), but Stellas are currently the best of their breed.
Cheers, Justin
Title: Re: Shimano Stella SW 20000
Post by: Roger on August 02, 2011, 01:01:53 AM
Post by: Roger on August 02, 2011, 01:01:53 AM
Clem, all I can say is WOW!!!!!! Great Job.....
Title: Re: Shimano Stella SW 20000
Post by: conchydong on August 02, 2011, 07:41:11 PM
Post by: conchydong on August 02, 2011, 07:41:11 PM
Great job on a beautiful piece of equipment. I will never ever try it if I ever own a Stella, but it was nice to see just how those babies are constructed. Thanks for the tutorial.
Title: Re: Shimano Stella SW 20000
Post by: plastic tiki on August 02, 2011, 08:17:40 PM
Post by: plastic tiki on August 02, 2011, 08:17:40 PM
awesome job clem ;D
Title: Re: Shimano Stella SW 20000
Post by: Alto Mare on August 02, 2011, 11:28:27 PM
Post by: Alto Mare on August 02, 2011, 11:28:27 PM
Very nice tutorial Clem, I always enjoy them. Thanks for sharing and keep 'em coming! Sal
Title: Re: Shimano Stella SW 20000
Post by: alantani on August 08, 2011, 05:03:11 PM
Post by: alantani on August 08, 2011, 05:03:11 PM
it's amazing that this stuff is coming in from all over the world! clem, when you get a chance, can you send me a pm with your address? thanks! alan
Title: Re: Shimano Stella SW 20000
Post by: Clem on August 10, 2011, 07:27:20 AM
Post by: Clem on August 10, 2011, 07:27:20 AM
Hi Alan,
When I first serviced the Stella I noticed that the drag washers appeared to have a coating of "blue" colored grease? - When I started to inspect the washers I thought they were starting to disintegrate...fortunately, this turned out to not be the case..it was a combination of "caked" grease and a small amount of fibre from the washer. Do you know of a "blue" drag grease that Shimano use?
Title: Re: Shimano Stella SW 20000
Post by: Black Widow Tackle on August 28, 2011, 01:18:04 AM
Post by: Black Widow Tackle on August 28, 2011, 01:18:04 AM
GREAT review!!!
Title: Re: Shimano Stella SW 20000
Post by: hafnor on September 01, 2011, 11:25:02 PM
Post by: hafnor on September 01, 2011, 11:25:02 PM
what a great review Clem. bold move to go out on probably the most advanced reel out there.... looks like the reel could use a light coat of grease inside the house and on the drive gears...?
Title: Re: Shimano Stella SW 20000
Post by: Nessie Hunter on September 02, 2011, 04:49:34 PM
Post by: Nessie Hunter on September 02, 2011, 04:49:34 PM
Amazing tutorial Clem, Thanks.....
I have worked on a couple of the Stella Spinning reels..
I now Refuse to work on them for my normal price ! ( I try to price them out of doing it!!!) LOL
I absolutely Hate them!!!! But you make it look easy!!!!
I have worked on a couple of the Stella Spinning reels..
I now Refuse to work on them for my normal price ! ( I try to price them out of doing it!!!) LOL
I absolutely Hate them!!!! But you make it look easy!!!!
Title: Re: Shimano Stella SW 20000
Post by: johndtuttle on June 17, 2012, 05:27:48 PM
Post by: johndtuttle on June 17, 2012, 05:27:48 PM
"Itsa just lika mi Ferrari when I a rebuilda the Fuel Injectione. Enzo woulda be very proud, Pisano!"
:D
Thanks for the post, beautiful machinery. :)
:D
Thanks for the post, beautiful machinery. :)
Title: Re: Shimano Stella SW 20000
Post by: kenwahoo on July 19, 2012, 09:08:45 AM
Post by: kenwahoo on July 19, 2012, 09:08:45 AM
My hat off to you! Alan Hawk mentioned that the Stella contains over 200 parts and seeing your breakdown makes me appreciate my Saltiga and other reels which have less than half the number of parts. I am contemplating buying a Stella but am not sure because of the number of parts in it. Compare that to one of my first reels a DAM 5000 which is not as smooth but is every bit as strong and simple to service. I am not enthused or encourage to buy a reel that I have to send to Shimano every time it needs a service. I'll be happy to buy a Zeebaas but their lightest reel is now 20oz whereas I am looking at no more than 15oz/450gm. At least the Zeebaas is simple enough for self servicing. I think that there's something wrong when a manufacturer cannot use the KISS principle. Some of the best ideas are such and you are left with thinking "why didn't I think of that". You have to ask the question why Daiwa's Saltiga uses half the Stella's parts to do the same job at their level. I am saying this broadly so no need to dispute which is the better reel. btw anyone know how many parts in a Zeebaas or Van Staal?
Title: Re: Shimano Stella SW 20000
Post by: johndtuttle on August 08, 2012, 08:23:46 PM
Post by: johndtuttle on August 08, 2012, 08:23:46 PM
Thx for the fine post! :)
Title: Re: Shimano Stella SW 20000
Post by: nagz on January 29, 2013, 03:33:01 AM
Post by: nagz on January 29, 2013, 03:33:01 AM
Does anyone know why this reel would make a slight ticking noise after servicing when the handle is turned?
Thanks
Thanks
Title: Re: Shimano Stella SW 20000
Post by: Clem on January 29, 2013, 04:40:32 AM
Post by: Clem on January 29, 2013, 04:40:32 AM
Hi Nagz,
That could be caused by the AR pawl if the pawl springhas not gone through the hole...the pawl is likley touching the AR ratchet has the handle is turned...will need to remove the cover and check. Dont keep turning it as the pawl wire could become stuck in the gear
That could be caused by the AR pawl if the pawl springhas not gone through the hole...the pawl is likley touching the AR ratchet has the handle is turned...will need to remove the cover and check. Dont keep turning it as the pawl wire could become stuck in the gear
Title: Re: Shimano Stella SW 20000
Post by: nagz on January 29, 2013, 04:51:59 AM
Post by: nagz on January 29, 2013, 04:51:59 AM
Hello clem
The anti reverse seems to be fine, thank goodness
I only put a very light coat of cals on the gears, so I'm thinking I may need to apply more
Would that contribute?
The anti reverse seems to be fine, thank goodness
I only put a very light coat of cals on the gears, so I'm thinking I may need to apply more
Would that contribute?
Title: Re: Shimano Stella SW 20000
Post by: Clem on January 29, 2013, 04:57:58 AM
Post by: Clem on January 29, 2013, 04:57:58 AM
I dont think it will be that...Did you dissasemble completely? Is the ticking consistent or only in part of the cycle when turning the handle?
Title: Re: Shimano Stella SW 20000
Post by: Clem on January 29, 2013, 05:16:45 AM
Post by: Clem on January 29, 2013, 05:16:45 AM
Just take your time - process of elimination really..
Not too many things to check
Handle – Main gear - Side cover bearings
Pinion - bearings
Oscillation gear – worm shaft – bearings
Rotor – bearings – Rotor nut – Liner roller assembly
Sometimes the Line roller assembly can have a little play...sticky/thick grease can occasionally cause sucking/popping sound
Title: Re: Shimano Stella SW 20000
Post by: wallacewt on January 29, 2013, 06:56:42 AM
Post by: wallacewt on January 29, 2013, 06:56:42 AM
im so glad i gotcha outa bed clem
good stuff
good stuff
Title: Re: Shimano Stella SW 20000
Post by: Clem on January 29, 2013, 10:27:19 AM
Post by: Clem on January 29, 2013, 10:27:19 AM
heh heh...good on ya wallace
Title: Re: Shimano Stella SW 20000
Post by: chopsticks on April 26, 2013, 09:31:07 PM
Post by: chopsticks on April 26, 2013, 09:31:07 PM
Terrific tutorial, really well done with good clear images.
One thing worth mentioning is that the rotor nut is a reverse thread.
One thing worth mentioning is that the rotor nut is a reverse thread.
Title: Re: Shimano Stella SW 20000
Post by: lois on June 22, 2013, 02:38:14 AM
Post by: lois on June 22, 2013, 02:38:14 AM
i am getting around to repairing a couple of Stellas in my shop and i was going to replace the
rotor nut on the Stella SW 20000. Now i understand that the threads on the pinion gear is supposed to be reverse
thread...? But it seems that the rotor nuts i received are standard thread. Has this been a problem with anyone else?
I've tried screwing on all four that I received backwards and forwards, and i've followed the threads and t seems like i
got a bad batch.
has this happened to anyone else?
please advise asap. thanks
Title: Re: Shimano Stella SW 20000
Post by: Cone on June 22, 2013, 07:03:23 PM
Post by: Cone on June 22, 2013, 07:03:23 PM
lois, I'm not a Shimano guy. I have and do own one or two. From the pics in this post the rotor nut does seem to be LH threads. If you go to the 8000fa thread the threads appear to be RH. I would check to make sure the rotor nuts are for the model and year Stella you are servicing. A call to Shimano may be in order. I believe there have been changes in some previous Shimano's that can be confusing.
I hope someone else can answer your question better. Good luck.
Bob
I hope someone else can answer your question better. Good luck.
Bob
Title: Re: Shimano Stella SW 20000
Post by: Clem on June 24, 2013, 07:50:53 AM
Post by: Clem on June 24, 2013, 07:50:53 AM
Hi Lois
I would say they just sent you the wrong ones..has happened to me before when I have ordered them for the FA and recd SW's.. :-\
I would say they just sent you the wrong ones..has happened to me before when I have ordered them for the FA and recd SW's.. :-\
Quote from: lois on June 22, 2013, 02:38:14 AM
i am getting around to repairing a couple of Stellas in my shop and i was going to replace the
rotor nut on the Stella SW 20000. Now i understand that the threads on the pinion gear is supposed to be reverse
thread...? But it seems that the rotor nuts i received are standard thread. Has this been a problem with anyone else?
I've tried screwing on all four that I received backwards and forwards, and i've followed the threads and t seems like i
got a bad batch.
has this happened to anyone else?
please advise asap. thanks
Title: Re: Shimano Stella SW 20000
Post by: lois on June 24, 2013, 08:30:41 PM
Post by: lois on June 24, 2013, 08:30:41 PM
ah ok, i think that is where the problem is...i may have ordered the FA ones. thanks guys, i'm going to give my rep a call! ;D
Title: Re: Shimano Stella SW 20000
Post by: lois on June 25, 2013, 04:11:38 AM
Post by: lois on June 25, 2013, 04:11:38 AM
ok i've cleared it up. thanks for all of your help.
Title: Re: Shimano Stella SW 20000
Post by: handi2 on October 03, 2014, 03:40:31 PM
Post by: handi2 on October 03, 2014, 03:40:31 PM
I too cannot charge a normal price after doing many of these reels. It takes at least 3 hours are more. Imagine doing a Stella 2500 sized reel. It was a nightmare..!!
Title: Re: Shimano Stella SW 20000
Post by: PE Pete on June 17, 2015, 01:15:14 AM
Post by: PE Pete on June 17, 2015, 01:15:14 AM
Kiaora cuz, that's mean! Just joined this forum & am looking for 08 Stella's.
You know of anyone want to flick any?
Where about are you? I'm in Aucks but will flick ya a PM soon.
Cheers Pete
You know of anyone want to flick any?
Where about are you? I'm in Aucks but will flick ya a PM soon.
Cheers Pete
Title: Re: Shimano Stella SW 20000
Post by: anglingarchitect on June 17, 2015, 02:37:01 AM
Post by: anglingarchitect on June 17, 2015, 02:37:01 AM
My Vanstal is solid not opened for five years at least.
I guess I should send it in, before it seizes up on me.
I guess I should send it in, before it seizes up on me.
Title: Re: Shimano Stella SW 20000
Post by: PE Pete on June 25, 2015, 09:15:27 AM
Post by: PE Pete on June 25, 2015, 09:15:27 AM
Hey Clem, mate I was so inspired by your post that I thought I would take my new 08 Stella SW 10k apart!
Then I thought get real! But I might be tempted to buy a box of Beerzeeees & bring it round to yours. Lol
Pete
Then I thought get real! But I might be tempted to buy a box of Beerzeeees & bring it round to yours. Lol
Pete