Title: Tutorial Installing IAR bearing
Post by: Slowly on February 03, 2011, 05:40:57 AM
Post by: Slowly on February 03, 2011, 05:40:57 AM
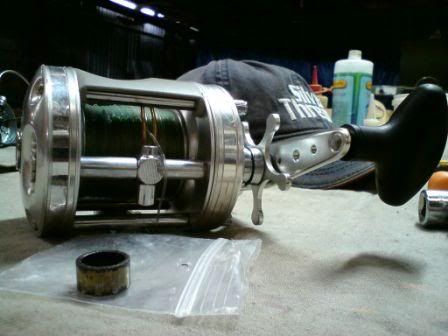
I recently upgraded to greased carbontex an old Abu 6501 c3, this reel was having problems with the IAR bearing, and when completely locking down the drag to test it and pulling line out of the reel, the IAR slipped and broke. Some time ago I ordered a new IAR from mike's, so I decided to install it.
Here's how
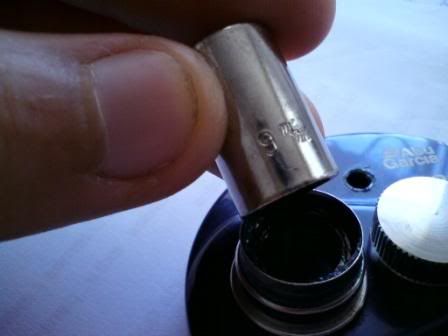
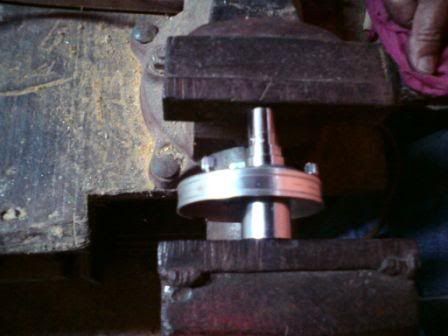
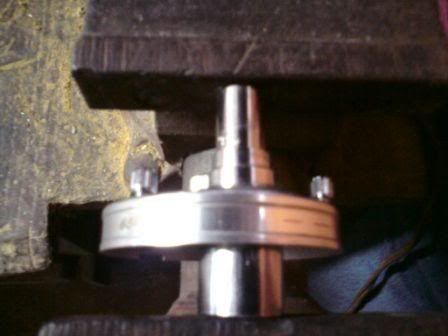
Use impact sockets, a 9mm that fits the IAR, and a 14mm to fit the handle side plate.
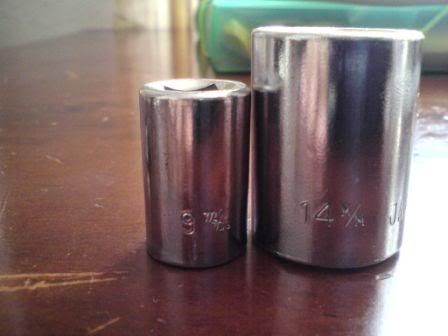
See that the 9mm socket fits nicely inside the 14mm
Used the c4 only for demonstration purposes.
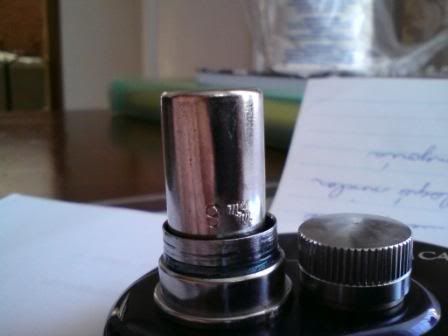
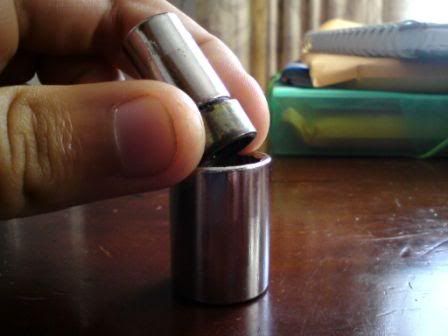
Be sure to center the 14mm socket correcty, if not, you WILL damage the side plate beyond repair when using the press!!!
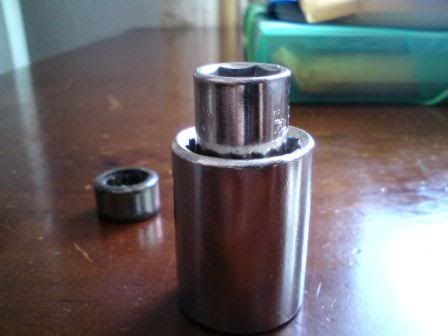
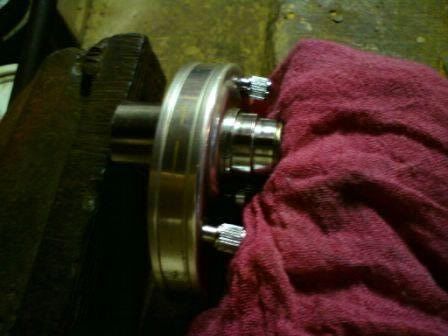
This is how you will put the pieces once using the press

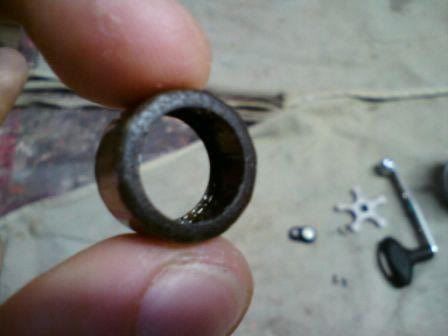
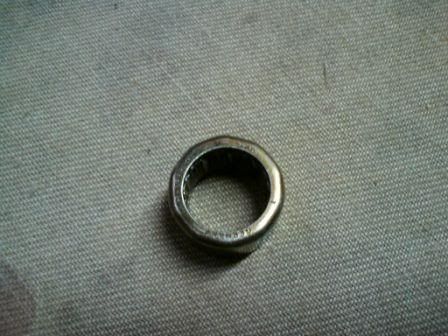
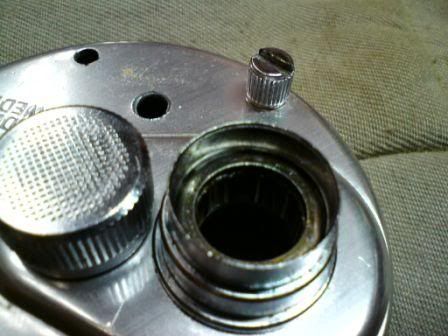
Broken and old IAR
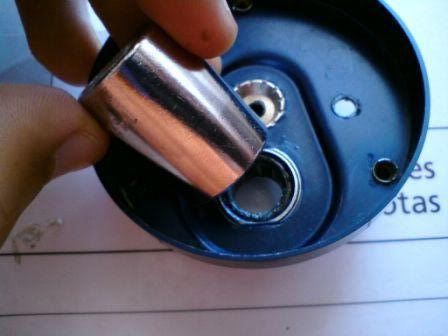
Apply some oil to the inner part of the side plate, to help the new bearing slide in.
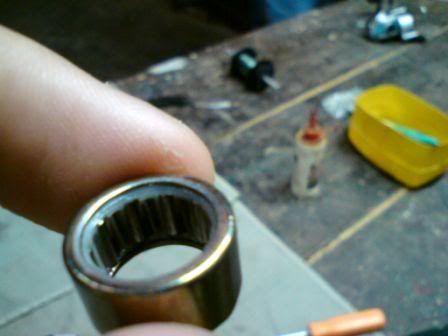
New IAR bearing ;D
For pre-installing the IAR use a towel to avoid scratching it.
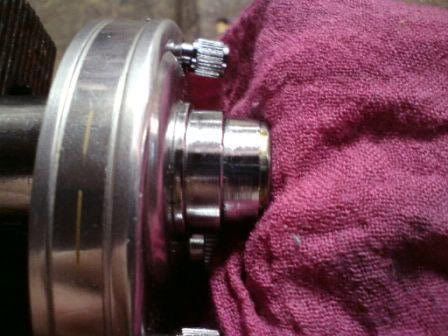
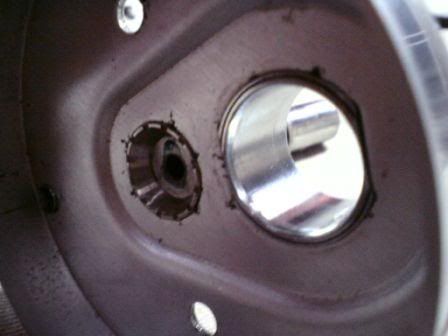
Notice the 14mm socket is centered
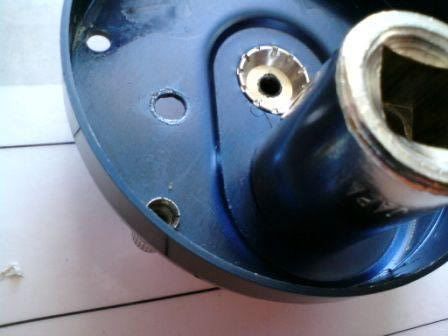
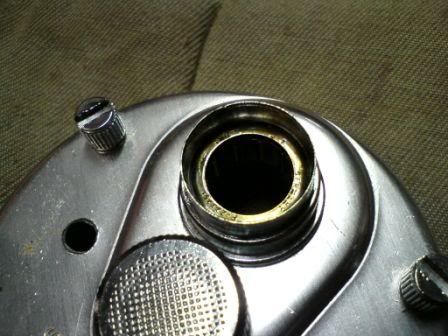
Once you can't keep on pushing the IAR only with the press, use the 9mm socket.
Remember that the IAR-B has to be correctly positioned, if you push it in too much it WON'T work, and also if you don't press it enough the same will occur, so push slowly and check often. If you pressed it in too much, keep on pushing until it comes out and try again, don't try to push it the other way around, you will damage the plate!
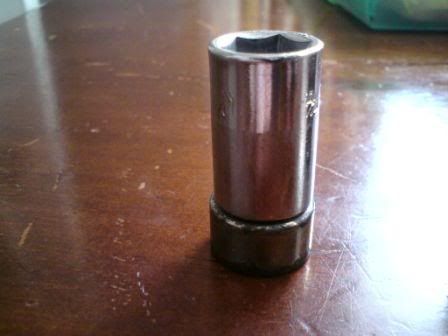
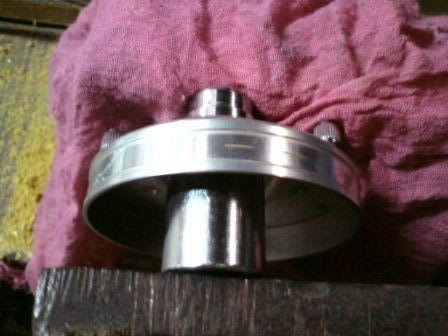
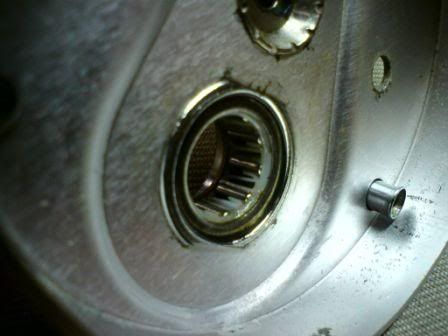
Job done! 8)
Here's how
Use impact sockets, a 9mm that fits the IAR, and a 14mm to fit the handle side plate.
See that the 9mm socket fits nicely inside the 14mm
Used the c4 only for demonstration purposes.
Be sure to center the 14mm socket correcty, if not, you WILL damage the side plate beyond repair when using the press!!!
This is how you will put the pieces once using the press
Broken and old IAR
Apply some oil to the inner part of the side plate, to help the new bearing slide in.
New IAR bearing ;D
For pre-installing the IAR use a towel to avoid scratching it.
Notice the 14mm socket is centered
Once you can't keep on pushing the IAR only with the press, use the 9mm socket.
Remember that the IAR-B has to be correctly positioned, if you push it in too much it WON'T work, and also if you don't press it enough the same will occur, so push slowly and check often. If you pressed it in too much, keep on pushing until it comes out and try again, don't try to push it the other way around, you will damage the plate!
Job done! 8)
Title: Re: Tutorial Installing IAR bearing
Post by: Bryan Young on February 03, 2011, 02:23:06 PM
Post by: Bryan Young on February 03, 2011, 02:23:06 PM
Very nice with the pics on the process. You make it look so easy.
Title: Re: Tutorial Installing IAR bearing
Post by: BigT on February 03, 2011, 10:16:43 PM
Post by: BigT on February 03, 2011, 10:16:43 PM
Great tip! Thanks for sharing... that's really good info ;D
Cheers, T
Cheers, T
Title: Re: Tutorial Installing IAR bearing
Post by: Brewer on February 04, 2011, 02:00:45 AM
Post by: Brewer on February 04, 2011, 02:00:45 AM
wow! very nice!
Title: Re: Tutorial Installing IAR bearing
Post by: alantani on February 04, 2011, 04:07:09 AM
Post by: alantani on February 04, 2011, 04:07:09 AM
been thinking of the same thing. thanks for posting this. alan
Title: Re: Tutorial Installing IAR bearing
Post by: Slowly on February 04, 2011, 03:56:05 PM
Post by: Slowly on February 04, 2011, 03:56:05 PM
Thanks everyone for the great feedback! ;D ;D ;D
Title: Re: Tutorial Installing IAR bearing
Post by: Roger on February 05, 2011, 01:56:13 AM
Post by: Roger on February 05, 2011, 01:56:13 AM
That ought to get 'er done......... Thank's
Title: Re: Tutorial Installing IAR bearing
Post by: haggard1 on March 23, 2011, 01:30:47 AM
Post by: haggard1 on March 23, 2011, 01:30:47 AM
I was wondering how to get those out. Thanks for the info.
Title: Re: Tutorial Installing IAR bearing
Post by: Snagged2 on August 16, 2011, 11:13:23 PM
Post by: Snagged2 on August 16, 2011, 11:13:23 PM
Hello All,,
I enjoyed the tutorial and, wanted to show how I move the IAR bearings..
I just use a combination of sockets,,bolts, nuts, etc,,, as I've not had any "tooling" made up..
Just came up with the pieces and components to do the same thing as using the vice..
Would be nice to have some dedicated parts to push and move the IAR bearings, and set them to the correct depth with the tooling of the correct thickness..But, until then,, this and I'm sure other systems will work!!
Title: Re: Tutorial Installing IAR bearing
Post by: alantani on August 17, 2011, 05:49:37 AM
Post by: alantani on August 17, 2011, 05:49:37 AM
you could do something similar to remove them as well!
Title: Re: Tutorial Installing IAR bearing
Post by: Snagged2 on August 17, 2011, 07:11:07 PM
Post by: Snagged2 on August 17, 2011, 07:11:07 PM
Yes,, it works for both removing and installing, just change out the sizes and location of the pusher sockets and washers!!
and,, none of it bears against the sideplate,, so far it works good.
and,, none of it bears against the sideplate,, so far it works good.
Title: Re: Tutorial Installing IAR bearing
Post by: bres on September 09, 2011, 05:52:41 PM
Post by: bres on September 09, 2011, 05:52:41 PM
Hi , That's a great tutorial. Im thinking of upgrading my old black 6500 which originally doesnt have an IAR bearing fitted. Just wondered how far to press in , on the photos it looks flush with the inside of the casing ,is that right? Has anyone upgraded the main gears / multi disc drag on one of these old reels?
Thanks
Thanks
Title: Re: Tutorial Installing IAR bearing
Post by: bdoc on October 10, 2011, 02:40:37 AM
Post by: bdoc on October 10, 2011, 02:40:37 AM
after installing the new iar bearing do you need to put any grease or oil on the needles before using
Title: Re: Tutorial Installing IAR bearing
Post by: alantani on October 10, 2011, 02:43:35 AM
Post by: alantani on October 10, 2011, 02:43:35 AM
i use corrosion x. that's the same thing that accurate uses. alan
Title: Re: Tutorial Installing IAR bearing
Post by: alantani on October 10, 2011, 02:47:25 AM
Post by: alantani on October 10, 2011, 02:47:25 AM
Quote from: bres on September 09, 2011, 05:52:41 PM
Hi , That's a great tutorial. Im thinking of upgrading my old black 6500 which originally doesnt have an IAR bearing fitted. Just wondered how far to press in , on the photos it looks flush with the inside of the casing ,is that right? Has anyone upgraded the main gears / multi disc drag on one of these old reels?
Thanks
flush is the correct answer. the silent dog actually works pretty well. it might not be worth the hassle or expense. alan
Title: Re: Tutorial Installing IAR bearing
Post by: Ken_D on October 10, 2011, 03:28:49 PM
Post by: Ken_D on October 10, 2011, 03:28:49 PM
Quote from: bres on September 09, 2011, 05:52:41 PM
Hi , That's a great tutorial. Im thinking of upgrading my old black 6500 which originally doesnt have an IAR bearing fitted. Just wondered how far to press in , on the photos it looks flush with the inside of the casing ,is that right? Has anyone upgraded the main gears / multi disc drag on one of these old reels?
Thanks
kewl. But forget it. IAR brg will not fit.
Title: Re: Tutorial Installing IAR bearing
Post by: Killerbug on December 20, 2011, 12:27:53 PM
Post by: Killerbug on December 20, 2011, 12:27:53 PM
Thanks to Slowly and Snagged2, this is great stuff.
Title: Re: Tutorial Installing IAR bearing
Post by: Slowly on December 23, 2011, 01:34:06 AM
Post by: Slowly on December 23, 2011, 01:34:06 AM
you're welcome!!! ;D ;D ;D
Title: Re: Tutorial Installing IAR bearing
Post by: Snagged2 on December 23, 2011, 03:55:05 AM
Post by: Snagged2 on December 23, 2011, 03:55:05 AM
Quote from: Slowly on December 23, 2011, 01:34:06 AMAbsolutely,,ditto
you're welcome!!! ;D ;D ;D
Title: Re: Tutorial Installing IAR bearing
Post by: B Austin on March 10, 2012, 10:12:25 PM
Post by: B Austin on March 10, 2012, 10:12:25 PM
I noticed in the pictures in the pictures that one side of the IAR is stamped and the other side is not. I've just broken open a supposedly virgin reel and the stamping (ie. ID #s and the like) inside of the plate. Is this is how it should be, or the other way around? I thought I saw in one of the tutorials the reverse case. I may be mistaken. Sorry that I did not ask this question before, but where is the best place to order these replacements?
Title: Re: Tutorial Installing IAR bearing
Post by: alantani on March 12, 2012, 05:56:10 AM
Post by: alantani on March 12, 2012, 05:56:10 AM
i'd install the inner tube into the IAR bearing and see which way it turns, just to make sure.
Title: Re: Tutorial Installing IAR bearing
Post by: Killerbug on March 12, 2012, 12:17:35 PM
Post by: Killerbug on March 12, 2012, 12:17:35 PM
Quote from: B Austin on March 10, 2012, 10:12:25 PM
I noticed in the pictures in the pictures that one side of the IAR is stamped and the other side is not. I've just broken open a supposedly virgin reel and the stamping (ie. ID #s and the like) inside of the plate. Is this is how it should be, or the other way around? I thought I saw in one of the tutorials the reverse case. I may be mistaken. Sorry that I did not ask this question before, but where is the best place to order these replacements?
On left handled reels the IAR is reverced.
Title: Re: Tutorial Installing IAR bearing
Post by: B Austin on March 16, 2012, 02:11:30 AM
Post by: B Austin on March 16, 2012, 02:11:30 AM
I just did the 14 and 9 mm method, but since I don't have a good vice, would it be approiate to ask for more specific instructions on tnis method. ie. bolt size etc? I hope I'm not just missing something.
Thanks in advance.
Thanks in advance.
Title: Re: Tutorial Installing IAR bearing
Post by: Ken_D on March 18, 2012, 06:04:35 PM
Post by: Ken_D on March 18, 2012, 06:04:35 PM
Quote from: B Austin on March 16, 2012, 02:11:30 AM
I just did the 14 and 9 mm method, but since I don't have a good vice, would it be approiate to ask for more specific instructions on tnis method. ie. bolt size etc? I hope I'm not just missing something.
Thanks in advance.
The Vise method is great if you have one. If not: All you need is a socket (Allen-head) capscrew, in inch, about 5/16" x 2 1/2", a hex nut for same, a flat washer, a 3/8" drive socket that catches that little 'lip' on the bearing boss, and a wrench or pliers for the hex nut.
The OD of the capscrew catches the outer race of the IAR. If you live where metric is the format, then take your sideplate to the shop, and get one of the appropriate measurements. I bought my capscrew and nut for under 2.00 Canadian.
Method: From the inside of the side plate, carefully insert capscrew in the IAR, place socket on boss, place washer on socket, place hex nut on washered capscrew, , and walk the IAR up and out into the socket. Easy-peasy lemon squeezey. I've modified an old brass doorknob instead of a wrench. The IAR is not all that tight in the boss.
To install a new IAR, place capscrew on IAR, place capscrew from the inside as before, with socket washer and nut, and and walk the IAR into the bearing housing-boss. That's why you want a capscrew about that 2" length...to allow for the depth of the new IAR. I place a drop of sewing machine oil in the boss, and carefully align the bearing to prevent canting and possible distortion on the way back in. Of the dozens so far, all is good.
(Many Abu reels don't have IAR, but are set up to take them, so in they go.)

Title: Re: Tutorial Installing IAR bearing
Post by: GulfOfBothnia on May 13, 2012, 06:00:29 AM
Post by: GulfOfBothnia on May 13, 2012, 06:00:29 AM
Great tips in here!
Yesterday I changed IAR for the very first time... succesfully.
Took it out in vice as described in here.
I used reloading press to put IAR in the side plate.
Yesterday I changed IAR for the very first time... succesfully.
Took it out in vice as described in here.
I used reloading press to put IAR in the side plate.
Title: Re: Tutorial Installing IAR bearing
Post by: fishnetter on February 15, 2013, 04:23:19 PM
Post by: fishnetter on February 15, 2013, 04:23:19 PM
Has anyone ever used the hydraulic method to remove bearings? I have filled up a bearing cavity on vehicles with grease and used a rod that just fits in the bearing hole and used the grease as the force and popped the bearings out. Never used it on a reel bearing yet but it works on vehicles with enclosed bearings. Just a thought?? ???
Title: Re: Tutorial Installing IAR bearing
Post by: Ken_D on May 12, 2013, 02:40:12 AM
Post by: Ken_D on May 12, 2013, 02:40:12 AM
Quote from: fishnetter on February 15, 2013, 04:23:19 PM
Has anyone ever used the hydraulic method to remove bearings? I have filled up a bearing cavity on vehicles with grease and used a rod that just fits in the bearing hole and used the grease as the force and popped the bearings out. Never used it on a reel bearing yet but it works on vehicles with enclosed bearings. Just a thought?? ???
Hi, it may work in reels with enclosed brgs, but in most abus, they are not enclosed. Some of the Penns are, tho.
Like the driveshaft bb on the 340 345's, and the spool bearing on the 330, in the side plate. But they come out easily enough w/o the aid of grease.
Title: Re: Tutorial Installing IAR bearing
Post by: Hangjebrata on July 15, 2013, 12:46:37 PM
Post by: Hangjebrata on July 15, 2013, 12:46:37 PM
Can you tell me the dimensions of Abu 6500 IAR
Title: Re: Tutorial Installing IAR bearing
Post by: Ken_D on July 16, 2013, 04:09:55 PM
Post by: Ken_D on July 16, 2013, 04:09:55 PM
Hello. Best to measure the OD of the sleeve that the clutch acts upon, for an accurate ID measurement. Then you can easily measure the OD and the width of the clutch.
It's difficult to measure the ID of the clutch, as the needles and the race make it hard to get callipers, set right. Try 10 x 8 x 14. Alternatively, you can search makers for a cross to the INA F223251 sized clutch.
It's difficult to measure the ID of the clutch, as the needles and the race make it hard to get callipers, set right. Try 10 x 8 x 14. Alternatively, you can search makers for a cross to the INA F223251 sized clutch.
Title: Re: Tutorial Installing IAR bearing
Post by: fishingjack on February 13, 2014, 01:56:10 AM
Post by: fishingjack on February 13, 2014, 01:56:10 AM
Wow, this is a nice thread.
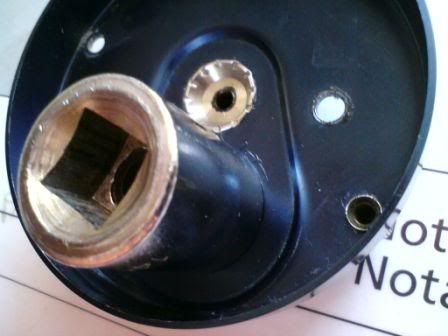
My IAR bearing has been getting worse and worse on my 6500 chrome rocket. I pretty much expected it after a good amount of abuse pulling in some big mekong catfish in the 100 to 140lb range. I haven't used the reel on catfish for quite some time, just carp in England now but I guess the damage was done. The accelerated wear and tear has finally taken it's toll. In one particular location the AR bearing would have quite a lot of back play before it would lock. Taking the bearing out, one of the pins actually fell out so that explains it. When reeling in and lifting the sinker ready for another cast the handle would rotate backwards up to 5 full revolutions before locking. An absolute pain. It seemed quite random.
I ordered a bearing in the UK. They state that Abu use 14.1mm bearings, which are a very tight fit. The companies here provide 14mm bearings with loctite to make up for the 0.1mm difference. It is amazing because the stock bearing was quite difficult to dislodge. I don't have a vice or anything so I used a nut tightener with a hammer to tap the bearing out. Well it ended up being hammering it out because it was so tightly inserted. I took great care not to bend the side plate but in the end the neck/collar of the side plate got a bit mis-shapped.
Eventually it did come out. I used cardboard to absorb the impact of the hammer on the nut tightener, but because there was maybe 2mm difference in size between the tool used to hammer the bearing out and the neck of the abu side plate, it did move around and actually bend the neck out of shape from round to more like a hexagon after I was finished. I will post up images.
Anyway I have tried slowly tapping the neck of the side plate back to a round shape and it seems 99% the same as what it was.
Now the interesting thing is that the 14mm bearing provided will just drop straight through the neck without loctite. I am sceptical that the loctite is going to be strong enough to prevent the bearing spinning freely under high drags but we'll see. I coated the bearing outside in loctite and inserted it into the collar after having removed grease off both surfaces. Pretty quickly I could feel the loctite sticking and the bearing no longer wants to drop out. To align the bearing I pushed it as far as a little line inside the collar which seems to indicate how far up the bearing should be inserted. I hope I have done it right. There is a tiny cap between the bottom of the bearing and the bottom of the side plate. I spent ages looking for instructions. I couldn't find any, so I spent ages looking for high res pictures of abu side plates withe the IAR bearing visible from the inside. That's how I actually came across this post.
I am now waiting 24 hrs for the loctite to set at 100% strength before reassembling the reel to test it.
If the loctite cannot hold the IAR bearing still then I may need to try a stronger adhesive.
Fingers crossed that this all works. :-\
I searched the internet for a long time trying to find pictures and I actually found these posts after I had finished, as I wanted to share my experience. Typical :D
Title: Re: Tutorial Installing IAR bearing
Post by: fishingjack on February 24, 2014, 12:08:40 PM
Post by: fishingjack on February 24, 2014, 12:08:40 PM
ok third time in trying to write this thanks to BSODs! >:(
After 2 days I finally got around to reassembling the reel which had sat in bits since replacing the AR bearing. The loctite seems to have done the trick. With a gentle check the bearing seems locked into the collar of the side plate. Before loctite it would drop straight through. I'm a little bit worried how it will fair under a heavy drag. Watch out knuckles! The plan at the moment is only to use it for carp in the UK. I have better reels for the Thai catfish now.
So here are pictures of the removed AR bearing, with the pin that dropped out. You may be able to see that the circular neck got a bit mis-shaped. I managed to tap it back with a hammer to being round again.
 (http://postimg.org/image/6l7cztey3/)
sidelate with AR bearing removed
 (http://postimg.org/image/f26vaqjmz/)
AR bearing with a pin dropped out. Side plate screw also fell out but went back in easily.
 (http://postimg.org/image/w1ftpzuuj/)
Damaged bearing
 (http://postimg.org/image/eqp6ionvt/)
Neck of side plate a little bit bent
 (http://postimg.org/image/wh2m5i2sp/)
Hammered it back gently, as good as new!
I have fished with the reel a few times since. Now fish have been hooked to test the reel yet. It's funny, it may be just me but the reel feels brand new again! Maybe I'm fooling myself. ;D
Last year I fitted the spool with ceramic bearings. Not a huge change as most energy in the cast is lost through the levelwind, which in this C3 model, is not using bearings for the worm gear or the cog driving it on the side plate.
 (http://postimg.org/image/627x065ed/)
Bearing fixed in place from below
 (http://postimg.org/image/rsgqxg9g5/)
Bearing fixed in place from above
 (http://postimg.org/image/wokdp59lh/)
Side plate reassembled
 (http://postimg.org/image/kb7ji8jx1/)
Reel reassembled
 (http://postimg.org/image/bbl66h4tb/)
 (http://postimg.org/image/u2n3gmzdr/)
Well I'm not sure he has noticed the change but he didn't say anything bad about the reel.
After 2 days I finally got around to reassembling the reel which had sat in bits since replacing the AR bearing. The loctite seems to have done the trick. With a gentle check the bearing seems locked into the collar of the side plate. Before loctite it would drop straight through. I'm a little bit worried how it will fair under a heavy drag. Watch out knuckles! The plan at the moment is only to use it for carp in the UK. I have better reels for the Thai catfish now.
So here are pictures of the removed AR bearing, with the pin that dropped out. You may be able to see that the circular neck got a bit mis-shaped. I managed to tap it back with a hammer to being round again.
(http://postimg.org/image/6l7cztey3/)sidelate with AR bearing removed
(http://postimg.org/image/f26vaqjmz/)AR bearing with a pin dropped out. Side plate screw also fell out but went back in easily.
(http://postimg.org/image/w1ftpzuuj/)Damaged bearing
(http://postimg.org/image/eqp6ionvt/)Neck of side plate a little bit bent
(http://postimg.org/image/wh2m5i2sp/)Hammered it back gently, as good as new!
I have fished with the reel a few times since. Now fish have been hooked to test the reel yet. It's funny, it may be just me but the reel feels brand new again! Maybe I'm fooling myself. ;D
Last year I fitted the spool with ceramic bearings. Not a huge change as most energy in the cast is lost through the levelwind, which in this C3 model, is not using bearings for the worm gear or the cog driving it on the side plate.
(http://postimg.org/image/627x065ed/)Bearing fixed in place from below
(http://postimg.org/image/rsgqxg9g5/)Bearing fixed in place from above
(http://postimg.org/image/wokdp59lh/)Side plate reassembled
(http://postimg.org/image/kb7ji8jx1/)Reel reassembled
(http://postimg.org/image/bbl66h4tb/) (http://postimg.org/image/u2n3gmzdr/)Well I'm not sure he has noticed the change but he didn't say anything bad about the reel.
Title: Re: Tutorial Installing IAR bearing
Post by: 0119 on February 24, 2014, 12:53:41 PM
Post by: 0119 on February 24, 2014, 12:53:41 PM
You must have a real knack for lobing those bread balls with a casting reel. Ive never seen anyone try it with a multiplier.
Title: Re: Tutorial Installing IAR bearing
Post by: Unutt on August 28, 2014, 07:50:03 PM
Post by: Unutt on August 28, 2014, 07:50:03 PM
I replace the IAR bearings on many of my reels. Many come with HF1012 bearings. I usually replace with HF1008 bearings. I press the bearing in until the bottom is flush with the side plate. Changing from 1012 to 1008 makes a discernible difference in how easy it is to turn the handle. I use the original anti reverse sleeve, which leaves an extra 4 millimeters exposed, but it cannot be seen under the drag knob anyway.
Title: Re: Tutorial Installing IAR bearing
Post by: Nicko_Cairns on January 20, 2015, 09:45:27 AM
Post by: Nicko_Cairns on January 20, 2015, 09:45:27 AM
Great post, thanks!
Title: Re: Tutorial Installing IAR bearing
Post by: Kayote on February 26, 2015, 12:10:36 AM
Post by: Kayote on February 26, 2015, 12:10:36 AM
I may be missing something here. On my Trinidad 14 there is a built in ring above the roller clutch bearing. I can't push straight through because it's flush inside. This seems to be set up different than the reel in the pictures. I just can't figure out how to push the old bearing out. Here are some pics of my reel.


Title: Re: Tutorial Installing IAR bearing
Post by: Bryan Young on February 26, 2015, 01:00:25 AM
Post by: Bryan Young on February 26, 2015, 01:00:25 AM
Oh no...you are in a pickle. I need to think about this one.
Title: Re: Tutorial Installing IAR bearing
Post by: ReelClean on February 26, 2015, 04:07:00 AM
Post by: ReelClean on February 26, 2015, 04:07:00 AM
Find a washer say 2mm wider than the ID of the inner diameter of the bearing cage on the bottom. Grind the sides of the washer and make it an oval shape with the width about, say, 4 or 5 mm less than the cage ID. With abit of adjustment you should be able to tilt and slide the washer inside the bearing, then it should lay flat on the cage and allow you something to beat on to drift it out.
Best I can think of....
alternatively, just slide a screwdriver in there and flog it out going side to side if you don't really want the bearing ;D
cheers
Steve
Best I can think of....
alternatively, just slide a screwdriver in there and flog it out going side to side if you don't really want the bearing ;D
cheers
Steve
Title: Re: Tutorial Installing IAR bearing
Post by: alantani on February 26, 2015, 04:52:20 AM
Post by: alantani on February 26, 2015, 04:52:20 AM
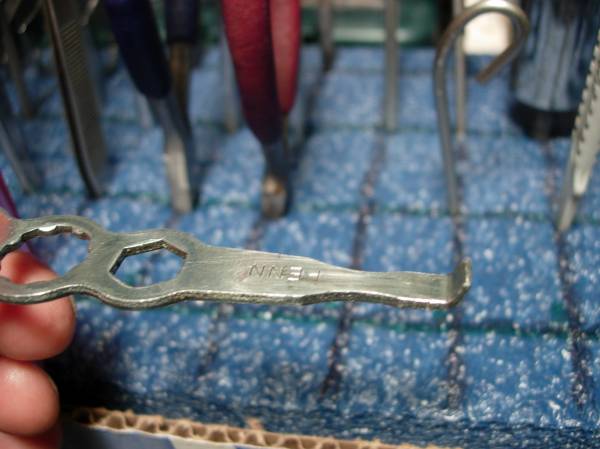
i use one of these to pry, pound, tap, wiggle or generally coax the case out.
Title: Re: Tutorial Installing IAR bearing
Post by: Kayote on February 27, 2015, 09:13:14 PM
Post by: Kayote on February 27, 2015, 09:13:14 PM
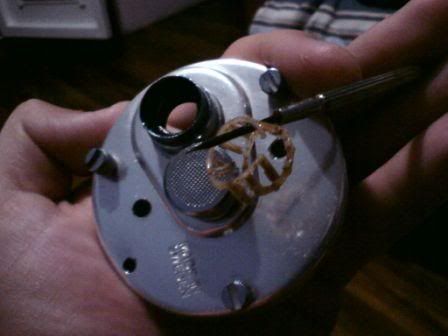
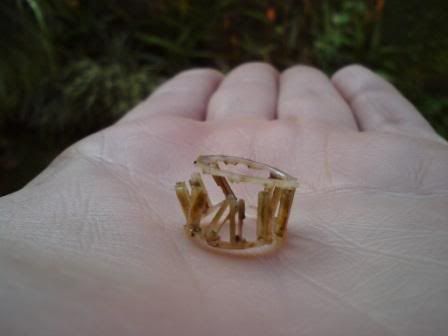
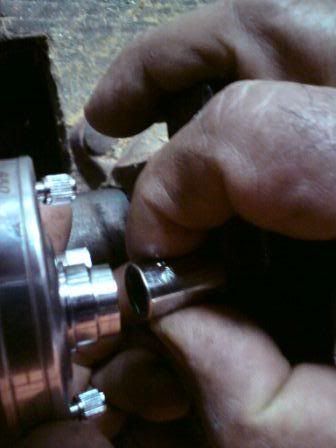
Just wanted to follow up on the roller clutch bearing that was stuck in my Trinidad 14. I tried making a tool and that didn't work because of my tool making skills. Tried forcing it out with a screwdriver and I could see myself damaging the side plate and couldn't budge it. Grinding down the oval washer worked like a charm. An 8 mm socket fit the hole perfectly and I set a 22 mm socket under the side plate for support and lightly tapped it out. Thanks everybody. That was incredibly frustrating. I had to walk away and come back to it later. Now I own it. Thanks again. I included a couple shots from the process. The last shot is how I crusted up the reel last summer.


Title: Re: Tutorial Installing IAR bearing
Post by: Bryan Young on February 27, 2015, 10:16:32 PM
Post by: Bryan Young on February 27, 2015, 10:16:32 PM
That is awesome. I was twisting my head on how an oval shaped washer would work. Learned something new today...it's a great day.
Title: Re: Tutorial Installing IAR bearing
Post by: Tightlines667 on February 27, 2015, 10:22:36 PM
Post by: Tightlines667 on February 27, 2015, 10:22:36 PM
This would make a good addition to the 'tip of the day' thread. Well done!
Title: Re: Tutorial Installing IAR bearing
Post by: Unutt on February 28, 2015, 12:46:16 AM
Post by: Unutt on February 28, 2015, 12:46:16 AM
WOW, that is a great idea. I bet that becomes one of my go to tools.
Title: Re: Tutorial Installing IAR bearing
Post by: ReelClean on February 28, 2015, 09:51:09 AM
Post by: ReelClean on February 28, 2015, 09:51:09 AM
YA MEAN IT ACTUALLY WORKED????
Well there ya go....... :)
Well there ya go....... :)
Title: Re: Tutorial Installing IAR bearing
Post by: exp2000 on April 09, 2018, 12:57:33 PM
Post by: exp2000 on April 09, 2018, 12:57:33 PM
Quote from: ReelClean on February 26, 2015, 04:07:00 AM
Find a washer say 2mm wider than the ID of the inner diameter of the bearing cage on the bottom. Grind the sides of the washer and make it an oval shape with the width about, say, 4 or 5 mm less than the cage ID. With abit of adjustment you should be able to tilt and slide the washer inside the bearing, then it should lay flat on the cage and allow you something to beat on to drift it out.
Very clever Steve. :o
~
Title: Re: Tutorial Installing IAR bearing
Post by: pachuc on December 15, 2019, 07:49:03 PM
Post by: pachuc on December 15, 2019, 07:49:03 PM
Hi,
very good post...
I have an Abu Revo Beast RV03... and this one way clutch bearing seems to sit very tight in.. but all the pins are almost falling out from this inner basket.. or how to name it..
Question is.. if i buy this part (it's number is 1275594).. can i just remove this inside basket with those 11 small pins and put it back into my bearing sleeve that still sits very god in my reel...?
anyone tried this before?
I would little bit nervous to use hammer to remove this bearing .. don't have any press etc.
I have putted all the small pins into this plastic basket using a little bit hot souce grease to hold them in place (probably there should not be any grease ....) .. and it's actually working fine.... but it's noisy as hell......
Title: Re: Tutorial Installing IAR bearing
Post by: retiredandfishing on February 02, 2020, 01:17:04 AM
Post by: retiredandfishing on February 02, 2020, 01:17:04 AM
Just wanted add my thanks to everyone for the contributions they made on the IAR bearing fix. I used the two socket, vice approach. Worked great.
Thanks, Steve
Thanks, Steve