Title: Grouper Junior — WIP
Post by: Decker on March 24, 2020, 03:29:45 PM
Post by: Decker on March 24, 2020, 03:29:45 PM
I've always admired the ingenuity of guys on this site, and have imagined many franken-reels from what I have learned here. The Grouper Special has been an inspiration, and I've often thought of building one. Lately I can't find the links, but the I believe the original reel was made by a guy named George, in Alaska for halibut I think, using the Penn 3/0, Newell Yellowtail Special base and bars, and a Long Beach 66 spool. This is the first thread to coin the name:https://alantani.com/index.php?topic=5320.0 (https://alantani.com/index.php?topic=5320.0)I recall "Rowdy" Rudy commenting on the gearing and drag, and Sal "Alto Mare" came up with a unique gear combination that improved the retrieve to 2.6:1. There were other members involved but those are the ones I remember.
Later I had another thought. Gearing similar to the Grouper Special is found in the Senator 2/0 111. It has the 66 bridge, but a smaller, narrower spool as is used in the Long Beach 60. It occurred to be that I could build a 2/0 beast with modifications similar to the Grouper Special. It would hold less line, but still plenty of braid for East Coast wreck fishing, and be narrower. With this inspiration, and using knowledge learned from the masters on this site, I decided to build what I would like to call the "Grouper Junior."
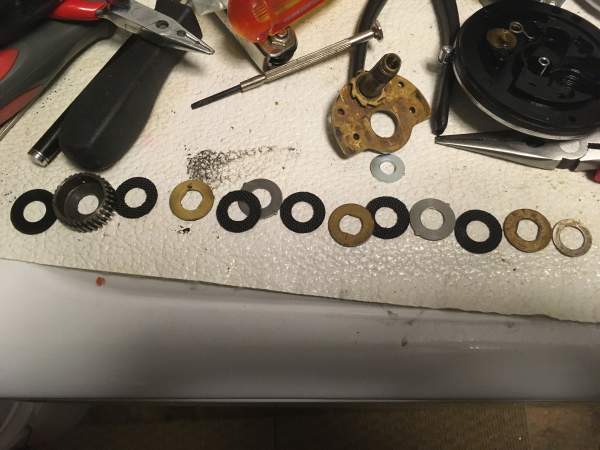
Here are the upgrade ingredients that I have to work with:

Later I had another thought. Gearing similar to the Grouper Special is found in the Senator 2/0 111. It has the 66 bridge, but a smaller, narrower spool as is used in the Long Beach 60. It occurred to be that I could build a 2/0 beast with modifications similar to the Grouper Special. It would hold less line, but still plenty of braid for East Coast wreck fishing, and be narrower. With this inspiration, and using knowledge learned from the masters on this site, I decided to build what I would like to call the "Grouper Junior."
Here are the upgrade ingredients that I have to work with:
- Aluminum 85 spool to replace the chrome one
- Tiburon T-bar power handle
- Stainless steel gear sleeve
- 5-149 main gear and 13-113H pinion: Sal's contribution
Title: Re: Grouper Junior — WIP
Post by: Crow on March 24, 2020, 03:57:34 PM
Post by: Crow on March 24, 2020, 03:57:34 PM
Sounds like a good project !!
Title: Re: Grouper Junior — WIP
Post by: xjchad on March 24, 2020, 04:11:54 PM
Post by: xjchad on March 24, 2020, 04:11:54 PM
Very cool idea Joe!
Looking forward to seeing it come together!
One of Ted's aluminum stands would be a great upgrade too!
Looking forward to seeing it come together!
One of Ted's aluminum stands would be a great upgrade too!
Title: Re: Grouper Junior — WIP
Post by: Decker on March 24, 2020, 04:27:15 PM
Post by: Decker on March 24, 2020, 04:27:15 PM
Quote from: xjchad on March 24, 2020, 04:11:54 PM
Very cool idea Joe!
Looking forward to seeing it come together!
One of Ted's aluminum stands would be a great upgrade too!
Thanks, Chad. Ted's stands wont fit this. The 2/0 stand has three holes per side and is the same width as the Long Beach 60, which has two holes per side. I would love to see someone make a base or frame for that width.
Title: Re: Grouper Junior — WIP
Post by: mo65 on March 24, 2020, 04:53:10 PM
Post by: mo65 on March 24, 2020, 04:53:10 PM
Great idea for a build Joe! That 2/0 stock stand is pretty stout, and add the 6 posts, it should be plenty strong. 8)
Title: Re: Grouper Junior — WIP
Post by: Decker on March 24, 2020, 05:41:18 PM
Post by: Decker on March 24, 2020, 05:41:18 PM
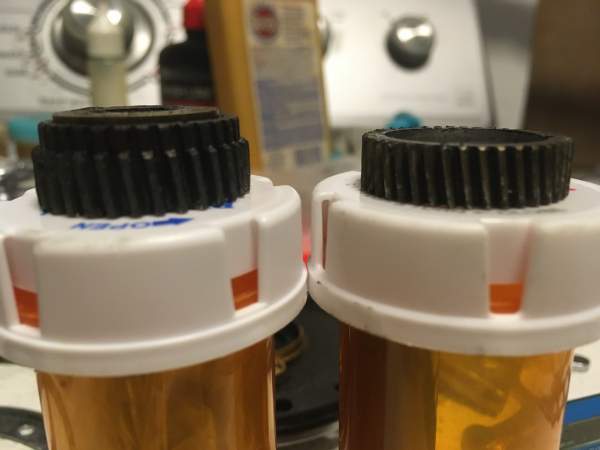
I took everything apart, and put the stainless sleeve on. I believe some guys put a delrin washer under the sleeve, but it doesn't seem possible for this build.
I had another 66 bridge and main gear that I scavenged parts from. This one had a black delrin (I think) washer under the main, which I reused. The main gear had a 5-stack of carbontex, definitely reusable.
Now the dilemma... if I use the 5-149 main gear, it will only hold a 3-stack using the washer I have. I have a stainless 5-66 gear from the salvaged bridge with a 5-stack. Do I use the 66 or the 149 gear? If the 149, I'll want to get one of Bryan's 5-stack kits for it, if this reel is going to be the brute I intend. Plus, if this is really going to be a franken-reel, then it should have the 149.
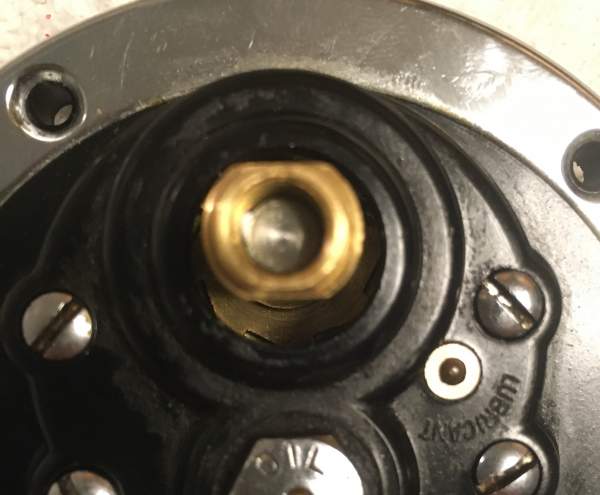
The other thing that is missing is a stainless dog. Ideally I'd like to double-dog, but will probably put that off. Part # for the dog is 15-99. I wonder if Lee has those.
I had another 66 bridge and main gear that I scavenged parts from. This one had a black delrin (I think) washer under the main, which I reused. The main gear had a 5-stack of carbontex, definitely reusable.
Now the dilemma... if I use the 5-149 main gear, it will only hold a 3-stack using the washer I have. I have a stainless 5-66 gear from the salvaged bridge with a 5-stack. Do I use the 66 or the 149 gear? If the 149, I'll want to get one of Bryan's 5-stack kits for it, if this reel is going to be the brute I intend. Plus, if this is really going to be a franken-reel, then it should have the 149.
The other thing that is missing is a stainless dog. Ideally I'd like to double-dog, but will probably put that off. Part # for the dog is 15-99. I wonder if Lee has those.
Title: Re: Grouper Junior — WIP
Post by: xjchad on March 24, 2020, 06:21:38 PM
Post by: xjchad on March 24, 2020, 06:21:38 PM
Joe,
I don't think a delrin washer under the sleeve would work, the clearance is very small.
I've been putting a very thin (.010"-.012") stainless shim under the sleeve of the Mag 10's with good results.
It has really taken the play out of the handle and (so far) has solved the issues Randy (JRD) was having with the sleeve grinding on the bridge.
What is the diameter of the base of the bridge post? If it's the same, I'll send you some shims to try.
Title: Re: Grouper Junior — WIP
Post by: mo65 on March 24, 2020, 09:06:50 PM
Post by: mo65 on March 24, 2020, 09:06:50 PM
Hey Joe,
You didn't mention this, maybe you already know it, that 149 gear is a bit larger diameter than the 66 gear. It usually requires a bit of dremel work. Not a big deal considering the increased speed the 149 main/113H pinion provides. If I remember right, Sal said that Bryans' 5-stack kit works fine in the 149 gear. I cobbled together a home brewed 5-stack on my reel...I was out of cash...Ha! 8)
You didn't mention this, maybe you already know it, that 149 gear is a bit larger diameter than the 66 gear. It usually requires a bit of dremel work. Not a big deal considering the increased speed the 149 main/113H pinion provides. If I remember right, Sal said that Bryans' 5-stack kit works fine in the 149 gear. I cobbled together a home brewed 5-stack on my reel...I was out of cash...Ha! 8)
Title: Re: Grouper Junior — WIP
Post by: Decker on March 24, 2020, 11:26:38 PM
Post by: Decker on March 24, 2020, 11:26:38 PM
Mo, I remembered about grinding out the plate from Sal's tutorial; "not much," he said. I tried the gear for size in the side plate and it fit, so well I was tempted to assemble without the dremel work. I need to keep the power down on mine so I don't ruin the side plate.
Tell me how you cobbled your 5 stack. I really don't have the cash either. I'm looking for your post. I forgot about that 99-width Grouper variant of yours. Sweet, but I'm going smaller. ;)
Found it: this is a long thread with a lot of innovation: https://alantani.com/index.php?topic=9979.msg346704#msg346704
Title: Re: Grouper Junior — WIP
Post by: mo65 on March 25, 2020, 02:42:45 AM
Post by: mo65 on March 25, 2020, 02:42:45 AM
Quote from: Decker on March 24, 2020, 11:26:38 PM
Mo, I remembered about grinding out the plate from Sal's tutorial; "not much," he said. I tried the gear for size in the side plate and it fit, so well I was tempted to assemble without the dremel work.
If I remember correctly, the gear fit into my side plate also, but when put onto the bridge it scrapes at the top.
Quote from: Decker on March 24, 2020, 11:26:38 PM
Tell me how you cobbled your 5 stack.
I used two of Bryan's thin washers(one carbon fiber and one metal) left over from a previous project, then the Mitchell 302 washers and two more thin CFs, then stock #6-60 washers. The top eared metal was so close to the edge I bent the ears down to keep them in the gear's slot.
Title: Re: Grouper Junior — WIP
Post by: Decker on March 25, 2020, 02:56:10 AM
Post by: Decker on March 25, 2020, 02:56:10 AM
I decided to put the gears, jack, bridge etc. in before grinding the plate, as a dry run. I'm going to reveal my lack of experience and say that it took several tries to figure out that the pinion has to go on the bearing before the jack screws, yoke and jack are put in. Got lots of practice with the yoke/jack orientation. Left the dog out of the dry run. Put the spacer sleeve, star and a handle on.
When it was together, it looked good. I could operate the eccentric okay, but even tightening the drag down, I could not crank it. It had seemed before assembly like the 149 main gear should be able to move inside the plate, but no. I should mention that on top of the last drag washer, I added a hard fiber washer and four belville washers. It seemed like those would work well for taking up the space left by the shorter main gear (compared to the 5-66).
Next step is grinding out the plate. I recall there are three concentric gradations to the opening. Am wondering if I only need to grind the largest part of the gear opening, or more? How will I know if I've taken away enough material short of doing another dry run?
This is more challenging than I anticipated, but I've been too much an armchair reel mechanic and am happy to be getting into it.
Title: Re: Grouper Junior — WIP
Post by: mhc on March 25, 2020, 03:23:58 AM
Post by: mhc on March 25, 2020, 03:23:58 AM
Which bridge are you using Joe? I think Sal's 5-149 and 13-113H gear set works on a 3-113 bridge not the 3-66 bridge.
Quote from the 2/0 Bait Special thread;
"I have decided to try a 4/0 3-113 bridge with Sal's grouper special gear combination of a 5-149 main and 13-113H pinion, to increase the gear ratio from 2.3:1 to 2.6:1.
A bit of background to the choice; The stock 112 3/0 & 111 2/0 Senators both use the 3-66 bridge with a 5-66 main gear (32 teeth) and 13-49 pinion (14 teeth) which gives a gear ratio of around 2.3:1.
The 113 4/0 uses a 3-113 bridge and a 5-66 main with a 13-113 pinion with a gear ratio of around 2:1. A few members here were making narrow 113 4/0 'grouper specials' and putting the 3-66 bridge and gears in the 4/0 to increase the speed a bit. The 3-66 bridge was not a perfect fit but close enough to work - then Sal came up with the 5-149 and 13-113H gear set on the 3-113 bridge to make his 2.6:1 grouper special.
If the 3-66 fit in 113, the 3-113 bridge with Sal's gear combination should fit in the 112 if I enlarge the gear space for the slightly larger 5-149 gear."
I stopped grinding the plate gear cavity when I saw daylight. ;D ;D
Mike
Title: Re: Grouper Junior — WIP
Post by: Ron Jones on March 25, 2020, 04:41:16 AM
Post by: Ron Jones on March 25, 2020, 04:41:16 AM
A 2.6:1 3/0 sized reel would be great. I've never wreck fished, but as I understand it you need a ton of grunt to turn big fish before they get tied up. If that is what you are looking for, Bryan has a 7+1 drag stack for that 66 gear that would stop a freight train.
Just pointing out options. If the 2/0 frames eren't hen's teeth, I'd say make 2.
The Man
Just pointing out options. If the 2/0 frames eren't hen's teeth, I'd say make 2.
The Man
Title: Re: Grouper Junior — WIP
Post by: Decker on March 25, 2020, 04:45:03 AM
Post by: Decker on March 25, 2020, 04:45:03 AM
Mike,
Glad you chimed in. Your Bait Special was one of my inspirations -- all that metal-work - wow. Appreciate the advice.
I'm using a 66 bridge. If I were to try a 113 bridge, are there other parts that would need to be changed too? I don't have one, but if that's the right way to do it, I'm in.
Cheers,
/Joe
Title: Re: Grouper Junior — WIP
Post by: Decker on March 25, 2020, 04:49:52 AM
Post by: Decker on March 25, 2020, 04:49:52 AM
Quote from: Ron Jones on March 25, 2020, 04:41:16 AM
A 2.6:1 3/0 sized reel would be great. I've never wreck fished, but as I understand it you need a ton of grunt to turn big fish before they get tied up. If that is what you are looking for, Bryan has a 7+1 drag stack for that 66 gear that would stop a freight train.
Just pointing out options. If the 2/0 frames eren't hen's teeth, I'd say make 2.
The Man
Ron, thanks. Yes, that's what I'm after. I fish New jersey, so our wreck fish aren't quite as strong as the southern ones. I'm using the 149 main, but can see that the 66 main has more room for drag.
Title: Re: Grouper Junior — WIP
Post by: mhc on March 25, 2020, 06:18:20 AM
Post by: mhc on March 25, 2020, 06:18:20 AM
Quote from: Decker on March 25, 2020, 04:45:03 AM
If I were to try a 113 bridge, are there other parts that would need to be changed too?
No other parts needed, just a gear set to suit the location of the post - either Sal's 5-149 & 13-113H set or stock 113 gears, a 5-66 and 13-113. The issue is getting it to fit into a 3/0 plate - the screw locations are very close but the gear sleeve post is a bit further from the pinion than on the 3-66 bridge (this is to make room for the larger 13-113 pinion in the 4/0 compared to the 13-49 pinion in the 3/0)
You might remember I broke through the side of the plate trying to make room - I'm not sure if that could have been avoided, I would need to have another look at it.
It's all good fun Joe - don't let me put you off having a go :)
Mike
Title: Re: Grouper Junior — WIP
Post by: Decker on March 25, 2020, 06:24:09 AM
Post by: Decker on March 25, 2020, 06:24:09 AM
Quote from: mhc on March 25, 2020, 06:18:20 AMQuote from: Decker on March 25, 2020, 04:45:03 AM
If I were to try a 113 bridge, are there other parts that would need to be changed too?
No other parts needed, just a gear set to suit the location of the post - either Sal's 5-149 & 13-113H set or stock 113 gears, a 5-66 and 13-113. The issue is getting it to fit into a 3/0 plate - the screw locations are very close but the gear sleeve post is a bit further from the pinion than on the 3-66 bridge (this is to make room for the larger 13-113 pinion in the 4/0 compared to the 13-49 pinion in the 3/0)
You might remember I broke through the side of the plate trying to make room - I'm not sure if that could have been avoided, I would need to have another look at it.
It's all good fun Joe - don't let me put you off having a go :)
Mike
Mike's post where he modified the plate: https://alantani.com/index.php?topic=21870.msg241342#msg241342
Oh boy. I'm trying to put a 113 bridge into a 2/0 plate, so it's uncharted territory. But the 2/0 plate should be very similar to the 3/0. From your posts it looks like the 113 bridge pushed the main further to the edge of the plate, making you grind out and into the ring area. Nothing that can't be overcome with epoxy, files, elbow grease and a sharp eye.
This is what separates the men from the boys, eh? :P So the dilemma again: stay with the original gears OR push for the slightly faster franken-reel. If I don't do it, someone else will. Decisions...
Title: Re: Grouper Junior — WIP
Post by: xjchad on March 25, 2020, 01:06:40 PM
Post by: xjchad on March 25, 2020, 01:06:40 PM
You can do this Joe!!!!
Title: Re: Grouper Junior — WIP
Post by: thorhammer on March 25, 2020, 02:01:23 PM
Post by: thorhammer on March 25, 2020, 02:01:23 PM
112 and 113 are same plate configuration.
Title: Re: Grouper Junior — WIP
Post by: mo65 on March 25, 2020, 02:07:08 PM
Post by: mo65 on March 25, 2020, 02:07:08 PM
Has anyone tried putting the 149 main/113H pinion into a 2/0 using the stock #3-66 bridge? It may fit better than swapping to the #3-113 bridge.
Something else to consider Joe: When I did this mod on a 4/0, speed increased from 2:1 to 2.6:1...a much more "worthwhile" mod than going from 2.3:1 to 2.6:1 on your 2/0.
Like Mike said...I'm not trying to put you off either. Actually, I'm super curious to see how those gears fit using the stock bridge. I went back and read the "Bait Special" thread and I can't find anything saying Mike tried the stock bridge...maybe I'm missing it.
Title: Re: Grouper Junior — WIP
Post by: Decker on March 25, 2020, 03:24:19 PM
Post by: Decker on March 25, 2020, 03:24:19 PM
Thanks for the support, guys!
Right, Mo. And I have a 5-stack for the original 66 main gear. Starts to look impractical to put in the Grouper Special gear set.
But I want a true franken-reel, not just an upgraded 2/0! I'm going to have to try, though maybe fail. Steps:
I put a notice on the trade board for a Bryan 5-stack to fit the 149 main...
Quote from: mo65 on March 25, 2020, 02:07:08 PM
Something else to consider Joe: When I did this mod on a 4/0, speed increased from 2:1 to 2.6:1...a much more "worthwhile" mod than going from 2.3:1 to 2.6:1 on your 2/0.
Right, Mo. And I have a 5-stack for the original 66 main gear. Starts to look impractical to put in the Grouper Special gear set.
But I want a true franken-reel, not just an upgraded 2/0! I'm going to have to try, though maybe fail. Steps:
- 1) Grind out some material in the plate for the main gear. Still don't know how much (short of daylight.) Dry run assemble with 66 bridge to test.
- 2) If the above does not work, try the 113 bridge. I ordered one cheap last night.
- 3) Assess how much aditional plate grinding might need to be done with the 113 plate.
I put a notice on the trade board for a Bryan 5-stack to fit the 149 main...
Title: Re: Grouper Junior — WIP
Post by: thorhammer on March 25, 2020, 03:55:47 PM
Post by: thorhammer on March 25, 2020, 03:55:47 PM
Hey gents, Mike, with a keen eye, called me to correction- 111 and 112 plates are the same configuration size-wise, NOT 113 (4/0).
Thanks Mike! Only one cup of coffee down then, lol.
John
Thanks Mike! Only one cup of coffee down then, lol.
John
Title: Re: Grouper Junior — WIP
Post by: mo65 on March 25, 2020, 03:58:30 PM
Post by: mo65 on March 25, 2020, 03:58:30 PM
Wish I had a spare 5-stack kit, but I use them as fast as I get them. Also wish I had a spare 2/0 or 3/0 head plate to send you. That's the worst case scenario...trashing the head plate...and I'm sure if that happens someone will hook you up with a replacement. I'm as stoked about this project as if I was the one doing it...best of luck Joe! 8)
Title: Re: Grouper Junior — WIP
Post by: Alto Mare on March 25, 2020, 05:08:18 PM
Post by: Alto Mare on March 25, 2020, 05:08:18 PM
You can do this Joe, it Isn't that tough for anyone.
Sal
Sal
Title: Re: Grouper Junior — WIP
Post by: Maxed Out on March 25, 2020, 06:18:59 PM
Post by: Maxed Out on March 25, 2020, 06:18:59 PM
Quote from: Alto Mare on March 25, 2020, 05:08:18 PM
You can do this Joe, it Isn't that tough for anyone.
Sal
Yeah Joe, and it's about time you signed up to the Ohana crash test dummy program. ;D ;D Welcome aboard and enjoy your journey on the road less traveled, but often times much more rewarding !!
Title: Re: Grouper Junior — WIP
Post by: xjchad on March 25, 2020, 07:37:14 PM
Post by: xjchad on March 25, 2020, 07:37:14 PM
Quote from: Maxed Out on March 25, 2020, 06:18:59 PMQuote from: Alto Mare on March 25, 2020, 05:08:18 PM
You can do this Joe, it Isn't that tough for anyone.
Sal
Yeah Joe, and it's about time you signed up to the Ohana crash test dummy program. ;D ;D Welcome aboard and enjoy your journey on the road less traveled, but often times much more rewarding !!
YES!!
Title: Re: Grouper Junior — WIP
Post by: Decker on March 25, 2020, 09:39:33 PM
Post by: Decker on March 25, 2020, 09:39:33 PM
Quote from: xjchad on March 25, 2020, 07:37:14 PMQuote from: Maxed Out on March 25, 2020, 06:18:59 PMQuote from: Alto Mare on March 25, 2020, 05:08:18 PM
You can do this Joe, it Isn't that tough for anyone.
Sal
Yeah Joe, and it's about time you signed up to the Ohana crash test dummy program. ;D ;D Welcome aboard and enjoy your journey on the road less traveled, but often times much more rewarding !!
YES!!
Time to spend less time on eBay and more in the shop!! ;D
Title: Re: Grouper Junior — WIP
Post by: Decker on March 30, 2020, 04:16:15 PM
Post by: Decker on March 30, 2020, 04:16:15 PM
The 113 bridge came today.
I checked out my dremel. Others have used the tungsten cutter for plate work. Don't have that bit but probably the sanding drum will work. Thought to use the flex shaft for better control, but am missing a connecting nut - now ordered.
Would be nice to have some calipers to be able to appreciate the small differences between the 113 and 66 setups.
Shoot! The bridge I was sent is a 3-113H. Can't use it. Looks like the guy was selling both; must have gotten them mixed up.
Title: Re: Grouper Junior — WIP
Post by: xjchad on March 30, 2020, 09:14:59 PM
Post by: xjchad on March 30, 2020, 09:14:59 PM
Quote from: Decker on March 30, 2020, 09:08:15 PM
Shoot! The bridge I was sent is a 3-113H. Can't use it.
Anyone have a 113 bridge?
Joe,
I can pull the bridge out of the 113 you sent me and send it with the drag and other parts.
I'll find a replacement later, don't need it as soon as you do.
Hoping to get to the post office sometime in the next few days.
Title: Re: Grouper Junior — WIP
Post by: Decker on March 30, 2020, 09:33:04 PM
Post by: Decker on March 30, 2020, 09:33:04 PM
Quote from: xjchad on March 30, 2020, 09:14:59 PMQuote from: Decker on March 30, 2020, 09:08:15 PM
Shoot! The bridge I was sent is a 3-113H. Can't use it.
Anyone have a 113 bridge?
Joe,
I can pull the bridge out of the 113 you sent me and send it with the drag and other parts.
I'll find a replacement later, don't need it as soon as you do.
Hoping to get to the post office sometime in the next few days.
Chad, thanks but don't do that. It is ironic that I just sent you a 113. I don't "need" it that badly.
Title: Re: Grouper Junior — WIP
Post by: foakes on March 30, 2020, 09:49:02 PM
Post by: foakes on March 30, 2020, 09:49:02 PM
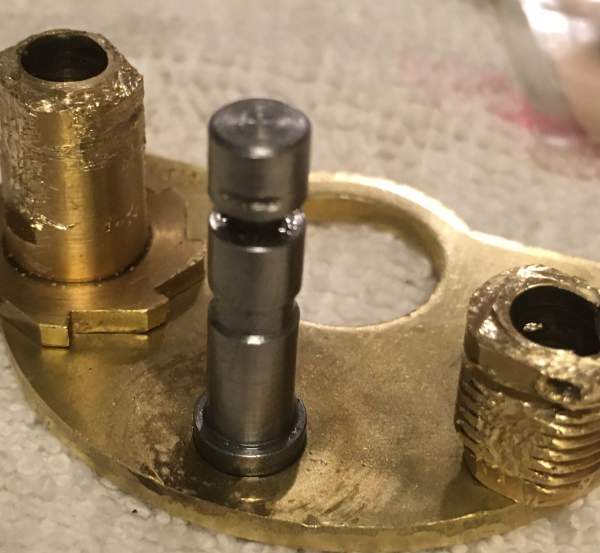
Here is a new 3-113 with sleeve and pin --
If you still need it, Joe -- let me know and I will send it out tomorrow, N/C.
Best,
Fred

If you still need it, Joe -- let me know and I will send it out tomorrow, N/C.
Best,
Fred
Title: Re: Grouper Junior — WIP
Post by: Decker on March 30, 2020, 09:57:49 PM
Post by: Decker on March 30, 2020, 09:57:49 PM
Thanks, as always, Fred! Your generosity knows no limits.
I'm wondering how much difference there is between the two plates. I don't have both to make a direct comparison, but they sure look alike. The sleeve of the 3-113H is certainly wider; probably the shaft is also wider.
I'm wondering how much difference there is between the two plates. I don't have both to make a direct comparison, but they sure look alike. The sleeve of the 3-113H is certainly wider; probably the shaft is also wider.
Title: Re: Grouper Junior — WIP
Post by: foakes on March 30, 2020, 10:03:15 PM
Post by: foakes on March 30, 2020, 10:03:15 PM
OK, Joe --
Will go out tomorrow.
Best,
Fred
Will go out tomorrow.
Best,
Fred
Title: Re: Grouper Junior — WIP
Post by: Decker on April 04, 2020, 08:21:39 PM
Post by: Decker on April 04, 2020, 08:21:39 PM
Got Fred's package today, and what a package it is! I'll soon experience what it is like to use professional quality screwdrivers! Have the 113 bridge now an no excuses to continue. Thank you, Fred!

Title: Re: Grouper Junior — WIP
Post by: xjchad on April 04, 2020, 08:55:14 PM
Post by: xjchad on April 04, 2020, 08:55:14 PM
That's awesome Joe! I love the reel bag too!
The parts I sent should be there on Monday.
The parts I sent should be there on Monday.
Title: Re: Grouper Junior — WIP
Post by: mo65 on April 04, 2020, 09:23:54 PM
Post by: mo65 on April 04, 2020, 09:23:54 PM
Way to go Fred! Love those Oakes reel bags. Enjoy those screwdrivers Joe!
Title: Re: Grouper Junior — WIP
Post by: Decker on April 22, 2020, 02:53:37 PM
Post by: Decker on April 22, 2020, 02:53:37 PM
Back at it...
Equipped with new screwdrivers, an Ultimate 5-stack, a 113 bridge, and some new Dremel parts, I restarted the attack last night.
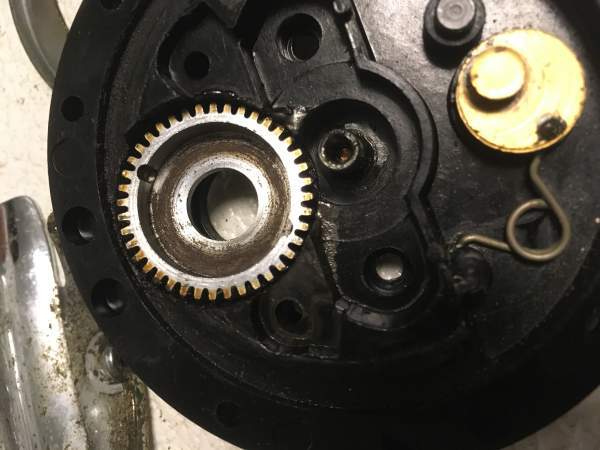
First order of business was to install the SS gear sleeve on the 113 bridge from Fred. I gather that this is usually a 5-minute deal, but found it to be a full lesson. Firstly, the bridge came with a sleeve attached. The pin that holds it to the post had been filed down, and I could not push it out easily. I don't have a specific tool for this. Tried a awl, and a filed-down mini-screwdriver. After several frustrated attempts, I decided to score the sleeve with a hacksaw, with the aim of breaking it off. You'll gather by this time that I am not very practiced in these matters. To make a long story short, I did get the sleeve off. In spite of being careful, the post did get nicked with the hacksaw, though not too badly.
Next step: fitting the sleeve to the bridge post. Although the SS sleeve fit easily on the 66 bridge post, it was tight and binding when I forced it on the 113 post. The post looked straight, and the hacksaw nick couldn't be the problem. Sanded the post with 220 grit sandpaper. After much trial and error, it fit and moved well. When I put the pin in, again it was binding. Took of the sleeve and worked the groove of the post with a fine file. After much trial, got that working smoothly. Chad had given me some spacers to put under the sleeve to remove any play there, but mine did not need it.
Next:head plate surgery. I installed the bridge alone to the head plate. This made it plain that the center point of the sleeve on the 113 bridge was a bit closer to the edge of the plate than the stock 66 bridge. Grinding would be focused on the outer semicircle of the main gear cutout. My new carbide grinder bits were ready for the work. I set up my dremel with the flex cable for maximum manageability, ans set it to the lowest speed to simulate Mo's battery-powered grinder. No need for speed.
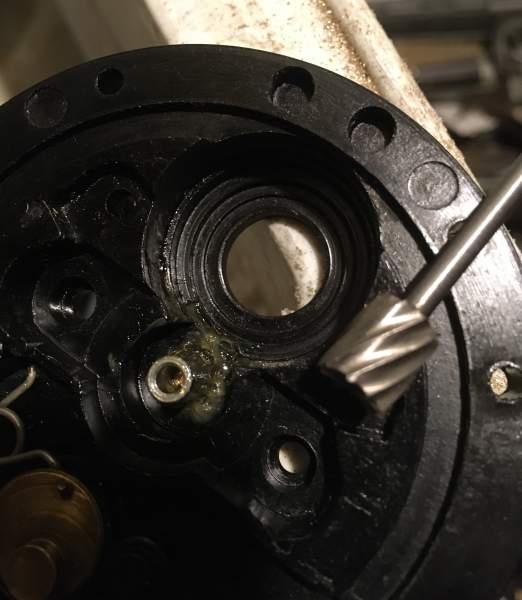
There was so much trying and retrying, that in one night I became an expert in jack and yoke assembly. I carefully avoided the daylight Mike had discovered when he attacked this same plate. At the outermost point of the main gear cutout, I did catch a glimpse of the inside of the outer ring chrome, and proceeded in a gingerly manner in that area.
At this point in time:
I'm not sure if the grinding in the main gear against the plate (requiring more grinding) or some bad interaction of the gears. It is making me think I need to double-check the model and condition of the gears.
Equipped with new screwdrivers, an Ultimate 5-stack, a 113 bridge, and some new Dremel parts, I restarted the attack last night.
First order of business was to install the SS gear sleeve on the 113 bridge from Fred. I gather that this is usually a 5-minute deal, but found it to be a full lesson. Firstly, the bridge came with a sleeve attached. The pin that holds it to the post had been filed down, and I could not push it out easily. I don't have a specific tool for this. Tried a awl, and a filed-down mini-screwdriver. After several frustrated attempts, I decided to score the sleeve with a hacksaw, with the aim of breaking it off. You'll gather by this time that I am not very practiced in these matters. To make a long story short, I did get the sleeve off. In spite of being careful, the post did get nicked with the hacksaw, though not too badly.
Next step: fitting the sleeve to the bridge post. Although the SS sleeve fit easily on the 66 bridge post, it was tight and binding when I forced it on the 113 post. The post looked straight, and the hacksaw nick couldn't be the problem. Sanded the post with 220 grit sandpaper. After much trial and error, it fit and moved well. When I put the pin in, again it was binding. Took of the sleeve and worked the groove of the post with a fine file. After much trial, got that working smoothly. Chad had given me some spacers to put under the sleeve to remove any play there, but mine did not need it.
Next:head plate surgery. I installed the bridge alone to the head plate. This made it plain that the center point of the sleeve on the 113 bridge was a bit closer to the edge of the plate than the stock 66 bridge. Grinding would be focused on the outer semicircle of the main gear cutout. My new carbide grinder bits were ready for the work. I set up my dremel with the flex cable for maximum manageability, ans set it to the lowest speed to simulate Mo's battery-powered grinder. No need for speed.
There was so much trying and retrying, that in one night I became an expert in jack and yoke assembly. I carefully avoided the daylight Mike had discovered when he attacked this same plate. At the outermost point of the main gear cutout, I did catch a glimpse of the inside of the outer ring chrome, and proceeded in a gingerly manner in that area.
At this point in time:
- If I install the bridge and main gear with drag (without yoke, jack, and pinion) and put the drag star and handle on, the main gear spins well, without binding
- If I install everything (short of the dog) and crank, there is some bumpy grinding.
I'm not sure if the grinding in the main gear against the plate (requiring more grinding) or some bad interaction of the gears. It is making me think I need to double-check the model and condition of the gears.
Title: Re: Grouper Junior — WIP
Post by: xjchad on April 22, 2020, 03:48:20 PM
Post by: xjchad on April 22, 2020, 03:48:20 PM
Good going Joe, sounds like you got a lot done and learned a lot too!
You said that it feel a bit rough when assembled. Is this with a dry assembly or fully lubed?
Handle or no handle?
I find it usually feels a bit rough when spinning the gears on a dry assembly with no handle is normal.
Try some grease on the gears and put the handle on it. I think it will feel a bit different.
Title: Re: Grouper Junior — WIP
Post by: Decker on April 22, 2020, 03:59:16 PM
Post by: Decker on April 22, 2020, 03:59:16 PM
Quote from: xjchad on April 22, 2020, 03:48:20 PM
You said that it feel a bit rough when assembled. Is this with a dry assembly or fully lubed?
Handle or no handle?
I find it usually feels a bit rough when spinning the gears on a dry assembly with no handle is normal.
Try some grease on the gears and put the handle on it. I think it will feel a bit different.
Chad, thanks. It is definitely dry now. I always tested with the star and handle. I think the grinding is more than lube can cover, but I may try it.
You know how dentists use some kind of ink to mark high spots on your teeth when they need to grind them down a little... trying to think how I could apply the principle to the reel fitting.
Title: Re: Grouper Junior — WIP
Post by: Decker on April 22, 2020, 04:06:12 PM
Post by: Decker on April 22, 2020, 04:06:12 PM
Adding details about the gear stack:
- Nothing between the sleeve and the plate. Fit has virtually no play but is smooth.
- Under-gear carbontex that came with Ultimate kit.
- 5-149 main gear with Ultimate 5-stack.
- 4 belville washers stacked for max space and compressiblility, on top of the last drag washer, inside the plate.
Title: Re: Grouper Junior — WIP
Post by: mo65 on April 22, 2020, 04:37:29 PM
Post by: mo65 on April 22, 2020, 04:37:29 PM
Adding the pinion seems to be triggering the grind. I'd check that out first...make sure you're trying the 113H and not the stock pinion. That is about all I can come up with now...but I'll roll this around in my head a bit more. 8)
I mark suspect spots with fresh blue grease. It will be wiped completely clean where it rubs.
Quote from: Decker on April 22, 2020, 03:59:16 PM
You know how dentists use some kind of ink to mark high spots on your teeth when they need to grind them down a little... trying to think how I could apply the principle to the reel fitting.
I mark suspect spots with fresh blue grease. It will be wiped completely clean where it rubs.
Title: Re: Grouper Junior — WIP
Post by: Crow on April 22, 2020, 07:12:59 PM
Post by: Crow on April 22, 2020, 07:12:59 PM
Looks like it's coming along, nicely ! Gotta' love the "ohana " spirit !!
Title: Re: Grouper Junior — WIP
Post by: Darin Crofton on April 22, 2020, 07:16:29 PM
Post by: Darin Crofton on April 22, 2020, 07:16:29 PM
Great job, Joe, attempting the unknown for you is not always easy, but glad you're giving it a shot, it's inspiring! D
Title: Re: Grouper Junior — WIP
Post by: xjchad on April 22, 2020, 07:29:26 PM
Post by: xjchad on April 22, 2020, 07:29:26 PM
Just saw your pics Joe.
Is the pinion contacting the bridge plate?
Is the pinion contacting the bridge plate?
Title: Re: Grouper Junior — WIP
Post by: Decker on April 22, 2020, 10:25:08 PM
Post by: Decker on April 22, 2020, 10:25:08 PM
The roughness is cyclical, and seems like the gears. The pinion is off-center of the bridge, but does not rub against it. The pinion I pulled from a 113h and the main stainless 5-149 was bought used on eBay. I'll pull them later to see what I can see, and maybe try them lubed.

Title: Re: Grouper Junior — WIP
Post by: oc1 on April 23, 2020, 04:03:50 AM
Post by: oc1 on April 23, 2020, 04:03:50 AM
Quote from: Decker on April 22, 2020, 10:25:08 PMWith every revolution of the handle or every revolution of the spool?
The roughness is cyclical, and seems like the gears.
-s
Title: Re: Grouper Junior — WIP
Post by: Decker on April 23, 2020, 04:15:44 AM
Post by: Decker on April 23, 2020, 04:15:44 AM
Dang, but I think I figured it out! I have the wrong main gear — not a 5-149. The main I have has 40 teeth. With a 113h pinion having 13 teeth, the 5-149 should have about 13x2.7 or about 35 teeth to get the 2.7 ratio. I should have just rolled the pinion over the edge or the main to see they didn't mesh. So, now I need a 5-149 main.
No shame in learning from mistakes. ::)
And BTW, this fun!
No shame in learning from mistakes. ::)
And BTW, this fun!
Title: Re: Grouper Junior — WIP
Post by: oc1 on April 23, 2020, 04:32:11 AM
Post by: oc1 on April 23, 2020, 04:32:11 AM
Good sleuthing.
-s
-s
Title: Re: Grouper Junior — WIP
Post by: Donnyboat on April 23, 2020, 07:23:18 AM
Post by: Donnyboat on April 23, 2020, 07:23:18 AM
Ay Joe your right into it man, an inspiration to all of us, looking forward to your end resalt, good luck, cheers Don.
Title: Re: Grouper Junior — WIP
Post by: mhc on April 23, 2020, 10:22:46 AM
Post by: mhc on April 23, 2020, 10:22:46 AM
Sounds correct Joe - I just counted the teeth on a photo of 5-149 and got 34, give or take a few. I don't think I've got another 5-149 - it would take forever to get to you at the moment anyway.
You could try filing 5 of the teeth off the gear you have ::) ;D Sorry, couldn't resist it.
Mike
You could try filing 5 of the teeth off the gear you have ::) ;D Sorry, couldn't resist it.
Mike
Title: Re: Grouper Junior — WIP
Post by: Decker on April 23, 2020, 12:34:15 PM
Post by: Decker on April 23, 2020, 12:34:15 PM
Quote from: mhc on April 23, 2020, 10:22:46 AM
Sounds correct Joe - I just counted the teeth on a photo of 5-149 and got 34, give or take a few. I don't think I've got another 5-149 - it would take forever to get to you at the moment anyway.
You could try filing 5 of the teeth off the gear you have ::) ;D Sorry, couldn't resist it.
Mike
Yeah, it's just as well, Mike. The teeth come from crocodiles down there don't they?
I couldn't wait and ordered the gear from Florida last night.
Appreciate the encouragement, guys! Cheers!
Title: Re: Grouper Junior — WIP
Post by: mo65 on April 23, 2020, 01:06:16 PM
Post by: mo65 on April 23, 2020, 01:06:16 PM
Quote from: Decker on April 23, 2020, 04:15:44 AM
Dang, but I think I figured it out! I have the wrong main gear — not a 5-149. The main I have has 40 teeth.
Joe,
You're not going to believe this. I looked at those pics you posted last night for a long time. I compared them to pics of my 149 gear project. It seemed like there were more teeth on your gear...but it was late...and I was beat. I just shook my head and turned in. Now when you get that correct gear there will be a lot more dremeling! 8)
Title: Re: Grouper Junior — WIP
Post by: Decker on April 23, 2020, 01:35:57 PM
Post by: Decker on April 23, 2020, 01:35:57 PM
Quote from: mo65 on April 23, 2020, 01:06:16 PMQuote from: Decker on April 23, 2020, 04:15:44 AM
Dang, but I think I figured it out! I have the wrong main gear — not a 5-149. The main I have has 40 teeth.
Joe,
You're not going to believe this. I looked at those pics you posted last night for a long time. I compared them to pics of my 149 gear project. It seemed like there were more teeth on your gear...but it was late...and I was beat. I just shook my head and turned in. Now when you get that correct gear there will be a lot more dremeling! 8)
Hey Mo, many thanks for looking out for me! Yes, more dremeling! ;D
Seems like to test the dremeling clearance, a good method is to attach the bridge with main gear (without yoke,jack, etc.) and tighten the star so that the gear can be turned. Is that how you do it? ON second thought, the yoke should probably be in place for the correct main gear vertical positioning.
P.S. I plan on double-dogging assuming that I can keep the head plate in one piece.
Title: Re: Grouper Junior — WIP
Post by: mo65 on April 23, 2020, 01:54:02 PM
Post by: mo65 on April 23, 2020, 01:54:02 PM
Quote from: Decker on April 23, 2020, 01:35:57 PM
Seems like to test the dremeling clearance, a good method is to attach the bridge with main gear (without yoke,jack, etc.) and tighten the star so that the gear can be turned. Is that how you do it? ON second thought, the yoke should probably be in place for the correct main gear vertical positioning.
P.S. I plan on double-dogging assuming that I can keep the head plate in one piece.
Yes, that is how I did it, BUT, make sure to tighten all 4 bridge screws when testing. I tried to take a shortcut by only using two screws...big mistake. The bridge wasn't fully seated in it's final position and I had to disassemble those double dogs and the whole damn works for more grinding.
Also...I was enlightened by another spiritual vision last night. I suddenly remembered Ted posting a trivia question: "What was the smallest Penn to feature side access drags"? You guessed it...the Senator 2/0! Maybe that open gaping hole is the easy answer to this mod! 8)
Title: Re: Grouper Junior — WIP
Post by: Decker on April 23, 2020, 01:59:39 PM
Post by: Decker on April 23, 2020, 01:59:39 PM
Quote from: mo65 on April 23, 2020, 01:54:02 PM
Also...I was enlightened by another spiritual vision last night. I suddenly remembered Ted posting a trivia question: "What was the smallest Penn to feature side access drags"? You guessed it...the Senator 2/0! Maybe that open gaping hole is the easy answer to this mod! 8)[/color]
Wow, that is a revelation. I have a 113H with the outside access drag cap, but have never seen it on a 2/0.
Title: Re: Grouper Junior — WIP
Post by: mo65 on April 23, 2020, 02:09:12 PM
Post by: mo65 on April 23, 2020, 02:09:12 PM
Quote from: Decker on April 23, 2020, 01:59:39 PMQuote from: mo65 on April 23, 2020, 01:54:02 PM
Also...I was enlightened by another spiritual vision last night. I suddenly remembered Ted posting a trivia question: "What was the smallest Penn to feature side access drags"? You guessed it...the Senator 2/0! Maybe that open gaping hole is the easy answer to this mod! 8)
Wow, that is a revelation. I have a 113H with the outside access drag cap, but have never seen it on a 2/0.
I'm not saying it would require no dremel work...but I think it's safe to say a whole lot less. Wish I had one of those plates in my parts...I don't even have an outside access 2/0 in my collection. An outside access 3/0 plate would work too. Maybe message Ted.
Title: Re: Grouper Junior — WIP
Post by: Decker on April 23, 2020, 02:19:36 PM
Post by: Decker on April 23, 2020, 02:19:36 PM
I'll wait and see what happens with the dremeling, Mo. The biggest limitation of the head plate mod is on the outer edge. As long as I can keep it looking decent, the ring will hold the plate together, I think. But if I break through, maybe using the outer access cap could help with the repair.
Title: Re: Grouper Junior — WIP
Post by: Alto Mare on April 23, 2020, 03:12:47 PM
Post by: Alto Mare on April 23, 2020, 03:12:47 PM
The bit you are using it very hard to control, I use something similar to these:
https://www.ebay.com/itm/324086490739
Your but will cut you if you touch your skin, the ones I'm showing shouldn't.
Just be careful if you're going to use yours.
Another thing I've noticed it that the gear sleeve is too far off center.
This could be related to the plate or bridge.
Tolerance changed a little as Penn moved along with their parts.
With that said, if the spacer sleeve slides up and down when the bridge is assembled, this would not be an issue.
I'm not sure if the bit I'm showing has a cutting tip, that's what you would want.
I wasn't able to find the exact one I use, the one I'm showing is very close.
By the way, I've been using my bit for 6-7 years and it still cuts.
Sal
Title: Re: Grouper Junior — WIP
Post by: Decker on April 23, 2020, 03:29:15 PM
Post by: Decker on April 23, 2020, 03:29:15 PM
Quote from: Alto Mare on April 23, 2020, 03:12:47 PM
The bit you are using it very hard to control, I use something similar to these:
https://www.ebay.com/itm/324086490739
Your but will cut you if you touch your skin, the ones I'm showing shouldn't.
Just be careful if you're going to use yours.
Another thing I've noticed it that the gear sleeve is too far off center.
This could be related to the plate or bridge.
Tolerance changed a little as Penn moved along with their parts.
With that said, if the spacer sleeve slides up and down when the bridge is assembled, this would not be an issue.
Sal, thanks. That bit looks good. I've been doing okay with mine at the slowest speed.
Yes, the sleeve is off-center, and it is definitely related to the 113 bridge. According to what Mike said, the 66 bridge won't work. I didn't mention it before, but I filed the outer plate opening a little to make the sleeve fit. Assuming it will work, I should probably figure out a way to close the opening on the opposite side, to prevent salt water or sand intrusion, etc. Maybe I could mold and sand some epoxy.
Title: Re: Grouper Junior — WIP
Post by: Decker on April 23, 2020, 05:38:32 PM
Post by: Decker on April 23, 2020, 05:38:32 PM
Ted (Maxed Out) sent me this pic of a 111 with outer drag access cap:

Title: Re: Grouper Junior — WIP
Post by: Decker on April 29, 2020, 04:15:04 PM
Post by: Decker on April 29, 2020, 04:15:04 PM
Next Steps: Got the right main yesterday, 5-149. Comparing with the other gear I had, it is a little wider and thicker.
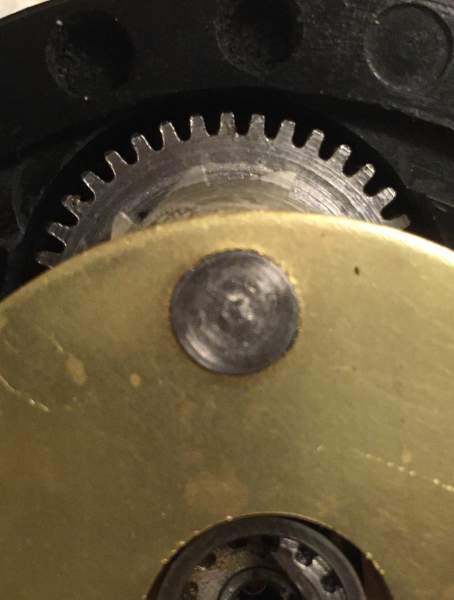
Back to dremeling. Lots of trial and error. I mentioned that earlier I ran into the inside of the outer ring. Also, I caught a tiny bit of daylight, just above the ring. Mike's pictures showed that he took a good chunk of material away from the ring. I wanted to try to avoid that. When trying the fit, it became obvious that the rubbing was mainly on the outermost part of the main, so I focused on going deeper, and trying to make the walls flatter (as opposed to crater-shaped). At one point, I chalked the cavity, assembled and noted where it had been scraped away. It did help.
At this point, the main will turn. I've even assembled with the pinion, yoke, jack, drag star, handle. Assembled the frame to verify spool alignment. Tightened down the 5-stack and there is still rubbing. The little bit of the outer ring that is visible inside the plate has become a bearing surface :P . If I crank a lot I can feel the ring heat up.
I need to be careful about taking more material away, and may end up doing some kind of plate repair like Mike did. The lazy part of me is thinking that maybe I can wear material away using the main gear itself. It is stainless, so against the brass ring I expect it to do okay. If I crank a lot, it does get better.
WILL POST PICS LATER
It is still fun!!
Title: Re: Grouper Junior — WIP
Post by: Ron Jones on April 29, 2020, 04:38:06 PM
Post by: Ron Jones on April 29, 2020, 04:38:06 PM
Spotting in that gear is the way to go. Might try a sharpie n the ring to identify contact.
Ron Jones
Ron Jones
Title: Re: Grouper Junior — WIP
Post by: Decker on April 29, 2020, 04:57:15 PM
Post by: Decker on April 29, 2020, 04:57:15 PM
Quote from: Ron Jones on April 29, 2020, 04:38:06 PM
Spotting in that gear is the way to go. Might try a sharpie n the ring to identify contact.
Ron Jones
The plate is black. I'm thinking of trying Whiteout (correction fluid) for contrast. The chalk worked, but not so well.
Title: Re: Grouper Junior — WIP
Post by: oc1 on April 29, 2020, 07:30:36 PM
Post by: oc1 on April 29, 2020, 07:30:36 PM
Prussian blue, aka marking blue.
=s
=s
Title: Re: Grouper Junior — WIP
Post by: Decker on April 12, 2021, 02:10:20 PM
Post by: Decker on April 12, 2021, 02:10:20 PM
I've been away from the site, and left this unfinished. Really missing Sal... Need to dedicate finishing this to his memory.
The main problem now is that the side plate is becoming swiss cheese. Somehow this didn't seem to bother Mike when he did the same build. I saved some of the black plate dust to maybe mix with epoxy for some body work later - if I dare.
Then there is also the external drag cap solution suggested by Mo. Gfish also offered a drag cap a while back that may work.
I tend to get bound up in decisions, but need to push through with this. It was the decision to use Sal's innovative 5-149/13-113H gear set that get me to this point with the sideplate.
Title: Re: Grouper Junior — WIP
Post by: Gfish on April 12, 2021, 02:23:24 PM
Post by: Gfish on April 12, 2021, 02:23:24 PM
Alright "the Deck" is a dealin! Lemme know about the drag cap(hat). Really wanna see how this one comes out, Joe!
Title: Re: Grouper Junior — WIP
Post by: Brewcrafter on April 13, 2021, 06:48:50 AM
Post by: Brewcrafter on April 13, 2021, 06:48:50 AM
Decker - If you are still working on getting proper clearances, try these tricks. https://alantani.com/index.php?topic=31860.msg372294#msg372294
I know it is a different reel (this was a 113H) but the same techniques could apply. If on the other had you have "gone too far", I also watch with interest. I have to think standard 113 sideplates aren't too hard to get a hold off, but since this thread has stretched over time, not exactly sure where you sit with the project but certainly want to help you see it through.
I know it is a different reel (this was a 113H) but the same techniques could apply. If on the other had you have "gone too far", I also watch with interest. I have to think standard 113 sideplates aren't too hard to get a hold off, but since this thread has stretched over time, not exactly sure where you sit with the project but certainly want to help you see it through.
Title: Re: Grouper Junior — WIP
Post by: oc1 on April 13, 2021, 07:57:04 AM
Post by: oc1 on April 13, 2021, 07:57:04 AM
Good to hear from you Joe.
Title: Re: Grouper Junior — WIP
Post by: mhc on April 13, 2021, 11:27:37 AM
Post by: mhc on April 13, 2021, 11:27:37 AM
Good to see you Joe and good to see you picking up the Grouper Junior project. From your earlier posts you were getting close to having clearance between the 149 main gear and the plate but the gear was touching the inside ring?
Mike
Mike
Title: Re: Grouper Junior — WIP
Post by: Decker on April 13, 2021, 12:56:38 PM
Post by: Decker on April 13, 2021, 12:56:38 PM
Hey guys, good to hear from you!
Steve, hope you got that linked image issue figured out. Your rustic tackle works are Gilligan's Island dreams. Remind me of the blue marker trick?
Brewcrafter, thanks for the tool tip. I may need to do something like that.
GFish, what are the inside/outside diameters of the cap you have?
Mike, you're one of the people that inspired me into this wilderness... Yes, I need to cut back the ring. Right now it is still on the plate. I see yours had to be cut pretty far back; how did you do it? I looked at your plate mod photos yesterday.
My post yesterday was to renew my commitment to this, but work is going to be slow. My four young ones keep me dancing.
Cheers to all,
/Joe "Decker"
Title: Re: Grouper Junior — WIP
Post by: thorhammer on April 13, 2021, 01:58:15 PM
Post by: thorhammer on April 13, 2021, 01:58:15 PM
Joe, good to have you back in the fold!
Title: Re: Grouper Junior — WIP
Post by: Decker on April 13, 2021, 04:44:19 PM
Post by: Decker on April 13, 2021, 04:44:19 PM
Back at you, John!
Title: Re: Grouper Junior — WIP
Post by: mhc on April 14, 2021, 11:09:05 AM
Post by: mhc on April 14, 2021, 11:09:05 AM
Quote from: Decker on April 13, 2021, 12:56:38 PM
I see yours had to be cut pretty far back; how did you do it?
/Joe "Decker"
I'll check on the weekend Joe, but I don't think I needed to modify the inside ring. ??? With the outer ring I'm pretty sure I would have used a half round coarse file to rough out the outer ring to fit around the patch I epoxied on to the plate - then finished it with a dremel sanding drum. I had a look through my photos but couldn't find any showing how I did it. I've also filed an information request with my memory but it hasn't responded yet. ;D
Mike
Title: Re: Grouper Junior — WIP
Post by: Decker on April 14, 2021, 12:17:19 PM
Post by: Decker on April 14, 2021, 12:17:19 PM
Quote from: mhc on April 14, 2021, 11:09:05 AM
I'll check on the weekend Joe, but I don't think I needed to modify the inside ring. ??? With the outer ring I'm pretty sure I would have used a half round coarse file to rough out the outer ring to fit around the patch I epoxied on to the plate - then finished it with a dremel sanding drum. I had a look through my photos but couldn't find any showing how I did it. I've also filed an information request with my memory but it hasn't responded yet. ;D
Right, it's the inside of the outer ring that needs the work. Yes, the file makes sense for that, though I don't think I have enough daylight yet for the file to pass through. I've been timid about digging too deep, but need to go for it.
My archive isn't as deep as yours, Mike, but I know those information retrievals require patience. Once the request has been placed, it is best not to pester the clerk too much. Better to just let him do his job, and one day the document will just magically appear ::)
Good thing we have this site! ;D Thanks, Alan!
Title: Re: Grouper Junior — WIP
Post by: Gfish on April 15, 2021, 09:11:14 PM
Post by: Gfish on April 15, 2021, 09:11:14 PM
Ok, joe. What I have is 2 drag caps(sometimes called "hat" cause a the shape). But they fit the 113-H size of a gear sleeve (0.5"). One's got a rubber guard the other don't, both are too big for my 111-2/0's side-plate with the NON- outside access opening. The metal o.d. = 1.25" on both. Prolly too big for the 2/0's side-plate, unless the 113-H 4/0 uses the same outside access drag cap as the 111 2/0 (I'mina check Mystic part #'s to see).
Got 2 sets of side plates for my 111, but never knew they came as outside access plates also. Older style? Newer? Anyway, I have some 111 parts as I bought a spare for the gear side- plate and aluminum spool.
1) 113H gear sleeve & 2 different side-plate styles
2) 111 plate with a no-rubber guard 113H drag cap—-too big for this plate, would interfere with the spool bushing.
Title: Re: Grouper Junior — WIP
Post by: Decker on April 16, 2021, 07:02:44 PM
Post by: Decker on April 16, 2021, 07:02:44 PM
Thanks, Gregg. Looks like I'll have to be extra crafty with the side plate.
Title: Re: Grouper Junior — WIP
Post by: Gfish on April 16, 2021, 09:42:58 PM
Post by: Gfish on April 16, 2021, 09:42:58 PM
Couldn't find a 2/0-111 with an outside drag access head-plate. They exist for the 3/0-112 Senators, though. Got the same part numbers as the 113H drag cap + felt washer.
Title: Re: Grouper Junior — WIP
Post by: jigmaster501 on February 05, 2022, 08:44:09 PM
Post by: jigmaster501 on February 05, 2022, 08:44:09 PM
Any luck with this????