Title: TUTORIAL: 5500 c3
Post by: alantani on December 09, 2008, 11:33:28 PM
Post by: alantani on December 09, 2008, 11:33:28 PM
written 11/16/05
when i first started doing reel seminars 5 years ago, one fourth of the reels brought in were ambassaduers. initially, they took up a third of the time. it took quite a while, but i figured out the right combination of penn ht-100 drag washers and metal washers. my problem was always a space issue. the penn washers i had were always too thick. recently, dawn at http://www.smoothdrag.com/ came out with a line of carbontex drag washers that fit perfectly. just slap on a coat of cal or shimano drag grease, switch out the drags and witness the miracle!
many of you have these old ambassaduers. it had been a love/hate relationship.
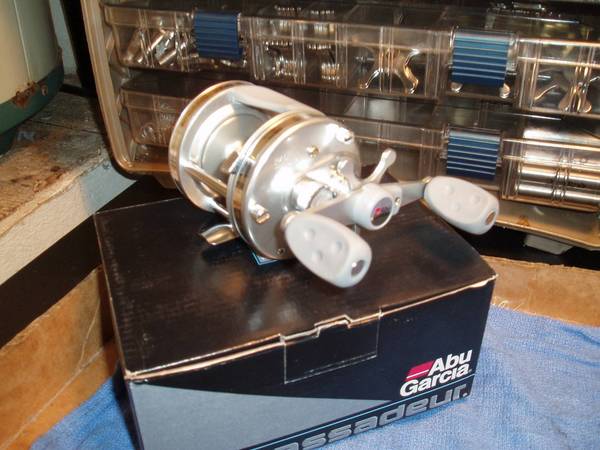
good looks and cheap, but unreliable. well, i want all of you to pull out those old seized up ambassaduers, and get ready to fall in love all over again. this is one reel that anyone can fix at home. here's how....
first, check out the smoothdrag website at http://www.smoothdrag.com/ and check out the carbontex drag washers. DO NOT get the old green or black smoothies. then call the smoothdrag lady. her name is dawn and her phone number is (760) 949-0271. order up a set of drag washers and some of cal's drag washer grease. she is absolutely one of the nicest people in the world. and tell her alan said hi!
next, go the the ambassaduer website at http://www.abugarcia.com/schematics/index.cfm and find the schematic for your reel. just as an example, i'm going to pick ambassaduer -> c3 -> 5500 -> 9909.pdf. let's start....
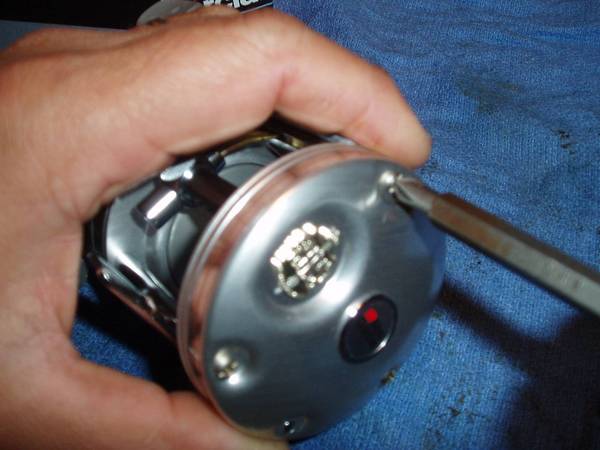
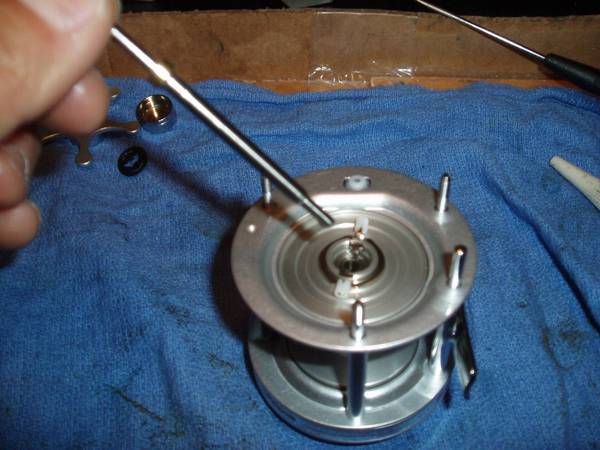
start with the left side plate. back off one screw (key #199) ONLY. squirt a small amount of grease into the screw hole and put the screw back!!!! do not remove the side plate. remove the next two screws, one at a time, and grease them as well.
remove the handle nut cap and screw (key #'s 14868, 96274 and 15359)
remove the c-clip (key #4490)

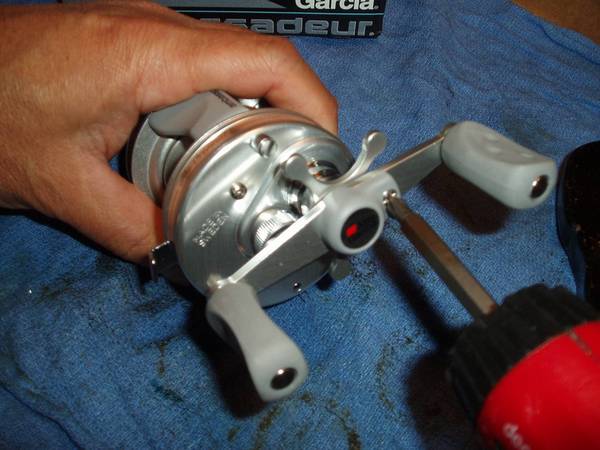
remove the handle nut (key #15359), the handle (key # 24500), the stainless steel spring (key # 5115), the star (key # 24502) and the cast control knob (key #'s 21717, 20917, and 20090)
remove the right side plate assembly (note that this photo shows the cast control knob still in place. it must be removed first).

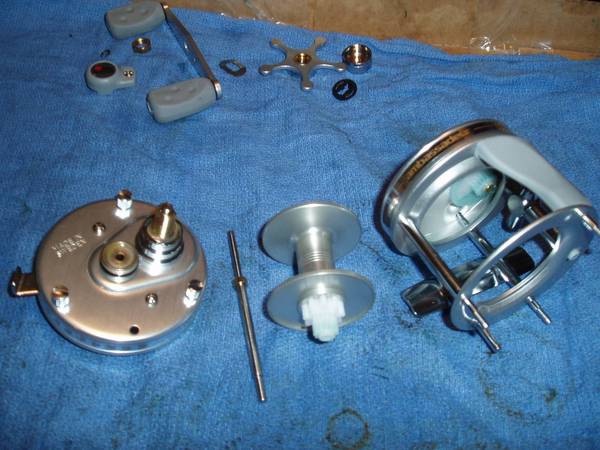
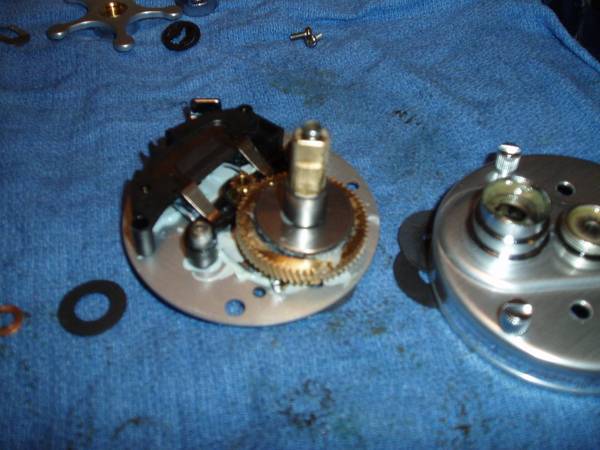
separate the reel as shown below.
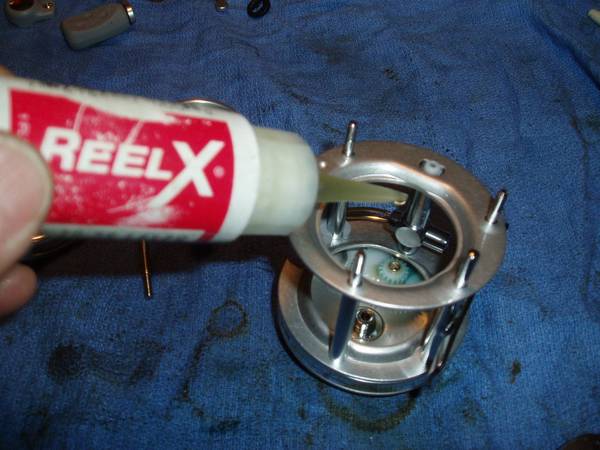
lube the level wind assembly.
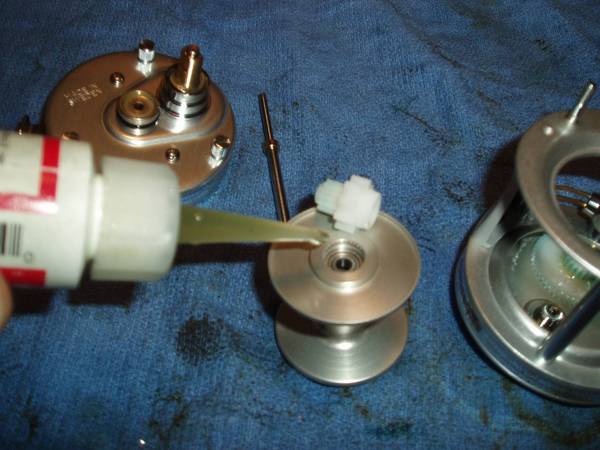
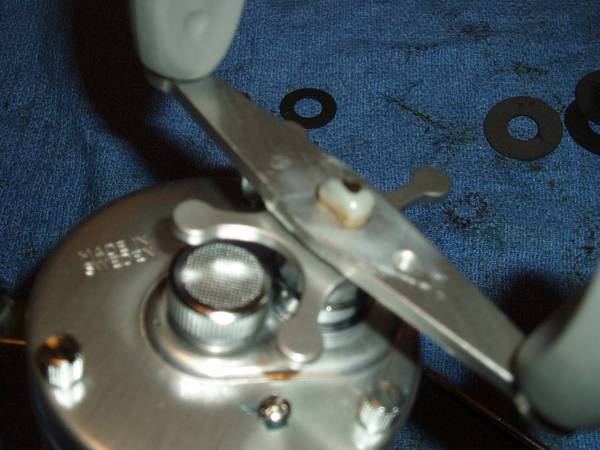
lube the left spool bearing (key #13472) by popping out the nylon sprocket gear (key #23403). don't forget to pop it back in!
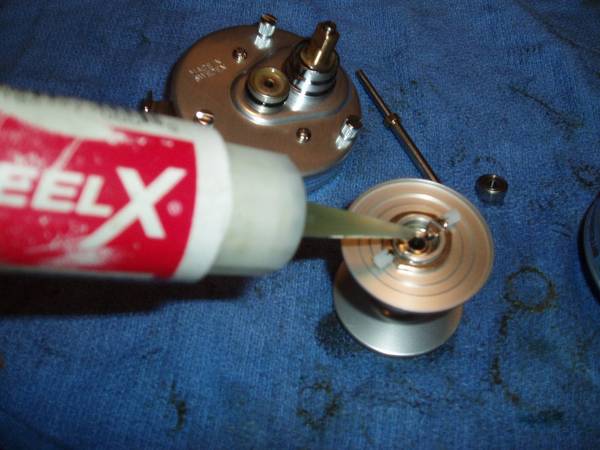
lube the right spool bearing (key #13472)
replace the spool assembly (key #970823) back into the frame and insert the spool shaft (key #802630)
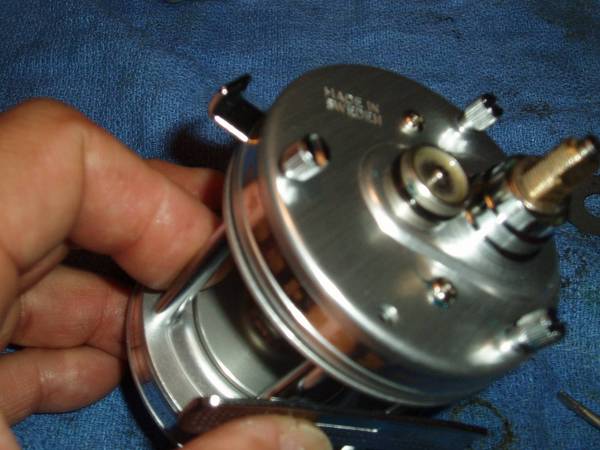
now, for the right side plate. remove the two right side plate bridge screws (key # 5229)
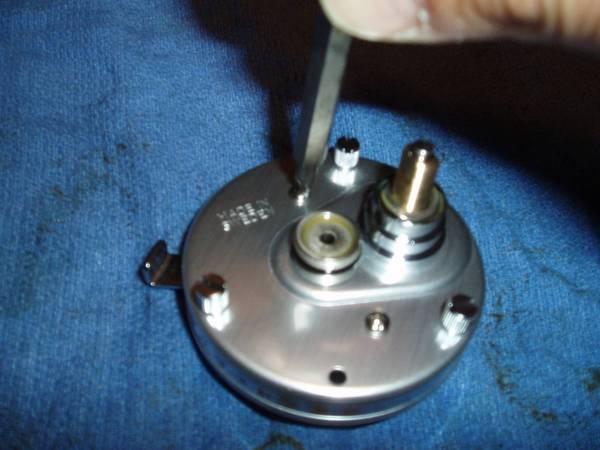
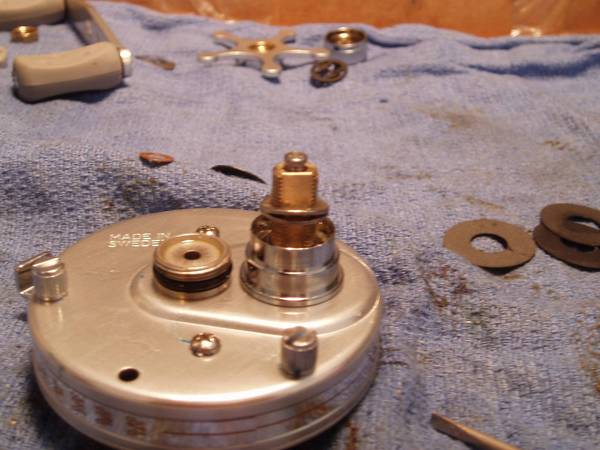
NOTE THIS IMPORTANT DIFFERENCE: older reels have a more reliable anti-reverse dog (key #20671). note that the dog has to "grab" the ratchet gear at base of the gear sleeve (key #22079), as shown in the schematic that i've chosen to work with. newer reels have a less reliable anti-reverse roller bearing, as shown in the photo below
if you have a dog, note the proper position of the dog now, and make sure it is reassembled in the same way.
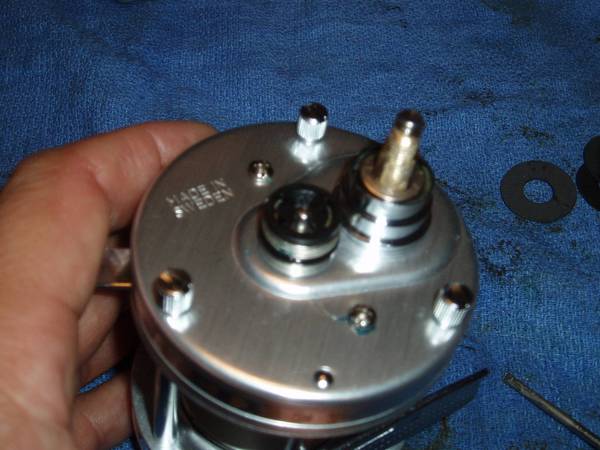
remove the right side plate cover (key #24511). note that the anti-reverse roller bearing sleeve and the two cupped pressure washers (key #5131) stayed with the side plate cover.
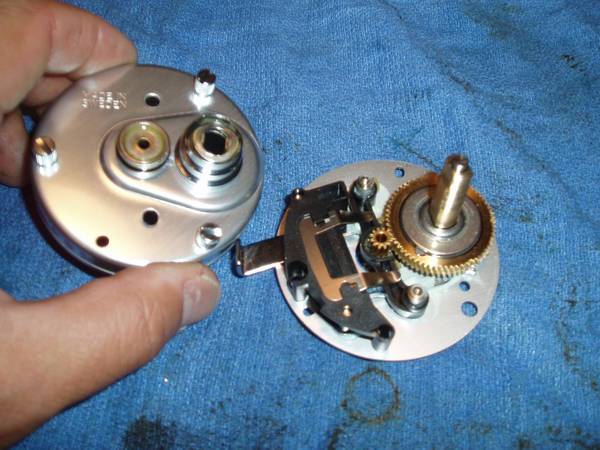
grease the screw holes
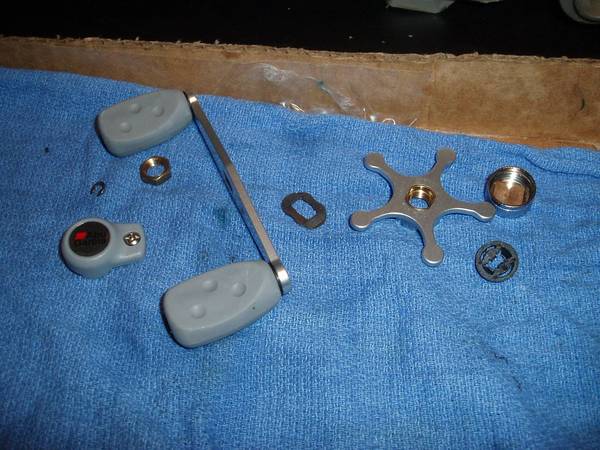
separate the drag/gear cluster as shown. note left to right, the ....
thrust washer (key #5189)
gear sleeve (key # 22079)
fiber washer (key # 13169)
main gear (key #21200)
3 alternating drag washers (key #20907)
flat slotted metal washer (key #20906)
flat keyed metal washer (key #20905)
cupped slotted metal washer (key #20960)
also shown in the photo are four new carbon fiber drag washers and a second flat slotted metal washer. ignore the second flat slotted metal washer.
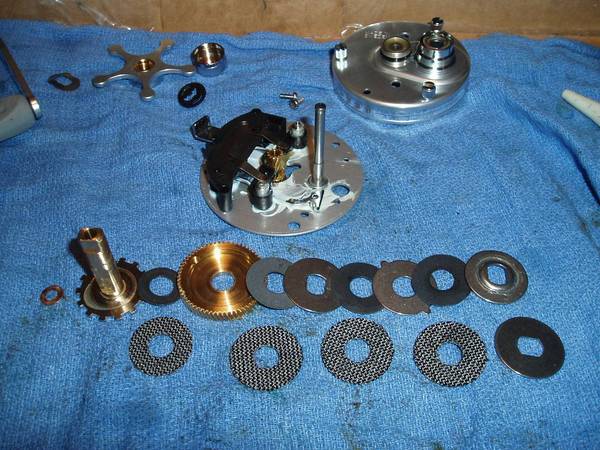
apply a generous coat of cal or shimano drag grease to the new carbontex drag washers, rebuild the gear drag/gear cluster and discard the orginal ambassaduer drag washers.
if your reel has a dog (key # 20671), put the dog back onto the ratchet gear (key # 22079), install the spacer (key #22001) and then drop the drag/gear cluster back onto the right side plate base (key #24508) .
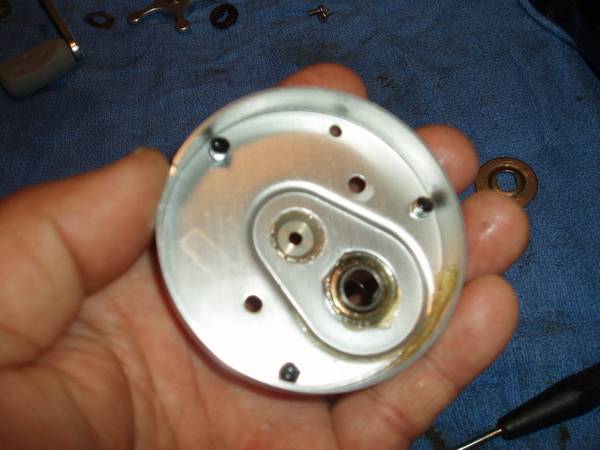
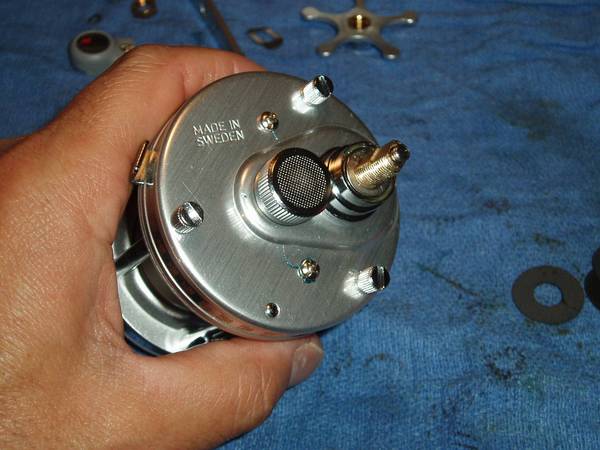
if your reel has an anti-reverse roller bearing, replace the roller bearing sleeve as shown in the photo below.
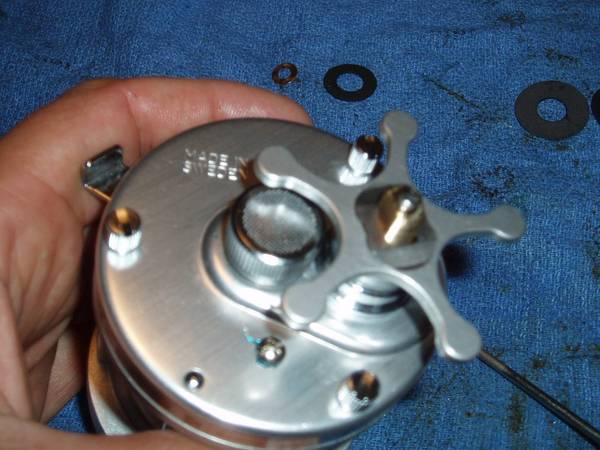
replace the right side plate bridge screws (key # 13369) and install the cupped pressure washers in a "()" orientation as shown below.
find the small white plastic brakes on the spool (key #20211) and press them in. failure to do this and the right side plate assembly may not seat properly.
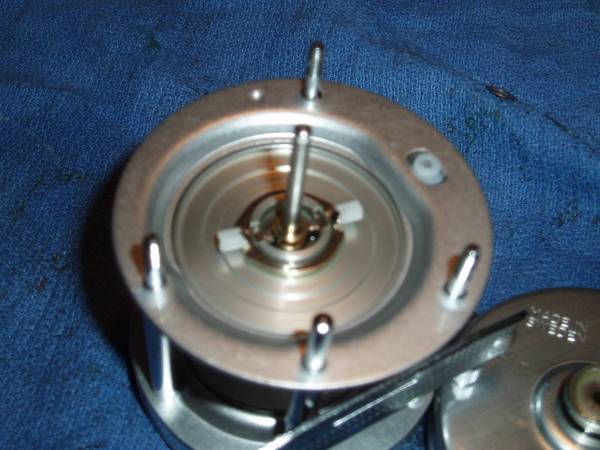
install the right side plate assembly back onto the frame. make sure that the brakes are pressed "in" and that the anti-reverse dog is also "in." the right side plate assembly should seat cleanly, flush and with a "snap." tighten down the three right side plate screws. now check to make sure that the gear sleeve (key # 22079) turns freely and that the anti-reverse mechanism functions properly.
install the cast control cap assembly.
install the star and spring.
grease and install the handle.
install the handle nut and c-clip
install the handle nut cap and retaining screw.
when i first started doing reel seminars 5 years ago, one fourth of the reels brought in were ambassaduers. initially, they took up a third of the time. it took quite a while, but i figured out the right combination of penn ht-100 drag washers and metal washers. my problem was always a space issue. the penn washers i had were always too thick. recently, dawn at http://www.smoothdrag.com/ came out with a line of carbontex drag washers that fit perfectly. just slap on a coat of cal or shimano drag grease, switch out the drags and witness the miracle!
many of you have these old ambassaduers. it had been a love/hate relationship.
good looks and cheap, but unreliable. well, i want all of you to pull out those old seized up ambassaduers, and get ready to fall in love all over again. this is one reel that anyone can fix at home. here's how....
first, check out the smoothdrag website at http://www.smoothdrag.com/ and check out the carbontex drag washers. DO NOT get the old green or black smoothies. then call the smoothdrag lady. her name is dawn and her phone number is (760) 949-0271. order up a set of drag washers and some of cal's drag washer grease. she is absolutely one of the nicest people in the world. and tell her alan said hi!
next, go the the ambassaduer website at http://www.abugarcia.com/schematics/index.cfm and find the schematic for your reel. just as an example, i'm going to pick ambassaduer -> c3 -> 5500 -> 9909.pdf. let's start....
start with the left side plate. back off one screw (key #199) ONLY. squirt a small amount of grease into the screw hole and put the screw back!!!! do not remove the side plate. remove the next two screws, one at a time, and grease them as well.
remove the handle nut cap and screw (key #'s 14868, 96274 and 15359)
remove the c-clip (key #4490)
remove the handle nut (key #15359), the handle (key # 24500), the stainless steel spring (key # 5115), the star (key # 24502) and the cast control knob (key #'s 21717, 20917, and 20090)
remove the right side plate assembly (note that this photo shows the cast control knob still in place. it must be removed first).
separate the reel as shown below.
lube the level wind assembly.
lube the left spool bearing (key #13472) by popping out the nylon sprocket gear (key #23403). don't forget to pop it back in!
lube the right spool bearing (key #13472)
replace the spool assembly (key #970823) back into the frame and insert the spool shaft (key #802630)
now, for the right side plate. remove the two right side plate bridge screws (key # 5229)
NOTE THIS IMPORTANT DIFFERENCE: older reels have a more reliable anti-reverse dog (key #20671). note that the dog has to "grab" the ratchet gear at base of the gear sleeve (key #22079), as shown in the schematic that i've chosen to work with. newer reels have a less reliable anti-reverse roller bearing, as shown in the photo below
if you have a dog, note the proper position of the dog now, and make sure it is reassembled in the same way.
remove the right side plate cover (key #24511). note that the anti-reverse roller bearing sleeve and the two cupped pressure washers (key #5131) stayed with the side plate cover.
grease the screw holes
separate the drag/gear cluster as shown. note left to right, the ....
thrust washer (key #5189)
gear sleeve (key # 22079)
fiber washer (key # 13169)
main gear (key #21200)
3 alternating drag washers (key #20907)
flat slotted metal washer (key #20906)
flat keyed metal washer (key #20905)
cupped slotted metal washer (key #20960)
also shown in the photo are four new carbon fiber drag washers and a second flat slotted metal washer. ignore the second flat slotted metal washer.
apply a generous coat of cal or shimano drag grease to the new carbontex drag washers, rebuild the gear drag/gear cluster and discard the orginal ambassaduer drag washers.
if your reel has a dog (key # 20671), put the dog back onto the ratchet gear (key # 22079), install the spacer (key #22001) and then drop the drag/gear cluster back onto the right side plate base (key #24508) .
if your reel has an anti-reverse roller bearing, replace the roller bearing sleeve as shown in the photo below.
replace the right side plate bridge screws (key # 13369) and install the cupped pressure washers in a "()" orientation as shown below.
find the small white plastic brakes on the spool (key #20211) and press them in. failure to do this and the right side plate assembly may not seat properly.
install the right side plate assembly back onto the frame. make sure that the brakes are pressed "in" and that the anti-reverse dog is also "in." the right side plate assembly should seat cleanly, flush and with a "snap." tighten down the three right side plate screws. now check to make sure that the gear sleeve (key # 22079) turns freely and that the anti-reverse mechanism functions properly.
install the cast control cap assembly.
install the star and spring.
grease and install the handle.
install the handle nut and c-clip
install the handle nut cap and retaining screw.
Title: Re: 5500 c3
Post by: alantani on December 24, 2009, 01:11:11 AM
Post by: alantani on December 24, 2009, 01:11:11 AM
Quote
Alan,
Thanks for the heads up on the Reel +
I just re-tuned that green 5500 I pictured in that Abu Hot Rod thread... it's got 6 bearings (not counting the 4 in the handle). I have gotten 33 and one half bumps...not bad. That is using the same spin the spool with your finger test. I also put in a set of Boca Lightning Abec 5's in favor of the stock bearings. Granted a 5500 is a 3/8" less in width than a 6500, 33 bumps I think is safe to say is SMOKIN. I hope I can keep it under control on the river! I just put an Avail Mag Kit on my other hotrod 5500...looking forward to trying that this weekend.
Title: Re: 5500 c3
Post by: Bryan Young on January 05, 2011, 06:21:55 AM
Post by: Bryan Young on January 05, 2011, 06:21:55 AM
Look, how time flies. The bearings are not open. LOL.
Title: Re: 5500 c3
Post by: Slowly on January 06, 2011, 11:55:53 PM
Post by: Slowly on January 06, 2011, 11:55:53 PM
Hi Alan. delayed Happy new year! :D
I ordered some parts from mike's and one of it is the stainless top drag plate with raised center portion (key# 20960). I ordered it because I thought it was the one shown in the red circle, but it isn't.
Where can I get one of those?
Is it really necesary? What benefits does it has over the stock part?
thanks in advance!
Title: Re: TUTORIAL: 5500 c3
Post by: alantani on January 07, 2011, 04:18:15 AM
Post by: alantani on January 07, 2011, 04:18:15 AM
if you use carbontex drag washers, you will not need the flat metal washer that is circled in red. if you still need one, however, i can send you one for the price of a first class stamp and a beer!!!!!!!!!!!!!!
Title: Re: TUTORIAL: 5500 c3
Post by: Slowly on January 08, 2011, 03:22:54 AM
Post by: Slowly on January 08, 2011, 03:22:54 AM
jajaja! I'll buy one if you tell me some advantages! ;D ;D
Title: Re: TUTORIAL: 5500 c3
Post by: ountida on October 04, 2012, 09:11:13 AM
Post by: ountida on October 04, 2012, 09:11:13 AM
Hi Alan, I'm a little confused. I want to upgrade my 6500c3 drag washer. castaway tackle shop sell the carbon drag washer.
http://www.castawaytackleshop.com/ProductDetails.asp?ProductCode=SD-5500CA
Is this the same one that is sold at smoothdrag.com?
Another question, can I used the original metal washer with the new carbon washer?
Do I lube one side of the carbon drag or both side?
Is it okay to lube the metal washer with cal , or do I leave it dry?
Thanks . I'm a little nervous, this is my first time doing a maintenance on this.
Title: Re: TUTORIAL: 5500 c3
Post by: redsetta on October 04, 2012, 09:39:34 AM
Post by: redsetta on October 04, 2012, 09:39:34 AM
QuoteIs this the same one that is sold at smoothdrag.com?Yes.
QuoteAnother question, can I used the original metal washer with the new carbon washer?Yes.
QuoteDo I lube one side of the carbon drag or both side?Both, lightly.
QuoteIs it okay to lube the metal washer with cal , or do I leave it dry?No need to lube the metals as they press against the greased CF.
Good luck, Justin
Title: Re: TUTORIAL: 5500 c3
Post by: ountida on October 04, 2012, 04:22:44 PM
Post by: ountida on October 04, 2012, 04:22:44 PM
Thank alot redsetta, wow everyone in here is helpful ;D, hopefully one day I can help other memeber out too
Title: Re: TUTORIAL: 5500 c3
Post by: jimmymac on November 03, 2013, 02:44:18 PM
Post by: jimmymac on November 03, 2013, 02:44:18 PM
I know this is a really old thread, but why are we not removing the left side cover on this reel? I saw the same instructions for the Record 60 tutorial as well.
Title: Re: TUTORIAL: 5500 c3
Post by: alantani on November 03, 2013, 05:25:50 PM
Post by: alantani on November 03, 2013, 05:25:50 PM
it needs to be redone. it's an old tutorial and i do things much differently now.
Title: Re: TUTORIAL: 5500 c3
Post by: jimmymac on November 04, 2013, 10:07:56 AM
Post by: jimmymac on November 04, 2013, 10:07:56 AM
Thanks Alan.
Title: Re: TUTORIAL: 5500 c3
Post by: Nicko_Cairns on January 02, 2015, 03:20:45 AM
Post by: Nicko_Cairns on January 02, 2015, 03:20:45 AM
Quote from: alantani on November 03, 2013, 05:25:50 PM
it needs to be redone. it's an old tutorial and i do things much differently now.
Is it messy opening up the left side? I'm about to service two of my Abu 5000 reels.
Title: Re: TUTORIAL: 5500 c3
Post by: Nicko_Cairns on January 02, 2015, 03:23:09 AM
Post by: Nicko_Cairns on January 02, 2015, 03:23:09 AM
Okay disregard, I'm guessing it is pretty similar to this reel: http://alantani.com/index.php?topic=1512.0
Title: Re: TUTORIAL: 5500 c3
Post by: fIsHsTiiCkS on January 02, 2015, 04:43:40 AM
Post by: fIsHsTiiCkS on January 02, 2015, 04:43:40 AM
Alan!! You need to do tutorials like this again!!
Title: Re: TUTORIAL: 5500 c3
Post by: alantani on January 02, 2015, 05:50:40 AM
Post by: alantani on January 02, 2015, 05:50:40 AM
yeah. i know. i'm hoping to start up again this year.
Title: Re: TUTORIAL: 5500 c3
Post by: Nicko_Cairns on January 02, 2015, 06:42:29 AM
Post by: Nicko_Cairns on January 02, 2015, 06:42:29 AM
Quote from: fIsHsTiiCkS on January 02, 2015, 04:43:40 AM
Alan!! You need to do tutorials like this again!!
Yeah, what have you been doing with your time Alan? ;)
Title: Re: TUTORIAL: 5500 c3
Post by: Noviceman on August 18, 2017, 01:39:47 PM
Post by: Noviceman on August 18, 2017, 01:39:47 PM
Actually was looking for a tutuorial for a 6500 c3 2 speed? Please advise..thanks
Title: Re: TUTORIAL: 5500 c3
Post by: handi2 on August 18, 2017, 04:44:43 PM
Post by: handi2 on August 18, 2017, 04:44:43 PM
I just finished the 6500c3 2 speed. I'm trying to buy it from the owner to collect. Its in mint condition. If it does become mine I will post the tutorial.
Keith
Keith
Title: Re: TUTORIAL: 5500 c3
Post by: Noviceman on August 18, 2017, 09:00:52 PM
Post by: Noviceman on August 18, 2017, 09:00:52 PM
Hey Keith..that would be great...pictures sure make things easier..Let me know if it works out..
Title: Re: TUTORIAL: 5500 c3
Post by: Rancanfish on August 19, 2017, 01:13:09 AM
Post by: Rancanfish on August 19, 2017, 01:13:09 AM
Keith, is yours the burgundy reel? I have one somewhere in a box.
Title: Re: TUTORIAL: 5500 c3
Post by: handi2 on September 17, 2017, 04:43:42 PM
Post by: handi2 on September 17, 2017, 04:43:42 PM
Yes it was dark red but the owner wouldn't sell it to me or the smaller one he brought in. They both were in mint condition. The inner sleeve was sticking on both of them.
Title: Re: TUTORIAL: 5500 c3
Post by: Rancanfish on September 18, 2017, 02:03:05 AM
Post by: Rancanfish on September 18, 2017, 02:03:05 AM
Keith, PM me an offer if you like, for the 6500-2 speed. Mint with unopened oil/wrench pak, and booklets. Box has a small bit of wear from being opened and closed to show it off a few times over the years
I just got it out of the cabinet. Forgot how pretty they are.
Randy
I just got it out of the cabinet. Forgot how pretty they are.
Randy
Title: Re: TUTORIAL: 5500 c3
Post by: BigTerp on June 08, 2018, 12:35:20 PM
Post by: BigTerp on June 08, 2018, 12:35:20 PM
Very informative thread!! I'm about to tear into 3 5500 C3's and a 4600 C3. All bought second hand and have been used for freshwater only up to this point. All are very smooth and in good shape. But I'm planning on taking them to the salt later this summer, so I want to do a proper tear down, clean and re-lube so they are protected from the salt. I'll treat these reels as saltwater reels since they will be used for about a week a year in the salt. I know the original post from Alan is a little dated, but based of this thread and his tutorial of the 6500 C3 I think I have a solid plan. Please let me know what you think.
- Complete tear down and clean (simple green, tooth brush, solvent if needed for bearings)
- Blue Yamaha grease for the main gear/cog wheel and lighted coated on internal metal parts and screws/screw holes
- Reel X/Corrosion X for bearings, worm gear/level wind, handle knobs, etc. Do you guys prefer one over the other? Or maybe even a completely different oil all together?
- New carbon washers lightly coated with Cal's
- Once re-assembled, all external parts wiped down lightly with Corrosion X for protection
Title: Re: TUTORIAL: 5500 c3
Post by: Swami805 on June 09, 2018, 12:35:05 AM
Post by: Swami805 on June 09, 2018, 12:35:05 AM
I have 2 older 5500's that I fished hard for a few years. Had to replace a few things now and then. Neither will go back in gear from free spool when I turn the handle. I had them apart,cleaned and lube but something is worn out. Any ideas? Thanks Sheridan
Title: Re: TUTORIAL: 5500 c3
Post by: alantani on June 09, 2018, 01:14:33 AM
Post by: alantani on June 09, 2018, 01:14:33 AM
BT, the plan sounds solid.
Sheridan, the ratchet gear under the main gear hits a kick lever. Usually the kick lever is bent out. If you bend it back straight up and it should work again.
Sheridan, the ratchet gear under the main gear hits a kick lever. Usually the kick lever is bent out. If you bend it back straight up and it should work again.
Title: Re: TUTORIAL: 5500 c3
Post by: Swami805 on June 09, 2018, 01:20:50 AM
Post by: Swami805 on June 09, 2018, 01:20:50 AM
Thanks Alan, I'll give it a try.
Title: Re: TUTORIAL: 5500 c3
Post by: reel man on June 09, 2018, 10:52:20 PM
Post by: reel man on June 09, 2018, 10:52:20 PM
Quote from: alantani on June 09, 2018, 01:14:33 AMWould like to chime in here. but thought it might be useful, I've exchanged the stock 5500 C3 cage with one from 5600 model that gives the thumbbar instead the dissengagement lever.
BT, the plan sounds solid.
Sheridan, the ratchet gear under the main gear hits a kick lever. Usually the kick lever is bent out. If you bend it back straight up and it should work again.
I may have missed it, but it's important to press the spool shaft into the plastic retainer in the cup on the right side plate.
Title: Re: TUTORIAL: 5500 c3
Post by: BigTerp on June 12, 2018, 03:06:09 PM
Post by: BigTerp on June 12, 2018, 03:06:09 PM
Quote from: alantani on June 09, 2018, 01:14:33 AM
BT, the plan sounds solid.
Thanks Alan. Appreciate the detailed thread!!
Title: Re: TUTORIAL: 5500 c3
Post by: nelz on February 01, 2019, 07:08:12 PM
Post by: nelz on February 01, 2019, 07:08:12 PM
How does one remove the cog wheel? Is it a fixed attachment?
Also, how is the Axle Clip oriented, does the cone point out or into the reel? (Part number 20090) I can't tell from the photo in this tutorial.


Also, how is the Axle Clip oriented, does the cone point out or into the reel? (Part number 20090) I can't tell from the photo in this tutorial.
Title: Re: TUTORIAL: 5500 c3
Post by: exp2000 on February 02, 2019, 12:07:52 AM
Post by: exp2000 on February 02, 2019, 12:07:52 AM
Quote from: nelz on February 01, 2019, 07:08:12 PM
How does one remove the cog wheel? Is it a fixed attachment?
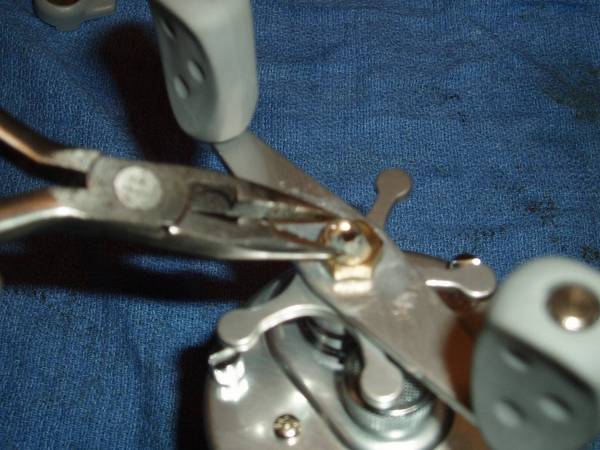
The nylon idle gear is a sacrificial part preventing damage to other components in the event that the line guide becomes jammed or obstructed. As such it is often in need of replacement. You need to apply pressure underneath the cog immediately adjacent the mounting post to pop it from it's mount. A table fork bent at 90 degrees or a flat tool bent at a slight angle will allow you to reach underneath to apply pressure.
However, be careful so as not to apply too much pressure as these can sometimes be so stubborn to remove that you may risk loosening the mounting post from the side-plate, especially on newer models. A drop of oil will help coax the idle gear from it's mounting post but a stream of hot air from a hair dryer will soften the lip of the nylon cog sufficiently to ensure success.
Quote from: nelz on February 01, 2019, 07:08:12 PM
Also, how is the Axle Clip oriented, does the cone point out or into the reel? (Part number 20090) I can't tell from the photo in this tutorial.
The cone fits over a notch in the end of the spindle. It points inwards.
~
Title: Re: TUTORIAL: 5500 c3
Post by: nelz on February 02, 2019, 02:28:18 AM
Post by: nelz on February 02, 2019, 02:28:18 AM
Thank you sir. ;D
Title: Re: TUTORIAL: 5500 c3
Post by: Pieter Arie on February 03, 2019, 10:33:38 PM
Post by: Pieter Arie on February 03, 2019, 10:33:38 PM
Quote from: exp2000 on February 02, 2019, 12:07:52 AMyou may risk loosening the mounting post from the side-plate
That happened to me once on a 6501UC >:( So the second time on a other reel I did it as shown here in this YouTube movie. Worked perfect for me.
https://www.youtube.com/watch?v=bMwei_JhUYI
Grt Piet.
Title: Re: TUTORIAL: 5500 c3
Post by: nelz on February 03, 2019, 10:53:42 PM
Post by: nelz on February 03, 2019, 10:53:42 PM
Quote from: Pieter Arie on February 03, 2019, 10:33:38 PMThat happened to me once on a 6501UC >:( So the second time on a other reel I did it as shown here in this YouTube movie. Worked perfect for me.
I just picked up a nice used 6500C3 that was all mucked up with dry grease. I wanted to remove the cog to clean behind it, but decided to do as best as possible without removing it because it just felt like something was gonna get damaged removing it. (Sprayed it with carb cleaner.)
Anyway, when I'm ready to hot-rod the reel I'll cut it off as per video. That PimpMyReel guy is a gold mine of Abu knowledge!
Thanks Pieter, the vid really cleared it up for me.
Title: Re: TUTORIAL: 5500 c3
Post by: Pieter Arie on February 03, 2019, 11:07:00 PM
Post by: Pieter Arie on February 03, 2019, 11:07:00 PM
You're welcom nelz
And yes, PMR is great!!
Grt Piet.
And yes, PMR is great!!
Grt Piet.
Title: Re: TUTORIAL: 5500 c3
Post by: exp2000 on February 04, 2019, 03:41:10 AM
Post by: exp2000 on February 04, 2019, 03:41:10 AM
Quote from: nelz on February 03, 2019, 10:53:42 PMQuote from: Pieter Arie on February 03, 2019, 10:33:38 PMThat happened to me once on a 6501UC >:( So the second time on a other reel I did it as shown here in this YouTube movie. Worked perfect for me.
I just picked up a nice used 6500C3 that was all mucked up with dry grease. I wanted to remove the cog to clean behind it, but decided to do as best as possible without removing it because it just felt like something was gonna get damaged removing it. (Sprayed it with carb cleaner.)
Anyway, when I'm ready to hot-rod the reel I'll cut it off as per video. That PimpMyReel guy is a gold mine of Abu knowledge!
Thanks Pieter, the vid really cleared it up for me.
The new trend is to introduce more complexity perhaps as a selling point for the upgrade mindset.
But does this really benefit the average buyer?
I already retrograde the new integral bearing worm for my customers. The original system will last a lifetime if properly cared for.
The new integral bearing one will stuff up quickly requiring constant replacement of the entire worm assembly so much more servicing and more cost involved.
Likewise, ABU successfully deployed the plain nylon idle gear for decades without bearings.
NEW versus OLD :
Pros:
Turns more freely but unless you are a competition caster I would be surprised if this translated
into any significant real world benefits.
Cons:
More complicated to adapt
More vulnerable (yet another bearing)
Requires sourcing new replacement part plus new retainer.
Minimum double original replacement cost vs zero cost my way.
I regularly pop these cogs in well under a minute without damaging them allowing you to re-use the original part.
Guess I must be missing something here?
I know. It's a video! Might have to remedy that.
~
Title: Re: TUTORIAL: 5500 c3
Post by: redsetta on February 04, 2019, 07:00:49 PM
Post by: redsetta on February 04, 2019, 07:00:49 PM
I agree - I always try to remove/replace/minimise failure points and simplify (wherever possible) in a way that balances performance and longevity...
Title: Re: TUTORIAL: 5500 c3
Post by: exp2000 on February 07, 2019, 04:53:30 PM
Post by: exp2000 on February 07, 2019, 04:53:30 PM
As promised, here is a video of my approach to removing the nylon idle gear from the pivot post on the side-plate of an ABU reel.
This is my first video production and it was made using a GoPro sports camera.
PS: I have now edited this video into a better production.
Hope you enjoy :)
https://youtu.be/mjrLRqN1C5w
This is my first video production and it was made using a GoPro sports camera.
PS: I have now edited this video into a better production.
Hope you enjoy :)
https://youtu.be/mjrLRqN1C5w
Title: Re: TUTORIAL: 5500 c3
Post by: Dominick on February 07, 2019, 06:50:29 PM
Post by: Dominick on February 07, 2019, 06:50:29 PM
Expo 2K thanks for that video. Always helpful. Dominick
Title: Re: TUTORIAL: 5500 c3
Post by: nelz on February 07, 2019, 07:08:48 PM
Post by: nelz on February 07, 2019, 07:08:48 PM
Well done video Mr. EXP2000, (still don't know your name).
My Penn wrench snapped when I tried to bend it like that, lol. ::)
My Penn wrench snapped when I tried to bend it like that, lol. ::)
Title: Re: TUTORIAL: 5500 c3
Post by: Lunker Larry on February 07, 2019, 08:17:56 PM
Post by: Lunker Larry on February 07, 2019, 08:17:56 PM
I like the bent screwdriver idea. Never tried that. What I've been doing is I just make a loop of 100 lb Power Pro, lay it under the cog so that it is centered and yank it straight up. May add the heating up part as that would seem to make it a lot easier.
Title: Re: TUTORIAL: 5500 c3
Post by: conchydong on February 08, 2019, 01:25:05 AM
Post by: conchydong on February 08, 2019, 01:25:05 AM
The paint can beer bottle openers that they give you at home depot when you buy paint work pretty good for things like this. You can grind them down a bit and use them for bearing pullers also. I love multi tasking tools.
Title: Re: TUTORIAL: 5500 c3
Post by: pointbob on November 14, 2022, 06:06:36 PM
Post by: pointbob on November 14, 2022, 06:06:36 PM
I've seen videos where grease is applied to cog wheel. Is that a good idea? Won't that slow things down.
I've done the e-clip mod to the cog wheel and just put a drop of oil on the clip. Should I add grease to the cog wheel teeth too...?
I've done the e-clip mod to the cog wheel and just put a drop of oil on the clip. Should I add grease to the cog wheel teeth too...?
Title: Re: TUTORIAL: 5500 c3
Post by: alantani on November 14, 2022, 06:07:41 PM
Post by: alantani on November 14, 2022, 06:07:41 PM
oil is better for better freespool.
Title: Re: TUTORIAL: 5500 c3
Post by: pointbob on November 14, 2022, 06:29:43 PM
Post by: pointbob on November 14, 2022, 06:29:43 PM
Quote from: alantani on November 14, 2022, 06:07:41 PMoil is better for better freespool.
Thanks Alan. by the way; when putting the spool bearings back in is it ok to have them (bearing side exposed) outward or inward? I took off the bearing seal in order to clean and lube them a while back and did not put the seal back on. Now I forgot which way...or does it even matter.
Title: Re: TUTORIAL: 5500 c3
Post by: alantani on November 16, 2022, 12:27:38 AM
Post by: alantani on November 16, 2022, 12:27:38 AM
open side away from water if possible.
Title: Re: TUTORIAL: 5500 c3
Post by: Ruffy on March 02, 2023, 03:33:02 AM
Post by: Ruffy on March 02, 2023, 03:33:02 AM
Hi all,
I have a question regarding the bearing supported levelwinds. From what I have seen the bearing nearest the cog is peened in behind the cog, i.e. it can't be removed and changed if it rusts out. To me it makes it a non-serviceable part, worrying where I fish in high salt and high humidity tropics as everything rusts.
Are there any variations that I am unaware of where both bearings are removable and replaceable?
I am looking at hot rodding a 5600c4 wiffle spool. It already has the levelwind with one (replaceable) bearing as standard, and a captive bushing on the other end. I am wondering about upgrading this. I already have the bearing supported cog wheel in the side plate from a record.
Cheers,
Andrew
Title: Re: TUTORIAL: 5500 c3
Post by: Donnyboat on March 02, 2023, 09:23:05 AM
Post by: Donnyboat on March 02, 2023, 09:23:05 AM
Why not do away with the line level, it only restricts the casting, & the reels are not very wide to manage your line retreaving, also ceramic bearings, will cast further, I was adverkating, braid line 16 strand, but I now think mone filament line will not dig in as much, so less snapping when casting. thats what the long casting groupe use, good luck, cheers Don.
Title: Re: TUTORIAL: 5500 c3
Post by: JasonGotaProblem on March 02, 2023, 03:19:20 PM
Post by: JasonGotaProblem on March 02, 2023, 03:19:20 PM
Quote from: Donnyboat on March 02, 2023, 09:23:05 AMWhy not do away with the line level, it only restricts the casting, & the reels are not very wide to manage your line retreaving, also ceramic bearings, will cast further, I was adverkating, braid line 16 strand, but I now think mone filament line will not dig in as much, so less snapping when casting. thats what the long casting groupe use, good luck, cheers Don.I've been having a lot of fun cutting level winds off abus lately. But I've discovered at least one fatal flaw in the concept: I personally seem to be incapable of managing line lay while simultaneously trying to jig a lure. Now that's probably a personal problem, but it's one i didn't consider til i started using my creations. Now those reels-for me- will be mostly used with live bait or potentially fast retrieve lures that don't require too much specificity in the jigging action.
Title: Re: TUTORIAL: 5500 c3
Post by: ExcessiveAngler on March 02, 2023, 06:36:09 PM
Post by: ExcessiveAngler on March 02, 2023, 06:36:09 PM
I've been having a lot of fun cutting level winds off abus lately. But I've discovered at least one fatal flaw in the concept: I personally seem to be incapable of managing line lay while simultaneously trying to jig a lure. Now that's probably a personal problem, but it's one i didn't consider til i started using my creations. Now those reels-for me- will be mostly used with live bait or potentially fast retrieve lures that don't require too much specificity in the jigging
I've been having a lot of fun cutting level winds off abus lately. But I've discovered at least one fatal flaw in the concept: I personally seem to be incapable of managing line lay while simultaneously trying to jig a lure. Now that's probably a personal problem, but it's one i didn't consider til i started using my creations. Now those reels-for me- will be mostly used with live bait or potentially fast retrieve lures that don't require too much specificity in the jigging action.
[/quote]
Hey Jason, how's it going brother!
Another revolving reel nut and newbie here!
Yep, that's the only drawback with removing the lw's , sometimes you want or need them back on there lol!
I just broke out two of my old favorite old, department store, red Abu6000's!
Going to give them the works, but not going down the rabbit hole lol!
Just a single bearing cog wheel and level wind, upgraded bearings and drags!
I'm not sure, if I'm going to go with a Mag elite plate or mono mag yet!
I had the same problem! It is a pita to try to level line with a light lure and try to keep imparting the action needed!
The old-timers told me eventually you will adjust to it, but definitely not that easy to get used to that's for sure!
EA
Title: Re: TUTORIAL: 5500 c3
Post by: Swami805 on March 02, 2023, 11:00:10 PM
Post by: Swami805 on March 02, 2023, 11:00:10 PM
Evening guiding the line on will become like breathing, you'll find yourself trying to do it even with a level wind
Title: Re: TUTORIAL: 5500 c3
Post by: pointbob on March 08, 2023, 06:27:46 PM
Post by: pointbob on March 08, 2023, 06:27:46 PM
Quote from: Donnyboat on March 02, 2023, 09:23:05 AMWhy not do away with the line level, it only restricts the casting, & the reels are not very wide to manage your line retreaving, also ceramic bearings, will cast further, I was adverkating, braid line 16 strand, but I now think mone filament line will not dig in as much, so less snapping when casting. thats what the long casting groupe use, good luck, cheers Don.
I float fish with abus on rivers for salmon; the level wind is crucial for having the line lay down evenly. Maybe if i was just casting off a rock for trevally, bait fishing then yeah. maybe lol. But honestly I can cast a mile with my tuned abu with level wind intact. I can't imagine the non stop managing line with my fingers as it laid down without a line guide.
Title: Re: TUTORIAL: 5500 c3
Post by: Shellbelly on March 08, 2023, 07:36:51 PM
Post by: Shellbelly on March 08, 2023, 07:36:51 PM
Quote from: Swami805 on March 02, 2023, 11:00:10 PMEvening guiding the line on will become like breathing, you'll find yourself trying to do it even with a level wind
To Jason's point, I don't see this method working well for me when I'm using top dogs or other types of walking topwater lures.
In fairness though, I do finger the line or ride the line guide in most other retrieves. It's probably a remnant of instinct from long ago.