Title: Daiwa Lexa 400HS-P: Service Tutorial and Maintenance Tips
Post by: johndtuttle on May 11, 2015, 11:28:15 PM
Post by: johndtuttle on May 11, 2015, 11:28:15 PM
Hey guys,
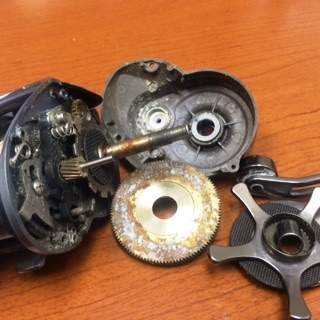
Its that time again and opportunity came knocking when a fellow fisherman had trouble with his reel. He sent it in to Daiwa and what they found was pretty ugly (this is a photo they sent to him):
 (http://alantani.com/index.php?action=gallery;sa=view;id=18018)
Well, he was a little upset but tbh, nothing the reel service community at alantani.com hasn't seen before in any number of reels...So, he had a bit of miscommunication with Daiwa and got disgusted....Well, I was curious about the Lexa 400HS-P as it is not carried in any of the shops near me and wondered how it compared to the Abu Garcia Revo NaCl 60 or Okuma Komodo 364 two reels more familiar to me now. I offered to see what I could do for him at no charge to him for the opportunity to examine the reel and do a service tutorial on it. If we needed parts it would be for him to buy them.
Typically I only do tutorials on my own reels (I am not a service center :) ) but they never get ugly enough for me to do a "basket case" tutorial on cleaning up a reel that has been neglected and really demonstrate the benefits of pre-service prep and regular care of your reel. So this was an opportunity to see if I could recondition it and make a useful post for Daiwa fans and fans of this emerging class of Saltwater Baitcasters that are revolutionizing casting lures with conventional reels. Needless to say the owner was ready to throw in the towel and decided to let me help.
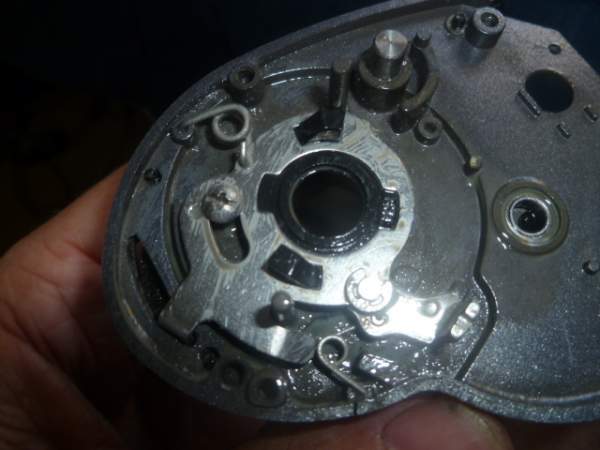
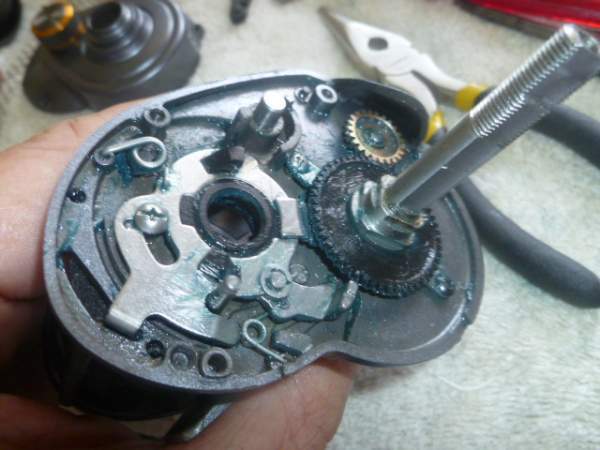
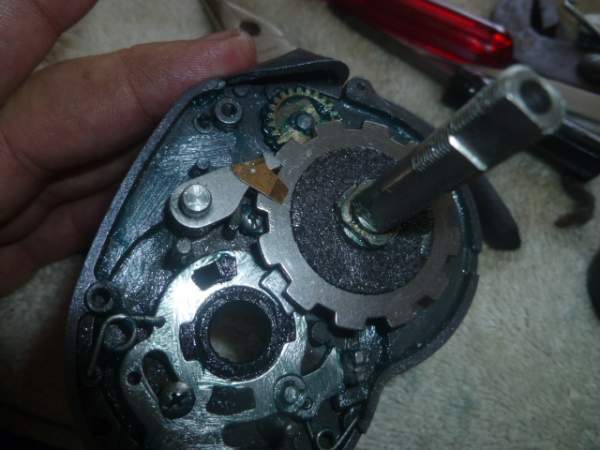
This is what I found on the right side. Fortunately the pinion uses a Bushing (38) rather than a bearing but the Roller Clutch (74) was frozen in place but still working:
 (http://alantani.com/index.php?action=gallery;sa=view;id=18024)
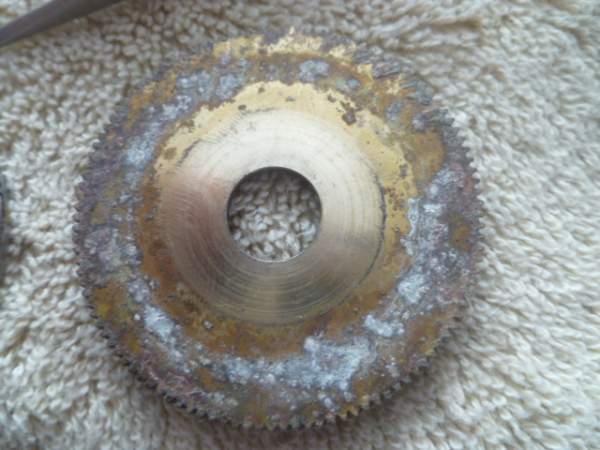
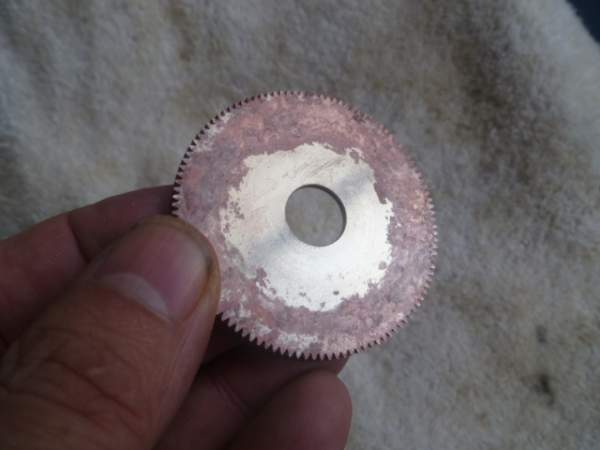
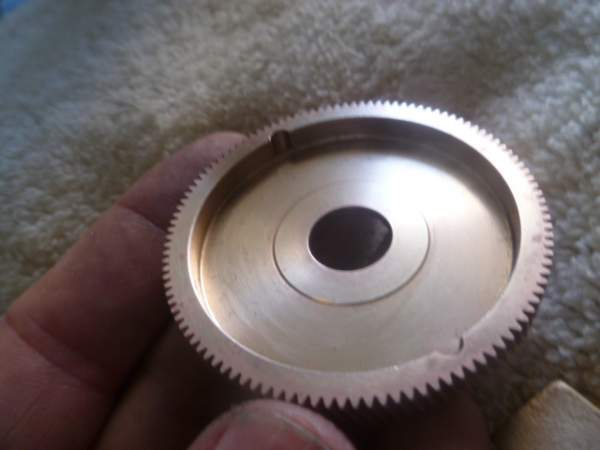
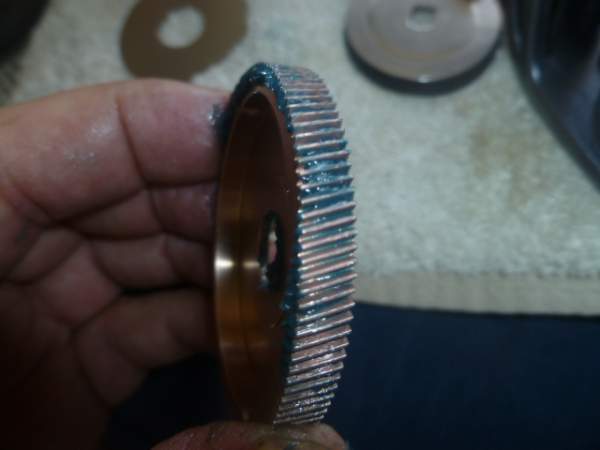
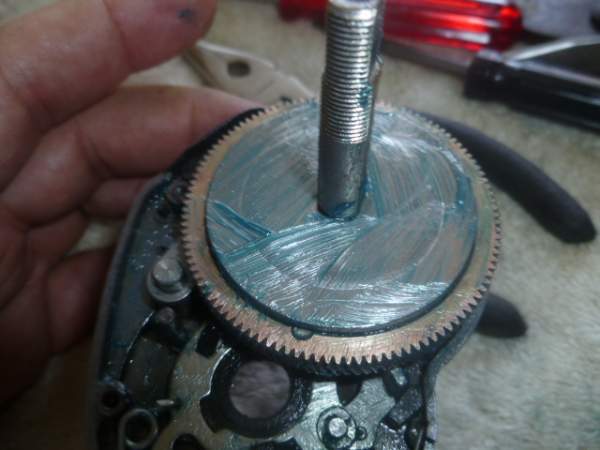
The Drive Gear (67) was pretty encrusted and rough:
 (http://alantani.com/index.php?action=gallery;sa=view;id=18025)
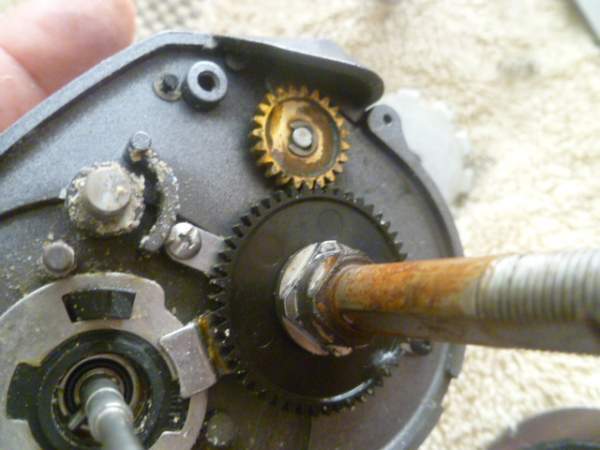
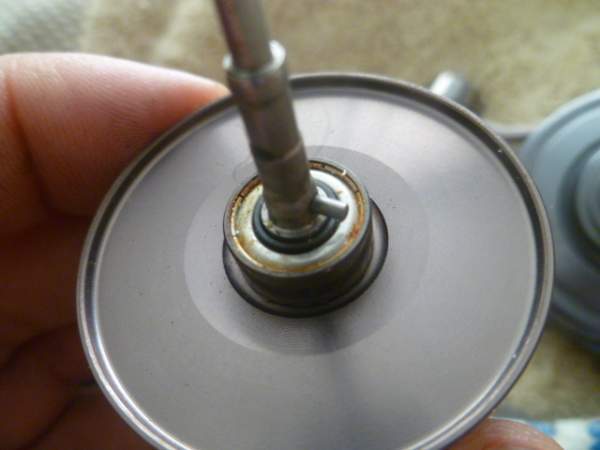
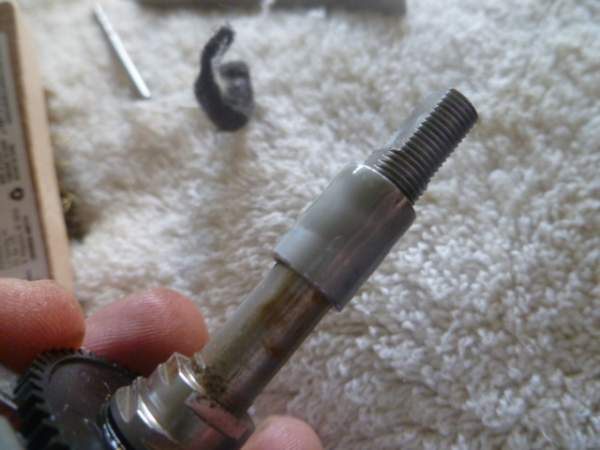
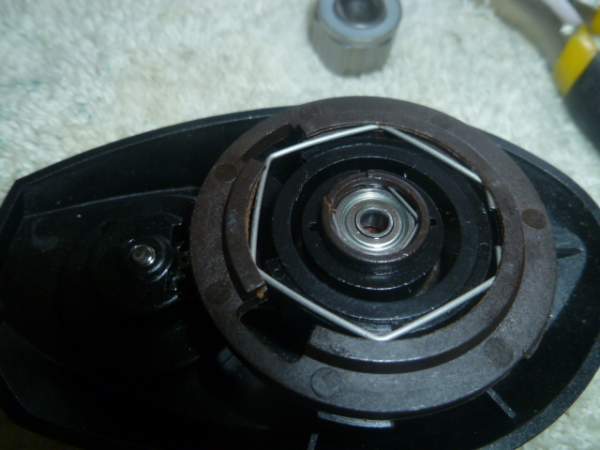
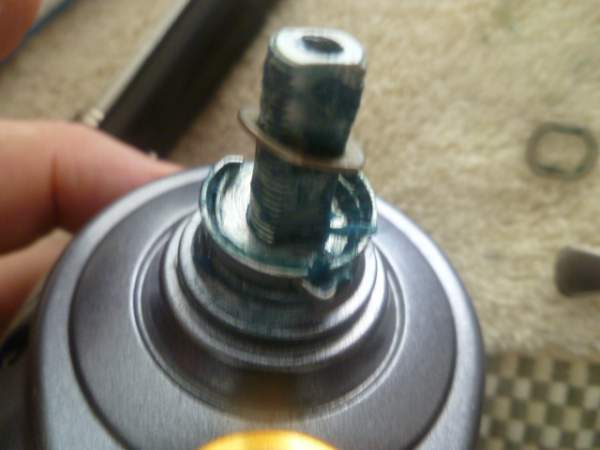
Lots of Salt and Schmutz. One of the more worrisome signs was the rust on the stainless steel Drive Shaft (62) that usually indicates trouble with the Roller Clutch:
 (http://alantani.com/index.php?action=gallery;sa=view;id=18027)
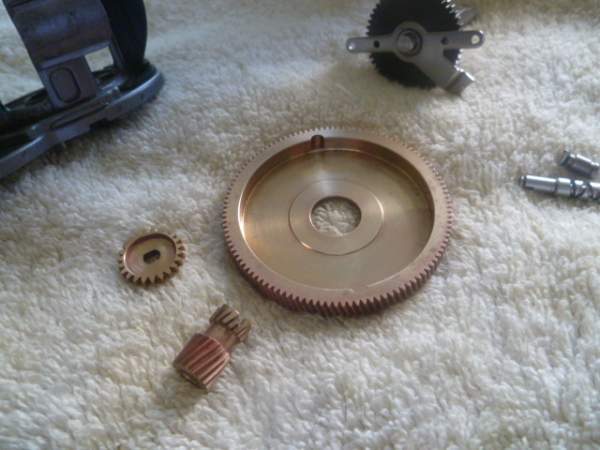
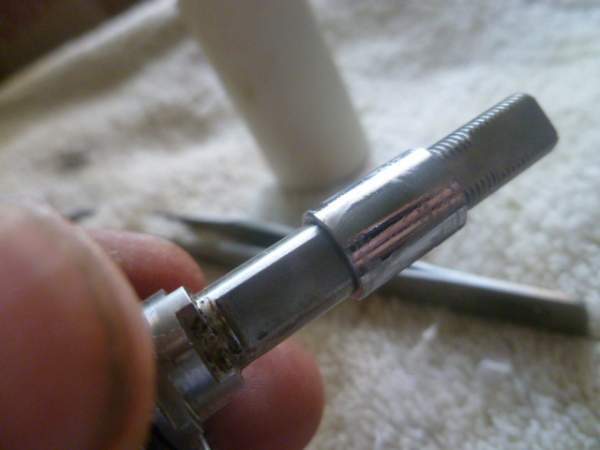
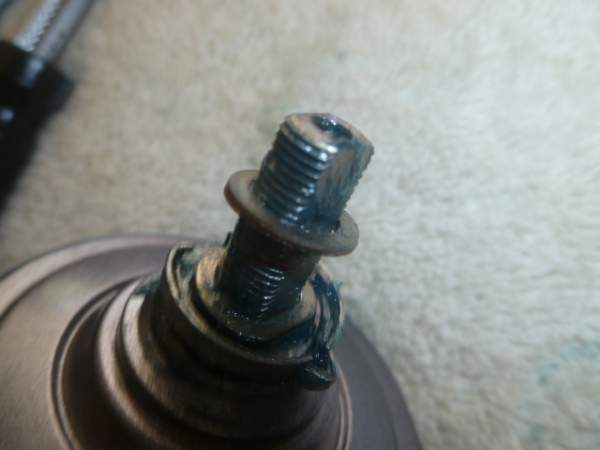
But fortunately lots of quality stainless parts that were salty and (maybe?) had a touch of old grease on them:
 (http://alantani.com/index.php?action=gallery;sa=view;id=18026)
The outside of the reel of course was not well cared for either by the owner. Corrosion on the Worm Shaft (53) and schmutz on the frame:
 (http://alantani.com/index.php?action=gallery;sa=view;id=18028)
 (http://alantani.com/index.php?action=gallery;sa=view;id=18029)
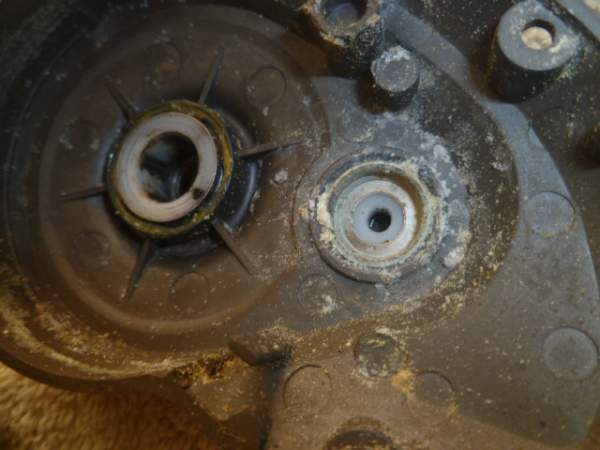
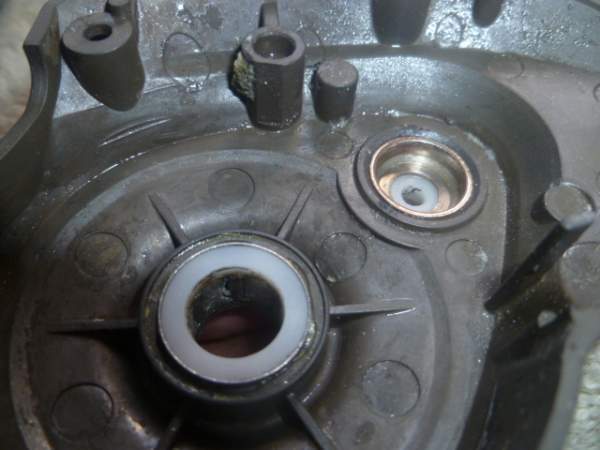
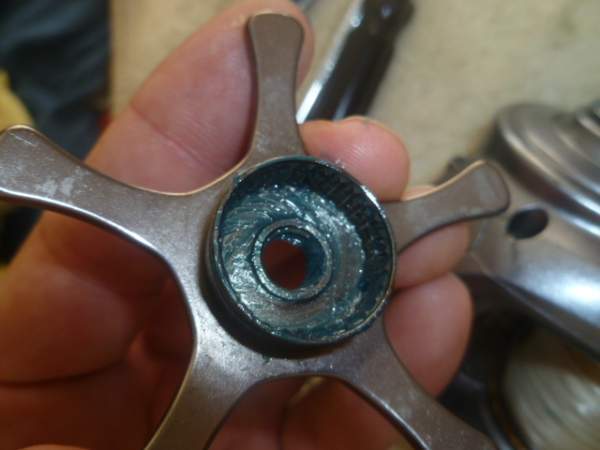
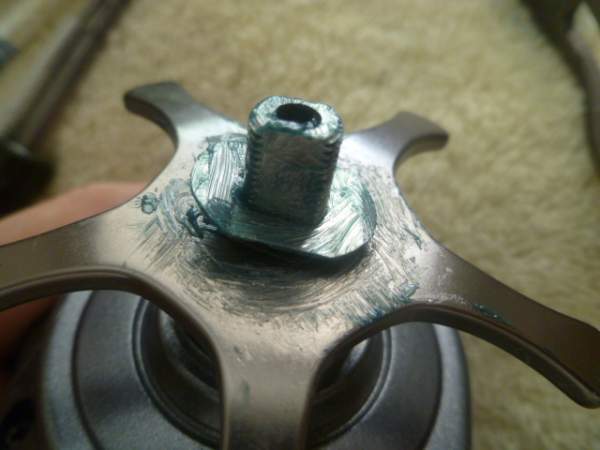
Classic accumulation of Salt in well known problem areas about to do it's worst:
 (http://alantani.com/index.php?action=gallery;sa=view;id=18021)
 (http://alantani.com/index.php?action=gallery;sa=view;id=18020)
But the Left Side was entirely unaffected and essentially functioned as new:
 (http://alantani.com/index.php?action=gallery;sa=view;id=18030)
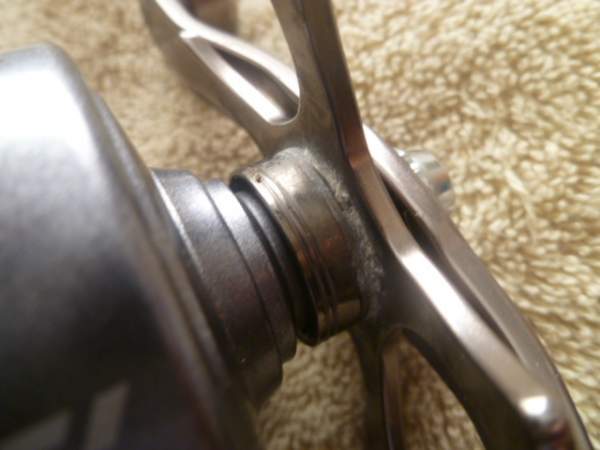
Other than a touch of corrosion on the left side of the Worm (53) where it has been feeding saltwater to dis-similar metals due to the Retainer clip (24) seated in it's black nylon Worm Shaft Washer (25) :
 (http://alantani.com/index.php?action=gallery;sa=view;id=18031)
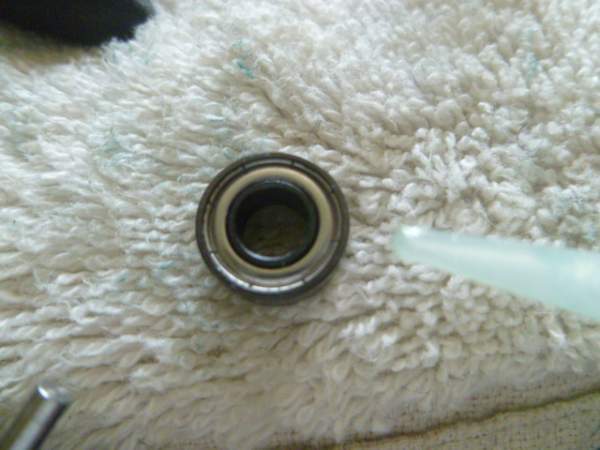
The right side spool Bearing (17) had a touch of corrosion on the shield (worrisome) but turned smoothly. Note the coated inner race of this "CRBB" bearing. Daiwa has obviously added some anti-corrosion features to it.
 (http://alantani.com/index.php?action=gallery;sa=view;id=18032)
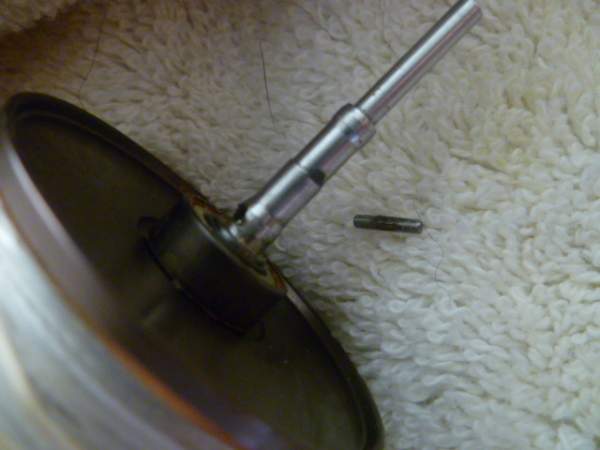
The Spool Pin (18) fortunately slides right out allowing removal of the bearing.
 (http://alantani.com/index.php?action=gallery;sa=view;id=18033)
So what we have seen are some signs of neglect where the reel has either not been rinsed well and wiped down properly (if done) but there also has been no lube applied from the outside even (on the Worm and handle etc) which we would consider pretty much the *minimum* required to keep any reel alive let alone a regular peek inside to see how things are going after hard use... This is on Dominic (the guy who sent me the reel) :(....Sorry Dom! You could have done better. :)
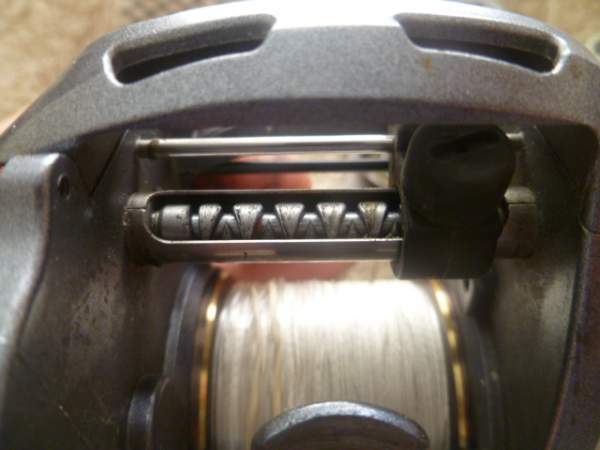
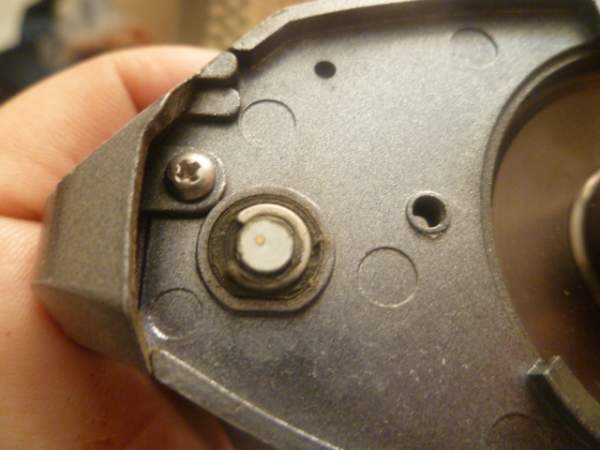
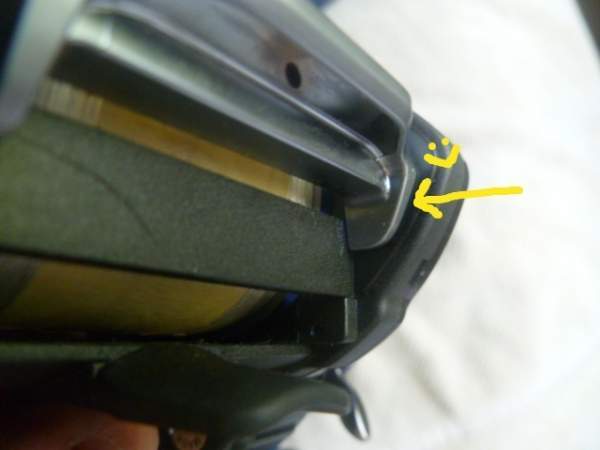
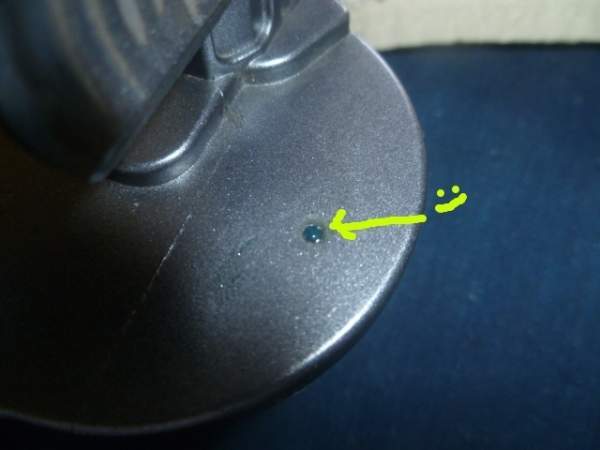
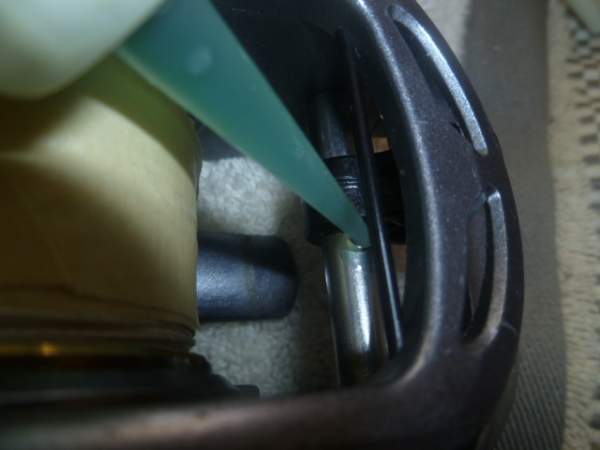
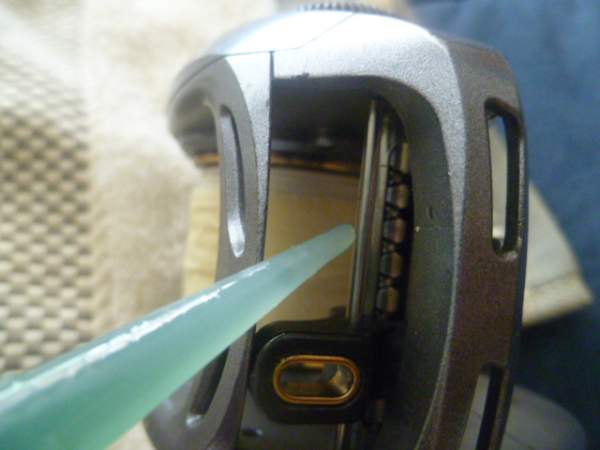
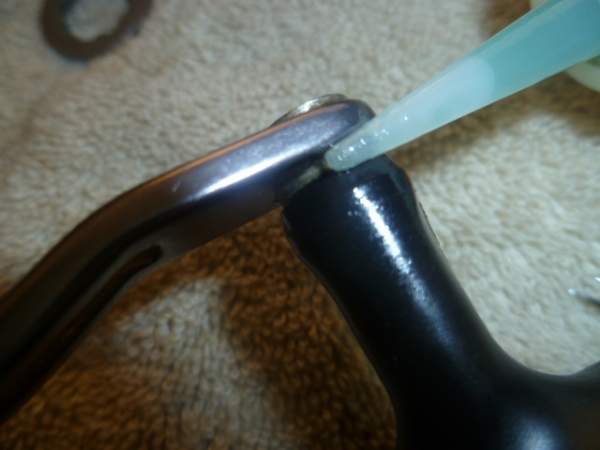
Daiwa's part in this fiasco is a bit of a design flaw on the Clutch Lever (20) that exposes a pretty big highway for salt into the reel. The Clutch Lever doesn't have much of a secondary flange on the bottom to help cover the gap when the Kick Lever returns it:
 (http://alantani.com/index.php?action=gallery;sa=view;id=18023)
This is how Abu Garcia does it with more flange below the Clutch Lever to cover the gap:
 (http://alantani.com/index.php?action=gallery;sa=view;id=18015)
But its actually a pretty complicated problem as the angle of the Frame has to be followed by the flange to keep it flush and Daiwa puts a little extra beef in their frame to accommodate a screw (that holds the right side plate) that takes some of the space a flange would require. Unfortunately its probably a pretty big redesign (new molds for Clutch Lever, Rt Side Plate and Frame) to fix it.
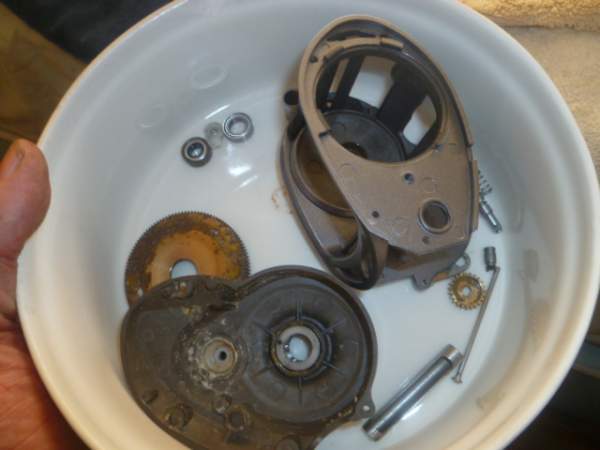
Ok, all of the parts that could be helped by corrosion removal were soaked in White Vinegar overnight (essentially a weak acid bath):
 (http://alantani.com/index.php?action=gallery;sa=view;id=18034)
The Right Side Plate (39) is in there in hopes to remove the Roller Clutch and help with any corrosion on the rollers. The Frame (22) is being soaked in hopes of removing the Bearing (56) underneath the Drive Shaft as it is frozen in it's receptacle.
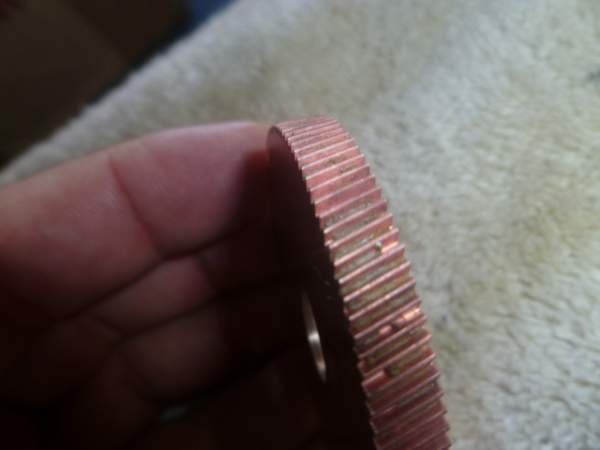
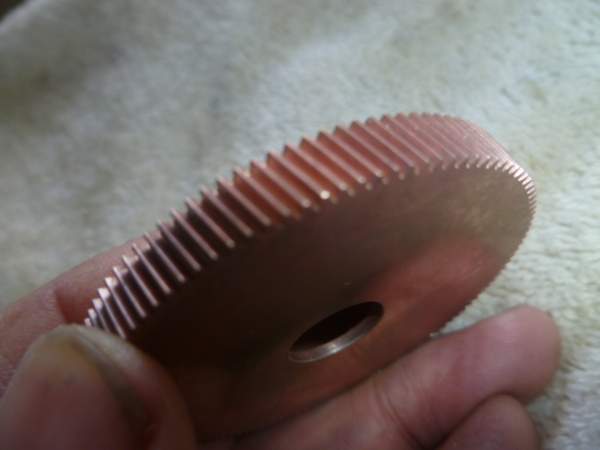
After coming out of the bath the brass parts have some superficial patina:
 (http://alantani.com/index.php?action=gallery;sa=view;id=18039)
And crusty bits still left in the gears:
 (http://alantani.com/index.php?action=gallery;sa=view;id=18040)
Which we will clean up with a soft brass brush:
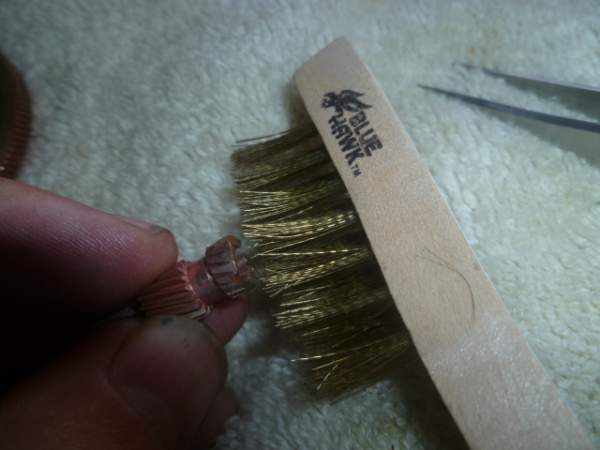 (http://alantani.com/index.php?action=gallery;sa=view;id=18044)
And fine Steel Wool:
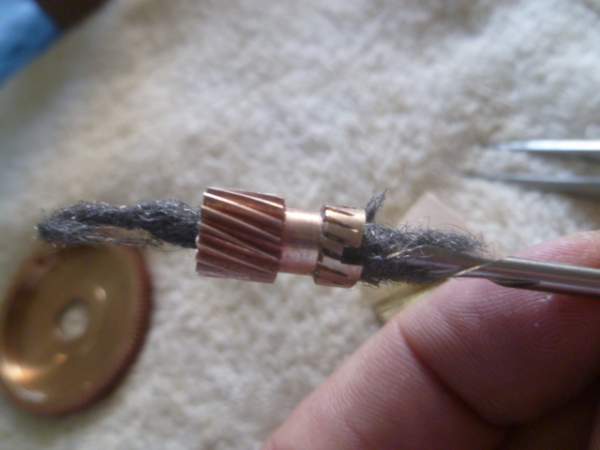 (http://alantani.com/index.php?action=gallery;sa=view;id=18045)
End results:
 (http://alantani.com/index.php?action=gallery;sa=view;id=18041)
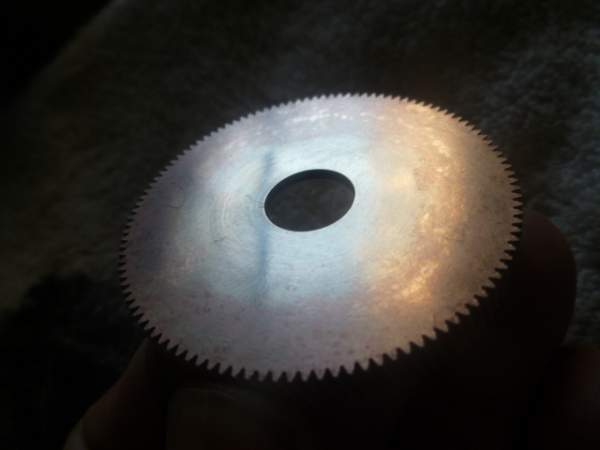 (http://alantani.com/index.php?action=gallery;sa=view;id=18042)
 (http://alantani.com/index.php?action=gallery;sa=view;id=18043)
 (http://alantani.com/index.php?action=gallery;sa=view;id=18050)
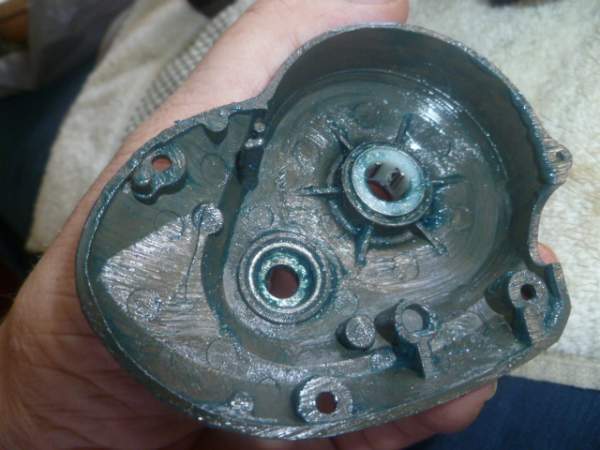
The Right Side Plate cleaned up very well:
 (http://alantani.com/index.php?action=gallery;sa=view;id=18046)
And the Roller Clutch was rehabbed with Corrosion-X and spinning the Gear Shaft Collar (73) inside it till it returned clear Corrosion-X:
 (http://alantani.com/index.php?action=gallery;sa=view;id=18047)
Still Schmutzie:
 (http://alantani.com/index.php?action=gallery;sa=view;id=18048)
Ahhhh, finally clear:
 (http://alantani.com/index.php?action=gallery;sa=view;id=18049)
The Clutch itself is not pressed into the RSP and can removed with *gentle* taps with something blunt. This one finally dropped out after Corrosion-X soaks.
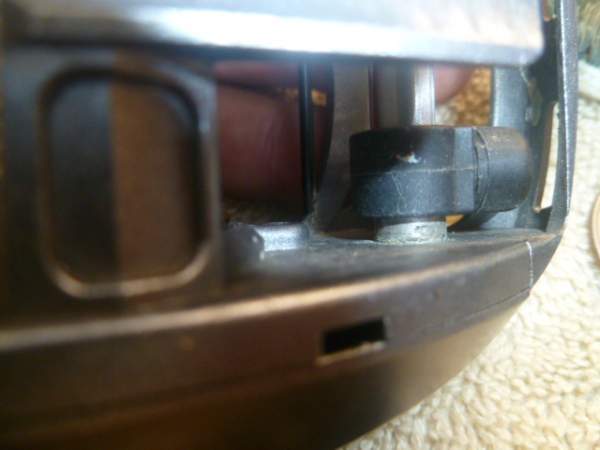
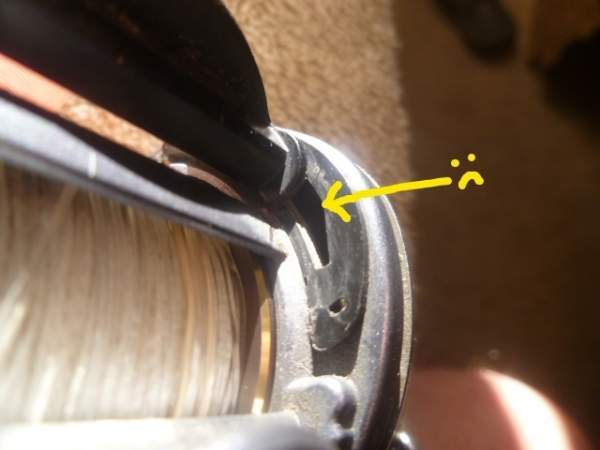
Another view of the troublesome gap allowing Saltwater entry:
 (http://alantani.com/index.php?action=gallery;sa=view;id=18051)
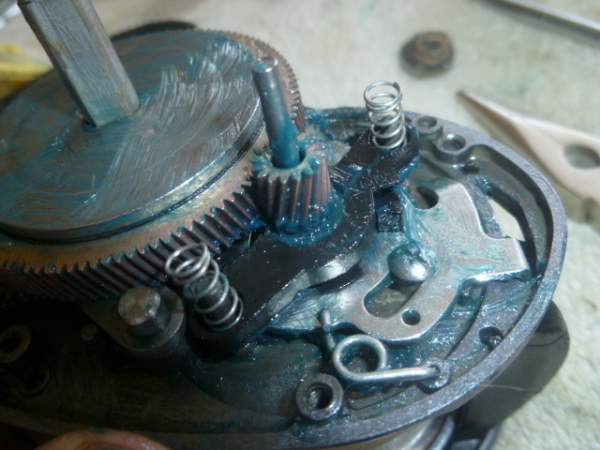
This is the frame with most of the linkages etc still in place. When I can get away with it I prefer not to remove all of the retaining clips and springs etc as there is always the chance of losing or damaging a part. It was all flooded with Corrosion-X and scrubbed with a toothbrush and was functioning well.
 (http://alantani.com/index.php?action=gallery;sa=view;id=18052)
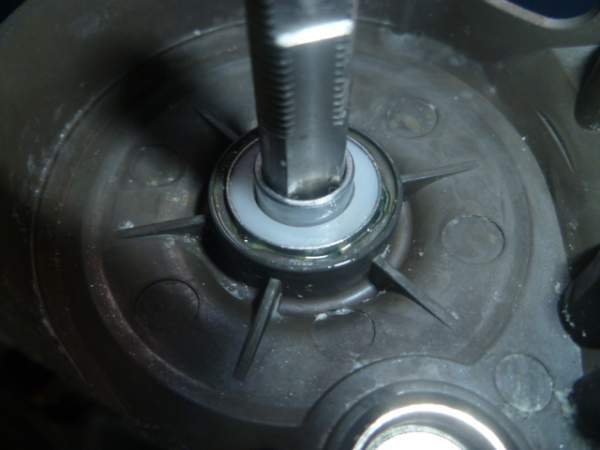
You can see the Bearing (56) under the drive shaft soaking in CX to try to get it out (above)...and it finally did (below):
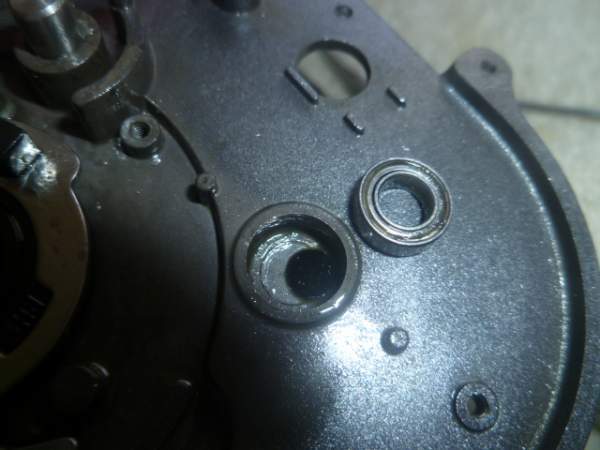 (http://alantani.com/index.php?action=gallery;sa=view;id=18055)
The receptacle for it is a notorious "sump" for collecting saltwater on all of this type of Drive Shaft supporting systems. The bearing was still fine though, a tribute to Daiwa quality. It was packed with grease and the receptacle was well filled with grease also. This remains an area we have to keep a close eye on.
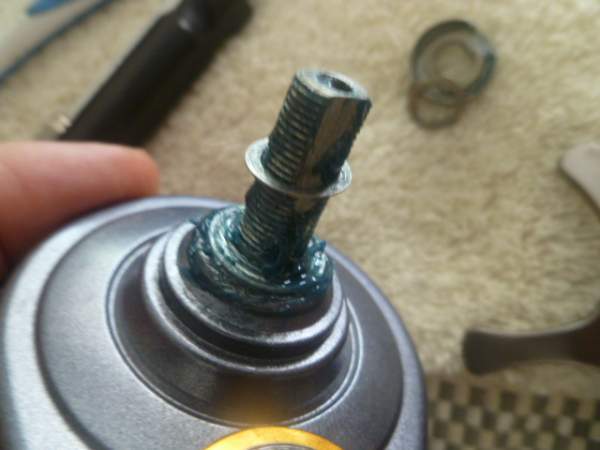
Ok, lets start getting everything covered with a nice light coat of Marine Bearing Grease to head off future problems:
 (http://alantani.com/index.php?action=gallery;sa=view;id=18069)
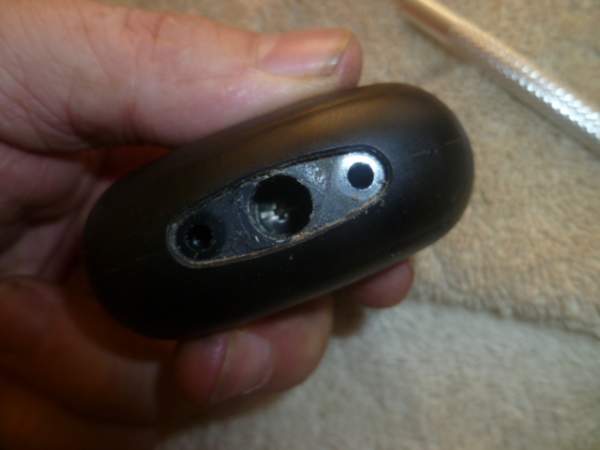
Note (above) the Screws for the Drive Shaft Plate (53) are two different colors (black and silver and different lengths) the Black one is (63) and is shorter than the Silver (59) this corresponds to their threaded holes as they are of different depths. They can be dipped in grease as their holes open on the other side. This is nice because you then have some grease protecting their ends from salt that could corrode them and all of the threads are protected:
 (http://alantani.com/index.php?action=gallery;sa=view;id=18016)
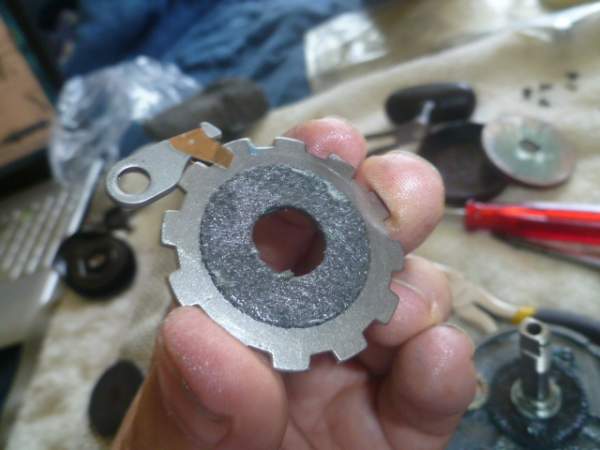
Cal's Drag Grease on the Washer (66) that goes between the A/R Ratchet and Drive Gear be sure to get the edges to prevent salt intrusion:
 (http://alantani.com/index.php?action=gallery;sa=view;id=18070)
Place the A/R Pawl (64) on the Ratchet (65) before placing them on the Drive Shaft (62) so that the Pawl can fit over its stud and stop:
 (http://alantani.com/index.php?action=gallery;sa=view;id=18080)
 (http://alantani.com/index.php?action=gallery;sa=view;id=18072)
Well grease all of the exterior surface of the Drive Gear:
 (http://alantani.com/index.php?action=gallery;sa=view;id=18071)
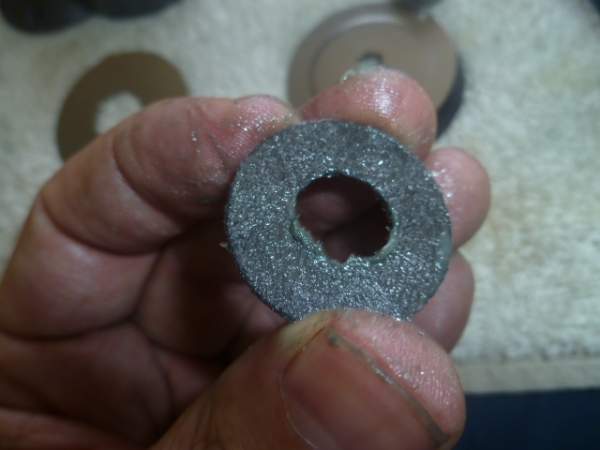
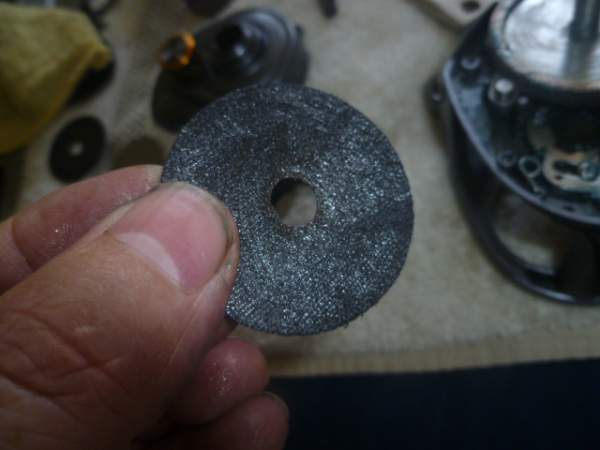
Cal's Grease on the Drag Washers (68):
 (http://alantani.com/index.php?action=gallery;sa=view;id=18073)
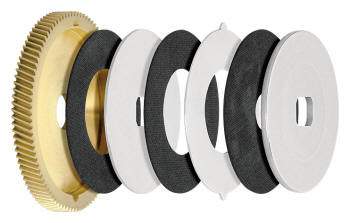
This is an image I found of the Stack...can't really improve on this for clarity:
 (http://alantani.com/index.php?action=gallery;sa=view;id=18019)
The last washer gets some more Marine Grease over the top. Be sure to place it so that the bevel is in contact with the outer edges of the stack )=] like so with the pressure on the "bell" and the outside edges (where most drag pressure is created) touch first:
 (http://alantani.com/index.php?action=gallery;sa=view;id=18074)
All greased up and ready to close:
 (http://alantani.com/index.php?action=gallery;sa=view;id=18076)
Note that this is substantially more protection that was afforded the "dry" reel from the factory. Some manufacturers have made great strides in improving preventive prep when the reel is assembled. I think particularly this type of saltwater baitcasting reel would benefit from better "pre-fishing preventive preparation" that every serious fisher-dude can manage on his own. Ideally it would be done at the factory.
The idea is that there is nowhere for Salt to begin corrosion and the reel can actually survive salt contamination for a remarkable amount of time before it gets a full service. This reel would have likely only needed a cleaning of soggy grease from inside of the reel with no corrosion present if it had been prepped before hand. Remember these are parts that will not get rinsed by fresh water. If salt gets in, it stays.
The right side with a light coat of grease on every surface:
 (http://alantani.com/index.php?action=gallery;sa=view;id=18053)
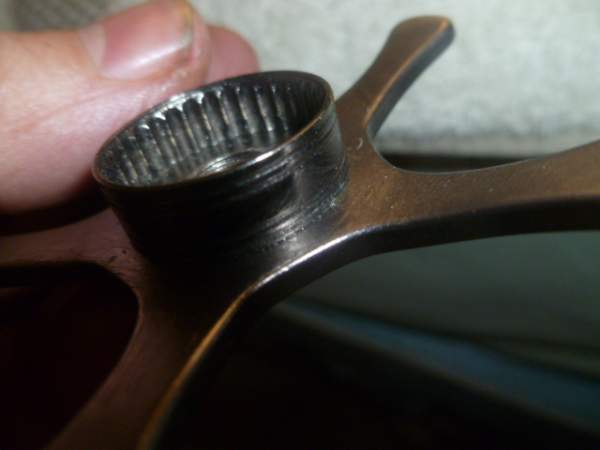
Some for the threads of the Cast Control Cap (45). This is not really fine tune-able cast control but a way to properly adjust the speed for very heavy baits:
 (http://alantani.com/index.php?action=gallery;sa=view;id=18054)
Some oil for that nice and clean spool bearing:
 (http://alantani.com/index.php?action=gallery;sa=view;id=18075)
And some for the left side Bearing (13). No need to mess with the cast control bits (*shudder) as long as they are working well:
 (http://alantani.com/index.php?action=gallery;sa=view;id=18081)
I skipped details on the worm shaft replacement. it really is very simple (but tedious to photograph). Keep an eye peeled for this little tiny guy not shown on the schematic if you remove the pawl (Line Guide Nut 49). It functions as a washer or spacer between the pawl and cap on the Line Guide:
 (http://alantani.com/index.php?action=gallery;sa=view;id=18068)
Once back together be sure to *regularly* oil your Worm:
 (http://alantani.com/index.php?action=gallery;sa=view;id=18065)
Also oil the *outside* of the Level Wind Guard (52) as the Line Guide (48) travels over it rather snugly. I was impressed at how a little oil freed up the reel by reducing friction here:
 (http://alantani.com/index.php?action=gallery;sa=view;id=18066)
Yes, and even oil the Long Screw as well as it runs through the Line Guide too. A little patina here will really bind:
 (http://alantani.com/index.php?action=gallery;sa=view;id=18067)
Ok, buttoning up is simple as can be, get some grease in those threads and slap the right side plate on...no need to show it for most people. 3 screws all the same (40) and one thin one with a unique location (41).
The handle is put back on with all parts first cleaned with Corrosion-X and a toothbrush scrub.
Before:
 (http://alantani.com/index.php?action=gallery;sa=view;id=18037)
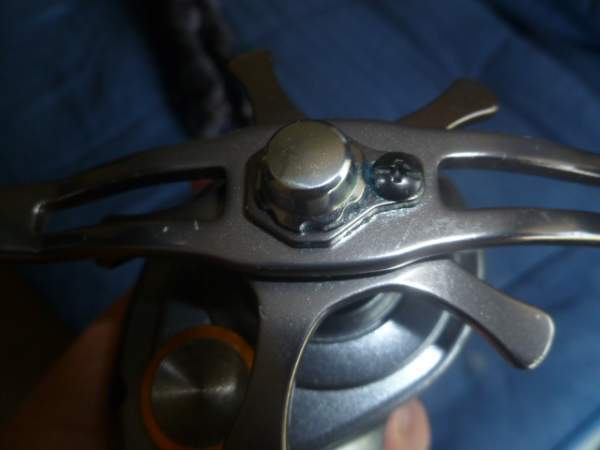
After:
 (http://alantani.com/index.php?action=gallery;sa=view;id=18038)
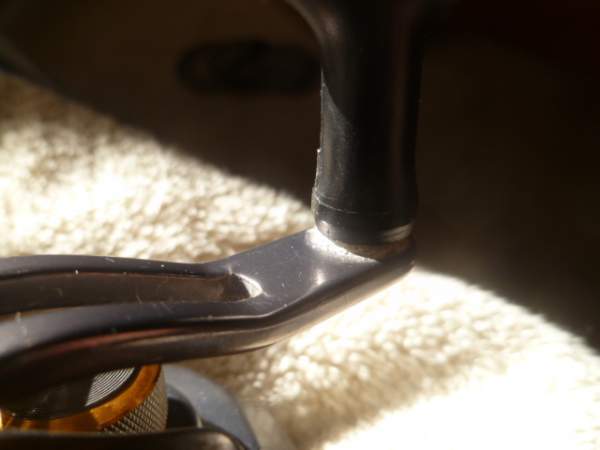
Note that due to Daiwa's quality finish there was no visible pitting of any of these parts.
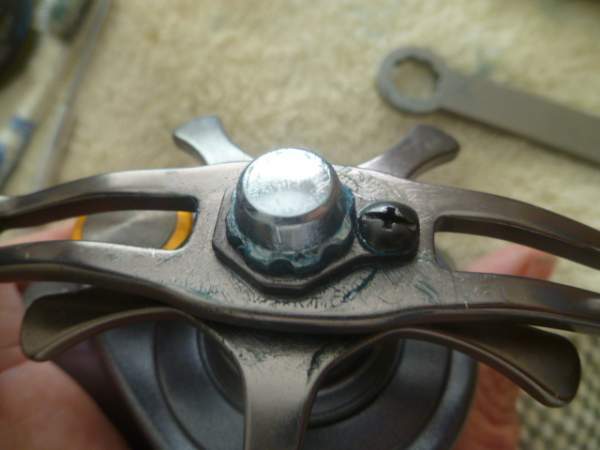
 (http://alantani.com/index.php?action=gallery;sa=view;id=18035)
No need to touch this screw. Probably secured with blue loctite to keep it snug. I just put a drop of Oil on it over the top to seep down to the shaft from that side and lube the two bearings inside:
 (http://alantani.com/index.php?action=gallery;sa=view;id=18036)
***Edit*** turns out the handle bearings went bad right after returning the reel to Dominick. No loctite, just on tight. This screw should be removed to service the bearings which is always a good idea. One of the likely trouble areas in this reel.**
The rest of the Handle Assembly goes back on. All very familiar to anyone who has worked on star drags before. Ball Bearing (75), packed with grease:
 (http://alantani.com/index.php?action=gallery;sa=view;id=18077)
Washer (76):
 (http://alantani.com/index.php?action=gallery;sa=view;id=18078)
Clicker Holder (77) with one Spring Washer (79) make sure they go back like ():
 (http://alantani.com/index.php?action=gallery;sa=view;id=18079)
Then another Washer (80) this one appeared of a "fibrous" nature:
 (http://alantani.com/index.php?action=gallery;sa=view;id=18057)
Then the Star (81):
 (http://alantani.com/index.php?action=gallery;sa=view;id=18056)
A Leaf Spring (83):
 (http://alantani.com/index.php?action=gallery;sa=view;id=18058)
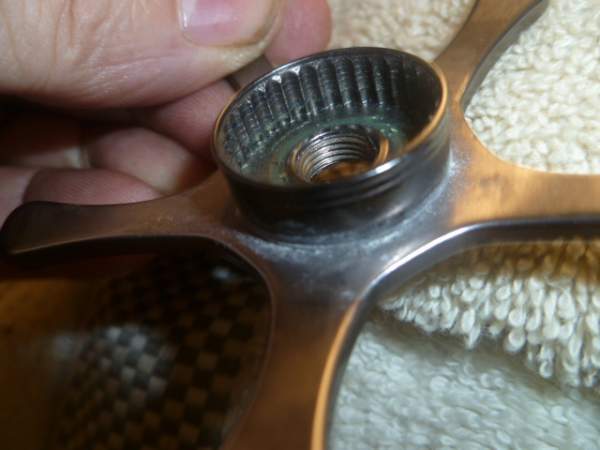
Handle and Nut (83 and 84):
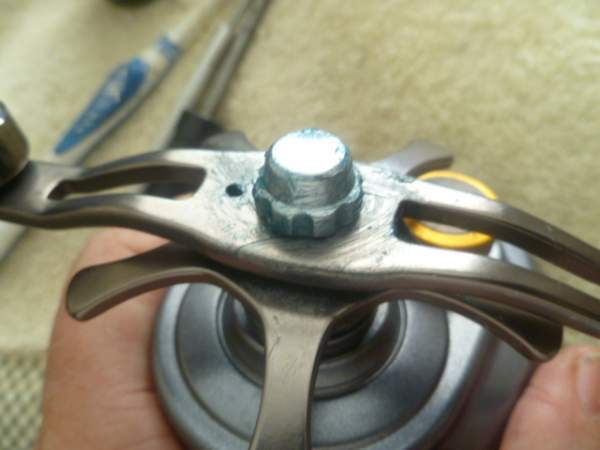 (http://alantani.com/index.php?action=gallery;sa=view;id=18059)
You need a Daiwa Wrench or Penn Senator Wrench (this is one Alan sent me :) ) so you don't scratch your nut:
 (http://alantani.com/index.php?action=gallery;sa=view;id=18022)
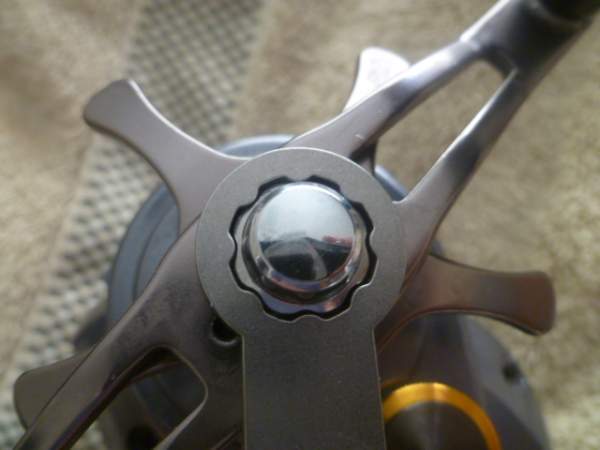
With the Handle, Handle Nut Plate and Screw (84,85 and 86):
 (http://alantani.com/index.php?action=gallery;sa=view;id=18083)
And then wiped up nice and clean with grease on every hidden surface:
 (http://alantani.com/index.php?action=gallery;sa=view;id=18184)
Ok, easy peasy! Right!? ;D
-------------------------------------------------------------------------------------------------------------
Ok, what have we seen and done?
Well, a well meaning guy who fishes his gear hard took a brand new concept in reels and ran with it. Unfortunately he probably didn't know much about pre-fishing prep nor the complexities of this type of reel that can be a little intimidating for a first time guy. Fished it hard and probably loved its casting abilities and cranking power with a great drag.
Rinsing his gear normally (with the reel in gear) exposed a pretty easy entry for salty water into his reel and some parts ended up on the road to perdition ;D. Fortunately we caught it in time.
Is it all on Daiwa that he had some corrosion inside? I would say not entirely, because if you service reels (even if just your own) you would be on top of this from the get go and probably only have occasional soggy grease to deal with. If you take the reel out of gear you also mostly cover the gap. Combine that with more gentle spray and you probably get minimal water inside. Combine that with pre-fishing prep and a regular look inside to monitor the state of affairs and you would likely never have trouble. It might be a bit of a flaw but is no deal breaker.
Taking proper care of your tools is part of getting your man-card punched.
However, the clutch lever could eventually use a redesign (I would expect it would in future iterations) to cover this gap entirely like a Revo, Komodo or Curado is done to prevent the customer service issues they might have with their average customer.
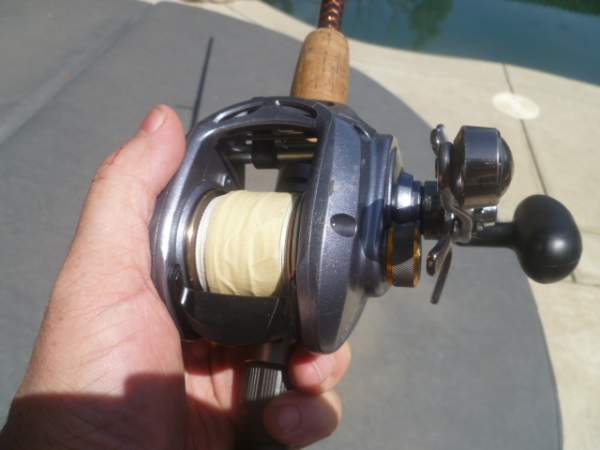
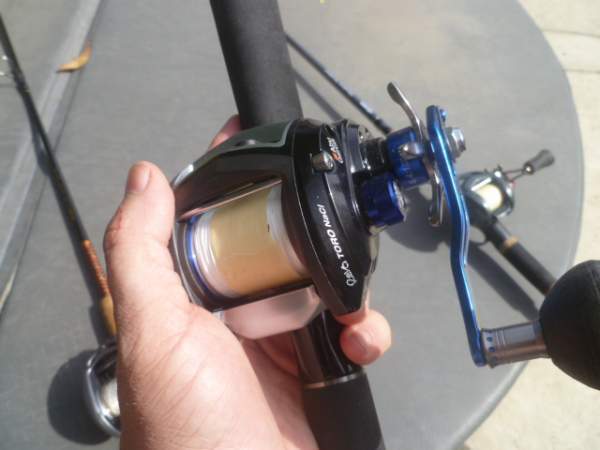
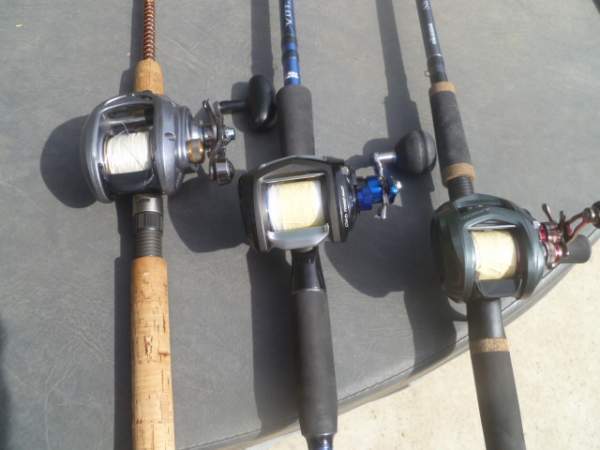
Overall, my impression of the reel is stellar. It is simple in some areas like bushings for the levelwind, but the LW is not synced. However the spool is quite narrow and this certainly did not affect casting in my tests (took it out for a spin at the local soccer field to make sure everything was back together right) nor should it cause problems under load. The main gear is MASSIVE and will have impressive cranking power for a high speed light and small reel. I can easily see why there are legions of guys casting to Calicos, Kelp Paddy Tuna and Yellows having a gas with these reels. They really are the next gen of conventional casting reels. Absolutely effortless to cast with minimal concern for back lashing.
Lastly it is a tribute to Daiwa quality that none of the parts had any lasting damage despite their sorry appearance. Word to the wise, take care of your reels before you do damage them! All of them require pre and post-fishing care.
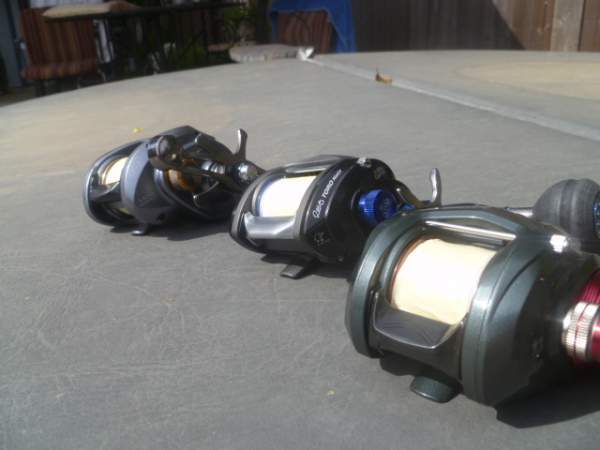
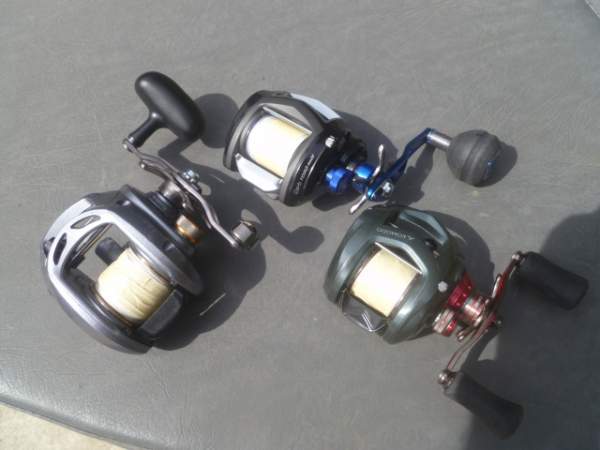
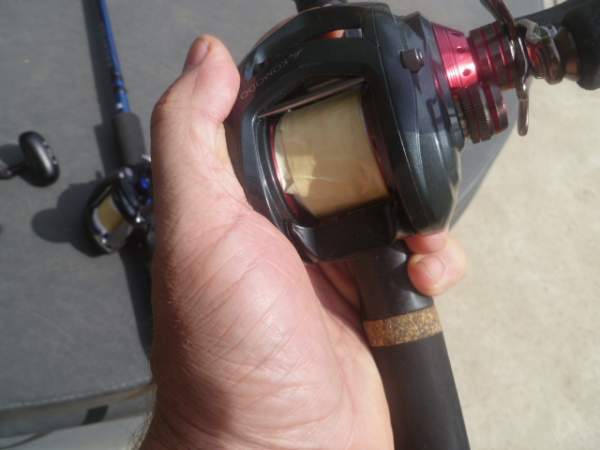
Some photos with Abu Garcia Revo NaCl and Okuma Komodo 364 for size comparisons:
 (http://alantani.com/index.php?action=gallery;sa=view;id=18064)
 (http://alantani.com/index.php?action=gallery;sa=view;id=18063)
 (http://alantani.com/index.php?action=gallery;sa=view;id=18062)
 (http://alantani.com/index.php?action=gallery;sa=view;id=18061)
 (http://alantani.com/index.php?action=gallery;sa=view;id=18185)
 (http://alantani.com/index.php?action=gallery;sa=view;id=18060)
best regards
Its that time again and opportunity came knocking when a fellow fisherman had trouble with his reel. He sent it in to Daiwa and what they found was pretty ugly (this is a photo they sent to him):
(http://alantani.com/index.php?action=gallery;sa=view;id=18018)Well, he was a little upset but tbh, nothing the reel service community at alantani.com hasn't seen before in any number of reels...So, he had a bit of miscommunication with Daiwa and got disgusted....Well, I was curious about the Lexa 400HS-P as it is not carried in any of the shops near me and wondered how it compared to the Abu Garcia Revo NaCl 60 or Okuma Komodo 364 two reels more familiar to me now. I offered to see what I could do for him at no charge to him for the opportunity to examine the reel and do a service tutorial on it. If we needed parts it would be for him to buy them.
Typically I only do tutorials on my own reels (I am not a service center :) ) but they never get ugly enough for me to do a "basket case" tutorial on cleaning up a reel that has been neglected and really demonstrate the benefits of pre-service prep and regular care of your reel. So this was an opportunity to see if I could recondition it and make a useful post for Daiwa fans and fans of this emerging class of Saltwater Baitcasters that are revolutionizing casting lures with conventional reels. Needless to say the owner was ready to throw in the towel and decided to let me help.
This is what I found on the right side. Fortunately the pinion uses a Bushing (38) rather than a bearing but the Roller Clutch (74) was frozen in place but still working:
(http://alantani.com/index.php?action=gallery;sa=view;id=18024)The Drive Gear (67) was pretty encrusted and rough:
(http://alantani.com/index.php?action=gallery;sa=view;id=18025)Lots of Salt and Schmutz. One of the more worrisome signs was the rust on the stainless steel Drive Shaft (62) that usually indicates trouble with the Roller Clutch:
(http://alantani.com/index.php?action=gallery;sa=view;id=18027)But fortunately lots of quality stainless parts that were salty and (maybe?) had a touch of old grease on them:
(http://alantani.com/index.php?action=gallery;sa=view;id=18026)The outside of the reel of course was not well cared for either by the owner. Corrosion on the Worm Shaft (53) and schmutz on the frame:
(http://alantani.com/index.php?action=gallery;sa=view;id=18028) (http://alantani.com/index.php?action=gallery;sa=view;id=18029)Classic accumulation of Salt in well known problem areas about to do it's worst:
(http://alantani.com/index.php?action=gallery;sa=view;id=18021) (http://alantani.com/index.php?action=gallery;sa=view;id=18020)But the Left Side was entirely unaffected and essentially functioned as new:
(http://alantani.com/index.php?action=gallery;sa=view;id=18030)Other than a touch of corrosion on the left side of the Worm (53) where it has been feeding saltwater to dis-similar metals due to the Retainer clip (24) seated in it's black nylon Worm Shaft Washer (25) :
(http://alantani.com/index.php?action=gallery;sa=view;id=18031)The right side spool Bearing (17) had a touch of corrosion on the shield (worrisome) but turned smoothly. Note the coated inner race of this "CRBB" bearing. Daiwa has obviously added some anti-corrosion features to it.
(http://alantani.com/index.php?action=gallery;sa=view;id=18032)The Spool Pin (18) fortunately slides right out allowing removal of the bearing.
(http://alantani.com/index.php?action=gallery;sa=view;id=18033)So what we have seen are some signs of neglect where the reel has either not been rinsed well and wiped down properly (if done) but there also has been no lube applied from the outside even (on the Worm and handle etc) which we would consider pretty much the *minimum* required to keep any reel alive let alone a regular peek inside to see how things are going after hard use... This is on Dominic (the guy who sent me the reel) :(....Sorry Dom! You could have done better. :)
Daiwa's part in this fiasco is a bit of a design flaw on the Clutch Lever (20) that exposes a pretty big highway for salt into the reel. The Clutch Lever doesn't have much of a secondary flange on the bottom to help cover the gap when the Kick Lever returns it:
(http://alantani.com/index.php?action=gallery;sa=view;id=18023)This is how Abu Garcia does it with more flange below the Clutch Lever to cover the gap:
(http://alantani.com/index.php?action=gallery;sa=view;id=18015)But its actually a pretty complicated problem as the angle of the Frame has to be followed by the flange to keep it flush and Daiwa puts a little extra beef in their frame to accommodate a screw (that holds the right side plate) that takes some of the space a flange would require. Unfortunately its probably a pretty big redesign (new molds for Clutch Lever, Rt Side Plate and Frame) to fix it.
Ok, all of the parts that could be helped by corrosion removal were soaked in White Vinegar overnight (essentially a weak acid bath):
(http://alantani.com/index.php?action=gallery;sa=view;id=18034)The Right Side Plate (39) is in there in hopes to remove the Roller Clutch and help with any corrosion on the rollers. The Frame (22) is being soaked in hopes of removing the Bearing (56) underneath the Drive Shaft as it is frozen in it's receptacle.
After coming out of the bath the brass parts have some superficial patina:
(http://alantani.com/index.php?action=gallery;sa=view;id=18039)And crusty bits still left in the gears:
(http://alantani.com/index.php?action=gallery;sa=view;id=18040)Which we will clean up with a soft brass brush:
(http://alantani.com/index.php?action=gallery;sa=view;id=18044)And fine Steel Wool:
(http://alantani.com/index.php?action=gallery;sa=view;id=18045)End results:
(http://alantani.com/index.php?action=gallery;sa=view;id=18041) (http://alantani.com/index.php?action=gallery;sa=view;id=18042) (http://alantani.com/index.php?action=gallery;sa=view;id=18043) (http://alantani.com/index.php?action=gallery;sa=view;id=18050)The Right Side Plate cleaned up very well:
(http://alantani.com/index.php?action=gallery;sa=view;id=18046)And the Roller Clutch was rehabbed with Corrosion-X and spinning the Gear Shaft Collar (73) inside it till it returned clear Corrosion-X:
(http://alantani.com/index.php?action=gallery;sa=view;id=18047)Still Schmutzie:
(http://alantani.com/index.php?action=gallery;sa=view;id=18048)Ahhhh, finally clear:
(http://alantani.com/index.php?action=gallery;sa=view;id=18049)The Clutch itself is not pressed into the RSP and can removed with *gentle* taps with something blunt. This one finally dropped out after Corrosion-X soaks.
Another view of the troublesome gap allowing Saltwater entry:
(http://alantani.com/index.php?action=gallery;sa=view;id=18051)This is the frame with most of the linkages etc still in place. When I can get away with it I prefer not to remove all of the retaining clips and springs etc as there is always the chance of losing or damaging a part. It was all flooded with Corrosion-X and scrubbed with a toothbrush and was functioning well.
(http://alantani.com/index.php?action=gallery;sa=view;id=18052)You can see the Bearing (56) under the drive shaft soaking in CX to try to get it out (above)...and it finally did (below):
(http://alantani.com/index.php?action=gallery;sa=view;id=18055)The receptacle for it is a notorious "sump" for collecting saltwater on all of this type of Drive Shaft supporting systems. The bearing was still fine though, a tribute to Daiwa quality. It was packed with grease and the receptacle was well filled with grease also. This remains an area we have to keep a close eye on.
Ok, lets start getting everything covered with a nice light coat of Marine Bearing Grease to head off future problems:
(http://alantani.com/index.php?action=gallery;sa=view;id=18069)Note (above) the Screws for the Drive Shaft Plate (53) are two different colors (black and silver and different lengths) the Black one is (63) and is shorter than the Silver (59) this corresponds to their threaded holes as they are of different depths. They can be dipped in grease as their holes open on the other side. This is nice because you then have some grease protecting their ends from salt that could corrode them and all of the threads are protected:
(http://alantani.com/index.php?action=gallery;sa=view;id=18016)Cal's Drag Grease on the Washer (66) that goes between the A/R Ratchet and Drive Gear be sure to get the edges to prevent salt intrusion:
(http://alantani.com/index.php?action=gallery;sa=view;id=18070)Place the A/R Pawl (64) on the Ratchet (65) before placing them on the Drive Shaft (62) so that the Pawl can fit over its stud and stop:
(http://alantani.com/index.php?action=gallery;sa=view;id=18080) (http://alantani.com/index.php?action=gallery;sa=view;id=18072)Well grease all of the exterior surface of the Drive Gear:
(http://alantani.com/index.php?action=gallery;sa=view;id=18071)Cal's Grease on the Drag Washers (68):
(http://alantani.com/index.php?action=gallery;sa=view;id=18073)This is an image I found of the Stack...can't really improve on this for clarity:
(http://alantani.com/index.php?action=gallery;sa=view;id=18019)The last washer gets some more Marine Grease over the top. Be sure to place it so that the bevel is in contact with the outer edges of the stack )=] like so with the pressure on the "bell" and the outside edges (where most drag pressure is created) touch first:
(http://alantani.com/index.php?action=gallery;sa=view;id=18074)All greased up and ready to close:
(http://alantani.com/index.php?action=gallery;sa=view;id=18076)Note that this is substantially more protection that was afforded the "dry" reel from the factory. Some manufacturers have made great strides in improving preventive prep when the reel is assembled. I think particularly this type of saltwater baitcasting reel would benefit from better "pre-fishing preventive preparation" that every serious fisher-dude can manage on his own. Ideally it would be done at the factory.
The idea is that there is nowhere for Salt to begin corrosion and the reel can actually survive salt contamination for a remarkable amount of time before it gets a full service. This reel would have likely only needed a cleaning of soggy grease from inside of the reel with no corrosion present if it had been prepped before hand. Remember these are parts that will not get rinsed by fresh water. If salt gets in, it stays.
The right side with a light coat of grease on every surface:
(http://alantani.com/index.php?action=gallery;sa=view;id=18053)Some for the threads of the Cast Control Cap (45). This is not really fine tune-able cast control but a way to properly adjust the speed for very heavy baits:
(http://alantani.com/index.php?action=gallery;sa=view;id=18054)Some oil for that nice and clean spool bearing:
(http://alantani.com/index.php?action=gallery;sa=view;id=18075)And some for the left side Bearing (13). No need to mess with the cast control bits (*shudder) as long as they are working well:
(http://alantani.com/index.php?action=gallery;sa=view;id=18081)I skipped details on the worm shaft replacement. it really is very simple (but tedious to photograph). Keep an eye peeled for this little tiny guy not shown on the schematic if you remove the pawl (Line Guide Nut 49). It functions as a washer or spacer between the pawl and cap on the Line Guide:
(http://alantani.com/index.php?action=gallery;sa=view;id=18068)Once back together be sure to *regularly* oil your Worm:
(http://alantani.com/index.php?action=gallery;sa=view;id=18065)Also oil the *outside* of the Level Wind Guard (52) as the Line Guide (48) travels over it rather snugly. I was impressed at how a little oil freed up the reel by reducing friction here:
(http://alantani.com/index.php?action=gallery;sa=view;id=18066)Yes, and even oil the Long Screw as well as it runs through the Line Guide too. A little patina here will really bind:
(http://alantani.com/index.php?action=gallery;sa=view;id=18067)Ok, buttoning up is simple as can be, get some grease in those threads and slap the right side plate on...no need to show it for most people. 3 screws all the same (40) and one thin one with a unique location (41).
The handle is put back on with all parts first cleaned with Corrosion-X and a toothbrush scrub.
Before:
(http://alantani.com/index.php?action=gallery;sa=view;id=18037)After:
(http://alantani.com/index.php?action=gallery;sa=view;id=18038)Note that due to Daiwa's quality finish there was no visible pitting of any of these parts.
(http://alantani.com/index.php?action=gallery;sa=view;id=18035)No need to touch this screw. Probably secured with blue loctite to keep it snug. I just put a drop of Oil on it over the top to seep down to the shaft from that side and lube the two bearings inside:
(http://alantani.com/index.php?action=gallery;sa=view;id=18036)***Edit*** turns out the handle bearings went bad right after returning the reel to Dominick. No loctite, just on tight. This screw should be removed to service the bearings which is always a good idea. One of the likely trouble areas in this reel.**
The rest of the Handle Assembly goes back on. All very familiar to anyone who has worked on star drags before. Ball Bearing (75), packed with grease:
(http://alantani.com/index.php?action=gallery;sa=view;id=18077)Washer (76):
(http://alantani.com/index.php?action=gallery;sa=view;id=18078)Clicker Holder (77) with one Spring Washer (79) make sure they go back like ():
(http://alantani.com/index.php?action=gallery;sa=view;id=18079)Then another Washer (80) this one appeared of a "fibrous" nature:
(http://alantani.com/index.php?action=gallery;sa=view;id=18057)Then the Star (81):
(http://alantani.com/index.php?action=gallery;sa=view;id=18056)A Leaf Spring (83):
(http://alantani.com/index.php?action=gallery;sa=view;id=18058)Handle and Nut (83 and 84):
(http://alantani.com/index.php?action=gallery;sa=view;id=18059)You need a Daiwa Wrench or Penn Senator Wrench (this is one Alan sent me :) ) so you don't scratch your nut:
(http://alantani.com/index.php?action=gallery;sa=view;id=18022)With the Handle, Handle Nut Plate and Screw (84,85 and 86):
(http://alantani.com/index.php?action=gallery;sa=view;id=18083)And then wiped up nice and clean with grease on every hidden surface:
(http://alantani.com/index.php?action=gallery;sa=view;id=18184)Ok, easy peasy! Right!? ;D
-------------------------------------------------------------------------------------------------------------
Ok, what have we seen and done?
Well, a well meaning guy who fishes his gear hard took a brand new concept in reels and ran with it. Unfortunately he probably didn't know much about pre-fishing prep nor the complexities of this type of reel that can be a little intimidating for a first time guy. Fished it hard and probably loved its casting abilities and cranking power with a great drag.
Rinsing his gear normally (with the reel in gear) exposed a pretty easy entry for salty water into his reel and some parts ended up on the road to perdition ;D. Fortunately we caught it in time.
Is it all on Daiwa that he had some corrosion inside? I would say not entirely, because if you service reels (even if just your own) you would be on top of this from the get go and probably only have occasional soggy grease to deal with. If you take the reel out of gear you also mostly cover the gap. Combine that with more gentle spray and you probably get minimal water inside. Combine that with pre-fishing prep and a regular look inside to monitor the state of affairs and you would likely never have trouble. It might be a bit of a flaw but is no deal breaker.
Taking proper care of your tools is part of getting your man-card punched.
However, the clutch lever could eventually use a redesign (I would expect it would in future iterations) to cover this gap entirely like a Revo, Komodo or Curado is done to prevent the customer service issues they might have with their average customer.
Overall, my impression of the reel is stellar. It is simple in some areas like bushings for the levelwind, but the LW is not synced. However the spool is quite narrow and this certainly did not affect casting in my tests (took it out for a spin at the local soccer field to make sure everything was back together right) nor should it cause problems under load. The main gear is MASSIVE and will have impressive cranking power for a high speed light and small reel. I can easily see why there are legions of guys casting to Calicos, Kelp Paddy Tuna and Yellows having a gas with these reels. They really are the next gen of conventional casting reels. Absolutely effortless to cast with minimal concern for back lashing.
Lastly it is a tribute to Daiwa quality that none of the parts had any lasting damage despite their sorry appearance. Word to the wise, take care of your reels before you do damage them! All of them require pre and post-fishing care.
Some photos with Abu Garcia Revo NaCl and Okuma Komodo 364 for size comparisons:
(http://alantani.com/index.php?action=gallery;sa=view;id=18064) (http://alantani.com/index.php?action=gallery;sa=view;id=18063) (http://alantani.com/index.php?action=gallery;sa=view;id=18062) (http://alantani.com/index.php?action=gallery;sa=view;id=18061) (http://alantani.com/index.php?action=gallery;sa=view;id=18185) (http://alantani.com/index.php?action=gallery;sa=view;id=18060)best regards
Title: Re: Daiwa Lexa 400HS-P: Service Tutorial and Maintenance Tips
Post by: alantani on May 12, 2015, 02:36:46 AM
Post by: alantani on May 12, 2015, 02:36:46 AM
fabulous work! daiwa, and all the other reel companies, have to bear some of the burden of blame for this. at the very least, they should be looking at these photos with the goal of preventing this in the future. after all, that's what okuma did...... :-\
Title: Re: Daiwa Lexa 400HS-P: Service Tutorial and Maintenance Tips
Post by: Keta on May 12, 2015, 02:53:09 AM
Post by: Keta on May 12, 2015, 02:53:09 AM
Last week I had the first one in the shop, the owner does his own maintenance but the AR sleeve was fused to the gearsleeve and he did not know how to get it off.
Over all I will say I like the reel.
I also got 9 Diawa Saltest two speed lever drag reels last week to service and I'm VERY IMPRESSED with them.
Over all I will say I like the reel.
I also got 9 Diawa Saltest two speed lever drag reels last week to service and I'm VERY IMPRESSED with them.
Title: Re: Daiwa Lexa 400HS-P: Service Tutorial and Maintenance Tips
Post by: Alto Mare on May 12, 2015, 02:59:55 AM
Post by: Alto Mare on May 12, 2015, 02:59:55 AM
John, that reel looks new again, excellent work!!
Title: Re: Daiwa Lexa 400HS-P: Service Tutorial and Maintenance Tips
Post by: johndtuttle on May 12, 2015, 03:59:25 AM
Post by: johndtuttle on May 12, 2015, 03:59:25 AM
Quote from: alantani on May 12, 2015, 02:36:46 AM
fabulous work! daiwa, and all the other reel companies, have to bear some of the burden of blame for this. at the very least, they should be looking at these photos with the goal of preventing this in the future. after all, that's what okuma did...... :-\
Thanks Alan, you taught many of us all that we know! :D
It seems like we are making progress with occasional backsliding...some reels are coming out with ideal and different lubes in multiple locations ie Drag, Gears and others are getting the right flavors.
However, I must say I was disappointed when my Okuma Komodo came dry as a bone and the drags too.
I think probably they are made in a different factory than say, the Makairas so they haven't got the baitcaster assembly techs up to speed yet on pre-fishing prep.
Title: Re: Daiwa Lexa 400HS-P: Service Tutorial and Maintenance Tips
Post by: johndtuttle on May 12, 2015, 04:01:11 AM
Post by: johndtuttle on May 12, 2015, 04:01:11 AM
Quote from: Keta on May 12, 2015, 02:53:09 AM
Last week I had the first one in the shop, the owner does his own maintenance but the AR sleeve was fused to the gearsleeve and he did not know how to get it off.
Over all I will say I like the reel.
I also got 9 Diawa Saltest two speed lever drag reels last week to service and I'm VERY IMPRESSED with them.
yea, its your standard chrome plated part that rusts like a motha...Corrosion-X soaks! Love watching rust stream off parts when they get a taste of that stuff.
Title: Re: Daiwa Lexa 400HS-P: Service Tutorial and Maintenance Tips
Post by: fIsHsTiiCkS on May 12, 2015, 06:47:09 AM
Post by: fIsHsTiiCkS on May 12, 2015, 06:47:09 AM
Amazing work on bringing the reel back to fishing shape!! I have long considered getting that reel and you only push me more towards jtit!
Title: Re: Daiwa Lexa 400HS-P: Service Tutorial and Maintenance Tips
Post by: Zimbass on May 12, 2015, 09:18:30 AM
Post by: Zimbass on May 12, 2015, 09:18:30 AM
Great tutorial John. So glad we only fish fresh water, although I do get some that have tasted salt, and are not well maintained. Your post will be a help to many that "fish and store" !
Well done.
Terry.
Well done.
Terry.
Title: Re: Daiwa Lexa 400HS-P: Service Tutorial and Maintenance Tips
Post by: johndtuttle on May 12, 2015, 02:23:49 PM
Post by: johndtuttle on May 12, 2015, 02:23:49 PM
Quote from: fIsHsTiiCkS on May 12, 2015, 06:47:09 AM
Amazing work on bringing the reel back to fishing shape!! I have long considered getting that reel and you only push me more towards jtit!
All basic stuff learned from the guys here ;). Terrific reels.
Quote from: Zimbass on May 12, 2015, 09:18:30 AM
Great tutorial John. So glad we only fish fresh water, although I do get some that have tasted salt, and are not well maintained. Your post will be a help to many that "fish and store" !
Well done.
Terry.
Thx Terry!
Quote from: Alto Mare on May 12, 2015, 02:59:55 AM
John, that reel looks new again, excellent work!!
Thx Sal, it was fun to rescue it! ;D
Title: Re: Daiwa Lexa 400HS-P: Service Tutorial and Maintenance Tips
Post by: mike1010 on May 12, 2015, 03:16:08 PM
Post by: mike1010 on May 12, 2015, 03:16:08 PM
Nice work on both the reel and the presentation, John.
BTW, I am more and more impressed by how well Corrosion-X does as a penetrating oil.
BTW, I am more and more impressed by how well Corrosion-X does as a penetrating oil.
Title: Re: Daiwa Lexa 400HS-P: Service Tutorial and Maintenance Tips
Post by: Porthos on May 12, 2015, 03:32:05 PM
Post by: Porthos on May 12, 2015, 03:32:05 PM
Hey John,
Cool beans! That OP was really ticked off. You've returned balance to the Force, and hopefully pulled him back from the dark side.
Wai
(a.k.a., "Amadeus" on BD)
Cool beans! That OP was really ticked off. You've returned balance to the Force, and hopefully pulled him back from the dark side.
Wai
(a.k.a., "Amadeus" on BD)
Title: Re: Daiwa Lexa 400HS-P: Service Tutorial and Maintenance Tips
Post by: johndtuttle on May 12, 2015, 04:03:22 PM
Post by: johndtuttle on May 12, 2015, 04:03:22 PM
Quote from: mike1010 on May 12, 2015, 03:16:08 PMNice work on both the reel and the presentation, John.
BTW, I am more and more impressed by how well Corrosion-X does as a penetrating oil.
Corrosion-X makes this stuff they call "Rust Remover" but I bet it is just CX in a different package lol. Rust just pours off stuff when you use just regular CX. Its a beautiful thing.
Quote from: Porthos on May 12, 2015, 03:32:05 PMHey John,
Cool beans! That OP was really ticked off. You've returned balance to the Force, and hopefully pulled him back from the dark side.
Wai
(a.k.a., "Amadeus" on BD)
Yea, I hope he doesn't think I flamed him at all :).
If you have fished other reels and given them minimal care with no trouble then move up to more expensive designs the natural inclination is to assume they will require the same minimal attention. Au contraire Monsieur! ;D
A Jig Master can be crapped on for decades and still work, we all have seen it. That is because of brass bushings rather than bearings and the ultimate in design simplicity etc etc. along with minimal performance expectations.
Introduce thumb clutch levers with kick lever return, levelwind mechanisms, cast controls, silent dogs, uber bearing count for effortless casting, high drag numbers but an obsession with light weight....And you have just made a reel that costs 4 times as much... but that will die in a year with neglect after hard fishing in the salt. We have all seen it too.
If you know that all those modern features require care then the same reel will hold up for years and years if it gets the required maintenance. If you just don't know you probably have to kill one to learn the lesson.
Title: Re: Daiwa Lexa 400HS-P: Service Tutorial and Maintenance Tips
Post by: steelfish on May 12, 2015, 04:48:35 PM
Post by: steelfish on May 12, 2015, 04:48:35 PM
wow, nice tutorial John
I have a BNIB lexa 300hsp and I did the pre-fishing service to it, I didnt wanted to see mine like this in the future, people are still hesitate to open their reel or having their reels open when are brand new, if not broken dont fix it they say.. just few of my friends have gave me their reel for a pre-service. good thing is that those who dont wanted will come later with a reel with corroded parts and now I will charge them because its too damn ugly ;D
I have a BNIB lexa 300hsp and I did the pre-fishing service to it, I didnt wanted to see mine like this in the future, people are still hesitate to open their reel or having their reels open when are brand new, if not broken dont fix it they say.. just few of my friends have gave me their reel for a pre-service. good thing is that those who dont wanted will come later with a reel with corroded parts and now I will charge them because its too damn ugly ;D
Title: Re: Daiwa Lexa 400HS-P: Service Tutorial and Maintenance Tips
Post by: steelfish on May 12, 2015, 10:43:15 PM
Post by: steelfish on May 12, 2015, 10:43:15 PM
Quote from: Reel 224 on May 12, 2015, 09:22:17 PM
I could never understand that theory " If it ain't broke don't fix it". How about preventive maintenance! Fix it before it brakes....Dah!!
normally from people that are not handy, lazy or dont want to pay for preventive maintenance "until" is needed (broken)
Title: Re: Daiwa Lexa 400HS-P: Service Tutorial and Maintenance Tips
Post by: handi2 on May 12, 2015, 11:51:56 PM
Post by: handi2 on May 12, 2015, 11:51:56 PM
Great job John..!!
I love my Daiwa Lexa Reels. I use the 400 High Power in the Gulf.
I love my Daiwa Lexa Reels. I use the 400 High Power in the Gulf.
Title: Re: Daiwa Lexa 400HS-P: Service Tutorial and Maintenance Tips
Post by: johndtuttle on May 13, 2015, 12:18:33 AM
Post by: johndtuttle on May 13, 2015, 12:18:33 AM
Quote from: handi2 on May 12, 2015, 11:51:56 PM
Great job John..!!
I love my Daiwa Lexa Reels. I use the 400 High Power in the Gulf.
Thanks Handi. Hey, did you ever post those pictures here of the reel with the uber soggy grease inside that cleaned up great? I think it would be good to have on the site to generate discussion.
Quote from: steelfish on May 12, 2015, 10:43:15 PMQuote from: Reel 224 on May 12, 2015, 09:22:17 PM
I could never understand that theory " If it ain't broke don't fix it". How about preventive maintenance! Fix it before it brakes....Dah!!
normally from people that are not handy, lazy or dont want to pay for preventive maintenance "until" is needed (broken)
To be fair, the modern reel is a "black box" to most guys and they are kinda scared to go inside. Nothing is worse than losing a part (*sproing*...o crap....) or breaking something and your precious baby is out of commission for awhile. ;D Reminds me, I gotta get that spring on order from Okuma ;D.
But that inconvenience sure beats destroying a good reel from lack of maintenance.
Title: Re: Daiwa Lexa 400HS-P: Service Tutorial and Maintenance Tips
Post by: Reel 224 on May 13, 2015, 12:58:02 AM
Post by: Reel 224 on May 13, 2015, 12:58:02 AM
Quote from: johndtuttle on May 13, 2015, 12:18:33 AMQuote from: handi2 on May 12, 2015, 11:51:56 PM
Great job John..!!
I love my Daiwa Lexa Reels. I use the 400 High Power in the Gulf.
Thanks Handi. Hey, did you ever post those pictures here of the reel with the uber soggy grease inside that cleaned up great? I think it would be good to have on the site to generate discussion.Quote from: steelfish on May 12, 2015, 10:43:15 PMQuote from: Reel 224 on May 12, 2015, 09:22:17 PM
I could never understand that theory " If it ain't broke don't fix it". How about preventive maintenance! Fix it before it brakes....Dah!!
normally from people that are not handy, lazy or dont want to pay for preventive maintenance "until" is needed (broken)
To be fair, the modern reel is a "black box" to most guys and they are kinda scared to go inside. Nothing is worse than losing a part (*sproing*...o crap....) or breaking something and your precious baby is out of commission for awhile. ;D Reminds me, I gotta get that spring on order from Okuma ;D.
But that inconvenience sure beats destroying a good reel from lack of maintenance.
Yes that's true some reels are intimidating, but you have lots of help here if you run into trouble. You also have to approach this with a game plan and not just close you eyes and jump. Ask and learn first before you hear (Bong*). (OH S*&T).... ;D Just sayin!!
Title: Re: Daiwa Lexa 400HS-P: Service Tutorial and Maintenance Tips
Post by: steelfish on May 13, 2015, 01:27:40 AM
Post by: steelfish on May 13, 2015, 01:27:40 AM
Quote from: Reel 224 on May 13, 2015, 12:58:02 AM
......... before you hear (Bong*). (OH S*&T).... ;D Just sayin!!
this just happened to me last week, a big LD drag spring jumped and suddenly my world stopped for a moment trying to hear the sound of the spring hitting the floor.. after 4 seconds nothing, nada, none, zero sound.. danm!! then I was worry no sound.. so it landed in something like a clothe or pillow.. no much of that in my room... after few minutes of search I found it, spring landed on my of my socks I just took off next to me.
Title: Re: Daiwa Lexa 400HS-P: Service Tutorial and Maintenance Tips
Post by: Reel 224 on May 13, 2015, 01:46:47 AM
Post by: Reel 224 on May 13, 2015, 01:46:47 AM
Quote from: steelfish on May 13, 2015, 01:27:40 AMQuote from: Reel 224 on May 13, 2015, 12:58:02 AM
......... before you hear (Bong*). (OH S*&T).... ;D Just sayin!!
this just happened to me last week, a big LD drag spring jumped and suddenly my world stopped for a moment trying to hear the sound of the spring hitting the floor.. after 4 seconds nothing, nada, none, zero sound.. danm!! then I was worry no sound.. so it landed in something like a clothe or pillow.. no much of that in my room... after few minutes of search I found it, spring landed on my of my socks I just took off next to me.
;D ;D Spring said :P
Title: Re: Daiwa Lexa 400HS-P: Service Tutorial and Maintenance Tips
Post by: johndtuttle on May 18, 2015, 06:42:24 PM
Post by: johndtuttle on May 18, 2015, 06:42:24 PM
Got this PM from Dominic Lee (the reel's owner):
"Hey John! got the reel back and its GREAT!!! wow its like new! spins great and feels perfect! wow! you wouldn't happen to know anyone at Alan Tani's site would you? I never received an email after I signed up there so I can't post anything.
Thanks again for the great writeup and fixing my reel!!! i'll definitely be taking a lot better care of it now that I know these are extremely sensitive reels!
Thanks!"
He'd like to comment in the thread if he can get his confirming email :).
Anyways, other than a small issue with the sealing around the thumb button it should be noted that it has the same design on the left side, but the left side was entirely unaffected by salt intrusion.
This may be a case of habitually rinsing the right side more than the left with the reel propped on the handle side etc or some other unforeseen quirk.
Regardless, the rehabilitation of the parts is a tribute to Daiwa's essential quality of materials and finish which would not be possible if they were not made right from the get go.
Great reel that fits a perfect size niche (~300 yards of 50lb braid) for much inshore and light offshore fishing.
best
Title: Re: Daiwa Lexa 400HS-P: Service Tutorial and Maintenance Tips
Post by: fish_guts on May 18, 2015, 07:37:28 PM
Post by: fish_guts on May 18, 2015, 07:37:28 PM
Got the reel back from John and its like new!! Great writeup and very good information. Seems as though this reel demands extra care besides just rinsing it off. i'll be sure to depress the button when rinsing to avoid getting any water in that open spot. Reel performs like new! hard to believe it was at Daiwa needing tons of parts and John managed to make it like new with Zero new parts!!
since the fiasco with this reel occurred I took the time to open my other reels and grease them all.
Talica 12ii (Like brand new inside)
Avet SX MC 2 speed (non raptor) just needed a pinion bearing but super clean inside
Okuma Andros 5aii - Just serviced from Okuma (Excellent customer service by the way!!!)
Taking it out sunday to try it out on some local yellows!
Title: Re: Daiwa Lexa 400HS-P: Service Tutorial and Maintenance Tips
Post by: johndtuttle on May 18, 2015, 07:54:38 PM
Post by: johndtuttle on May 18, 2015, 07:54:38 PM
Quote from: fish_guts on May 18, 2015, 07:37:28 PM
Got the reel back from John and its like new!! Great writeup and very good information. Seems as though this reel demands extra care besides just rinsing it off. i'll be sure to depress the button when rinsing to avoid getting any water in that open spot. Reel performs like new! hard to believe it was at Daiwa needing tons of parts and John managed to make it like new with Zero new parts!!
since the fiasco with this reel occurred I took the time to open my other reels and grease them all.
Talica 12ii (Like brand new inside)
Avet SX MC 2 speed (non raptor) just needed a pinion bearing but super clean inside
Okuma Andros 5aii - Just serviced from Okuma (Excellent customer service by the way!!!)
Taking it out sunday to try it out on some local yellows!
Glad you got registered Dom. :)
To be fair, the time required is probably prohibitive for the service centers at Daiwa, Shimano, Penn, Okuma et al....they probably have ultrasonic cleaners and everything else imaginable for removing schmutz on parts and quick clean up...but no one there can spend the time really buffing parts by hand and reconditioning a reel etc. like the guys do here.
A job like yours is a very time intensive one that is only done when the replacement part is not readily at hand or for fun/regard for an old reel with many war stories behind it and of course, for illustrative purposes :). Typically, I think it is safe to assume that the big name service centers are overwhelmed with work during the busiest time of the year...getting ready for summer season...and wait times are tough for most guys needing a service as it is.
If a part is rough, no time is spent re-habbing it (all the time spent is wasted if that clutch doesn't work despite your efforts or the gear remains rough etc) so parts are simply replaced rather than refurbished meticulously. It's just a reality that the techs have to use their time more efficiently than the specialty guys or hobbyists like me.
best
Title: Re: Daiwa Lexa 400HS-P: Service Tutorial and Maintenance Tips
Post by: johndtuttle on June 01, 2015, 04:54:47 PM
Post by: johndtuttle on June 01, 2015, 04:54:47 PM
Some updates from Dom (fish_guts):
"Hey John. I was fishing the lexa and he paddle part of the handle got really loose. I took it apart at home and one of the handle bearings fell apart. There seems to be a little lip at the top of the shaft and there are some marks on the shaft prob from the bearing being eaten up. Can I just sand it smooth and put new handle bearings? Thanks"
My reply:
yep, the shaft is gonna be some serious tough stainless so you can't really hurt it. On the other hand, you may need to do nothing because it doesn't rotate, the bearing takes all of the load. Just buff it enough as needed to get the bearing on the shaft.
Look at the screw and see if there is a drop of blue goo on the end. Typically they do and it is Blue Loctite. This can be important to keep that screw tight in the long term. If you don't have any, you can put the screw back tight...with a little grease on the tip to protect it. But it may come loose again so be sure to get it tight, but don't strip it ;).
never use Red Loctite because that is a permanent glue. Blue is intended to keep stuff tight but be removable.
let me know how you make out. I hope the rest of the reel is working well?
best, John
Dom replied:
"Hey John the reel works great!!! Like brand new! The screw was actually really tight just the bearing fell apart and that caused it to get loose. Cool I'll call daiwa for the bearings today! Thanks!!"
my reply:
Get two while you're at it just in case the other one is in trouble. My guess is the one at the base of the handle crumbled? There was a lot of salt there.
The handle assembly is one of those "let sleeping dogs lie" if it is working generally. If they use Blue Loctite it is a pain to work with to put it back together. If they go the "get it super tight" route there is always the worry of stripping a part.
Putting it back together slather it all aggressively with Marine Bearing Grease. The knob may not spin like crazy like before, but it will not be noticeable when using the reel and be ideally protected. Then regular care is just oil from the outside. Try not to take the screw off unless you really must....eventually there is a loss of tolerance and you can have trouble with it getting loose etc.
best
Title: Re: Daiwa Lexa 400HS-P: Service Tutorial and Maintenance Tips
Post by: fish_guts on June 01, 2015, 05:42:50 PM
Post by: fish_guts on June 01, 2015, 05:42:50 PM
Well I Called Daiwa and it seems they want almost $30 for the 2 handle bearings..
Probably just going to go ahead and buy the slightly longer handle with EVA foam knob for around the same price (not from Daiwa)
Thanks again John for all the help!
If anyone knows the bearing sizes that would be a great help!
Thanks!
Probably just going to go ahead and buy the slightly longer handle with EVA foam knob for around the same price (not from Daiwa)
Thanks again John for all the help!
If anyone knows the bearing sizes that would be a great help!
Thanks!
Title: Re: Daiwa Lexa 400HS-P: Service Tutorial and Maintenance Tips
Post by: johndtuttle on July 21, 2015, 05:27:31 PM
Post by: johndtuttle on July 21, 2015, 05:27:31 PM
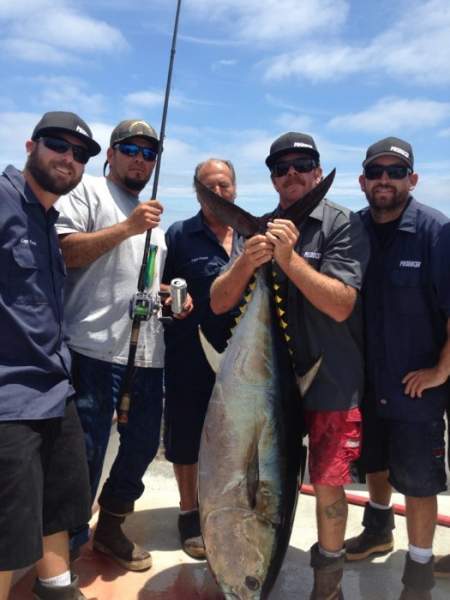
Just to give the Lexa 400 some props this is an example of what the reel is capable of...~120lbs BFT caught recently out of San Diego:
 (http://alantani.com/index.php?action=gallery;sa=view;id=18017)
Which is probably pushing your luck but the reel did it and props to the angler! ;D
50# Braid to 50# Fluoro I think it was, hooked and landed on a Yozuri Sashimi Bull popper. Props to Daiwa too. ;)
(http://alantani.com/index.php?action=gallery;sa=view;id=18017)Which is probably pushing your luck but the reel did it and props to the angler! ;D
50# Braid to 50# Fluoro I think it was, hooked and landed on a Yozuri Sashimi Bull popper. Props to Daiwa too. ;)
Title: Re: Daiwa Lexa 400HS-P: Service Tutorial and Maintenance Tips
Post by: SteveL on August 11, 2015, 02:37:30 AM
Post by: SteveL on August 11, 2015, 02:37:30 AM
Quote from: johndtuttle on May 12, 2015, 04:03:22 PM
Corrosion-X makes this stuff they call "Rust Remover" but I bet it is just CX in a different package lol. Rust just pours off stuff when you use just regular CX. Its a beautiful thing.
I am guessing that the Corrosion X Rust Remover is a non acidic chelating type similar to Evapo-rust (see http://www.evapo-rust.com/product-info/ (http://www.evapo-rust.com/product-info/)). The color liquid of the CX rust remover is similar and the description is similar.
I picked up a 3/0 Senator that was crusted over with salt and corrosion. Cracked it open and found essentially zero wear (not even the dog), just corrosion and rust. The steel gear had a full layer of surface rust, some pitting under the gear and inside under the drag washers. I bought a quart of Evapo-rust at O'Reilly Auto Parts for about $10, and found that a 6 hour soak made the gear look new with the exception of the pitting on the underside and inside (light sanding there to smooth it).
The product works wonders on rusted items, and they say it won't hurt plastic or non-ferrous metals. Unlike acid based removers (citric, acetic, oxalic or phosphoric), this apparently does not harm the underlying metal. Best part is that it is reusable until it turns black from the dissolved iron.
I've used this on a bunch of parts and lightly rusted tools, and I haven't used more than a couple ounces. For my purposes, I have ignored their directions on rinsing, redipping and airdrying. I have been rinsing with water, blotting dry, dippinng in clean mineral spirits, and then a shot of WD or CX to protect until I'm ready to grease and install.
I have not tried the CX rust remover, but I would expect it to work about the same.
Wonder how this stuff would work in an ultrasonic cleaner?
Title: Re: Daiwa Lexa 400HS-P: Service Tutorial and Maintenance Tips
Post by: jcool3 on July 11, 2016, 02:34:57 PM
Post by: jcool3 on July 11, 2016, 02:34:57 PM
Sorry, I am novice when it comes to working on reels but I want to check out the gears on
my lexas and grease them. To access ... is it necessary to take off the handle first.
Or will unscrewing the 3 screws work.
my lexas and grease them. To access ... is it necessary to take off the handle first.
Or will unscrewing the 3 screws work.
Title: Re: Daiwa Lexa 400HS-P: Service Tutorial and Maintenance Tips
Post by: kungajim on July 11, 2016, 02:48:47 PM
Post by: kungajim on July 11, 2016, 02:48:47 PM
Quote from: jcool3 on July 11, 2016, 02:34:57 PM
To access ... is it necessary to take off the handle first.
Or will unscrewing the 3 screws work.
you definitely have to take off the handle, as well as a bunch of washers, etc. definitely check out this site to get some step by step pics on how to strip down, clean, lube, and put the reel back together. it's also very important to have the schematics, as well as proper tools and lubes.
good luck,
Jim
Title: Re: Daiwa Lexa 400HS-P: Service Tutorial and Maintenance Tips
Post by: johndtuttle on July 11, 2016, 06:04:06 PM
Post by: johndtuttle on July 11, 2016, 06:04:06 PM
Quote from: jcool3 on July 11, 2016, 02:34:57 PM
Sorry, I am novice when it comes to working on reels but I want to check out the gears on
my lexas and grease them. To access ... is it necessary to take off the handle first.
Or will unscrewing the 3 screws work.
The handle bits are very easy to remove if you have a Daiwa or Penn wrench for the handle nut. Otherwise you can try wrapping it in a towel and using pliers to avoid scratching it (which will promote corrosion).
All the rest just lifts off. Carefully set them down in order and the plate will lift off. Nothing hard at all. ;)
Title: Re: Daiwa Lexa 400HS-P: Service Tutorial and Maintenance Tips
Post by: jcool3 on July 12, 2016, 02:53:41 AM
Post by: jcool3 on July 12, 2016, 02:53:41 AM
Quote from: johndtuttle on July 11, 2016, 06:04:06 PMQuote from: jcool3 on July 11, 2016, 02:34:57 PM
Sorry, I am novice when it comes to working on reels but I want to check out the gears on
my lexas and grease them. To access ... is it necessary to take off the handle first.
Or will unscrewing the 3 screws work.
The handle bits are very easy to remove if you have a Daiwa or Penn wrench for the handle nut. Otherwise you can try wrapping it in a towel and using pliers to avoid scratching it (which will promote corrosion).
All the rest just lifts off. Carefully set them down in order and the plate will lift off. Nothing hard at all. ;)
Thanks, I found a lexa takeapart on youtube. On another thread, someone was talking about putting vaseline in the reel...is that a option to keep saltwater out??
Title: Re: Daiwa Lexa 400HS-P: Service Tutorial and Maintenance Tips
Post by: johndtuttle on July 12, 2016, 03:15:38 AM
Post by: johndtuttle on July 12, 2016, 03:15:38 AM
Quote from: jcool3 on July 12, 2016, 02:53:41 AMQuote from: johndtuttle on July 11, 2016, 06:04:06 PMQuote from: jcool3 on July 11, 2016, 02:34:57 PM
Sorry, I am novice when it comes to working on reels but I want to check out the gears on
my lexas and grease them. To access ... is it necessary to take off the handle first.
Or will unscrewing the 3 screws work.
The handle bits are very easy to remove if you have a Daiwa or Penn wrench for the handle nut. Otherwise you can try wrapping it in a towel and using pliers to avoid scratching it (which will promote corrosion).
All the rest just lifts off. Carefully set them down in order and the plate will lift off. Nothing hard at all. ;)
Thanks, I found a lexa takeapart on youtube. On another thread, someone was talking about putting vaseline in the reel...is that a option to keep saltwater out??
No, you can use any Marine Bearing Grease you want, but you want the anti-salt additives that it has to better protect your reel. It will protect it longer.
Title: Re: Daiwa Lexa 400HS-P: Service Tutorial and Maintenance Tips
Post by: maxpowers on August 15, 2016, 01:05:01 AM
Post by: maxpowers on August 15, 2016, 01:05:01 AM
John,
Do you remembered if the handle had a bit of vertical play in it? What I meant is if you remembered if the handle pulled out a couple of mm of play. My 400 developed this recently and when I took it apart, the black plastic gear that is held in place by the E-clip has a bit of play in it.
Do you remembered if the handle had a bit of vertical play in it? What I meant is if you remembered if the handle pulled out a couple of mm of play. My 400 developed this recently and when I took it apart, the black plastic gear that is held in place by the E-clip has a bit of play in it.
Title: Re: Daiwa Lexa 400HS-P: Service Tutorial and Maintenance Tips
Post by: johndtuttle on August 15, 2016, 03:59:49 AM
Post by: johndtuttle on August 15, 2016, 03:59:49 AM
Quote from: maxpowers on August 15, 2016, 01:05:01 AM
John,
Do you remembered if the handle had a bit of vertical play in it? What I meant is if you remembered if the handle pulled out a couple of mm of play. My 400 developed this recently and when I took it apart, the black plastic gear that is held in place by the E-clip has a bit of play in it.
The handle normally has some axial play as the drive shaft moves in and out. This can cause some play in the black idle gear. However, I have not heard of this causing trouble. Under load generally there isn't play and it is of small concern, generally.
Overall the reel offers an amazingly capable package for the coin, but part of that lightweight character and resulting compromises mean such tolerance issues have to be accepted.
Its truly a dilemma...if the reel was tanked up a bit then even though it would be tougher people would probably complain about the weight and cost and that would hurt sales. "Performance for the weight and cost" versus "what the market will pay for" are competing here for hearts and minds. :D
Title: Re: Daiwa Lexa 400HS-P: Service Tutorial and Maintenance Tips
Post by: maxpowers on August 15, 2016, 06:06:29 AM
Post by: maxpowers on August 15, 2016, 06:06:29 AM
Quote from: johndtuttle on August 15, 2016, 03:59:49 AMQuote from: maxpowers on August 15, 2016, 01:05:01 AM
John,
Do you remembered if the handle had a bit of vertical play in it? What I meant is if you remembered if the handle pulled out a couple of mm of play. My 400 developed this recently and when I took it apart, the black plastic gear that is held in place by the E-clip has a bit of play in it.
The handle normally has some axial play as the drive shaft moves in and out. This can cause some play in the black idle gear. However, I have not heard of this causing trouble. Under load generally there isn't play and it is of small concern, generally.
Overall the reel offers an amazingly capable package for the coin, but part of that lightweight character and resulting compromises mean such tolerance issues have to be accepted.
Its truly a dilemma...if the reel was tanked up a bit then even though it would be tougher people would probably complain about the weight and cost and that would hurt sales. "Performance for the weight and cost" versus "what the market will pay for" are competing here for hearts and minds. :D
Thanks John. I added some grease to the sump area and it helped a bit.
Title: Re: Daiwa Lexa 400HS-P: Service Tutorial and Maintenance Tips
Post by: rusn007 on April 08, 2017, 06:53:27 AM
Post by: rusn007 on April 08, 2017, 06:53:27 AM
Thanks for a great tutorial writeup!
I recently picked up a newer version of the Lexa 400... looks like a solid reel and can't wait to put it to a test.
I wad debating between Tranx and Lexa - my buddy who had Lexa and landed some 40#+ fish convinced me to get it (cheaper in price also helped).
I recently picked up a newer version of the Lexa 400... looks like a solid reel and can't wait to put it to a test.
I wad debating between Tranx and Lexa - my buddy who had Lexa and landed some 40#+ fish convinced me to get it (cheaper in price also helped).
Title: Re: Daiwa Lexa 400HS-P: Service Tutorial and Maintenance Tips
Post by: maxpowers on April 25, 2018, 02:51:52 AM
Post by: maxpowers on April 25, 2018, 02:51:52 AM
My well abused Lexa 400 worm shaft gave out again. This is the second time it had failed within the last 3 years, although I do used it quite a bit, 80% of my fishing time. Daiwa quoted $8 for the worm shaft but is out of stock for who knows when. I decided to just remove the black line feeder thingie and will fish it non line wind for a while until the part is back in stock with daiwa. I'll report back on how it fished without the linewinder feature.
Title: Re: Daiwa Lexa 400HS-P: Service Tutorial and Maintenance Tips
Post by: maxpowers on May 06, 2018, 09:19:48 PM
Post by: maxpowers on May 06, 2018, 09:19:48 PM
It was ok using the reel without the levelwind but every once in awhile I forgot that the reel is not levelwind and the line bunches up a bit but it's not too bad. It's definitely better than having a screwy levelwind and you can't even manually levelwind.
Title: Re: Daiwa Lexa 400HS-P: Service Tutorial and Maintenance Tips
Post by: spize909 on June 27, 2018, 03:43:35 AM
Post by: spize909 on June 27, 2018, 03:43:35 AM
Quote from: maxpowers on May 06, 2018, 09:19:48 PMMike did it free spool better? I fished mine quite bit on my last charter and kind of really noticed that the free spool was not quite where I needed it to fish bait. I attribute some of it to the line guide on the worm gear and also probably the fact that I haven't torn it completely down to wipe out or add or change grease/oil since I bought it (fished very little).
It was ok using the reel without the levelwind but every once in awhile I forgot that the reel is not levelwind and the line bunches up a bit but it's not too bad. It's definitely better than having a screwy levelwind and you can't even manually levelwind.
Title: Re: Daiwa Lexa 400HS-P: Service Tutorial and Maintenance Tips
Post by: johndtuttle on July 05, 2021, 12:36:24 AM
Post by: johndtuttle on July 05, 2021, 12:36:24 AM
Quote from: spize909 on June 27, 2018, 03:43:35 AMQuote from: maxpowers on May 06, 2018, 09:19:48 PMIt was ok using the reel without the levelwind but every once in awhile I forgot that the reel is not levelwind and the line bunches up a bit but it's not too bad. It's definitely better than having a screwy levelwind and you can't even manually levelwind.Mike did it free spool better? I fished mine quite bit on my last charter and kind of really noticed that the free spool was not quite where I needed it to fish bait. I attribute some of it to the line guide on the worm gear and also probably the fact that I haven't torn it completely down to wipe out or add or change grease/oil since I bought it (fished very little).
Using light oils (ie TSI or Corrosion-X) regularly are going to make a big difference but mostly for casting. Use it on the outside of the guide where the pawl assembly slides too.
Fact of the matter the LP reels are inferior for fly lining a bait but great for casting it.... Your standard narrow star-drag reel (ie beefed up JIgmaster, Fathom or Trini etc) is going to be the superior tool to let the bait swim.
Keep the LP casting rig ready with poppers or surface iron, have a dedicated bait rig with a regular star drag (even a Squall 25N is dreamy) for fly lining, imo. This way you have a back up ready to go at all times too.
One or the other can be made to work for the other discipline but the specialized tool for a given application is superior for most.
Title: Re: Daiwa Lexa 400HS-P: Service Tutorial and Maintenance Tips
Post by: jiggyjig on June 13, 2022, 01:29:57 AM
Post by: jiggyjig on June 13, 2022, 01:29:57 AM
Hi,
I hope this old thread is still monitored. I have a frozen bearing on the crank side and hope someone can give me some advice on how to ease it out without wrecking everything.

I hope this old thread is still monitored. I have a frozen bearing on the crank side and hope someone can give me some advice on how to ease it out without wrecking everything.
Title: Re: Daiwa Lexa 400HS-P: Service Tutorial and Maintenance Tips
Post by: alantani on June 18, 2022, 02:28:05 PM
Post by: alantani on June 18, 2022, 02:28:05 PM
I have a small set of "crowbars" the look like this. I have to file away at them and rebend them all the time. There is also usually some cussing involved. :-\

Title: Re: Daiwa Lexa 400HS-P: Service Tutorial and Maintenance Tips
Post by: jiggyjig on June 20, 2022, 07:44:32 PM
Post by: jiggyjig on June 20, 2022, 07:44:32 PM
Quote from: alantani on June 18, 2022, 02:28:05 PMI have a small set of "crowbars" the look like this. I have to file away at them and rebend them all the time. There is also usually some cussing involved. :-\Thanks Alan, I made a similar 'crowbar' and got the bearing out in pieces - and made a hole in the frame in the process. I've patched it up with Araldite epoxy glue and see how long it last for .........